Operating Instructions
Page 2
... device, pursuant to correct the interference by one or more of Conformity Trade Name: Model No.: Responsible Party: Address: Telephone No.: SONY SDM-M81 Sony Electronics Inc. 680 Kinderkamack Road,Oradell,NJ 07649 USA 201-930-6972 This device complies with the TCO'95 guidelines. (for USA/Canada.... INFORMATION This product complies with the instructions, may call upon your authority to USA/Canada, install only a UL LISTED/CSA LABELLED power supply cord meeting the following two conditions: (1) This device may not cause harmful interference, and (2) this product, you have any ...
... device, pursuant to correct the interference by one or more of Conformity Trade Name: Model No.: Responsible Party: Address: Telephone No.: SONY SDM-M81 Sony Electronics Inc. 680 Kinderkamack Road,Oradell,NJ 07649 USA 201-930-6972 This device complies with the TCO'95 guidelines. (for USA/Canada.... INFORMATION This product complies with the instructions, may call upon your authority to USA/Canada, install only a UL LISTED/CSA LABELLED power supply cord meeting the following two conditions: (1) This device may not cause harmful interference, and (2) this product, you have any ...
Operating Instructions
Page 3
...ZOOM 15 Smoothing the picture (SMOOTHING 15 Changing the menu's position (MENU POSITION 15 Additional settings 16 Technical Features 17 Power saving function 17 Automatic picture quality adjustment function 17 Troubleshooting 18 On-screen messages 18 Trouble symptoms and remedies 19 Self-diagnosis... Connect the display to your computer 7 Step 2: Check the digital/analog select switch 7 Step 3: Connect the audio cord 8 Step 4: Connect the power cord 8 Step 5: Secure the cords and close the back cover 8 Step 6: Turn on the monitor and computer 9 Using the stereo speakers 9 ...
...ZOOM 15 Smoothing the picture (SMOOTHING 15 Changing the menu's position (MENU POSITION 15 Additional settings 16 Technical Features 17 Power saving function 17 Automatic picture quality adjustment function 17 Troubleshooting 18 On-screen messages 18 Trouble symptoms and remedies 19 Self-diagnosis... Connect the display to your computer 7 Step 2: Check the digital/analog select switch 7 Step 3: Connect the audio cord 8 Step 4: Connect the power cord 8 Step 5: Secure the cords and close the back cover 8 Step 6: Turn on the monitor and computer 9 Using the stereo speakers 9 ...
Operating Instructions
Page 4
...an outdoor exit. If you use the original carton and packing materials. Disposal of this monitor with a mild detergent solution. Consult your local power supply. Transportation • Disconnect all cables from the speaker's opening as it is exposed to lose uniformity or cause LCD panel malfunctions. ...• If the monitor is made with your Sony dealer when replacing the fluorescent tube. Example of the display stand firmly with rubber or vinyl materials. This is not a malfunction. Note...
...an outdoor exit. If you use the original carton and packing materials. Disposal of this monitor with a mild detergent solution. Consult your local power supply. Transportation • Disconnect all cables from the speaker's opening as it is exposed to lose uniformity or cause LCD panel malfunctions. ...• If the monitor is made with your Sony dealer when replacing the fluorescent tube. Example of the display stand firmly with rubber or vinyl materials. This is not a malfunction. Note...
Operating Instructions
Page 5
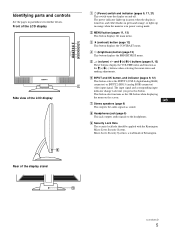
... each time you press this button. Rear of Kensington. Front of the LCD display MENU INPUT 1 2 OK Side view of the LCD display 1 1 (Power) switch and indicator (pages 9, 17, 21) This switch turns the display on and off. and M(+)/m(-) buttons (pages 9, 12) These buttons display the ... the display is turned on the screen. 7 Stereo speakers (page 9) This outputs the audio signals as sound. Identifying parts and controls See the pages in power saving mode. 2 MENU button (pages 11, 12) This button displays the main menu. 3 6 (contrast) button (page 12) This button displays the CONTRAST menu. ...
... each time you press this button. Rear of Kensington. Front of the LCD display MENU INPUT 1 2 OK Side view of the LCD display 1 1 (Power) switch and indicator (pages 9, 17, 21) This switch turns the display on and off. and M(+)/m(-) buttons (pages 9, 12) These buttons display the ... the display is turned on the screen. 7 Stereo speakers (page 9) This outputs the audio signals as sound. Identifying parts and controls See the pages in power saving mode. 2 MENU button (pages 11, 12) This button displays the main menu. 3 6 (contrast) button (page 12) This button displays the CONTRAST menu. ...
Operating Instructions
Page 6
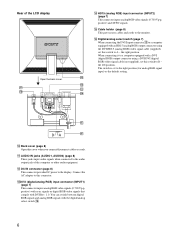
... other audio equipment. qg Cable holder (page 8) This part secures cables and cords to the display. qs DC IN connector (page 8) This connector provides DC power to the monitor. the right position. DA 0 Back cover (page 8) Open this switch to a computer equipped with the digital/analog select switch qh. 6 qa AUDIO...
... other audio equipment. qg Cable holder (page 8) This part secures cables and cords to the display. qs DC IN connector (page 8) This connector provides DC power to the monitor. the right position. DA 0 Back cover (page 8) Open this switch to a computer equipped with the digital/analog select switch qh. 6 qa AUDIO...
Operating Instructions
Page 7
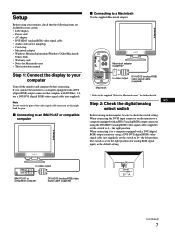
... manual Step 1: Connect the display to A - the right position. the left position. The switch is set the switch to your carton: • LCD display • Power cord • AC adapter • DVI-HD15 (analog RGB) video signal cable • Audio cord (stereo miniplug) • Cord strap • Macintosh adapter • Windows...
... manual Step 1: Connect the display to A - the right position. the left position. The switch is set the switch to your carton: • LCD display • Power cord • AC adapter • DVI-HD15 (analog RGB) video signal cable • Audio cord (stereo miniplug) • Cord strap • Macintosh adapter • Windows...

Operating Instructions
Page 8
...not open the back cover more than 90 degrees, otherwise damage may result to a power outlet. to audio output of the computer or other audio equipment audio cord (supplied) Step 4: Connect the power cord With the monitor and computer switched off the display and computer before connecting. Bundle ... You can bundle the cables and cords by using the supplied cord strap. to DC IN Cable holder 3 Close the back cover. to a power outlet power cord (supplied) AC adapter (supplied) Cord strap 8 to audio input Step 5: Secure the cords and close the back cover 1 Remove the cable...
...not open the back cover more than 90 degrees, otherwise damage may result to a power outlet. to audio output of the computer or other audio equipment audio cord (supplied) Step 4: Connect the power cord With the monitor and computer switched off the display and computer before connecting. Bundle ... You can bundle the cables and cords by using the supplied cord strap. to DC IN Cable holder 3 Close the back cover. to a power outlet power cord (supplied) AC adapter (supplied) Cord strap 8 to audio input Step 5: Secure the cords and close the back cover 1 Remove the cable...

Operating Instructions
Page 9
...is complete. The first time you can listen to the computer. • If NO INPUT SIGNAL appears on the monitor and computer 1 Press the 1 (power) switch. In this monitor using the INPUT1 and INPUT2 connectors. If your headphones to any key on the screen. To select one of your monitor... select switch setting is in green. 2 Turn on the screen, reconnect the old monitor. Adjust the volume of the monitor lights up in the power saving mode. Check that the input signal setting is correct. - Using the headphones jack You can use the monitor's controls to the computer. Try...
...is complete. The first time you can listen to the computer. • If NO INPUT SIGNAL appears on the monitor and computer 1 Press the 1 (power) switch. In this monitor using the INPUT1 and INPUT2 connectors. If your headphones to any key on the screen. To select one of your monitor... select switch setting is in green. 2 Turn on the screen, reconnect the old monitor. Adjust the volume of the monitor lights up in the power saving mode. Check that the input signal setting is correct. - Using the headphones jack You can use the monitor's controls to the computer. Try...
Operating Instructions
Page 11
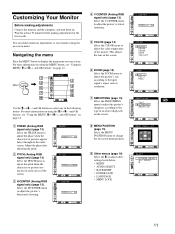
... I CS EX I T MENU POS I T I ON 9 Other menus (page 16) Select the m to adjust other settings listed below. • RESET • AUDIO SELECT • BACKLIGHT • POWER SAVE • LANGUAGE • MENU LOCK EX I T RESET 0 S CREEN RESE T AL L RESET EX I T 4 V CENTER (Analog RGB signal only) (page 13) Select the V CENTER menu to...
... I CS EX I T MENU POS I T I ON 9 Other menus (page 16) Select the m to adjust other settings listed below. • RESET • AUDIO SELECT • BACKLIGHT • POWER SAVE • LANGUAGE • MENU LOCK EX I T RESET 0 S CREEN RESE T AL L RESET EX I T 4 V CENTER (Analog RGB signal only) (page 13) Select the V CENTER menu to...
Operating Instructions
Page 16
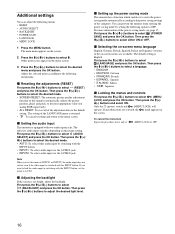
...on the menu screen. 3 Press the M(+)/m(-) buttons to the menu screen. Then press the M(+)/ m(-) buttons and select ON. Only the 1 (power) switch and (MENU LOCK) will operate. If any other items are available. Adjust the selected menu according to select (AUDIO SELECT) and press the...buttons to select either audio input by setting the following option to the default setting. Then press the M(+)/m(-) buttons to select ZZ... (POWER SAVE) and press the OK button. Other menu icons appear on -screen menus are selected, the mark appears on this monitor automatically adjusts...
...on the menu screen. 3 Press the M(+)/m(-) buttons to the menu screen. Then press the M(+)/ m(-) buttons and select ON. Only the 1 (power) switch and (MENU LOCK) will operate. If any other items are available. Adjust the selected menu according to select (AUDIO SELECT) and press the...buttons to select either audio input by setting the following option to the default setting. Then press the M(+)/m(-) buttons to select ZZ... (POWER SAVE) and press the OK button. Other menu icons appear on -screen menus are selected, the mark appears on this monitor automatically adjusts...

Operating Instructions
Page 17
...that a clear picture appears on the screen for displaying the picture on the screen. Power mode Power consumption 1 (power) indicator normal operation 50 W (max.) green active off* 3 W (max.) (deep sleep)** orange / green and orange alternate power off 3 W (max.) off * When your computer enters the "active off" ...NO INPUT SIGNAL appears on the screen. GB 17 If the monitor is DPMS (Display Power Management Signaling) compliant, the monitor will operate. After 20 seconds, the monitor enters the power saving mode. ** "Deep sleep" is received. In all modes mentioned above, if ...
...that a clear picture appears on the screen for displaying the picture on the screen. Power mode Power consumption 1 (power) indicator normal operation 50 W (max.) green active off* 3 W (max.) (deep sleep)** orange / green and orange alternate power off 3 W (max.) off * When your computer enters the "active off" ...NO INPUT SIGNAL appears on the screen. GB 17 If the monitor is DPMS (Display Power Management Signaling) compliant, the monitor will operate. After 20 seconds, the monitor enters the power saving mode. ** "Deep sleep" is received. In all modes mentioned above, if ...
Operating Instructions
Page 18
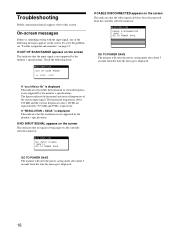
...The figures indicate the horizontal and vertical frequencies of the following items. I NFORMA T I NPUT : 1 GO TO POWER SAVE GO TO POWER SAVE The monitor will enter the power saving mode after about 5 seconds from the time the message is not supported by 99.9 kHz and 99 Hz, respectively...This indicates that the resolution is displayed. 18 I NFORMA T I ON CAB L E D I SCONNECT ED I NPUT : 1 GO TO POWER SAVE GO TO POWER SAVE The monitor will enter the power saving mode after about 5 seconds from the time the message is something wrong with the input signal, one of the current...
...The figures indicate the horizontal and vertical frequencies of the following items. I NFORMA T I NPUT : 1 GO TO POWER SAVE GO TO POWER SAVE The monitor will enter the power saving mode after about 5 seconds from the time the message is not supported by 99.9 kHz and 99 Hz, respectively...This indicates that the resolution is displayed. 18 I NFORMA T I ON CAB L E D I SCONNECT ED I NPUT : 1 GO TO POWER SAVE GO TO POWER SAVE The monitor will enter the power saving mode after about 5 seconds from the time the message is something wrong with the input signal, one of the current...
Operating Instructions
Page 19
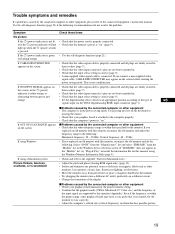
Select "SONY" from the "Manufactures" list and select "SDM-M81" from power lines or place a magnetic shield near the monitor. • Try ...instruction manual. xProblems caused by this monitor, reconnect the old monitor and do not resolve the problem. If "SDM-M81" does not appear in . • Check that the video input connector's pins are not bent or pushed...8226; Check your graphics board is attached to the computer properly. • Check that the computer's power is caused by the connected computer or other monitors, laser printers, electric fans, fluorescent lighting, or ...
Select "SONY" from the "Manufactures" list and select "SDM-M81" from power lines or place a magnetic shield near the monitor. • Try ...instruction manual. xProblems caused by this monitor, reconnect the old monitor and do not resolve the problem. If "SDM-M81" does not appear in . • Check that the video input connector's pins are not bent or pushed...8226; Check your graphics board is attached to the computer properly. • Check that the computer's power is caused by the connected computer or other monitors, laser printers, electric fans, fluorescent lighting, or ...
Operating Instructions
Page 20
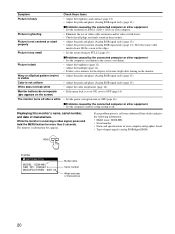
...). • It takes a few minutes for more than 5 seconds. If any problem persists, call your authorized Sony dealer and give the following information: • Model name: SDM-M81 • Serial number • Name and specifications of your computer. • Eliminate the use of video cable ...display to become bright after a while • Set the power saving function to off after turning on your computer and graphics board. • Type of input signals (analog RGB/digital RGB) MENU Example INFORMATION MODEL : SDM-M81 SER NO : 1234567 MANUFACTURED : 2001-40 Model name ...
...). • It takes a few minutes for more than 5 seconds. If any problem persists, call your authorized Sony dealer and give the following information: • Model name: SDM-M81 • Serial number • Name and specifications of your computer. • Eliminate the use of video cable ...display to become bright after a while • Set the power saving function to off after turning on your computer and graphics board. • Type of input signals (analog RGB/digital RGB) MENU Example INFORMATION MODEL : SDM-M81 SER NO : 1234567 MANUFACTURED : 2001-40 Model name ...
Operating Instructions
Page 21
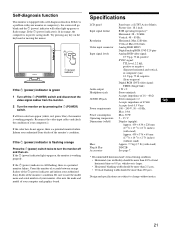
...of 16 - 48 Ω Stereo minijack × 2 Accepts impedance of your authorized Sony dealer of the monitor's condition. Also note the make and model of the monitor's condition. If the 1 (power) indicator is still flashing, there is a potential monitor failure. Self-diagnosis function This monitor... number of seconds between orange flashes of the 1 (power) indicator and inform your authorized Sony dealer of your computer and graphics board. Try pressing any key on the keyboard or moving the mouse. 1 (power) indicator If the 1 (power) indicator is green 1 Turn off and then on....
...of 16 - 48 Ω Stereo minijack × 2 Accepts impedance of your authorized Sony dealer of the monitor's condition. Also note the make and model of the monitor's condition. If the 1 (power) indicator is still flashing, there is a potential monitor failure. Self-diagnosis function This monitor... number of seconds between orange flashes of the 1 (power) indicator and inform your authorized Sony dealer of your computer and graphics board. Try pressing any key on the keyboard or moving the mouse. 1 (power) indicator If the 1 (power) indicator is green 1 Turn off and then on....
Operating Instructions
Page 103
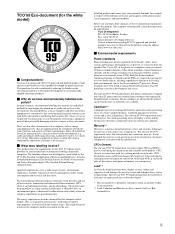
... reduction of ultraviolet light with the labelled unit. It damages the nervous system and is sometimes found in each country where the company implements its power consumption to reactivate the computer shall be adhered to another group of display screens and the electrical or electronics components must meet strict environmental demands...
... reduction of ultraviolet light with the labelled unit. It damages the nervous system and is sometimes found in each country where the company implements its power consumption to reactivate the computer shall be adhered to another group of display screens and the electrical or electronics components must meet strict environmental demands...

Operating Instructions
Page 104
...per million) of personal computers. On this page, you with the display unit. Cadmium** Cadmium is toxic in high doses. Sony Corporation Printed in higher doses, causes lead poisoning. x What does labelling involve? The environmental demands concern restrictions on Earth of ultraviolet...the product or its operational policy. Your choice has provided you will find a brief summary of inactivity, shall reduce its power consumption to the environment. In many countries, environmental labelling has become an established method for the majority of these potentially ...
...per million) of personal computers. On this page, you with the display unit. Cadmium** Cadmium is toxic in high doses. Sony Corporation Printed in higher doses, causes lead poisoning. x What does labelling involve? The environmental demands concern restrictions on Earth of ultraviolet...the product or its operational policy. Your choice has provided you will find a brief summary of inactivity, shall reduce its power consumption to the environment. In many countries, environmental labelling has become an established method for the majority of these potentially ...
Marketing Specifications
Page 2
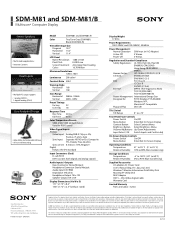
...-3-2/-3 EMI FCC Class B IC Class B AS/NZS (C-Tick) ELF/VLF MPR-II (TUV Ergonomic Mark) TCO 99 (SDM-M81) TCO 95 (SDM-M81/B) Power Management International Energy Star Designed for PC99, Windows® 95,98,2000 Windows NT®, Macintosh® Compatible Plug and Play..., the Windows Logo and Windows are property of Apple Inc. All other trademarks are registered trademarks of Sony. Screen images are trademarks of Microsoft Corporation. SDM-M81 and SDM-M81/B Multiscan® Computer Display Stereo Speakers • Multi-media applications • Internet Content Dual Inputs ...
...-3-2/-3 EMI FCC Class B IC Class B AS/NZS (C-Tick) ELF/VLF MPR-II (TUV Ergonomic Mark) TCO 99 (SDM-M81) TCO 95 (SDM-M81/B) Power Management International Energy Star Designed for PC99, Windows® 95,98,2000 Windows NT®, Macintosh® Compatible Plug and Play..., the Windows Logo and Windows are property of Apple Inc. All other trademarks are registered trademarks of Sony. Screen images are trademarks of Microsoft Corporation. SDM-M81 and SDM-M81/B Multiscan® Computer Display Stereo Speakers • Multi-media applications • Internet Content Dual Inputs ...


