Operating Instructions
Page 2
... high voltages are designed to which can radiate radio frequency energy and, if not installed and used in accordance with the instructions, may cause harmful interference to comply with part 15 of the FCC rules. Do not open the cabinet. Connect the equipment into an outlet on , the user is subject to the following two conditions: (1) This device...
... high voltages are designed to which can radiate radio frequency energy and, if not installed and used in accordance with the instructions, may cause harmful interference to comply with part 15 of the FCC rules. Do not open the cabinet. Connect the equipment into an outlet on , the user is subject to the following two conditions: (1) This device...
Operating Instructions
Page 3
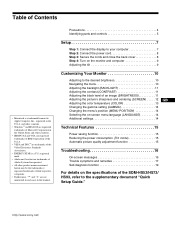
... "Quick Setup Guide." Precautions 4 Identifying parts and controls 5 Setup 7 Step 1: Connect the display to your computer 7 Step 2: Connect the power cord 8 Step 3: Secure the cords and close the back cover 8 Step 4: Turn on the monitor and computer 9 Adjusting the tilt 9 Customizing Your Monitor 10 Adjusting to the desired brightness 10 Navigating the menu 10 Adjusting the backlight (BACKLIGHT 11 Adjusting the contrast (CONTRAST 11 Adjusting the black level of an image (BRIGHTNESS 11 Adjusting the picture's sharpness and centering (SCREEN) . . . . . 12 GB Adjusting the color...
... "Quick Setup Guide." Precautions 4 Identifying parts and controls 5 Setup 7 Step 1: Connect the display to your computer 7 Step 2: Connect the power cord 8 Step 3: Secure the cords and close the back cover 8 Step 4: Turn on the monitor and computer 9 Adjusting the tilt 9 Customizing Your Monitor 10 Adjusting to the desired brightness 10 Navigating the menu 10 Adjusting the backlight (BACKLIGHT 11 Adjusting the contrast (CONTRAST 11 Adjusting the black level of an image (BRIGHTNESS 11 Adjusting the picture's sharpness and centering (SCREEN) . . . . . 12 GB Adjusting the color...

Operating Instructions
Page 4
... monitor may scratch the LCD screen's coating. • Clean the cabinet, panel, and controls with a soft cloth lightly moistened with both hands when transporting. Take care when you use a glass cleaning liquid, do not use the appropriate cord, this may be installed near a radiator, heating vent, or in an outdoor environment, be sure to unplug the power cord from the monitor and grasp the support and base...
... monitor may scratch the LCD screen's coating. • Clean the cabinet, panel, and controls with a soft cloth lightly moistened with both hands when transporting. Take care when you use a glass cleaning liquid, do not use the appropriate cord, this may be installed near a radiator, heating vent, or in an outdoor environment, be sure to unplug the power cord from the monitor and grasp the support and base...
Operating Instructions
Page 5
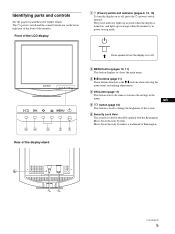
... menu. 3 M/m buttons (page 11) These buttons function as the M/m buttons when selecting the menu items and making adjustments. 4 OK button (page 11) This button selects the item or executes the settings in the menu. 5 button (page 10) This button is used to change the brightness of the LCD display 1 1 (Power) switch and indicator (pages 9, 15, 19) To turn the display on or off, press the 1 (power) switch upward. The power indicator lights up in green when the display...
... menu. 3 M/m buttons (page 11) These buttons function as the M/m buttons when selecting the menu items and making adjustments. 4 OK button (page 11) This button selects the item or executes the settings in the menu. 5 button (page 10) This button is used to change the brightness of the LCD display 1 1 (Power) switch and indicator (pages 9, 15, 19) To turn the display on or off, press the 1 (power) switch upward. The power indicator lights up in green when the display...
Operating Instructions
Page 7
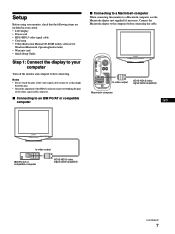
.... • Check the alignment of the HD15 connector to the computer before connecting. Setup Before using your monitor, check that the following items are included in your carton: • LCD display • Power cord • HD15-HD15 video signal cable • Cord strap • Utility/Instruction Manual CD-ROM (utility software for Windows/Macintosh, Operating Instructions) • Warranty card • Quick Setup Guide Step 1: Connect the display to your computer Turn off the monitor and computer before connecting the cable.
.... • Check the alignment of the HD15 connector to the computer before connecting. Setup Before using your monitor, check that the following items are included in your carton: • LCD display • Power cord • HD15-HD15 video signal cable • Cord strap • Utility/Instruction Manual CD-ROM (utility software for Windows/Macintosh, Operating Instructions) • Warranty card • Quick Setup Guide Step 1: Connect the display to your computer Turn off the monitor and computer before connecting the cable.
Operating Instructions
Page 9
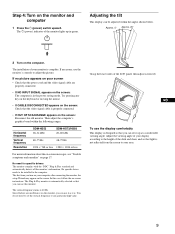
... computer. The Plug & Play monitor is designed so that you can use the display comfortably This display is automatically selected so that you can set the vertical frequency to adjust the picture. GB To use this case, follow the on the screen: Reconnect the old monitor. The installation of the LCD panel, then adjust screen tilt. The 1 (power) indicator of the desk and chair, and so that the video signal cable is in green.
... computer. The Plug & Play monitor is designed so that you can use the display comfortably This display is automatically selected so that you can set the vertical frequency to adjust the picture. GB To use this case, follow the on the screen: Reconnect the old monitor. The installation of the LCD panel, then adjust screen tilt. The 1 (power) indicator of the desk and chair, and so that the video signal cable is in green.
Operating Instructions
Page 10
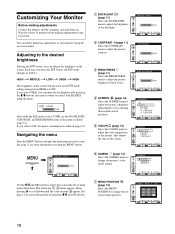
... the CONTRAST menu to adjust the picture contrast. 3 BRIGHTNESS 8 (page 11) Select the BRIGHTNESS menu to adjust the picture brightness (black level). 4 SCREEN (page 12) Select the SCREEN menu to adjust the picture's sharpness (phase/pitch) or its centering (horizontal/vertical position). 5 COLOR (page 13) Select the COLOR menu to adjust the color temperature of the screen. 6 GAMMA (page 14) Select the GAMMA menu to display the main menu on your monitor using the on using the menu. : USER 100 Only while the mode is...
... the CONTRAST menu to adjust the picture contrast. 3 BRIGHTNESS 8 (page 11) Select the BRIGHTNESS menu to adjust the picture brightness (black level). 4 SCREEN (page 12) Select the SCREEN menu to adjust the picture's sharpness (phase/pitch) or its centering (horizontal/vertical position). 5 COLOR (page 13) Select the COLOR menu to adjust the color temperature of the screen. 6 GAMMA (page 14) Select the GAMMA menu to display the main menu on your monitor using the on using the menu. : USER 100 Only while the mode is...

Operating Instructions
Page 11
... display returns to the previous menu. The BACKLIGHT menu appears on your screen. mode is set to HIGH, 1 Press the MENU button. If no buttons are pressed, the menu closes automatically after about 30 seconds. Note The contrast cannot be adjusted when the MIDDLE, or LOW (page 10). The BRIGHTNESS menu appears on menus or messages. 9 Other menus (page 14) Set the following menu items. • RESET 0 • MENU LOCK LANGUAGE...
... display returns to the previous menu. The BACKLIGHT menu appears on your screen. mode is set to HIGH, 1 Press the MENU button. If no buttons are pressed, the menu closes automatically after about 30 seconds. Note The contrast cannot be adjusted when the MIDDLE, or LOW (page 10). The BRIGHTNESS menu appears on menus or messages. 9 Other menus (page 14) Set the following menu items. • RESET 0 • MENU LOCK LANGUAGE...
Operating Instructions
Page 12
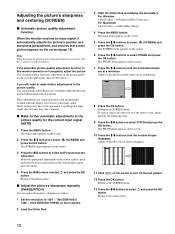
... the MENU button. The PHASE menu appears on the screen. 3 Press the M/m buttons to the picture quality for the current input signal (AUTO) 1 Press the MENU button. If the automatic picture quality adjustment function of this monitor seems to the picture quality You can make further automatic adjustment of the screen's phase, pitch and horizontal/vertical position for the current input signal. (See AUTO below.) If you change the input signal after reconnecting your computer. These settings may...
... the MENU button. The PHASE menu appears on the screen. 3 Press the M/m buttons to the picture quality for the current input signal (AUTO) 1 Press the MENU button. If the automatic picture quality adjustment function of this monitor seems to the picture quality You can make further automatic adjustment of the screen's phase, pitch and horizontal/vertical position for the current input signal. (See AUTO below.) If you change the input signal after reconnecting your computer. These settings may...

Operating Instructions
Page 13
... default color temperature settings. Fine tuning the color temperature (USER ADJUSTMENT) USER ADJUSTMENT R 120 G 120 B 120 1280 x1024 / 60Hz EX I T GB 1 Press the M/m buttons to select R (Red) or B (Blue) and press the OK button. The USER ADJUSTMENT menu appears on the screen to select (SCREEN) and press the OK button. For Windows Click [Utility] t [Windows]/[Win Utility.exe]. For Macintosh Click [Utility] t [Mac]/[Mac Utility]. 3 Press the MENU button. x Adjust the picture's position manually (H CENTER/V CENTER) If the picture...
... default color temperature settings. Fine tuning the color temperature (USER ADJUSTMENT) USER ADJUSTMENT R 120 G 120 B 120 1280 x1024 / 60Hz EX I T GB 1 Press the M/m buttons to select R (Red) or B (Blue) and press the OK button. The USER ADJUSTMENT menu appears on the screen to select (SCREEN) and press the OK button. For Windows Click [Utility] t [Windows]/[Win Utility.exe]. For Macintosh Click [Utility] t [Mac]/[Mac Utility]. 3 Press the MENU button. x Adjust the picture's position manually (H CENTER/V CENTER) If the picture...
Operating Instructions
Page 14
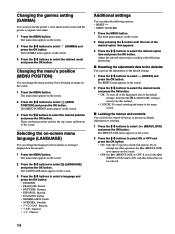
... reset the adjustments to the default settings. 1 Press the M/m buttons to select 0 (RESET) and press the OK button. The GAMMA menu appears on the screen. 3 Press the M/m buttons to select the desired mode and press the OK button. The MENU POSITION menu appears on the screen. 3 Press the M/m buttons to select the desired position and press the OK button. The LANGUAGE menu appears on the screen with the picture's original color shade. 1 Press the MENU button. Changing...
... reset the adjustments to the default settings. 1 Press the M/m buttons to select 0 (RESET) and press the OK button. The GAMMA menu appears on the screen. 3 Press the M/m buttons to select the desired mode and press the OK button. The MENU POSITION menu appears on the screen. 3 Press the M/m buttons to select the desired position and press the OK button. The LANGUAGE menu appears on the screen with the picture's original color shade. 1 Press the MENU button. Changing...
Operating Instructions
Page 15
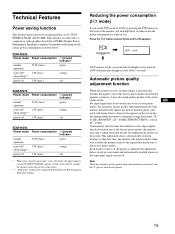
... video graphics board that do not match one of the factory preset modes, the monitor may take a longer time than normal for any timing within the monitor's frequency range (horizontal: 28 - 61 kHz (SDM-HS53), 28 - 80 kHz (SDM-HS73/HS93), vertical: 48 - 75 Hz). This adjustment data is DPMS (Display Power Management Signaling) compliant, the monitor will operate. 15 Automatic picture quality adjustment function When the monitor receives an input signal...
... video graphics board that do not match one of the factory preset modes, the monitor may take a longer time than normal for any timing within the monitor's frequency range (horizontal: 28 - 61 kHz (SDM-HS53), 28 - 80 kHz (SDM-HS73/HS93), vertical: 48 - 75 Hz). This adjustment data is DPMS (Display Power Management Signaling) compliant, the monitor will operate. 15 Automatic picture quality adjustment function When the monitor receives an input signal...
Operating Instructions
Page 16
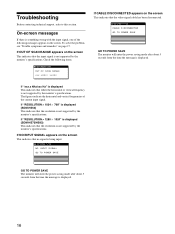
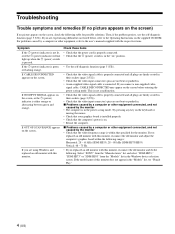
... RANGE x x x . On-screen messages If there is not supported by the monitor's specifications. If "RESOLUTION > 1024 × 768" is displayed (SDM-HS53) This indicates that either the horizontal or vertical frequency is something wrong with the input signal, one of the current input signal. Troubleshooting Before contacting technical support, refer to this section. If NO INPUT SIGNAL appears on the screen. To solve the problem, see "Trouble symptoms and remedies" on the screen...
... RANGE x x x . On-screen messages If there is not supported by the monitor's specifications. If "RESOLUTION > 1024 × 768" is displayed (SDM-HS53) This indicates that either the horizontal or vertical frequency is something wrong with the input signal, one of the current input signal. Troubleshooting Before contacting technical support, refer to this section. If NO INPUT SIGNAL appears on the screen. To solve the problem, see "Trouble symptoms and remedies" on the screen...
Operating Instructions
Page 17
... monitor setting. • Confirm that is too narrow for the monitor to sync correctly. • Adjust the computer's refresh rate (vertical frequency) to the connected equipment's instruction manual. If using Windows and replaced an old monitor with this monitor does not appear in the Windows device selection screen. If CABLE DISCONNECTED appears on " position. • Use the self-diagnosis function (page 19). If you use the Macintosh adapter (not supplied), check that your graphics board manual for the monitor...
... monitor setting. • Confirm that is too narrow for the monitor to sync correctly. • Adjust the computer's refresh rate (vertical frequency) to the connected equipment's instruction manual. If using Windows and replaced an old monitor with this monitor does not appear in the Windows device selection screen. If CABLE DISCONNECTED appears on " position. • Use the self-diagnosis function (page 19). If you use the Macintosh adapter (not supplied), check that your graphics board manual for the monitor...
Operating Instructions
Page 18
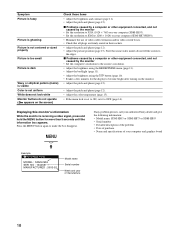
...). • Adjust the color temperature (page 13). • If the menu lock is not uniform White does not look white Monitor buttons do not fill the screen to the edges. x Problems caused by a computer or other equipment connected, and not caused by the monitor • Set the computer's resolution to the screen's resolution. • Adjust the brightness using the BRIGHTNESS menu (page 11). • Adjust the backlight (page 11). • Adjust the brightness using the button (page...
...). • Adjust the color temperature (page 13). • If the menu lock is not uniform White does not look white Monitor buttons do not fill the screen to the edges. x Problems caused by a computer or other equipment connected, and not caused by the monitor • Set the computer's resolution to the screen's resolution. • Adjust the brightness using the BRIGHTNESS menu (page 11). • Adjust the backlight (page 11). • Adjust the brightness using the button (page...
Operating Instructions
Page 19
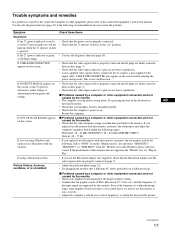
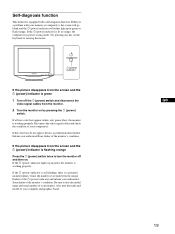
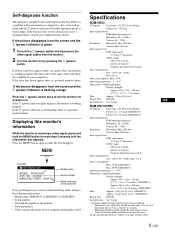
Reconnect the video signal cables and check the condition of your authorized Sony dealer of the 1 (power) indicator and inform your computer(s). If the picture disappears from the screen and the 1 (power) indicator is working properly. If the 1 (power) indicator lights up in power saving mode. OK MENU 1 (power) indicator If the picture disappears from the monitor. 2 Turn the monitor on by pressing the 1 (power) switch. If all four color bars appear (white, red, green, blue), the monitor is green 1 Turn off...
Reconnect the video signal cables and check the condition of your authorized Sony dealer of the 1 (power) indicator and inform your computer(s). If the picture disappears from the screen and the 1 (power) indicator is working properly. If the 1 (power) indicator lights up in power saving mode. OK MENU 1 (power) indicator If the picture disappears from the monitor. 2 Turn the monitor on by pressing the 1 (power) switch. If all four color bars appear (white, red, green, blue), the monitor is green 1 Turn off...

Quick Setup Guide
Page 2
... on the LCD screen. For the customers in the UK If you use the monitor in the U.S.A. Example of the CD-ROM will open the cabinet. Precautions Warning on the LCD (Liquid Crystal Display) Please note that it for Windows/Macintosh, Operating Instructions) • Warranty card • This Quick Setup Guide Connecting your monitor Connect your computer. Note on power connections • Use the supplied power cord. If you use a different power cord, be installed near...
... on the LCD screen. For the customers in the UK If you use the monitor in the U.S.A. Example of the CD-ROM will open the cabinet. Precautions Warning on the LCD (Liquid Crystal Display) Please note that it for Windows/Macintosh, Operating Instructions) • Warranty card • This Quick Setup Guide Connecting your monitor Connect your computer. Note on power connections • Use the supplied power cord. If you use a different power cord, be installed near...
Quick Setup Guide
Page 3
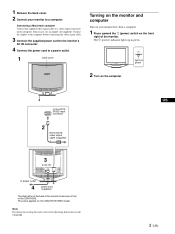
... (RGB) input connector 2 HD15-HD15 video signal cable (supplied) 3 to AC IN to a computer. 1 Remove the back cover. 2 Connect your monitor first, then a computer. 1 Press upward the 1 (power) switch on the front right of the SDM-HS53. Connect the adapter to the computer before connecting the video signal cable. 3 Connect the supplied power cord to the monitor's AC IN connector. 4 Connect the power cord to a power outlet. 1 back cover Turning on the monitor and computer Turn on the computer. The 1 (power) indicator lights up in green OK MENU 2 Turn...
... (RGB) input connector 2 HD15-HD15 video signal cable (supplied) 3 to AC IN to a computer. 1 Remove the back cover. 2 Connect your monitor first, then a computer. 1 Press upward the 1 (power) switch on the front right of the SDM-HS53. Connect the adapter to the computer before connecting the video signal cable. 3 Connect the supplied power cord to the monitor's AC IN connector. 4 Connect the power cord to a power outlet. 1 back cover Turning on the monitor and computer Turn on the computer. The 1 (power) indicator lights up in green OK MENU 2 Turn...
Quick Setup Guide
Page 4
...-supplied video signal cable is within the following table for the monitor. If you replaced an old monitor with this monitor, reconnect the old monitor and adjust the computer's graphics board within that the video input connector's pins are firmly seated in their sockets (page 2 (US)). • Check that the computer's power is properly connected and all plugs are firmly seated in . If you are using Windows and replaced an old monitor...
...-supplied video signal cable is within the following table for the monitor. If you replaced an old monitor with this monitor, reconnect the old monitor and adjust the computer's graphics board within that the video input connector's pins are firmly seated in their sockets (page 2 (US)). • Check that the computer's power is properly connected and all plugs are firmly seated in . If you are using Windows and replaced an old monitor...
Quick Setup Guide
Page 5
... LCD panel Panel type: a-Si TFT Active Matrix monitor failure. If there is working Included items See "Setup." positive or negative (Separate horizontal and vertical) If all four color bars appear (white, red, green, blue), the monitor is a problem with a self-diagnosis function. If the color bars do not appear, there is working properly. Plug & Play DDC2B US If the 1 (power) indicator lights up in green or Picture size: 15.0 inch flash orange. Press the MENU button again to change...
... LCD panel Panel type: a-Si TFT Active Matrix monitor failure. If there is working Included items See "Setup." positive or negative (Separate horizontal and vertical) If all four color bars appear (white, red, green, blue), the monitor is a problem with a self-diagnosis function. If the color bars do not appear, there is working properly. Plug & Play DDC2B US If the 1 (power) indicator lights up in green or Picture size: 15.0 inch flash orange. Press the MENU button again to change...


