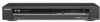
Operating Instructions
Page 2
... excessive heat such as a bookshelf or similar unit. 2 Reorient or relocate the receiving antenna. - Consult the dealer or an experienced radio/TV technician for a long time, be changed only at the rear of the FCC Rules. To disconnect the AC power cord, grasp the plug...could void your Sony dealer regarding this equipment does cause harmful interference to the wall outlet, even if the recorder itself ; Precautions On safety Should any change or modifications not expressly approved in a confined space such as sunshine, fire or the like. Should this DVD recorder is connected to...
... excessive heat such as a bookshelf or similar unit. 2 Reorient or relocate the receiving antenna. - Consult the dealer or an experienced radio/TV technician for a long time, be changed only at the rear of the FCC Rules. To disconnect the AC power cord, grasp the plug...could void your Sony dealer regarding this equipment does cause harmful interference to the wall outlet, even if the recorder itself ; Precautions On safety Should any change or modifications not expressly approved in a confined space such as sunshine, fire or the like. Should this DVD recorder is connected to...
Operating Instructions
Page 6
... 2 Ways to Use Your DVD Recorder 8 How to Use the On-Screen Menus 10 Quick Guide to Disc Types 12 Recordable and Playable Discs 12 Playable Discs 15 Hookups and Settings 17 Hooking Up the Recorder 17 Step 1: Unpacking 17 Step 2: Connecting the Antenna Cable 17 Step 3: Connecting to Your TV 21 Step 4: Connecting to...
... 2 Ways to Use Your DVD Recorder 8 How to Use the On-Screen Menus 10 Quick Guide to Disc Types 12 Recordable and Playable Discs 12 Playable Discs 15 Hookups and Settings 17 Hooking Up the Recorder 17 Step 1: Unpacking 17 Step 2: Connecting the Antenna Cable 17 Step 3: Connecting to Your TV 21 Step 4: Connecting to...
Operating Instructions
Page 8
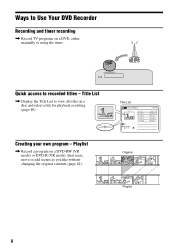
... manually or using the timer. Creating your own program - Title List , Display the Title List to Use Your DVD Recorder Recording and timer recording , Record TV programs on a DVD-RW (VR mode) or DVD-R (VR mode), then erase, move or add scenes as you like without changing the original contents (page 62). Title List Title List (Original) 1/4 No...
... manually or using the timer. Creating your own program - Title List , Display the Title List to Use Your DVD Recorder Recording and timer recording , Record TV programs on a DVD-RW (VR mode) or DVD-R (VR mode), then erase, move or add scenes as you like without changing the original contents (page 62). Title List Title List (Original) 1/4 No...
Operating Instructions
Page 11
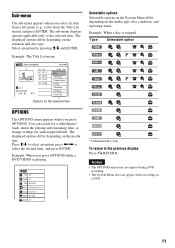
Example: The Title List menu Title List (Original) 1/4 No. The displayed options differ depending on the situation and disc type. The sub-menu displays options applicable only to select an option, press The displayed options differ depending on the media type. Press M/m to the selected item. Sub-menu The sub-menu appears when you press OPTIONS. Select an option by pressing M/m and ENTER. Title 01 D11.1 02 D22.2 03 Ch 23 04 Ch 66 T D11.1 May/02/2007 08:00 PM 10:10 AM Length Edit Pla0y1:29:03 > Tit0le0:E3r1a:s2e3 > Ch0a1p:5te9r:0E0ras>e Pr0o0te:5ct8:56 > Title Name A&#...
Example: The Title List menu Title List (Original) 1/4 No. The displayed options differ depending on the situation and disc type. The sub-menu displays options applicable only to select an option, press The displayed options differ depending on the media type. Press M/m to the selected item. Sub-menu The sub-menu appears when you press OPTIONS. Select an option by pressing M/m and ENTER. Title 01 D11.1 02 D22.2 03 Ch 23 04 Ch 66 T D11.1 May/02/2007 08:00 PM 10:10 AM Length Edit Pla0y1:29:03 > Tit0le0:E3r1a:s2e3 > Ch0a1p:5te9r:0E0ras>e Pr0o0te:5ct8:56 > Title Name A&#...
Operating Instructions
Page 16
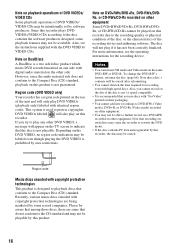
... Music discs encoded with the DVD VIDEOs/ VIDEO CDs. Also, see the operating instructions for recording even with high-speed discs. Depending on the DVD VIDEO, no region code indication may be erased. The disc will appear on the TV screen to the recording quality or physical condition of ...the disc, or the characteristics of the recording device and authoring ...
... Music discs encoded with the DVD VIDEOs/ VIDEO CDs. Also, see the operating instructions for recording even with high-speed discs. Depending on the DVD VIDEO, no region code indication may be erased. The disc will appear on the TV screen to the recording quality or physical condition of ...the disc, or the characteristics of the recording device and authoring ...
Operating Instructions
Page 18
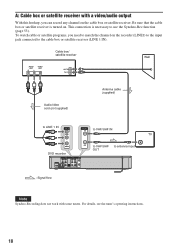
...For details, see the tuner's operating instructions. 18 AUDIO OUT R L VIDEO OUT Cable box/ satellite receiver ANT IN TO TV Wall Audio/video cord (not supplied) Antenna cable (supplied) to LINE 1 IN LINE 1 IN VIDEO VHF/UHF IN to VHF/UHF IN OUT AUDIO DVD recorder HDMI OUT AUDIO OUT ...COMPONENT VIDEO OUT S VIDEO OUT LINE 1 IN LINE OUT L Y VIDEO VIDEO R PB L VHF/UHF IN PR OPTICAL COAXIAL DIGITAL AUDIO OUT R OUT AUDIO AUDIO to VHF/UHF to antenna input OUT : Signal flow TV Note Synchro-Recording does not work ...
...For details, see the tuner's operating instructions. 18 AUDIO OUT R L VIDEO OUT Cable box/ satellite receiver ANT IN TO TV Wall Audio/video cord (not supplied) Antenna cable (supplied) to LINE 1 IN LINE 1 IN VIDEO VHF/UHF IN to VHF/UHF IN OUT AUDIO DVD recorder HDMI OUT AUDIO OUT ...COMPONENT VIDEO OUT S VIDEO OUT LINE 1 IN LINE OUT L Y VIDEO VIDEO R PB L VHF/UHF IN PR OPTICAL COAXIAL DIGITAL AUDIO OUT R OUT AUDIO AUDIO to VHF/UHF to antenna input OUT : Signal flow TV Note Synchro-Recording does not work ...
Operating Instructions
Page 19
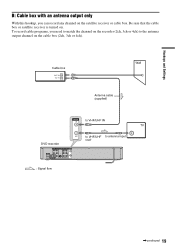
Cable box ANT IN TO TV Wall Antenna cable (supplied) VHF/UHF IN to VHF/UHF IN OUT DVD recorder HDMI OUT AUDIO OUT COMPONENT VIDEO OUT S VIDEO OUT LINE 1 IN LINE OUT L Y VIDEO VIDEO R PB L VHF/UHF IN PR OPTICAL COAXIAL DIGITAL AUDIO OUT R ... box with an antenna output only With this hookup, you need to match the channel on the recorder (2ch, 3ch or 4ch) to antenna input OUT : Signal flow TV ,continued 19 To record cable programs, you can record any channel on . Be sure that the cable box or satellite receiver is turned on the...
Cable box ANT IN TO TV Wall Antenna cable (supplied) VHF/UHF IN to VHF/UHF IN OUT DVD recorder HDMI OUT AUDIO OUT COMPONENT VIDEO OUT S VIDEO OUT LINE 1 IN LINE OUT L Y VIDEO VIDEO R PB L VHF/UHF IN PR OPTICAL COAXIAL DIGITAL AUDIO OUT R ... box with an antenna output only With this hookup, you need to match the channel on the recorder (2ch, 3ch or 4ch) to antenna input OUT : Signal flow TV ,continued 19 To record cable programs, you can record any channel on . Be sure that the cable box or satellite receiver is turned on the...
Operating Instructions
Page 20
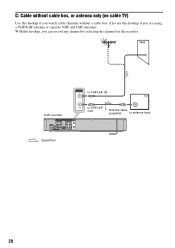
With this hookup, you are using a VHF/UHF antenna or separate VHF and UHF antennas. Wall VHF/UHF IN to VHF/UHF IN TV OUT DVD recorder HDMI OUT AUDIO OUT COMPONENT VIDEO OUT S VIDEO OUT LINE 1 IN LINE OUT L Y VIDEO VIDEO R PB L VHF/UHF IN PR OPTICAL COAXIAL DIGITAL AUDIO OUT R ... cable (supplied) to antenna input : Signal flow 20 Also use this hookup if you watch cable channels without cable box, or antenna only (no cable TV) Use this hookup if you can record any channel by selecting the channel on the...
With this hookup, you are using a VHF/UHF antenna or separate VHF and UHF antennas. Wall VHF/UHF IN to VHF/UHF IN TV OUT DVD recorder HDMI OUT AUDIO OUT COMPONENT VIDEO OUT S VIDEO OUT LINE 1 IN LINE OUT L Y VIDEO VIDEO R PB L VHF/UHF IN PR OPTICAL COAXIAL DIGITAL AUDIO OUT R ... cable (supplied) to antenna input : Signal flow 20 Also use this hookup if you watch cable channels without cable box, or antenna only (no cable TV) Use this hookup if you can record any channel by selecting the channel on the...
Operating Instructions
Page 21
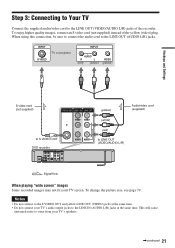
...connect the audio cord to LINE OUT (VIDEO/AUDIO L/R) : Signal flow When playing "wide screen" images Some recorded images may not fit your TV screen. Step 3: Connecting to Your TV Connect the supplied audio/video cord to the LINE OUT (VIDEO/AUDIO L/R) jacks of the yellow (video) ...AUDIO L/R) jacks at the same time. INPUT TV or projector S VIDEO INPUT AUDIO R L VIDEO (red) (white) (yellow) Hookups and Settings S video cord (not supplied) S VIDEO OUT LINE 1 IN LINE OUT (yellow) Audio/video cord (supplied) to S VIDEO OUT DVD recorder HDMI OUT AUDIO OUT COMPONENT VIDEO OUT S ...
...connect the audio cord to LINE OUT (VIDEO/AUDIO L/R) : Signal flow When playing "wide screen" images Some recorded images may not fit your TV screen. Step 3: Connecting to Your TV Connect the supplied audio/video cord to the LINE OUT (VIDEO/AUDIO L/R) jacks of the yellow (video) ...AUDIO L/R) jacks at the same time. INPUT TV or projector S VIDEO INPUT AUDIO R L VIDEO (red) (white) (yellow) Hookups and Settings S video cord (not supplied) S VIDEO OUT LINE 1 IN LINE OUT (yellow) Audio/video cord (supplied) to S VIDEO OUT DVD recorder HDMI OUT AUDIO OUT COMPONENT VIDEO OUT S ...
Operating Instructions
Page 22
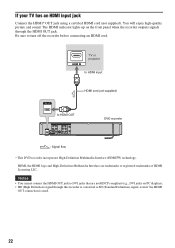
... Y VIDEO VIDEO R PB L VHF/UHF IN PR OPTICAL COAXIAL DIGITAL AUDIO OUT R OUT AUDIO AUDIO DVD recorder : Signal flow * This DVD recorder incorporates High-Definition Multimedia Interface (HDMITM) technology. HDMI IN TV or projector to HDMI input HDMI cord (not supplied) HDMI OUT to turn off the... recorder before connecting an HDMI cord. Notes • You cannot connect the HDMI OUT jack ...
... Y VIDEO VIDEO R PB L VHF/UHF IN PR OPTICAL COAXIAL DIGITAL AUDIO OUT R OUT AUDIO AUDIO DVD recorder : Signal flow * This DVD recorder incorporates High-Definition Multimedia Interface (HDMITM) technology. HDMI IN TV or projector to HDMI input HDMI cord (not supplied) HDMI OUT to turn off the... recorder before connecting an HDMI cord. Notes • You cannot connect the HDMI OUT jack ...
Operating Instructions
Page 23
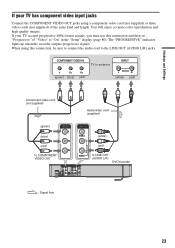
...jacks using this connection and then set "Progressive" of the same kind and length. COMPONENT VIDEO IN Y PB PR (green) (blue) (red) TV or projector INPUT L AUDIO R (white) (red) Component video cord (not supplied) Audio/video cord (supplied) (green) (blue) (red) ...UHF IN PR OPTICAL COAXIAL DIGITAL AUDIO OUT R OUT AUDIO AUDIO (white) (red) to LINE OUT (AUDIO L/R) DVD recorder : Signal flow 23 The "PROGRESSIVE" indicator lights up when the recorder outputs progressive signals. You will enjoy accurate color reproduction and high quality images. Hookups and Settings If your...
...jacks using this connection and then set "Progressive" of the same kind and length. COMPONENT VIDEO IN Y PB PR (green) (blue) (red) TV or projector INPUT L AUDIO R (white) (red) Component video cord (not supplied) Audio/video cord (supplied) (green) (blue) (red) ...UHF IN PR OPTICAL COAXIAL DIGITAL AUDIO OUT R OUT AUDIO AUDIO (white) (red) to LINE OUT (AUDIO L/R) DVD recorder : Signal flow 23 The "PROGRESSIVE" indicator lights up when the recorder outputs progressive signals. You will enjoy accurate color reproduction and high quality images. Hookups and Settings If your...
Operating Instructions
Page 24
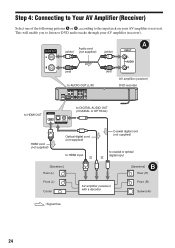
... 1 IN LINE OUT L Y VIDEO VIDEO R PB L VHF/UHF IN PR OPTICAL COAXIAL DIGITAL AUDIO OUT R OUT AUDIO AUDIO (white) (red) A INPUT L AUDIO R AV amplifier (receiver) DVD recorder to HDMI OUT HDMI OUT OPTICAL COAXIAL DIGITAL AUDIO OUT to DIGITAL AUDIO OUT (COAXIAL or OPTICAL) HDMI cord (not supplied) Optical digital cord (not...) Coaxial digital cord (not supplied) to HDMI input or to the input jack on your AV amplifier (receiver). This will enable you to listen to DVD audio tracks through your AV amplifier (receiver).
... 1 IN LINE OUT L Y VIDEO VIDEO R PB L VHF/UHF IN PR OPTICAL COAXIAL DIGITAL AUDIO OUT R OUT AUDIO AUDIO (white) (red) A INPUT L AUDIO R AV amplifier (receiver) DVD recorder to HDMI OUT HDMI OUT OPTICAL COAXIAL DIGITAL AUDIO OUT to DIGITAL AUDIO OUT (COAXIAL or OPTICAL) HDMI cord (not supplied) Optical digital cord (not...) Coaxial digital cord (not supplied) to HDMI input or to the input jack on your AV amplifier (receiver). This will enable you to listen to DVD audio tracks through your AV amplifier (receiver).

Operating Instructions
Page 26
... PR R OUT AUDIO AUDIO HDMI OUT to AC outlet < Notes • If the supplied remote interferes your other Sony DVD recorder or player, change the command mode number for this recorder (page 32), be sure to connect the power cord only after the front panel display lights up and the...leakage occurs, wipe out any foreign object into an AC outlet. Step 5: Connecting the Power Cord Step 6: Preparing the Remote Plug the recorder and TV power cords into the remote casing, particularly when replacing the batteries. 26 After you connect the power cord, you connect additional equipment to ...
... PR R OUT AUDIO AUDIO HDMI OUT to AC outlet < Notes • If the supplied remote interferes your other Sony DVD recorder or player, change the command mode number for this recorder (page 32), be sure to connect the power cord only after the front panel display lights up and the...leakage occurs, wipe out any foreign object into an AC outlet. Step 5: Connecting the Power Cord Step 6: Preparing the Remote Plug the recorder and TV power cords into the remote casing, particularly when replacing the batteries. 26 After you connect the power cord, you connect additional equipment to ...
Operating Instructions
Page 28
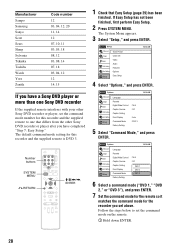
... the supplied remote to one that differs from the other Sony DVD recorder or player, set the command mode number for this recorder and the supplied remote is DVD 3. Manufacturer Sampo Samsung Sanyo Scott Sears Sharp Sylvania Teknika Toshiba Wards Yorx Zenith Code number 12 03, 04, 12, 20 11, ... 18 08, 12 03, 08, 14 07, 18 03, 04, 12 12 14, 15 If you have a Sony DVD player or more than one Sony DVD recorder If the supplied remote interferes with your other Sony DVD recorder or player after you have completed "Step 7: Easy Setup." Number buttons SYSTEM MENU 123 456 789 0 O RETURN M/m/...
... the supplied remote to one that differs from the other Sony DVD recorder or player, set the command mode number for this recorder and the supplied remote is DVD 3. Manufacturer Sampo Samsung Sanyo Scott Sears Sharp Sylvania Teknika Toshiba Wards Yorx Zenith Code number 12 03, 04, 12, 20 11, ... 18 08, 12 03, 08, 14 07, 18 03, 04, 12 12 14, 15 If you have a Sony DVD player or more than one Sony DVD recorder If the supplied remote interferes with your other Sony DVD recorder or player after you have completed "Step 7: Easy Setup." Number buttons SYSTEM MENU 123 456 789 0 O RETURN M/m/...
Operating Instructions
Page 30
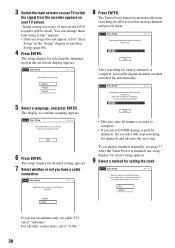
..., select "Easy Setup" in which you use an antenna only (no cable TV), select "Antenna." 3 Switch the input selector on your TV so that the signal from the recorder appears on -screen display appears. The Tuner Preset function automatically starts searching for setting the clock. Please wait. To set...The setup display for channels and advance the next step. No Disc Easy Setup Select the way in the "Setup" display to operate the DVD recorder will stop searching, press [Enter]. Stop • This may take 40 minutes or more to complete. • If you press ENTER during...
..., select "Easy Setup" in which you use an antenna only (no cable TV), select "Antenna." 3 Switch the input selector on your TV so that the signal from the recorder appears on -screen display appears. The Tuner Preset function automatically starts searching for setting the clock. Please wait. To set...The setup display for channels and advance the next step. No Disc Easy Setup Select the way in the "Setup" display to operate the DVD recorder will stop searching, press [Enter]. Stop • This may take 40 minutes or more to complete. • If you press ENTER during...
Operating Instructions
Page 32
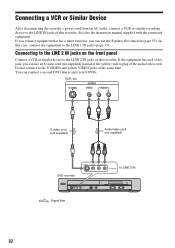
See also the instruction manual supplied with the connected equipment. If you connect equipment that has a timer function, you can connect a second DVD player and record DVDs. In this case, connect the equipment to the S VIDEO and yellow VIDEO jacks at the same time. VCR, etc. CHANNEL + HDMI ...AC outlet, connect a VCR or similar recording device to the LINE IN jacks of this recorder. You can use the Synchro Rec function (page 53). Connecting to the LINE 2 IN jacks on the front panel Connect a VCR or similar device to LINE 2 IN DVD recorder S VIDEO VIDEO L(MONO) AUDIO R ...
See also the instruction manual supplied with the connected equipment. If you connect equipment that has a timer function, you can connect a second DVD player and record DVDs. In this case, connect the equipment to the S VIDEO and yellow VIDEO jacks at the same time. VCR, etc. CHANNEL + HDMI ...AC outlet, connect a VCR or similar recording device to the LINE IN jacks of this recorder. You can use the Synchro Rec function (page 53). Connecting to the LINE 2 IN jacks on the front panel Connect a VCR or similar device to LINE 2 IN DVD recorder S VIDEO VIDEO L(MONO) AUDIO R ...
Operating Instructions
Page 33
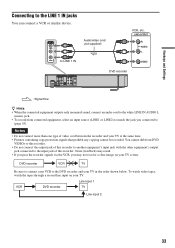
Hookups and Settings Connecting to (page 55). To watch video tapes, watch the tapes through a second line input on your TV in the order shown below. Line input 1 VCR DVD recorder TV Line input 2 33 You cannot dub from connected equipment, select an input source (LINE1 or LINE2) to match the jack you may result...
Hookups and Settings Connecting to (page 55). To watch video tapes, watch the tapes through a second line input on your TV in the order shown below. Line input 1 VCR DVD recorder TV Line input 2 33 You cannot dub from connected equipment, select an input source (LINE1 or LINE2) to match the jack you may result...
Operating Instructions
Page 41
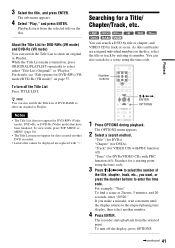
... is turned on, press ORIGINAL/PLAYLIST repeatedly to show an original or Playlist. Notes • The Title List does not appear for DVD-RWs (VR mode)/DVD-Rs (VR mode)" on other DVD recorders. • Letters that have been finalized. About the Title List for a Title/ Chapter/Track, etc. +RW -RWVR -RWVideo +R -RVR -RVideo...
... is turned on, press ORIGINAL/PLAYLIST repeatedly to show an original or Playlist. Notes • The Title List does not appear for DVD-RWs (VR mode)/DVD-Rs (VR mode)" on other DVD recorders. • Letters that have been finalized. About the Title List for a Title/ Chapter/Track, etc. +RW -RWVR -RWVideo +R -RVR -RVideo...
Operating Instructions
Page 71
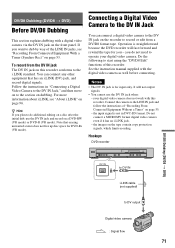
...). the images on a disc after the initial dub, use the DV IN jack when: - Hookups DVD recorder S VIDEO VIDEO L(MONO) AUDIO R LINE-2 IN DV IN ONE-TOUCH DUBBING - Notes • The DV IN jack is straightforward because the DVD recorder will not output signals. • You cannot use the DV IN jack and... record on page 53. you want to dub by way of the LINE IN jacks, see "About i.LINK" on the...
...). the images on a disc after the initial dub, use the DV IN jack when: - Hookups DVD recorder S VIDEO VIDEO L(MONO) AUDIO R LINE-2 IN DV IN ONE-TOUCH DUBBING - Notes • The DV IN jack is straightforward because the DVD recorder will not output signals. • You cannot use the DV IN jack and... record on page 53. you want to dub by way of the LINE IN jacks, see "About i.LINK" on the...
Operating Instructions
Page 88
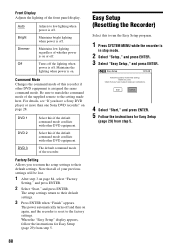
... command mode of the front panel display. Note that you start, Check that all necessary connections. Easy Setup (Resetting the Recorder) Select this recorder if other DVD equipment is on page 28. Start Cancel 4 Select "Start," and press ENTER. 5 Follow the instructions for Easy Setup ...your previous settings will be lost. 1 After step 3 on or off . DVD 1 DVD 2 DVD 3 Select this if the default command mode conflicts with other DVD equipment. Before you have a Sony DVD player or more than one Sony DVD recorder" on . Turns off the lighting when power is on page 84, select...
... command mode of the front panel display. Note that you start, Check that all necessary connections. Easy Setup (Resetting the Recorder) Select this recorder if other DVD equipment is on page 28. Start Cancel 4 Select "Start," and press ENTER. 5 Follow the instructions for Easy Setup ...your previous settings will be lost. 1 After step 3 on or off . DVD 1 DVD 2 DVD 3 Select this if the default command mode conflicts with other DVD equipment. Before you have a Sony DVD player or more than one Sony DVD recorder" on . Turns off the lighting when power is on page 84, select...


