Operating Instructions
Page 2
...experienced radio/TV technician for a long time, be unplugged from the wall outlet. On power sources • Operate the recorder only on 120 V AC, 60 Hz. • The recorder is not ...installed and used in accordance with this product will not occur in this manual could void your Sony dealer regarding this apparatus to rain or moisture. Refer servicing to qualified... installed apparatus shall not be determined by turning the equipment off . • Install this DVD recorder is connected. - Note This equipment has been tested and found to comply with adequate ventilation...
...experienced radio/TV technician for a long time, be unplugged from the wall outlet. On power sources • Operate the recorder only on 120 V AC, 60 Hz. • The recorder is not ...installed and used in accordance with this product will not occur in this manual could void your Sony dealer regarding this apparatus to rain or moisture. Refer servicing to qualified... installed apparatus shall not be determined by turning the equipment off . • Install this DVD recorder is connected. - Note This equipment has been tested and found to comply with adequate ventilation...
Operating Instructions
Page 4
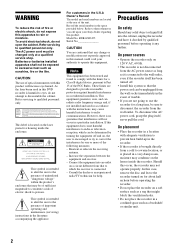
... Recording) mode Functions available for DVD-Rs in video mode Functions available for DVD VIDEOs Functions available for DVD-RAMs VCD CD DATA CD DATA DVD Functions available for VIDEO CDs or CD-Rs/CD-RWs in video CD format Functions available for DATA DVDs (DVD-ROMs/DVD+RWs/ DVD-RWs/DVD+Rs/DVD-...The on-screen display illustrations used in this manual may not match the graphics displayed on your TV screen. • The explanations regarding discs in this manual refer to discs that are created on other recorders and played back on this recorder. The explanations do not apply to discs created...
... Recording) mode Functions available for DVD-Rs in video mode Functions available for DVD VIDEOs Functions available for DVD-RAMs VCD CD DATA CD DATA DVD Functions available for VIDEO CDs or CD-Rs/CD-RWs in video CD format Functions available for DATA DVDs (DVD-ROMs/DVD+RWs/ DVD-RWs/DVD+Rs/DVD-...The on-screen display illustrations used in this manual may not match the graphics displayed on your TV screen. • The explanations regarding discs in this manual refer to discs that are created on other recorders and played back on this recorder. The explanations do not apply to discs created...
Operating Instructions
Page 8
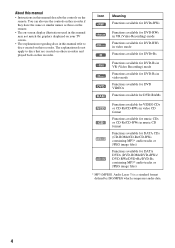
Ways to Use Your DVD Recorder Recording and timer recording , Record TV programs on a DVD-RW (VR mode) or DVD-R (VR mode), then erase, move or add scenes as you like without changing the original contents (page 62). Quick access to view all titles on a ...disc and select a title for playback or editing (page 40). Title List Title List (Original) 1/4 No. Playlist , Record a program on a DVD, either manually or using the timer. Title 01 D11.1 02 D22.2 03 Ch 23 04 Ch 66 T D11.1 May/02/2007 08:00 PM 10:10...
Ways to Use Your DVD Recorder Recording and timer recording , Record TV programs on a DVD-RW (VR mode) or DVD-R (VR mode), then erase, move or add scenes as you like without changing the original contents (page 62). Quick access to view all titles on a ...disc and select a title for playback or editing (page 40). Title List Title List (Original) 1/4 No. Playlist , Record a program on a DVD, either manually or using the timer. Title 01 D11.1 02 D22.2 03 Ch 23 04 Ch 66 T D11.1 May/02/2007 08:00 PM 10:10...
Operating Instructions
Page 12
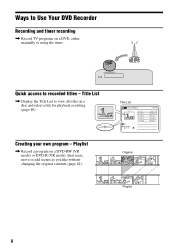
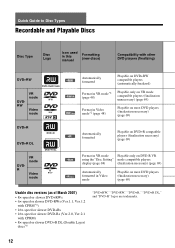
Quick Guide to Disc Types Recordable and Playable Discs Disc Type Disc Logo Icon used in this manual Formatting (new discs) Compatibility with other DVD players (finalizing) DVD+RW DVDRW VR mode Video mode DVD+R DVD+R DL DVDR VR mode Video mode +RW -RWVR -RWVideo Automatically formatted Playable on DVD+RW compatible players (automatically finalized) Format in VR...
Quick Guide to Disc Types Recordable and Playable Discs Disc Type Disc Logo Icon used in this manual Formatting (new discs) Compatibility with other DVD players (finalizing) DVD+RW DVDRW VR mode Video mode DVD+R DVD+R DL DVDR VR mode Video mode +RW -RWVR -RWVideo Automatically formatted Playable on DVD+RW compatible players (automatically finalized) Format in VR...
Operating Instructions
Page 15
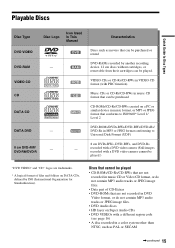
...can be played. DATA DVD - RAM VIDEO CD CD VCD CD DATA CD DATA CD DATA DVD - 8 cm DVD+RW/ DVD-RW/DVD-R - Characteristics Discs such as PAL or SECAM ,continued 15 Discs that cannot be played • CD-ROMs/CD-Rs/CD-RWs that are not recorded in This Manual DVD DVD-RAM - Playable Discs Quick... Guide to Disc Types Disc Type DVD VIDEO Disc Logo Icon Used in music CD or Video CD format, or do not contain MP3 audio ...
...can be played. DATA DVD - RAM VIDEO CD CD VCD CD DATA CD DATA CD DATA DVD - 8 cm DVD+RW/ DVD-RW/DVD-R - Characteristics Discs such as PAL or SECAM ,continued 15 Discs that cannot be played • CD-ROMs/CD-Rs/CD-RWs that are not recorded in This Manual DVD DVD-RAM - Playable Discs Quick... Guide to Disc Types Disc Type DVD VIDEO Disc Logo Icon Used in music CD or Video CD format, or do not contain MP3 audio ...
Operating Instructions
Page 30
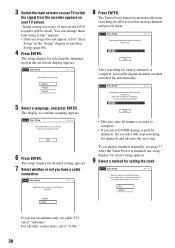
... necessary to operate the DVD recorder will look for receivable Analog channels. No Disc Easy Setup Press [ENTER] to confirm scanning appears. The Tuner Preset function automatically starts searching for setting the clock. After the Tuner Preset is complete, receivable...Manual Antenna Cable If you press ENTER during search for channels, the recorder will receive channels. 8 Press ENTER. No Disc Easy Setup Select the screen language. Start 6 Press ENTER. Please wait. Allow 40+ minutes for receivable Digital channels. No Disc Easy Setup Select the way in the on your TV...
... necessary to operate the DVD recorder will look for receivable Analog channels. No Disc Easy Setup Press [ENTER] to confirm scanning appears. The Tuner Preset function automatically starts searching for setting the clock. After the Tuner Preset is complete, receivable...Manual Antenna Cable If you press ENTER during search for channels, the recorder will receive channels. 8 Press ENTER. No Disc Easy Setup Select the screen language. Start 6 Press ENTER. Please wait. Allow 40+ minutes for receivable Digital channels. No Disc Easy Setup Select the way in the on your TV...

Operating Instructions
Page 31
... ENTER when "Finish" appears. All connections and setup operations are complete. Note To record TV programs using the timer, you want to send a DTS signal to your amplifier (receiver), and press ENTER. The recorder will automatically search for selecting the picture size of the screen. For details, see ...type of the week is finished. Hookups and Settings 10 Select "Manual," and press ENTER. Set the day, year, hour, minutes, and AM/PM in the "Setup" display (page 88). "4:3 Pan Scan": For standard TVs. If your TV type. The setup display for a channel that carries a time ...
... ENTER when "Finish" appears. All connections and setup operations are complete. Note To record TV programs using the timer, you want to send a DTS signal to your amplifier (receiver), and press ENTER. The recorder will automatically search for selecting the picture size of the screen. For details, see ...type of the week is finished. Hookups and Settings 10 Select "Manual," and press ENTER. Set the day, year, hour, minutes, and AM/PM in the "Setup" display (page 88). "4:3 Pan Scan": For standard TVs. If your TV type. The setup display for a channel that carries a time ...
Operating Instructions
Page 32
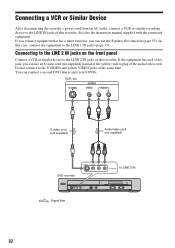
... Signal flow 32 You can use an S video cord (not supplied) instead of the yellow (video) plug of the audio/video cord. In this recorder. Do not connect to LINE 2 IN DVD recorder S VIDEO VIDEO L(MONO) AUDIO R LINE-2 IN DV IN ONE-TOUCH DUBBING - Connecting a VCR or Similar Device After disconnecting the... to the LINE 2 IN jacks of this case, connect the equipment to the LINE 1 IN jacks (page 33). See also the instruction manual supplied with the connected equipment. If the equipment has an S video jack, you can connect a second DVD player and record DVDs.
... Signal flow 32 You can use an S video cord (not supplied) instead of the yellow (video) plug of the audio/video cord. In this recorder. Do not connect to LINE 2 IN DVD recorder S VIDEO VIDEO L(MONO) AUDIO R LINE-2 IN DV IN ONE-TOUCH DUBBING - Connecting a VCR or Similar Device After disconnecting the... to the LINE 2 IN jacks of this case, connect the equipment to the LINE 1 IN jacks (page 33). See also the instruction manual supplied with the connected equipment. If the equipment has an S video jack, you can connect a second DVD player and record DVDs.
Operating Instructions
Page 71
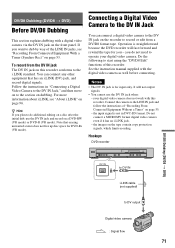
... and follow the instructions of the LINE IN jacks, see "About i.LINK" on dubbing. Connect the camera to the section on page 96. Hookups DVD recorder S VIDEO VIDEO L(MONO) AUDIO R LINE-2 IN DV IN ONE-TOUCH DUBBING - For more information about i.LINK, see...the input signal is straightforward because the DVD recorder will not output signals. • You cannot use the DV IN jack and record on page 55. - Notes • The DV IN jack is for you want to the i.LINK standard. your digital video camera. See the instruction manual supplied with a digital video camera via...
... and follow the instructions of the LINE IN jacks, see "About i.LINK" on dubbing. Connect the camera to the section on page 96. Hookups DVD recorder S VIDEO VIDEO L(MONO) AUDIO R LINE-2 IN DV IN ONE-TOUCH DUBBING - For more information about i.LINK, see...the input signal is straightforward because the DVD recorder will not output signals. • You cannot use the DV IN jack and record on page 55. - Notes • The DV IN jack is for you want to the i.LINK standard. your digital video camera. See the instruction manual supplied with a digital video camera via...
Operating Instructions
Page 76
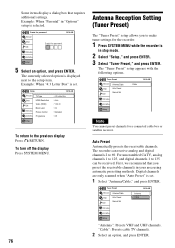
...": Presets cable TV channels. 2 Select an option, and press ENTER. Create the password Title List 10:10 AM Timer Edit Create the password. Tuner Preset Title List Timer Edit Antenna/Cable Auto Preset Manual Set DV/D8 Dubbing Disc Setting Setup : Cable 10:10 AM Note You cannot preset channels for the recorder. 1 Press...
...": Presets cable TV channels. 2 Select an option, and press ENTER. Create the password Title List 10:10 AM Timer Edit Create the password. Tuner Preset Title List Timer Edit Antenna/Cable Auto Preset Manual Set DV/D8 Dubbing Disc Setting Setup : Cable 10:10 AM Note You cannot preset channels for the recorder. 1 Press...
Operating Instructions
Page 77
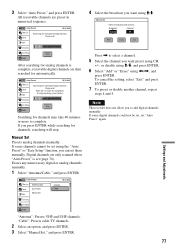
...DV/D8 Dubbing Disc Setting Stop Setup After searching for channels, searching will stop searching, press [Enter]. Tuner Preset Title List Timer Edit Antenna/Cable Auto Preset Manual Set DV/D8 Dubbing Disc Setting Setup 10:10 AM : AntAenntneanna Cable "Antenna": Presets VHF and UHF... channels. "Cable": Presets cable TV channels. 2 Select an option, and press ENTER. 3 Select "Manual Set," and press ENTER. 4 Select the broadcast you press ENTER while searching for analog channels is set them manually. Digital channels are only scanned when "Auto Preset" ...
...DV/D8 Dubbing Disc Setting Stop Setup After searching for channels, searching will stop searching, press [Enter]. Tuner Preset Title List Timer Edit Antenna/Cable Auto Preset Manual Set DV/D8 Dubbing Disc Setting Setup 10:10 AM : AntAenntneanna Cable "Antenna": Presets VHF and UHF... channels. "Cable": Presets cable TV channels. 2 Select an option, and press ENTER. 3 Select "Manual Set," and press ENTER. 4 Select the broadcast you press ENTER while searching for analog channels is set them manually. Digital channels are only scanned when "Auto Preset" ...
Operating Instructions
Page 78
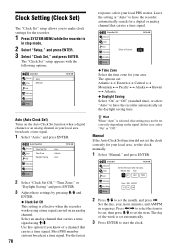
...◆ Clock Set CH This setting is selected, this setting may not be set the month, and press ,. z Hint When "Auto" is effective when the recorder works using M/m. Clock Setting (Clock Set) The "Clock Set" setup allows you know of a channel that carries a time signal. The "Clock Set" setup ... at "Auto" to make clock settings for a digital or analog channel that carries a time signal. In this option if you to have the recorder automatically set the clock manually. 1 Select "Manual," and press ENTER. Clock Set 10:10 AM Title List Timer Edit Set the time and date...
...◆ Clock Set CH This setting is selected, this setting may not be set the month, and press ,. z Hint When "Auto" is effective when the recorder works using M/m. Clock Setting (Clock Set) The "Clock Set" setup allows you know of a channel that carries a time signal. The "Clock Set" setup ... at "Auto" to make clock settings for a digital or analog channel that carries a time signal. In this option if you to have the recorder automatically set the clock manually. 1 Select "Manual," and press ENTER. Clock Set 10:10 AM Title List Timer Edit Set the time and date...
Operating Instructions
Page 79
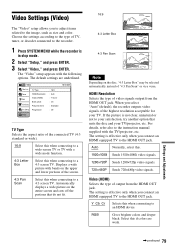
... while the recorder is in stop mode. 2 Select "Setup," and press ENTER. 3 Select "Video," and press ENTER. For details, refer also to the instruction manual supplied with a wide mode function. 4:3 Letter Box Select this when connecting to a wide-screen TV or TV with the TV/projector, etc. Select this when connecting to a 4:3 screen TV. Settings and...
... while the recorder is in stop mode. 2 Select "Setup," and press ENTER. 3 Select "Video," and press ENTER. For details, refer also to the instruction manual supplied with a wide mode function. 4:3 Letter Box Select this when connecting to a wide-screen TV or TV with the TV/projector, etc. Select this when connecting to a 4:3 screen TV. Settings and...
Operating Instructions
Page 89
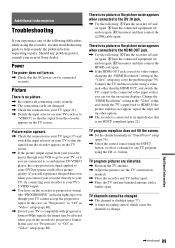
... appears. , Check the connection to your TV (page 17) and switch the input selector on your TV so that the signal from the recorder appears on the TV screen. , If the picture output signal from the recorder appears on your nearest Sony dealer. If you still experience this case...again. Additional Information ,continued 89 TV program reception does not fill the screen. , Set the channel manually in "Tuner Preset" setup (page 76). , Select the correct source using the INPUT button, or select a channel of the following difficulties while using the recorder, use this case, set "...
... appears. , Check the connection to your TV (page 17) and switch the input selector on your TV so that the signal from the recorder appears on the TV screen. , If the picture output signal from the recorder appears on your nearest Sony dealer. If you still experience this case...again. Additional Information ,continued 89 TV program reception does not fill the screen. , Set the channel manually in "Tuner Preset" setup (page 76). , Select the correct source using the INPUT button, or select a channel of the following difficulties while using the recorder, use this case, set "...

Operating Instructions
Page 91
... stops automatically. , If the disc has an auto pause signal, the recorder stops playback at the auto pause signal. See the instruction manual supplied with the disc. , While the recorder is selected (page 43). Recording does not start immediately after "LOAD," "FORMAT," or "INF WRITE" disappears...or width of the language for the titles recorded on the disc, you are not recorded on the DVD VIDEO. , The DVD VIDEO prohibits changing of the subtitles. , Try changing the subtitle using the DVD VIDEO's menu. , The angles cannot be able to "TV." The MP3 audio track cannot be changed ...
... stops automatically. , If the disc has an auto pause signal, the recorder stops playback at the auto pause signal. See the instruction manual supplied with the disc. , While the recorder is selected (page 43). Recording does not start immediately after "LOAD," "FORMAT," or "INF WRITE" disappears...or width of the language for the titles recorded on the disc, you are not recorded on the DVD VIDEO. , The DVD VIDEO prohibits changing of the subtitles. , Try changing the subtitle using the DVD VIDEO's menu. , The angles cannot be able to "TV." The MP3 audio track cannot be changed ...

Operating Instructions
Page 96
... Mbps) S400 (approx. 400 Mbps) The baud rate is a trademark approved by the i.LINK cable (DV connecting cable). When connecting this recorder to i.LINKcompatible equipment having a different maximum baud rate, the baud rate sometimes differs from equipment such as this unit is "S100." About i.LINK... listed under "Specifications" in one piece of equipment can be connected to be sent in the instruction manual of equipment can be connected. Required i.LINK cable Use the Sony i.LINK 4-pin-to-4-pin cable (during DV/D8 dubbing). i.LINK-compatible pieces of each equipment. ...
... Mbps) S400 (approx. 400 Mbps) The baud rate is a trademark approved by the i.LINK cable (DV connecting cable). When connecting this recorder to i.LINKcompatible equipment having a different maximum baud rate, the baud rate sometimes differs from equipment such as this unit is "S100." About i.LINK... listed under "Specifications" in one piece of equipment can be connected to be sent in the instruction manual of equipment can be connected. Required i.LINK cable Use the Sony i.LINK 4-pin-to-4-pin cable (during DV/D8 dubbing). i.LINK-compatible pieces of each equipment. ...
Operating Instructions
Page 103
... 28, 88 COMPONENT VIDEO OUT 23 Connecting the antenna cable 17 to your AV/amplifier (receiver) 24 to your TV 21 Controlling TVs with the remote 27 "Copy" 67 Copy protection 48, 100 Copy-Free 48 Copy-Never 48 Copy-Once 48..."DV/D8 One Touch Dubbing" 74 "DV/D8 Simple Dubbing" 73 "DVD Auto Chapter" 83 DVD Editing 57 DVD VIDEO 15, 100 DVD+R 12, 100 DVD+R DL 12 DVD+RW 12, 100 DVD-R 12, 100 DVD-RAM 15 DVD-RW 12, 100 E Easy Setup 88 "Edit" 55 "Edit Playlist"... Language abbreviation 102 LINE 1 IN 33 LINE 2 IN 32 "Line Audio Input" 53, 56, 83 M Manual Clock Set 78 "Manual Set" 77 MENU 36 ,continued 103
... 28, 88 COMPONENT VIDEO OUT 23 Connecting the antenna cable 17 to your AV/amplifier (receiver) 24 to your TV 21 Controlling TVs with the remote 27 "Copy" 67 Copy protection 48, 100 Copy-Free 48 Copy-Never 48 Copy-Once 48..."DV/D8 One Touch Dubbing" 74 "DV/D8 Simple Dubbing" 73 "DVD Auto Chapter" 83 DVD Editing 57 DVD VIDEO 15, 100 DVD+R 12, 100 DVD+R DL 12 DVD+RW 12, 100 DVD-R 12, 100 DVD-RAM 15 DVD-RW 12, 100 E Easy Setup 88 "Edit" 55 "Edit Playlist"... Language abbreviation 102 LINE 1 IN 33 LINE 2 IN 32 "Line Audio Input" 53, 56, 83 M Manual Clock Set 78 "Manual Set" 77 MENU 36 ,continued 103