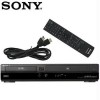
Operating Instructions
Page 6
...VCR Recording 74 Before Recording 74 VCR Recording From Connected Equipment Without the Timer 75 VCR Timer Recording From Connected Equipment 77 Changing or Canceling VCR Timer Settings (Timer List 79 Recording From Connected Equipment With a Timer (Synchro Rec 80 Recording From Another VCR or Similar Device 82 Dubbing (TAPE y DVD... Setting (Clock Set 97 Video Settings (Video 98 Audio Settings (Audio 100 Recording, VCR, Set Top Box, Control for HDMI Settings (Features 102 Language, Parental Control Settings/Factory Settings (Options 104 Easy Setup (Resetting the Recorder 106 6US
...VCR Recording 74 Before Recording 74 VCR Recording From Connected Equipment Without the Timer 75 VCR Timer Recording From Connected Equipment 77 Changing or Canceling VCR Timer Settings (Timer List 79 Recording From Connected Equipment With a Timer (Synchro Rec 80 Recording From Another VCR or Similar Device 82 Dubbing (TAPE y DVD... Setting (Clock Set 97 Video Settings (Video 98 Audio Settings (Audio 100 Recording, VCR, Set Top Box, Control for HDMI Settings (Features 102 Language, Parental Control Settings/Factory Settings (Options 104 Easy Setup (Resetting the Recorder 106 6US
Operating Instructions
Page 60
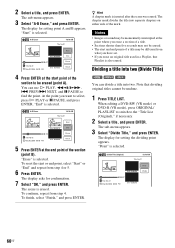
... the "Title List (Original)," if necessary. 2 Select a title, and press ENTER. The display asks for confirmation. 7 Select "OK," and press ENTER. When editing a DVD-RW (VR mode) or DVD-R (VR mode), press ORIGINAL/ PLAYLIST to switch to find the point. A-B Erase 10:10 AM Title No.01 Start 00:00:10 00....01 Start 00:00:00 00:00:07 T Title No. 01 May/02/2008 08:00 PM End 00:00:00 Point Divide 60US To reset the start point of the section (point B). The chapter mark divides the title into two. The sub-menu appears. 3 Select "Divide Title," and press ENTER...
... the "Title List (Original)," if necessary. 2 Select a title, and press ENTER. The display asks for confirmation. 7 Select "OK," and press ENTER. When editing a DVD-RW (VR mode) or DVD-R (VR mode), press ORIGINAL/ PLAYLIST to switch to find the point. A-B Erase 10:10 AM Title No.01 Start 00:00:10 00....01 Start 00:00:00 00:00:07 T Title No. 01 May/02/2008 08:00 PM End 00:00:00 Point Divide 60US To reset the start point of the section (point B). The chapter mark divides the title into two. The sub-menu appears. 3 Select "Divide Title," and press ENTER...
Operating Instructions
Page 61
... End 00:00:10 Point Divide 5 Press ENTER. z Hint If the dividing point is set too close to the beginning of characters is selected. To reset the dividing point, select "No" and press ENTER, then repeat from step 4. 6 Select "Yes," and press ENTER. The "Title Name" display appears.... to finish. 7 Select "Yes," and press ENTER. When the display for confirmation. Since the displayed number of the title, the title cannot be different. DVD TITLE LIST 123 456 789 0 O RETURN ORIGINAL/ PLAYLIST M/m/ To use H PLAY, , . 4 Press ENTER at the point where you want to divide...
... End 00:00:10 Point Divide 5 Press ENTER. z Hint If the dividing point is set too close to the beginning of characters is selected. To reset the dividing point, select "No" and press ENTER, then repeat from step 4. 6 Select "Yes," and press ENTER. The "Title Name" display appears.... to finish. 7 Select "Yes," and press ENTER. When the display for confirmation. Since the displayed number of the title, the title cannot be different. DVD TITLE LIST 123 456 789 0 O RETURN ORIGINAL/ PLAYLIST M/m/ To use H PLAY, , . 4 Press ENTER at the point where you want to divide...

Operating Instructions
Page 63
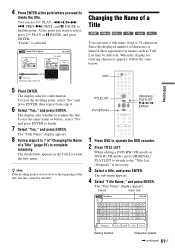
...turn off the display Press SYSTEM MENU. Playing a Playlist title 1 Press TITLE LIST. 2 Press ORIGINAL/PLAYLIST to switch to find the point. To reset the start and end points in a title may be different from step 5. 8 When you want to the previous display Press O RETURN. The sub-...menu appears. 4 Select "Play," and press ENTER. DVD Editing 3 Select "Edit," and press ENTER. PREV/> NEXT, and X PAUSE to the "Playlist" Title List. To continue, repeat from what you have set....
...turn off the display Press SYSTEM MENU. Playing a Playlist title 1 Press TITLE LIST. 2 Press ORIGINAL/PLAYLIST to switch to find the point. To reset the start and end points in a title may be different from step 5. 8 When you want to the previous display Press O RETURN. The sub-...menu appears. 4 Select "Play," and press ENTER. DVD Editing 3 Select "Edit," and press ENTER. PREV/> NEXT, and X PAUSE to the "Playlist" Title List. To continue, repeat from what you have set....
Operating Instructions
Page 68
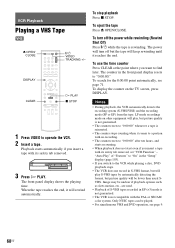
... a portion with no recording. • The counter resets to "0:00:00" after ten hours, and starts recounting. • When playback does not start even if you switch to operate the VCR. 2 Insert a tape. CLEAR H PLAY x STOP 1 Press VIDEO to the VCR while playing a disc, DVD playback stops. • The VCR does not record in EP (×3) mode...
... a portion with no recording. • The counter resets to "0:00:00" after ten hours, and starts recounting. • When playback does not start even if you switch to operate the VCR. 2 Insert a tape. CLEAR H PLAY x STOP 1 Press VIDEO to the VCR while playing a disc, DVD playback stops. • The VCR does not record in EP (×3) mode...

Operating Instructions
Page 71
Searching Using Various Functions The VCR automatically marks the tape with an index signal at the point where each recording begins. You can easily find a specific point using various search functions. Note During DVD recording, you cannot use VCR search functions. 123 456 789 0 H PLAY CLEAR VIDEO M/m/
Searching Using Various Functions The VCR automatically marks the tape with an index signal at the point where each recording begins. You can easily find a specific point using various search functions. Note During DVD recording, you cannot use VCR search functions. 123 456 789 0 H PLAY CLEAR VIDEO M/m/
Operating Instructions
Page 106
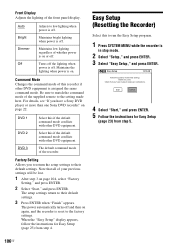
... that all necessary connections. Before you have a Sony DVD player or more than one Sony DVD recorder" on or off . Front Display Adjusts the lighting of the recorder. DVD 1 DVD 2 DVD 3 Select this if the default command mode conflicts with other DVD equipment. The default command mode of the front ... When the "Easy Setup" display appears, follow the instructions for Easy Setup (page 23) from step 4. Easy Setup (Resetting the Recorder) Select this recorder if other DVD equipment is in stop mode. 2 Select "Setup," and press ENTER. 3 Select "Easy Setup," and press ENTER. Start...
... that all necessary connections. Before you have a Sony DVD player or more than one Sony DVD recorder" on or off . Front Display Adjusts the lighting of the recorder. DVD 1 DVD 2 DVD 3 Select this if the default command mode conflicts with other DVD equipment. The default command mode of the front ... When the "Easy Setup" display appears, follow the instructions for Easy Setup (page 23) from step 4. Easy Setup (Resetting the Recorder) Select this recorder if other DVD equipment is in stop mode. 2 Select "Setup," and press ENTER. 3 Select "Easy Setup," and press ENTER. Start...
Operating Instructions
Page 110
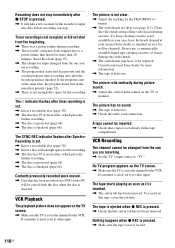
...recorded on a DVD with enough space for the VCR. VCR Playback The playback picture does not appear on the TV screen. , Make sure the TV is finalized (page 66). button. , The video heads are recording. , Set the TV's input source to the channel for the VCR... tracking by the TRACKING +/- If a Sony cleaning cassette is defective. Consult your local Sony dealer for the recorder to video input. VCR Recording The channel cannot be erased from the ...safety tab has been removed. Reset the clock (page 97). , The channel or input changed from the one you are recording. , The program that ...
...recorded on a DVD with enough space for the VCR. VCR Playback The playback picture does not appear on the TV screen. , Make sure the TV is finalized (page 66). button. , The video heads are recording. , Set the TV's input source to the channel for the VCR... tracking by the TRACKING +/- If a Sony cleaning cassette is defective. Consult your local Sony dealer for the recorder to video input. VCR Recording The channel cannot be erased from the ...safety tab has been removed. Reset the clock (page 97). , The channel or input changed from the one you are recording. , The program that ...
Operating Instructions
Page 111
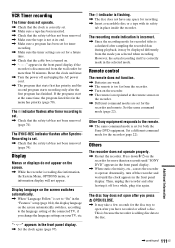
VCR Timer recording The timer does not operate. , Check that the clock is correctly set. , Make sure a tape has been inserted. , Check that the safety tab has not been removed. , Make sure the tape is not at its safety tab in place inside the recorder. The SYNC-REC indicator flashes...same time, the program listed first in again. Display Menus or displays do not appear on the recorder for both the Sony DVD equipment. Reset the clock and timer. , Turn the power off the recorder and wait until "SONY DVD" appears in the front panel display. , Set the clock again (page 97). Set a different...
VCR Timer recording The timer does not operate. , Check that the clock is correctly set. , Make sure a tape has been inserted. , Check that the safety tab has not been removed. , Make sure the tape is not at its safety tab in place inside the recorder. The SYNC-REC indicator flashes...same time, the program listed first in again. Display Menus or displays do not appear on the recorder for both the Sony DVD equipment. Reset the clock and timer. , Turn the power off the recorder and wait until "SONY DVD" appears in the front panel display. , Set the clock again (page 97). Set a different...
Operating Instructions
Page 127
...REC MODE 49 Recording 47, 74 recordable discs 30 recording format 30 recording mode 47 tape speed 74 Recording mode 47, 74 Recording time 47, 50 Region code 33 Remaining time 40, 76 Remote 21, 117 REPLAY 35, 70 Resetting 106 Resume Play...68, 75 Sub-menu 11 SUBTITLE 35 "Subtitle" 104 "Surround" 101 SYNCHRO REC 55, 81 "Synchro Recording" 55, 80, 103 System Menu 10 T "Tape Length" 103 Tape speed 74 TIME/TEXT 41, 72 TIMER ...TV Type" 98 U "Unfinalize" 67 Unrecordable pictures 48 "USB Dubbing" 91 V "VCR Function" 103 "Video (HDMI)" 98 VIDEO CD 32 Video mode 30 Video settings 98 VR mode 30 Z Zoom 43...
...REC MODE 49 Recording 47, 74 recordable discs 30 recording format 30 recording mode 47 tape speed 74 Recording mode 47, 74 Recording time 47, 50 Region code 33 Remaining time 40, 76 Remote 21, 117 REPLAY 35, 70 Resetting 106 Resume Play...68, 75 Sub-menu 11 SUBTITLE 35 "Subtitle" 104 "Surround" 101 SYNCHRO REC 55, 81 "Synchro Recording" 55, 80, 103 System Menu 10 T "Tape Length" 103 Tape speed 74 TIME/TEXT 41, 72 TIMER ...TV Type" 98 U "Unfinalize" 67 Unrecordable pictures 48 "USB Dubbing" 91 V "VCR Function" 103 "Video (HDMI)" 98 VIDEO CD 32 Video mode 30 Video settings 98 VR mode 30 Z Zoom 43...
