Operating Instructions
Page 10
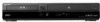
SYSTEM MENU 123 456 789 0 O RETURN M/m/ How to Use the On-Screen Menus The following three displays are mainly used to use. Once you become familiar with the basic operations, you will find the recorder easy to operate this recorder.
SYSTEM MENU 123 456 789 0 O RETURN M/m/ How to Use the On-Screen Menus The following three displays are mainly used to use. Once you become familiar with the basic operations, you will find the recorder easy to operate this recorder.
Operating Instructions
Page 21
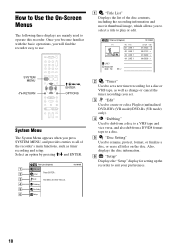
... your TV TV CH +/- When using the supplied remote. Do not touch the liquid with bare hands should last about three to operate your Sony TV. Adjust the volume of different manufacturers. - Select the channel on your TV TV INPUT Switch your TV's input source TV DIGITAL/ ANALOG...properly. Insert two size AA (R6) batteries by matching the 3 and # ends on the batteries to the markings inside the battery compartment, and insert new batteries. • Do not expose the remote sensor (marked on the recorder. Hookups and Settings Step 6: Preparing the Remote You can use , the ...
... your TV TV CH +/- When using the supplied remote. Do not touch the liquid with bare hands should last about three to operate your Sony TV. Adjust the volume of different manufacturers. - Select the channel on your TV TV INPUT Switch your TV's input source TV DIGITAL/ ANALOG...properly. Insert two size AA (R6) batteries by matching the 3 and # ends on the batteries to the markings inside the battery compartment, and insert new batteries. • Do not expose the remote sensor (marked on the recorder. Hookups and Settings Step 6: Preparing the Remote You can use , the ...
Operating Instructions
Page 30
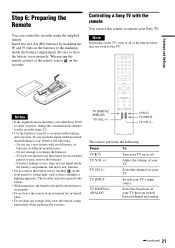
Quick Guide to Disc Types Recordable and Playable Discs Disc Type Disc Logo Icon used in this manual Formatting (new discs) Compatibility with other DVD players (finalizing) DVD+RW DVDRW VR mode Video mode +RW -RWVR -RWVideo Automatically formatted Playable on ... on most DVD players (finalization necessary) (page 88) DVD+R DVD+R DL Automatically +R formatted Playable on DVD+R compatible players (finalization necessary) (page 88) DVDR VR mode Video mode -RVR -RVideo Format in VR mode Playable only on DVD-R VR using the "Disc Setting" mode compatible players display (page 67...
Quick Guide to Disc Types Recordable and Playable Discs Disc Type Disc Logo Icon used in this manual Formatting (new discs) Compatibility with other DVD players (finalizing) DVD+RW DVDRW VR mode Video mode +RW -RWVR -RWVideo Automatically formatted Playable on ... on most DVD players (finalization necessary) (page 88) DVD+R DVD+R DL Automatically +R formatted Playable on DVD+R compatible players (finalization necessary) (page 88) DVDR VR mode Video mode -RVR -RVideo Format in VR mode Playable only on DVD-R VR using the "Disc Setting" mode compatible players display (page 67...
Operating Instructions
Page 34
...the disc is not playable. If you try to play if it has not been correctly finalized. RDR-VX525 NO. Region code (DVD VIDEO only) Your recorder has a region code printed on the same DVD... that a disc's contents will not play any other equipment Some DVD+RWs/DVD+Rs, DVD-RWs/DVDRs, or CD-RWs/CD-Rs cannot be played on this recorder due to rewrite the DVD menu. ... the operating instructions for recording even with "For Video" printed on their packaging. • You cannot add new recordings to DVD-RWs (Video mode), DVD+Rs, or DVD-Rs (Video mode) recorded on other equipment....
...the disc is not playable. If you try to play if it has not been correctly finalized. RDR-VX525 NO. Region code (DVD VIDEO only) Your recorder has a region code printed on the same DVD... that a disc's contents will not play any other equipment Some DVD+RWs/DVD+Rs, DVD-RWs/DVDRs, or CD-RWs/CD-Rs cannot be played on this recorder due to rewrite the DVD menu. ... the operating instructions for recording even with "For Video" printed on their packaging. • You cannot add new recordings to DVD-RWs (Video mode), DVD+Rs, or DVD-Rs (Video mode) recorded on other equipment....

Operating Instructions
Page 47
...box/satellite receiver. Recording stops when a copy guard signal is detected. To format in VR mode, change the recording format on used DVDRs. • The recorder records on DVD-RWs by pressing the AUDIO button. DVD Recording DVD Recording From Connected Equipment Without the Timer ... in the Setup Display (page 100). INPUT DISPLAY z REC H PLAY x STOP X PAUSE REC MODE 1 Turn on the disc tray. Formatting a new disc New, unformatted discs are automatically formatted when first inserted in "Audio" setup to operate the DVD recorder. 3 Press Z OPEN/CLOSE, and place a recordable...
...box/satellite receiver. Recording stops when a copy guard signal is detected. To format in VR mode, change the recording format on used DVDRs. • The recorder records on DVD-RWs by pressing the AUDIO button. DVD Recording DVD Recording From Connected Equipment Without the Timer ... in the Setup Display (page 100). INPUT DISPLAY z REC H PLAY x STOP X PAUSE REC MODE 1 Turn on the disc tray. Formatting a new disc New, unformatted discs are automatically formatted when first inserted in "Audio" setup to operate the DVD recorder. 3 Press Z OPEN/CLOSE, and place a recordable...

Operating Instructions
Page 50
For the DVD-RW/DVD-R's recording format (VR mode or Video mode), see "Formatting a new disc" on page 47. 4 Press TIMER. Unused discs are automatically formatted. Wait until "LOAD" disappears from the front panel display. Timer - PM L-in--e-1 -S--P 04 --- --/-- --:-- --:-- ---- --- 05 --- --/-- --:-- --:-- ---- --- ...
For the DVD-RW/DVD-R's recording format (VR mode or Video mode), see "Formatting a new disc" on page 47. 4 Press TIMER. Unused discs are automatically formatted. Wait until "LOAD" disappears from the front panel display. Timer - PM L-in--e-1 -S--P 04 --- --/-- --:-- --:-- ---- --- 05 --- --/-- --:-- --:-- ---- --- ...

Operating Instructions
Page 60
"Divide" is limited, their appearance in the Title List with the new name. To use H PLAY, , ./>, x STOP, and X PAUSE to find the point. The divided title appears in menus such as before, select "No" and press ENTER ...
"Divide" is limited, their appearance in the Title List with the new name. To use H PLAY, , ./>, x STOP, and X PAUSE to find the point. The divided title appears in menus such as before, select "No" and press ENTER ...
Operating Instructions
Page 64
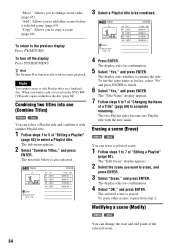
... use the same name as before a selected scene (page 65). Erasing a scene (Erase) -RWVR -RVR You can select a Playlist title and combine it with the new name. "Move": Allows you to copy a scene (page 66). To turn off the display Press SYSTEM MENU. Combining two titles into one Playlist title with...
... use the same name as before a selected scene (page 65). Erasing a scene (Erase) -RWVR -RVR You can select a Playlist title and combine it with the new name. "Move": Allows you to copy a scene (page 66). To turn off the display Press SYSTEM MENU. Combining two titles into one Playlist title with...

Operating Instructions
Page 65
... No.02 / 03 01 00:00:34 02 00:00:10 03 Playlist No.01 Check Erase 00:04:20 Modify Move Add Copy 4 Select a new location using "End" is captured as a scene. The re-selected section is selected. "Start" is selected. "Change" is selected.
... No.02 / 03 01 00:00:34 02 00:00:10 03 Playlist No.01 Check Erase 00:04:20 Modify Move Add Copy 4 Select a new location using "End" is captured as a scene. The re-selected section is selected. "Start" is selected. "Change" is selected.
Operating Instructions
Page 68
... cannot mix VR mode and Video mode on the same DVD-RW or DVD-R. • You cannot change the recording format on used DVDRs. • The recorder records on new DVD-Rs in VR mode (page 47). 68 however, the name may not display on DVD-RWs (Video mode) that have been...
... cannot mix VR mode and Video mode on the same DVD-RW or DVD-R. • You cannot change the recording format on used DVDRs. • The recorder records on new DVD-Rs in VR mode (page 47). 68 however, the name may not display on DVD-RWs (Video mode) that have been...
Operating Instructions
Page 91
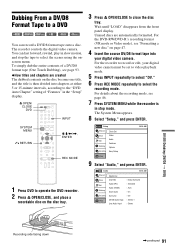
Z OPEN/ CLOSE DVD SYSTEM MENU 123 456 789 0 O RETURN INPUT M/m/ Dubbing From a DV/D8 Format Tape to select the scenes using the onscreen menu. The recorder controls the digital video camera. To simply dub the entire contents of a DV/D8 format tape (One Touch Dubbing), see page 93. ◆How titles and chapters are created The dubbed contents on the disc become one title, and the title is then divided into chapters at either 5 or 15-minute intervals, according to the "DVD Auto Chapter" setting of "Features" in slow motion, and stop the tape to a DVD +RW -RWVR -RWVideo +R -RVR ...
Z OPEN/ CLOSE DVD SYSTEM MENU 123 456 789 0 O RETURN INPUT M/m/ Dubbing From a DV/D8 Format Tape to select the scenes using the onscreen menu. The recorder controls the digital video camera. To simply dub the entire contents of a DV/D8 format tape (One Touch Dubbing), see page 93. ◆How titles and chapters are created The dubbed contents on the disc become one title, and the title is then divided into chapters at either 5 or 15-minute intervals, according to the "DVD Auto Chapter" setting of "Features" in slow motion, and stop the tape to a DVD +RW -RWVR -RWVideo +R -RVR ...
Operating Instructions
Page 103
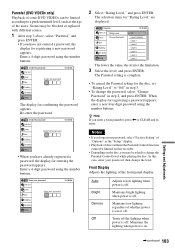
...for "Rating Level" are displayed. Maintains low lighting regardless of whether power is complete. • To cancel the Parental setting for registering a new password appears. Enter a 4-digit password using the number buttons. The Parental setting is on this case, enter your password, then change the... disc. Maintains the lighting when power is off . Dubbing Disc Setting Setup The display for registering a password appears, enter a new four-digit password using the number buttons. Create the password Title List 10:10 AM Timer Edit Confirm the password. Enter your ...
...for "Rating Level" are displayed. Maintains low lighting regardless of whether power is complete. • To cancel the Parental setting for registering a new password appears. Enter a 4-digit password using the number buttons. The Parental setting is on this case, enter your password, then change the... disc. Maintains the lighting when power is off . Dubbing Disc Setting Setup The display for registering a password appears, enter a new four-digit password using the number buttons. Create the password Title List 10:10 AM Timer Edit Confirm the password. Enter your ...


