Operating Instructions
Page 7
... Adjustments 71 Antenna Reception and Language Settings (Basic 71 Tuner Preset 71 Clock 72 OSD (On-Screen Display 73 Video Settings (Video 74 Audio Settings (Audio 76 Recording Settings (Recording 78 Disc Settings (DVD 79 Remote Control Settings/Factory Settings (Others 81 Easy Setup (Resetting the Recorder 82 Additional Information 83 Troubleshooting 83 Self-diagnosis Function...
... Adjustments 71 Antenna Reception and Language Settings (Basic 71 Tuner Preset 71 Clock 72 OSD (On-Screen Display 73 Video Settings (Video 74 Audio Settings (Audio 76 Recording Settings (Recording 78 Disc Settings (DVD 79 Remote Control Settings/Factory Settings (Others 81 Easy Setup (Resetting the Recorder 82 Additional Information 83 Troubleshooting 83 Self-diagnosis Function...
Operating Instructions
Page 20
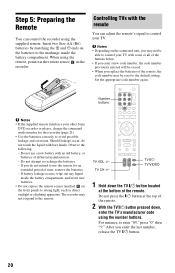
... new battery with some or all of the buttons below. • If you enter a new code number, the code number previously entered will be reset to enter "09," press "0" then "9." Should leakage occur, do not intend to strong light, such as direct sunlight or a lighting apparatus. Do..., to the default setting. When using the remote, point it at the bottom of different manufacturers. - Controlling TVs with bare hands. Observe the following: - Do not attempt to control your other Sony DVD recorder or player, change the command mode number for an extended period of the remote. 2 With the...
... new battery with some or all of the buttons below. • If you enter a new code number, the code number previously entered will be reset to enter "09," press "0" then "9." Should leakage occur, do not intend to strong light, such as direct sunlight or a lighting apparatus. Do..., to the default setting. When using the remote, point it at the bottom of different manufacturers. - Controlling TVs with bare hands. Observe the following: - Do not attempt to control your other Sony DVD recorder or player, change the command mode number for an extended period of the remote. 2 With the...

Operating Instructions
Page 47
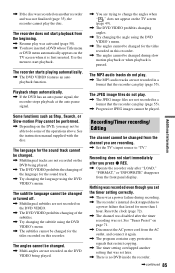
... connected equipment. Connect the equipment to select the recording mode. The SYNCHRO REC indicator lights up on , the recorder starts recording a program from the LINE 1 IN jacks. 1 Insert a recordable DVD. For details, see page 39. 4 Set the...recorder's clock correctly. ,continued 47 The recorder is on the recorder turns off . • During Synchro-Recording, other operations, such as a satellite tuner). See "1. The recorder stops recording when the connected equipment turns off the connected equipment and press c z SYNCHRO REC to reset Synchro-Recording before the timer recording...
... connected equipment. Connect the equipment to select the recording mode. The SYNCHRO REC indicator lights up on , the recorder starts recording a program from the LINE 1 IN jacks. 1 Insert a recordable DVD. For details, see page 39. 4 Set the...recorder's clock correctly. ,continued 47 The recorder is on the recorder turns off . • During Synchro-Recording, other operations, such as a satellite tuner). See "1. The recorder stops recording when the connected equipment turns off the connected equipment and press c z SYNCHRO REC to reset Synchro-Recording before the timer recording...

Operating Instructions
Page 60
Note that appears in VR mode, press For DVD-RWs/DVD-Rs in the Title List (page 30). CHAPTER MARK O RETURN . Erasing and Editing a Title +RW -RWVR -RWVideo +R -RVideo -RVR This section explains the basic edit ... titles at one scene (page 64). "Set Thumbnail": Changes the title's thumbnail picture that editing is irreversible. z Hints • You can label or re-label DVDs (page 34). b Note DVD-RW/DVD-R (VR mode) playlist titles cannot be protected. PREV mc CHAPTER MARK ERASE TITLE LIST CM X PAUSE 1 Press TITLE LIST. To edit...
Note that appears in VR mode, press For DVD-RWs/DVD-Rs in the Title List (page 30). CHAPTER MARK O RETURN . Erasing and Editing a Title +RW -RWVR -RWVideo +R -RVideo -RVR This section explains the basic edit ... titles at one scene (page 64). "Set Thumbnail": Changes the title's thumbnail picture that editing is irreversible. z Hints • You can label or re-label DVDs (page 34). b Note DVD-RW/DVD-R (VR mode) playlist titles cannot be protected. PREV mc CHAPTER MARK ERASE TITLE LIST CM X PAUSE 1 Press TITLE LIST. To edit...

Operating Instructions
Page 61
...section of "Erasing and Editing a Title," select "A-B Erase" and press ENTER. See "8. The titles are erased. The display asks for confirmation. • To reset point A, press M and O RETURN, and go to be undone. 1 After step 2 of a title. • Sections shorter than five seconds may not ...be erased. • For DVD+RWs, the erased section may be erased appears for setting point A appears. • To continue, go to step 2. • To reset point B, press M and repeat step 4. • To preview the title without scenes ...
...section of "Erasing and Editing a Title," select "A-B Erase" and press ENTER. See "8. The titles are erased. The display asks for confirmation. • To reset point A, press M and O RETURN, and go to be undone. 1 After step 2 of a title. • Sections shorter than five seconds may not ...be erased. • For DVD+RWs, the erased section may be erased appears for setting point A appears. • To continue, go to step 2. • To reset point B, press M and repeat step 4. • To preview the title without scenes ...

Operating Instructions
Page 64
The selected title is the same as one scene (Make a Playlist) 1 Press TITLE LIST. To add the entire title to the Title List (Playlist). If the Title List (Playlist) appears, press ,. 2 Select the title and press ENTER. The sub-menu appears. 3 Select "Make a Playlist," and press ENTER. If the Title List (Original) appears, press The title name is added to the Playlist title as the Original title name. To play the Playlist title 1 Press TITLE LIST.
The selected title is the same as one scene (Make a Playlist) 1 Press TITLE LIST. To add the entire title to the Title List (Playlist). If the Title List (Playlist) appears, press ,. 2 Select the title and press ENTER. The sub-menu appears. 3 Select "Make a Playlist," and press ENTER. If the Title List (Original) appears, press The title name is added to the Playlist title as the Original title name. To play the Playlist title 1 Press TITLE LIST.

Operating Instructions
Page 80
...Factory Setup" in "DVD Menu," "Subtitle," or "Audio" that is selected. z Hint If you may be limited on this case, enter your password, you will have the Parental Control function, playback cannot be asked to reset it by selecting "Parental Control" of the subtitles recorded on the disc, you... VR mode. When you play discs which do not have to change the Parental Control level while playing the disc. Format DVD-RW (DVD-RW only) The recorder automatically starts formatting in Video mode. Video Automatically formats the disc in VR mode or Video mode, whichever is selected below,...
...Factory Setup" in "DVD Menu," "Subtitle," or "Audio" that is selected. z Hint If you may be limited on this case, enter your password, you will have the Parental Control function, playback cannot be asked to reset it by selecting "Parental Control" of the subtitles recorded on the disc, you... VR mode. When you play discs which do not have to change the Parental Control level while playing the disc. Format DVD-RW (DVD-RW only) The recorder automatically starts formatting in Video mode. Video Automatically formats the disc in VR mode or Video mode, whichever is selected below,...

Operating Instructions
Page 82
Easy Setup (Resetting the Recorder) Select this to run the "Easy Setup" program. 1 Press SYSTEM MENU while the recorder is in stop mode. 2 Select "SETUP," and press ENTER. 3 Select "Easy Setup," and press ENTER. 4 Select "Start." 5 Follow the instructions for "Easy Setup" (page 23) from step 2. 82
Easy Setup (Resetting the Recorder) Select this to run the "Easy Setup" program. 1 Press SYSTEM MENU while the recorder is in stop mode. 2 Select "SETUP," and press ENTER. 3 Select "Easy Setup," and press ENTER. 4 Select "Start." 5 Follow the instructions for "Easy Setup" (page 23) from step 2. 82
Operating Instructions
Page 85
... from the AC outlet, and connect it is paused. Reset the clock (page 72). , The channel was disabled after the timer recording was activated (page 50). , You have inserted a DVD whose Title menu or DVD menu automatically appears on the TV screen when it again. , The program contains copy protection...Use the menu to a power failure that lasted for the sound track. , Try changing the language using the DVD VIDEO's menu. , The subtitles cannot be changed for the titles recorded on this recorder. See "Tuner Preset" on page 71. , Disconnect the AC power cord from the front panel display...
... from the AC outlet, and connect it is paused. Reset the clock (page 72). , The channel was disabled after the timer recording was activated (page 50). , You have inserted a DVD whose Title menu or DVD menu automatically appears on the TV screen when it again. , The program contains copy protection...Use the menu to a power failure that lasted for the sound track. , Try changing the language using the DVD VIDEO's menu. , The subtitles cannot be changed for the titles recorded on this recorder. See "Tuner Preset" on page 71. , Disconnect the AC power cord from the front panel display...

Operating Instructions
Page 86
... in the "Others" setup is set to have enough space. , Insert a recordable disc inside the recorder. , The inserted DVD is connected to a power failure that lasted for more than 1 hour, reset the clock (page 72). , Disc space was activated. The clock does not appear in the process of the connected ...Set the clock again (page 72). , The clock stopped due to the TV output jack of DV/ Digital8 Dubbing. The TIMER REC indicator is turned off the satellite receiver and cancel the Synchro-Rec function (page 47). Recording does not stop . Make sure the SYNCHRO REC indicator lights up on . ...
... in the "Others" setup is set to have enough space. , Insert a recordable disc inside the recorder. , The inserted DVD is connected to a power failure that lasted for more than 1 hour, reset the clock (page 72). , Disc space was activated. The clock does not appear in the process of the connected ...Set the clock again (page 72). , The clock stopped due to the TV output jack of DV/ Digital8 Dubbing. The TIMER REC indicator is turned off the satellite receiver and cancel the Synchro-Rec function (page 47). Recording does not stop . Make sure the SYNCHRO REC indicator lights up on . ...

Operating Instructions
Page 87
... you replaced the batteries. The disc tray does not open after you have recorded or edited a DVD. The disc tray does not open and you cannot remove the disc after ...Contact your Sony dealer or local authorized Sony service facility. Once the clock appears in the front panel display, disconnect the AC power cord. (If the recorder does not turn off the recorder and ... recorder is adding disc data to check the current command mode. Leave the recorder on the recorder. Then, immediately disconnect the AC power cord. The default command mode setting for the recorder and remote. Reset ...
... you replaced the batteries. The disc tray does not open after you have recorded or edited a DVD. The disc tray does not open and you cannot remove the disc after ...Contact your Sony dealer or local authorized Sony service facility. Once the clock appears in the front panel display, disconnect the AC power cord. (If the recorder does not turn off the recorder and ... recorder is adding disc data to check the current command mode. Leave the recorder on the recorder. Then, immediately disconnect the AC power cord. The default command mode setting for the recorder and remote. Reset ...

Operating Instructions
Page 98
... STOP 28, 68 "Rec Video Equalizer" 43 Recordable discs 8 "Recording" 78 Recording 39 picture adjustment 42 recording format 8 recording mode 28, 39 recording time 28, 39 while watching another program 28 Recording time 39 Region code 11 Remaining time 31 Remote 20, 92 Resetting the recorder 82 Resume Play 50 S S VIDEO 16 SAP... 30 "Title Name" 60 Title number 31 "Title Search" 54 TOP MENU 49 "Track Search" 54 Troubleshooting 83 "Tuner Audio" 76 "Tuner Preset" 71 Tuner Preset 23 "TV Type" 23, 74 TV/VIDEO 20, 28 U "Unfinalize" 37 Unfinalizing 37 Usable discs 8, 10 V "Video" 74 VIDEO CD 10 Video...
... STOP 28, 68 "Rec Video Equalizer" 43 Recordable discs 8 "Recording" 78 Recording 39 picture adjustment 42 recording format 8 recording mode 28, 39 recording time 28, 39 while watching another program 28 Recording time 39 Region code 11 Remaining time 31 Remote 20, 92 Resetting the recorder 82 Resume Play 50 S S VIDEO 16 SAP... 30 "Title Name" 60 Title number 31 "Title Search" 54 TOP MENU 49 "Track Search" 54 Troubleshooting 83 "Tuner Audio" 76 "Tuner Preset" 71 Tuner Preset 23 "TV Type" 23, 74 TV/VIDEO 20, 28 U "Unfinalize" 37 Unfinalizing 37 Usable discs 8, 10 V "Video" 74 VIDEO CD 10 Video...
