Operating Instructions
Page 4
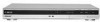
...8226; In this manual, "disc" is required when the apparatus has been damaged in any way, such as those on the remote. • The on-screen display illustrations used as radiators, heat registers, stoves, or other apparatus (including amplifiers) that are provided... played back on this apparatus during lightning storms or when unused for your TV screen. • The explanations regarding DVDs in this manual refer to DVDs created on this recorder. 13) Unplug this recorder. Important Safety Instructions 1) Read these instructions. 2) Keep these instructions. 3) Heed all warnings. 4) ...
...8226; In this manual, "disc" is required when the apparatus has been damaged in any way, such as those on the remote. • The on-screen display illustrations used as radiators, heat registers, stoves, or other apparatus (including amplifiers) that are provided... played back on this apparatus during lightning storms or when unused for your TV screen. • The explanations regarding DVDs in this manual refer to DVDs created on this recorder. 13) Unplug this recorder. Important Safety Instructions 1) Read these instructions. 2) Keep these instructions. 3) Heed all warnings. 4) ...
Operating Instructions
Page 5
...the LINE 2 IN jacks on the front panel 25 Connecting to a Satellite or Digital Tuner 26 Eight Basic Operations - Reformatting a disc 37 ,continued 5 Recording a Program 27 Checking the disc status while recording 28 3. Inserting a Disc 27 2. Table of Contents WARNING 2 Precautions 3 Quick ... TV 15 Step 2: Connecting the Video Cords 16 Step 3: Connecting the Audio Cords 18 Step 4: Connecting the AC Power Cord 19 Step 5: Preparing the Remote 20 Controlling TVs with the remote 20 If you have a Sony DVD player or more than one Sony DVD recorder 21 Changing channels of a Recorded ...
...the LINE 2 IN jacks on the front panel 25 Connecting to a Satellite or Digital Tuner 26 Eight Basic Operations - Reformatting a disc 37 ,continued 5 Recording a Program 27 Checking the disc status while recording 28 3. Inserting a Disc 27 2. Table of Contents WARNING 2 Precautions 3 Quick ... TV 15 Step 2: Connecting the Video Cords 16 Step 3: Connecting the Audio Cords 18 Step 4: Connecting the AC Power Cord 19 Step 5: Preparing the Remote 20 Controlling TVs with the remote 20 If you have a Sony DVD player or more than one Sony DVD recorder 21 Changing channels of a Recorded ...
Operating Instructions
Page 7
... Adjustments 71 Antenna Reception and Language Settings (Basic 71 Tuner Preset 71 Clock 72 OSD (On-Screen Display 73 Video Settings (Video 74 Audio Settings (Audio 76 Recording Settings (Recording 78 Disc Settings (DVD 79 Remote Control Settings/Factory Settings (Others 81 Easy Setup (Resetting the Recorder 82 Additional Information 83 Troubleshooting 83 Self-diagnosis Function...
... Adjustments 71 Antenna Reception and Language Settings (Basic 71 Tuner Preset 71 Clock 72 OSD (On-Screen Display 73 Video Settings (Video 74 Audio Settings (Audio 76 Recording Settings (Recording 78 Disc Settings (DVD 79 Remote Control Settings/Factory Settings (Others 81 Easy Setup (Resetting the Recorder 82 Additional Information 83 Troubleshooting 83 Self-diagnosis Function...
Operating Instructions
Page 20
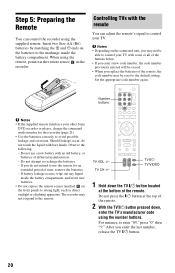
When using the remote, point it at the remote sensor on the batteries to the remote. Controlling TVs with the remote You can control the recorder using the number buttons. Set the appropriate code number again. Should leakage occur, do not intend to control your TV. If you may not be able to control your other Sony DVD recorder or player...
When using the remote, point it at the remote sensor on the batteries to the remote. Controlling TVs with the remote You can control the recorder using the number buttons. Set the appropriate code number again. Should leakage occur, do not intend to control your TV. If you may not be able to control your other Sony DVD recorder or player...

Operating Instructions
Page 21
... at a time until you find the one that "Easy Setup" (page 23) has been finished. Adjusts the volume of controllable TVs If more than one Sony DVD recorder If the supplied remote interferes with your TV's input source If you have a Sony DVD player or more than one code number is DVD3. Selects the channel on or off...
... at a time until you find the one that "Easy Setup" (page 23) has been finished. Adjusts the volume of controllable TVs If more than one Sony DVD recorder If the supplied remote interferes with your TV's input source If you have a Sony DVD player or more than one code number is DVD3. Selects the channel on or off...
Operating Instructions
Page 22
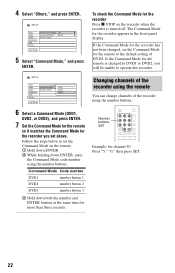
... will be unable to DVD1 or DVD2, you set above. Changing channels of the recorder using the remote You can change channels of the recorder using the number buttons. Number buttons, SET Example: for the recorder appears in the front panel display. The Command Mode for channel 50 Press "5," "0," ...22 If the Command Mode for more than three seconds. To check the Command Mode for the recorder Press x STOP on the recorder when the recorder is changed , set the Command Mode on the remote. 1 Hold down ENTER. 2 While holding down both the number and ENTER buttons at the same...
... will be unable to DVD1 or DVD2, you set above. Changing channels of the recorder using the remote You can change channels of the recorder using the number buttons. Number buttons, SET Example: for the recorder appears in the front panel display. The Command Mode for channel 50 Press "5," "0," ...22 If the Command Mode for more than three seconds. To check the Command Mode for the recorder Press x STOP on the recorder when the recorder is changed , set the Command Mode on the remote. 1 Hold down ENTER. 2 While holding down both the number and ENTER buttons at the same...

Operating Instructions
Page 67
... page 39. 5 Press OPTIONS on the remote to select the recording mode. The tape's time code is in the recorded portion of the tape. - The recording mode changes as a tape with your digital video camera. If the picture size or the recording mode on the tape being turned off the... recorder during dubbing. DV/Digital8 Dubbing 3 Press INPUT SELECT on the remote repeatedly to select "Rec Settings," and adjust the recording settings (page 42). There is a blank space in any...
... page 39. 5 Press OPTIONS on the remote to select the recording mode. The tape's time code is in the recorded portion of the tape. - The recording mode changes as a tape with your digital video camera. If the picture size or the recording mode on the tape being turned off the... recorder during dubbing. DV/Digital8 Dubbing 3 Press INPUT SELECT on the remote repeatedly to select "Rec Settings," and adjust the recording settings (page 42). There is a blank space in any...

Operating Instructions
Page 68
... a single title. m Dub the selected scenes After you want to dub Using the recorder's remote control, fast forward or rewind the tape to DVD become a single title. How chapters are created The contents dubbed to "On" in the "Recording" setup, this function, do the following: Connect your digital video camera and prepare for DV...
... a single title. m Dub the selected scenes After you want to dub Using the recorder's remote control, fast forward or rewind the tape to DVD become a single title. How chapters are created The contents dubbed to "On" in the "Recording" setup, this function, do the following: Connect your digital video camera and prepare for DV...

Operating Instructions
Page 81
...Finish" appears. Turn off . Note that all of the recorder if other operational settings. 1 Press SYSTEM MENU while the recorder is assigned the same Command Mode. For details, see "If you have a Sony DVD player or more than one Sony DVD recorder" on page 21. 81 The display for selecting a group...Factory Setup" in stop mode. 2 Select "SETUP," and press ENTER. 3 Select "Others," and press ENTER. The default settings are underlined. Remote Control Settings/ Factory Settings (Others) The "Others" setup allows you to set to power save mode and make the lighting dark. The selected ...
...Finish" appears. Turn off . Note that all of the recorder if other operational settings. 1 Press SYSTEM MENU while the recorder is assigned the same Command Mode. For details, see "If you have a Sony DVD player or more than one Sony DVD recorder" on page 21. 81 The display for selecting a group...Factory Setup" in stop mode. 2 Select "SETUP," and press ENTER. 3 Select "Others," and press ENTER. The default settings are underlined. Remote Control Settings/ Factory Settings (Others) The "Others" setup allows you to set to power save mode and make the lighting dark. The selected ...

Operating Instructions
Page 87
... displayed in the front panel display. , Contact your Sony dealer or local authorized Sony service facility. The disc tray does not open after you have recorded or edited a DVD. Then, immediately disconnect the AC power cord. This is because the recorder is not pointed at the remote sensor on page 88). Reset the code (page 20...
... displayed in the front panel display. , Contact your Sony dealer or local authorized Sony service facility. The disc tray does not open after you have recorded or edited a DVD. Then, immediately disconnect the AC power cord. This is because the recorder is not pointed at the remote sensor on page 88). Reset the code (page 20...

Operating Instructions
Page 90
... connected to 80% Supplied accessories: Audio/video cord (1) Power cord (1) Antenna cable (1) Remote commander (remote) (1) Size AA (R6) batteries (2) Specifications and design are operations and data transactions with...temperature: 5ºC to 35ºC (41ºF to 95ºF) Operating humidity: 25% to this recorder is a digital serial interface for handling digital video, digital audio and other data in .) (width/height/... familiar term for IEEE 1394 data transport bus proposed by SONY, and is an international standard standardized by the i.LINK cable (DV connecting cable). About the name...
... connected to 80% Supplied accessories: Audio/video cord (1) Power cord (1) Antenna cable (1) Remote commander (remote) (1) Size AA (R6) batteries (2) Specifications and design are operations and data transactions with...temperature: 5ºC to 35ºC (41ºF to 95ºF) Operating humidity: 25% to this recorder is a digital serial interface for handling digital video, digital audio and other data in .) (width/height/... familiar term for IEEE 1394 data transport bus proposed by SONY, and is an international standard standardized by the i.LINK cable (DV connecting cable). About the name...
Operating Instructions
Page 92
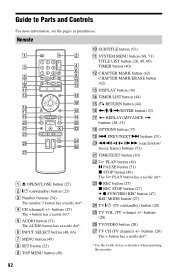
...) +/- buttons (27) The + button has a tactile dot*. buttons (20) Z TV/VIDEO button (20) wj TV CH (TV channel) +/- F INPUT SELECT button (48, 66) G MENU button (49) H SET...W z REC button (27) x REC STOP button (27) c z SYNCHRO REC button (47) REC MODE button (27) X TV [/1 (TV on /standby) button (23) C Number buttons (54) The number 5 button has a tactile dot*. E AUDIO button (51) ... and Controls For more information, see the pages in parentheses. Remote 123 456 789 0 A Z OPEN/CLOSE button (27) B [/1 (on /standby) button (20) Y TV VOL (TV volume) +/- buttons (20) The + button has a tactile...
...) +/- buttons (27) The + button has a tactile dot*. buttons (20) Z TV/VIDEO button (20) wj TV CH (TV channel) +/- F INPUT SELECT button (48, 66) G MENU button (49) H SET...W z REC button (27) x REC STOP button (27) c z SYNCHRO REC button (47) REC MODE button (27) X TV [/1 (TV on /standby) button (23) C Number buttons (54) The number 5 button has a tactile dot*. E AUDIO button (51) ... and Controls For more information, see the pages in parentheses. Remote 123 456 789 0 A Z OPEN/CLOSE button (27) B [/1 (on /standby) button (20) Y TV VOL (TV volume) +/- buttons (20) The + button has a tactile...
Operating Instructions
Page 93
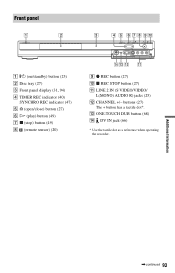
M ONE-TOUCH DUB button (68) N DV IN jack (66) * Use the tactile dot as a reference when operating the recorder. buttons (27) The + button has a tactile dot*. Additional Information ,continued 93 Front panel A [/1 (on/standby) button (23) B Disc tray (27) C Front panel display (31, 94) D TIMER REC indicator (40) SYNCHRO REC indicator (47) E A (open/close) button (27) F H (play) button (49) G x (stop) button (49) H (remote sensor) (20) I z REC button (27) J x REC STOP button (27) K LINE 2 IN (S VIDEO/VIDEO/ L(MONO) AUDIO R) jacks (25) L CHANNEL +/-
M ONE-TOUCH DUB button (68) N DV IN jack (66) * Use the tactile dot as a reference when operating the recorder. buttons (27) The + button has a tactile dot*. Additional Information ,continued 93 Front panel A [/1 (on/standby) button (23) B Disc tray (27) C Front panel display (31, 94) D TIMER REC indicator (40) SYNCHRO REC indicator (47) E A (open/close) button (27) F H (play) button (49) G x (stop) button (49) H (remote sensor) (20) I z REC button (27) J x REC STOP button (27) K LINE 2 IN (S VIDEO/VIDEO/ L(MONO) AUDIO R) jacks (25) L CHANNEL +/-
Operating Instructions
Page 96
...23, 74 "48kHz/96kHz PCM" 77 A "A-B Erase" 61 AC Power Cord 19 Adjusting playback picture 52 playback sound 53 recording picture 42 "AFT" 72 Album 31, 57 Album number 31 "Album Search" 54 Angle 49 Antenna 12 Area code 95 ... 16 Connecting the antenna cable 12 the audio cords 18 the video cords 16 "Contrast" 43, 52 Controlling TVs with the remote 20 Copy control signals 40 Copy-Free 40 Copy-Never 40 Copy-Once 40 CPRM 9 "Create a Playlist"...IN 66 DV/Digital8 Dubbing 66 One Touch Dubbing 68, 80 Program Edit 68 "DVD" 79 "DVD Menu" 80 "DVD Rec. Index Words in quotations appear in the on-screen displays.
...23, 74 "48kHz/96kHz PCM" 77 A "A-B Erase" 61 AC Power Cord 19 Adjusting playback picture 52 playback sound 53 recording picture 42 "AFT" 72 Album 31, 57 Album number 31 "Album Search" 54 Angle 49 Antenna 12 Area code 95 ... 16 Connecting the antenna cable 12 the audio cords 18 the video cords 16 "Contrast" 43, 52 Controlling TVs with the remote 20 Copy control signals 40 Copy-Free 40 Copy-Never 40 Copy-Once 40 CPRM 9 "Create a Playlist"...IN 66 DV/Digital8 Dubbing 66 One Touch Dubbing 68, 80 Program Edit 68 "DVD" 79 "DVD Menu" 80 "DVD Rec. Index Words in quotations appear in the on-screen displays.

Operating Instructions
Page 98
... STOP 28, 68 "Rec Video Equalizer" 43 Recordable discs 8 "Recording" 78 Recording 39 picture adjustment 42 recording format 8 recording mode 28, 39 recording time 28, 39 while watching another program 28 Recording time 39 Region code 11 Remaining time 31 Remote 20, 92 Resetting the recorder 82 Resume Play 50 S S VIDEO 16 SAP... 30 "Title Name" 60 Title number 31 "Title Search" 54 TOP MENU 49 "Track Search" 54 Troubleshooting 83 "Tuner Audio" 76 "Tuner Preset" 71 Tuner Preset 23 "TV Type" 23, 74 TV/VIDEO 20, 28 U "Unfinalize" 37 Unfinalizing 37 Usable discs 8, 10 V "Video" 74 VIDEO CD 10 Video...
... STOP 28, 68 "Rec Video Equalizer" 43 Recordable discs 8 "Recording" 78 Recording 39 picture adjustment 42 recording format 8 recording mode 28, 39 recording time 28, 39 while watching another program 28 Recording time 39 Region code 11 Remaining time 31 Remote 20, 92 Resetting the recorder 82 Resume Play 50 S S VIDEO 16 SAP... 30 "Title Name" 60 Title number 31 "Title Search" 54 TOP MENU 49 "Track Search" 54 Troubleshooting 83 "Tuner Audio" 76 "Tuner Preset" 71 Tuner Preset 23 "TV Type" 23, 74 TV/VIDEO 20, 28 U "Unfinalize" 37 Unfinalizing 37 Usable discs 8, 10 V "Video" 74 VIDEO CD 10 Video...


