Operating Instructions
Page 4
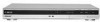
... instructions. 8) Do not install near water. 6) Clean only with the function being walked on the remote. If the provided plug does not fit into the apparatus, the apparatus has been exposed to avoid injury... Read these instructions. 2) Keep these instructions. 3) Heed all warnings. 4) Follow all servicing to DVDs created on this recorder. 13) Unplug this manual describe the controls on or pinched particularly at plugs, convenience receptacles, and...has been spilled or objects have fallen into your TV screen. • The explanations regarding DVDs in any ventilation openings.
... instructions. 8) Do not install near water. 6) Clean only with the function being walked on the remote. If the provided plug does not fit into the apparatus, the apparatus has been exposed to avoid injury... Read these instructions. 2) Keep these instructions. 3) Heed all warnings. 4) Follow all servicing to DVDs created on this recorder. 13) Unplug this manual describe the controls on or pinched particularly at plugs, convenience receptacles, and...has been spilled or objects have fallen into your TV screen. • The explanations regarding DVDs in any ventilation openings.
Operating Instructions
Page 5
..., or antenna only (no cable TV 15 Step 2: Connecting the Video Cords 16 Step 3: Connecting the Audio Cords 18 Step 4: Connecting the AC Power Cord 19 Step 5: Preparing the Remote 20 Controlling TVs with the remote 20 If you have a Sony DVD player or more than one Sony DVD recorder 21 Changing channels of a Recorded Program 33 6. Getting to Know...
..., or antenna only (no cable TV 15 Step 2: Connecting the Video Cords 16 Step 3: Connecting the Audio Cords 18 Step 4: Connecting the AC Power Cord 19 Step 5: Preparing the Remote 20 Controlling TVs with the remote 20 If you have a Sony DVD player or more than one Sony DVD recorder 21 Changing channels of a Recorded Program 33 6. Getting to Know...
Operating Instructions
Page 7
... Adjustments 71 Antenna Reception and Language Settings (Basic 71 Tuner Preset 71 Clock 72 OSD (On-Screen Display 73 Video Settings (Video 74 Audio Settings (Audio 76 Recording Settings (Recording 78 Disc Settings (DVD 79 Remote Control Settings/Factory Settings (Others 81 Easy Setup (Resetting the Recorder 82 Additional Information 83 Troubleshooting 83 Self-diagnosis Function...
... Adjustments 71 Antenna Reception and Language Settings (Basic 71 Tuner Preset 71 Clock 72 OSD (On-Screen Display 73 Video Settings (Video 74 Audio Settings (Audio 76 Recording Settings (Recording 78 Disc Settings (DVD 79 Remote Control Settings/Factory Settings (Others 81 Easy Setup (Resetting the Recorder 82 Additional Information 83 Troubleshooting 83 Self-diagnosis Function...
Operating Instructions
Page 20
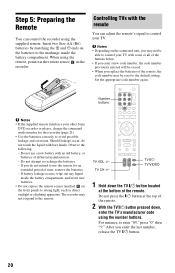
Step 5: Preparing the Remote You can adjust the remote's signal to control your other Sony DVD recorder or player, change the command mode number for an extended period of different manufacturers. - Number buttons b Notes • If the supplied remote interferes your TV. Observe the following: - TV CH +/- After you do not touch the liquid with some or all of...
Step 5: Preparing the Remote You can adjust the remote's signal to control your other Sony DVD recorder or player, change the command mode number for an extended period of different manufacturers. - Number buttons b Notes • If the supplied remote interferes your TV. Observe the following: - TV CH +/- After you do not touch the liquid with some or all of...

Operating Instructions
Page 21
... 1 Check that works with your TV TV CH +/- The default command mode setting for this recorder and the supplied remote is listed, try entering them one at a time until you find the one that differs from the other Sony DVD recorder or player after you have a Sony DVD player or more than one Sony DVD recorder If the supplied remote interferes with your...
... 1 Check that works with your TV TV CH +/- The default command mode setting for this recorder and the supplied remote is listed, try entering them one at a time until you find the one that differs from the other Sony DVD recorder or player after you have a Sony DVD player or more than one Sony DVD recorder If the supplied remote interferes with your...
Operating Instructions
Page 22
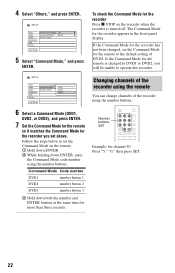
... "Command Mode," and press ENTER. To check the Command Mode for the recorder you will be unable to operate this recorder. Changing channels of the recorder using the remote You can change channels of DVD3. If the Command Mode for the recorder has not been changed to the default setting of the... DVD2, or DVD3), and press ENTER. 7 Set the Command Mode for the remote so it matches the Command Mode for the recorder Press x STOP on the recorder when the recorder is changed , set the Command Mode on the remote. 1 Hold down ENTER. 2 While holding down both the number and ENTER buttons ...
... "Command Mode," and press ENTER. To check the Command Mode for the recorder you will be unable to operate this recorder. Changing channels of the recorder using the remote You can change channels of DVD3. If the Command Mode for the recorder has not been changed to the default setting of the... DVD2, or DVD3), and press ENTER. 7 Set the Command Mode for the remote so it matches the Command Mode for the recorder Press x STOP on the recorder when the recorder is changed , set the Command Mode on the remote. 1 Hold down ENTER. 2 While holding down both the number and ENTER buttons ...

Operating Instructions
Page 67
...Press INPUT SELECT on the remote repeatedly to select the recording mode. The front panel display changes as follows: channel 4 Press REC MODE on the remote to select "DV / D8 Audio Input," and press ENTER. In this case, see page 39. 5 Press OPTIONS on the remote repeatedly to select "DV."... z Hint You can turn off . 67 Select one piece of digital video equipment to the recorder. • You cannot control the recorder using another device or another recorder of the same model. • You cannot record date, time, or the ...
...Press INPUT SELECT on the remote repeatedly to select the recording mode. The front panel display changes as follows: channel 4 Press REC MODE on the remote to select "DV / D8 Audio Input," and press ENTER. In this case, see page 39. 5 Press OPTIONS on the remote repeatedly to select "DV."... z Hint You can turn off . 67 Select one piece of digital video equipment to the recorder. • You cannot control the recorder using another device or another recorder of the same model. • You cannot record date, time, or the ...

Operating Instructions
Page 68
...created The contents dubbed to a DVD-RW/DVD-R (VR mode), each shooting session on the tape and each shooting session on the tape becomes a chapter on the disc. At this title is divided into chapters. Note that you want to dub Using the recorder's remote control, fast forward or rewind... the tape to a DVD. When "Auto Chapter" is set "Finalize Disc" of "One Touch Dubbing" to 6 of "Preparing for the whole process...
...created The contents dubbed to a DVD-RW/DVD-R (VR mode), each shooting session on the tape and each shooting session on the tape becomes a chapter on the disc. At this title is divided into chapters. Note that you want to dub Using the recorder's remote control, fast forward or rewind... the tape to a DVD. When "Auto Chapter" is set "Finalize Disc" of "One Touch Dubbing" to 6 of "Preparing for the whole process...

Operating Instructions
Page 81
...return to their default settings. Remote Control Settings/ Factory Settings (Others) The "Others" setup allows you to their default settings. 4 Press ENTER when "Finish" appears. Factory Setup Allows you have a Sony DVD player or more than one Sony DVD recorder" on page 21. 81 Note... that all of the recorder if other operational settings. 1 Press SYSTEM MENU while the recorder is off. Settings and Adjustments Power Save Standby Selects ...
...return to their default settings. Remote Control Settings/ Factory Settings (Others) The "Others" setup allows you to their default settings. 4 Press ENTER when "Finish" appears. Factory Setup Allows you have a Sony DVD player or more than one Sony DVD recorder" on page 21. 81 Note... that all of the recorder if other operational settings. 1 Press SYSTEM MENU while the recorder is off. Settings and Adjustments Power Save Standby Selects ...

Operating Instructions
Page 87
...the front panel display. , Contact your Sony dealer or local authorized Sony service facility. Then, unplug the recorder and after you press Z OPEN/CLOSE. , Turn off the recorder. Then, keep [/1 on the unit while the recorder is not pointed at the remote sensor on because the power was activated (...during recording. Remote control The remote does not function. , Batteries are weak. , The remote is locked. Press down A on the rear of the recorder is adding disc data to open and "TRAY LOCKED" appears in again. The disc tray does not open after you have recorded or edited a DVD....
...the front panel display. , Contact your Sony dealer or local authorized Sony service facility. Then, unplug the recorder and after you press Z OPEN/CLOSE. , Turn off the recorder. Then, keep [/1 on the unit while the recorder is not pointed at the remote sensor on because the power was activated (...during recording. Remote control The remote does not function. , Batteries are weak. , The remote is locked. Press down A on the rear of the recorder is adding disc data to open and "TRAY LOCKED" appears in again. The disc tray does not open after you have recorded or edited a DVD....

Operating Instructions
Page 90
...equipment to be connected, and that operations and data transactions are sometimes not possible on this recorder is i.LINKcompliant for IEEE 1394 data transport bus proposed by SONY, and is a trademark approved by many corporations. This section describes the i.LINK standard and ...41ºF to 95ºF) Operating humidity: 25% to 80% Supplied accessories: Audio/video cord (1) Power cord (1) Antenna cable (1) Remote commander (remote) (1) Size AA (R6) batteries (2) Specifications and design are operations and data transactions with other data in two directions between equipment having two...
...equipment to be connected, and that operations and data transactions are sometimes not possible on this recorder is i.LINKcompliant for IEEE 1394 data transport bus proposed by SONY, and is a trademark approved by many corporations. This section describes the i.LINK standard and ...41ºF to 95ºF) Operating humidity: 25% to 80% Supplied accessories: Audio/video cord (1) Power cord (1) Antenna cable (1) Remote commander (remote) (1) Size AA (R6) batteries (2) Specifications and design are operations and data transactions with other data in two directions between equipment having two...
Operating Instructions
Page 92
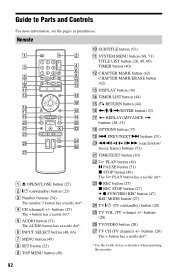
Remote 123 456 789 0 A Z OPEN/CLOSE button (27) B [/1 (on /standby) button (20) Y TV VOL (TV volume) +/- W z REC button (27) x REC STOP button (27) c z SYNCHRO REC button (47) REC MODE button (27) X TV [/1 (TV on /standby) button (23) C Number buttons (54) The number 5 button has a tactile dot*. E AUDIO... button (51) The AUDIO button has a tactile dot*. buttons (20) The + button has a tactile dot*. * Use the tactile dot as a reference when operating the recorder. 92 buttons (...
Remote 123 456 789 0 A Z OPEN/CLOSE button (27) B [/1 (on /standby) button (20) Y TV VOL (TV volume) +/- W z REC button (27) x REC STOP button (27) c z SYNCHRO REC button (47) REC MODE button (27) X TV [/1 (TV on /standby) button (23) C Number buttons (54) The number 5 button has a tactile dot*. E AUDIO... button (51) The AUDIO button has a tactile dot*. buttons (20) The + button has a tactile dot*. * Use the tactile dot as a reference when operating the recorder. 92 buttons (...
Operating Instructions
Page 93
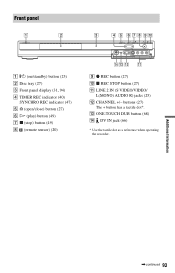
Additional Information ,continued 93 Front panel A [/1 (on/standby) button (23) B Disc tray (27) C Front panel display (31, 94) D TIMER REC indicator (40) SYNCHRO REC indicator (47) E A (open/close) button (27) F H (play) button (49) G x (stop) button (49) H (remote sensor) (20) I z REC button (27) J x REC STOP button (27) K LINE 2 IN (S VIDEO/VIDEO/ L(MONO) AUDIO R) jacks (25) L CHANNEL +/- M ONE-TOUCH DUB button (68) N DV IN jack (66) * Use the tactile dot as a reference when operating the recorder. buttons (27) The + button has a tactile dot*.
Additional Information ,continued 93 Front panel A [/1 (on/standby) button (23) B Disc tray (27) C Front panel display (31, 94) D TIMER REC indicator (40) SYNCHRO REC indicator (47) E A (open/close) button (27) F H (play) button (49) G x (stop) button (49) H (remote sensor) (20) I z REC button (27) J x REC STOP button (27) K LINE 2 IN (S VIDEO/VIDEO/ L(MONO) AUDIO R) jacks (25) L CHANNEL +/- M ONE-TOUCH DUB button (68) N DV IN jack (66) * Use the tactile dot as a reference when operating the recorder. buttons (27) The + button has a tactile dot*.
Operating Instructions
Page 96
...23, 74 "48kHz/96kHz PCM" 77 A "A-B Erase" 61 AC Power Cord 19 Adjusting playback picture 52 playback sound 53 recording picture 42 "AFT" 72 Album 31, 57 Album number 31 "Album Search" 54 Angle 49 Antenna 12 Area code 95...16 Connecting the antenna cable 12 the audio cords 18 the video cords 16 "Contrast" 43, 52 Controlling TVs with the remote 20 Copy control signals 40 Copy-Free 40 Copy-Never 40 Copy-Once 40 CPRM 9 "Create a Playlist"...IN 66 DV/Digital8 Dubbing 66 One Touch Dubbing 68, 80 Program Edit 68 "DVD" 79 "DVD Menu" 80 "DVD Rec. Index Words in quotations appear in the on-screen displays.
...23, 74 "48kHz/96kHz PCM" 77 A "A-B Erase" 61 AC Power Cord 19 Adjusting playback picture 52 playback sound 53 recording picture 42 "AFT" 72 Album 31, 57 Album number 31 "Album Search" 54 Angle 49 Antenna 12 Area code 95...16 Connecting the antenna cable 12 the audio cords 18 the video cords 16 "Contrast" 43, 52 Controlling TVs with the remote 20 Copy control signals 40 Copy-Free 40 Copy-Never 40 Copy-Once 40 CPRM 9 "Create a Playlist"...IN 66 DV/Digital8 Dubbing 66 One Touch Dubbing 68, 80 Program Edit 68 "DVD" 79 "DVD Menu" 80 "DVD Rec. Index Words in quotations appear in the on-screen displays.

Operating Instructions
Page 98
... STOP 28, 68 "Rec Video Equalizer" 43 Recordable discs 8 "Recording" 78 Recording 39 picture adjustment 42 recording format 8 recording mode 28, 39 recording time 28, 39 while watching another program 28 Recording time 39 Region code 11 Remaining time 31 Remote 20, 92 Resetting the recorder 82 Resume Play 50 S S VIDEO 16 SAP... 30 "Title Name" 60 Title number 31 "Title Search" 54 TOP MENU 49 "Track Search" 54 Troubleshooting 83 "Tuner Audio" 76 "Tuner Preset" 71 Tuner Preset 23 "TV Type" 23, 74 TV/VIDEO 20, 28 U "Unfinalize" 37 Unfinalizing 37 Usable discs 8, 10 V "Video" 74 VIDEO CD 10 Video...
... STOP 28, 68 "Rec Video Equalizer" 43 Recordable discs 8 "Recording" 78 Recording 39 picture adjustment 42 recording format 8 recording mode 28, 39 recording time 28, 39 while watching another program 28 Recording time 39 Region code 11 Remaining time 31 Remote 20, 92 Resetting the recorder 82 Resume Play 50 S S VIDEO 16 SAP... 30 "Title Name" 60 Title number 31 "Title Search" 54 TOP MENU 49 "Track Search" 54 Troubleshooting 83 "Tuner Audio" 76 "Tuner Preset" 71 Tuner Preset 23 "TV Type" 23, 74 TV/VIDEO 20, 28 U "Unfinalize" 37 Unfinalizing 37 Usable discs 8, 10 V "Video" 74 VIDEO CD 10 Video...


