Operating Instructions
Page 1
3-876-081-12(1) DVD Recorder Operating Instructions RDR-GX257 © 2008 Sony Corporation
3-876-081-12(1) DVD Recorder Operating Instructions RDR-GX257 © 2008 Sony Corporation
Operating Instructions
Page 2
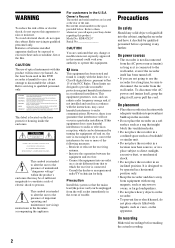
...lead (the power cord) can be unplugged from the wall socket immediately in this DVD recorder is harmful to eyes, do not expose this system so that interference will increase eye... outlet, even if the recorder itself ; On power sources • The recorder is not disconnected from equipment with this product will not occur in this manual could void your Sony dealer regarding this equipment. ...heat such as it any solid object or liquid fall into an outlet on the apparatus. RDR-GX257 Serial No CAUTION You are designed to qualified personnel only. never pull the cord. It is...
...lead (the power cord) can be unplugged from the wall socket immediately in this DVD recorder is harmful to eyes, do not expose this system so that interference will increase eye... outlet, even if the recorder itself ; On power sources • The recorder is not disconnected from equipment with this product will not occur in this manual could void your Sony dealer regarding this equipment. ...heat such as it any solid object or liquid fall into an outlet on the apparatus. RDR-GX257 Serial No CAUTION You are designed to qualified personnel only. never pull the cord. It is...
Operating Instructions
Page 3
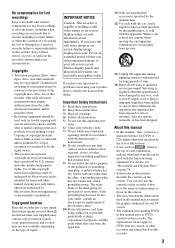
...of this apparatus near any lost recordings or relevant losses, including when recordings are not made due to reasons including recorder failure, or when the contents of a recording are lost recordings Sony is not liable and will not restore, recover, or replicate the recorded contents under any ventilation openings. Important...to the provisions of time. 14) Refer all instructions. 5) Do not use caution when moving the cart/apparatus combination to DVDs created on your TV for your outlet, consult an electrician for home and other materials may require authorization from the cable ...
...of this apparatus near any lost recordings or relevant losses, including when recordings are not made due to reasons including recorder failure, or when the contents of a recording are lost recordings Sony is not liable and will not restore, recover, or replicate the recorded contents under any ventilation openings. Important...to the provisions of time. 14) Refer all instructions. 5) Do not use caution when moving the cart/apparatus combination to DVDs created on your TV for your outlet, consult an electrician for home and other materials may require authorization from the cable ...
Operating Instructions
Page 4
... and Playing Time 30 Changing the Name of a Recorded Program (Title Input 31 Labeling and Protecting a Disc 32 Playing a DVD on Other Equipment (Finalize 33 Recording 35 Before Recording 35 Timer Recording From Connected Equipment 36 Checking/Changing/Canceling Timer Settings (Timer List 37 Recording Without the Timer 39 Recording From a VCR or Similar Device 41 Playback...
... and Playing Time 30 Changing the Name of a Recorded Program (Title Input 31 Labeling and Protecting a Disc 32 Playing a DVD on Other Equipment (Finalize 33 Recording 35 Before Recording 35 Timer Recording From Connected Equipment 36 Checking/Changing/Canceling Timer Settings (Timer List 37 Recording Without the Timer 39 Recording From a VCR or Similar Device 41 Playback...
Operating Instructions
Page 5
... IN Jack 59 Dubbing From a DV/Digital8 Format Tape to a DVD 60 Settings and Adjustments 62 Using the Setup Displays 62 Recorder Settings (General 63 Language Settings 64 Audio Settings 65 Parental Control Settings (Lock 66 Recording Settings (Video 67 Disc Settings 68 Resetting the Recorder (Factory Set 69 Additional Information 70 Troubleshooting 70...
... IN Jack 59 Dubbing From a DV/Digital8 Format Tape to a DVD 60 Settings and Adjustments 62 Using the Setup Displays 62 Recorder Settings (General 63 Language Settings 64 Audio Settings 65 Parental Control Settings (Lock 66 Recording Settings (Video 67 Disc Settings 68 Resetting the Recorder (Factory Set 69 Additional Information 70 Troubleshooting 70...
Operating Instructions
Page 11
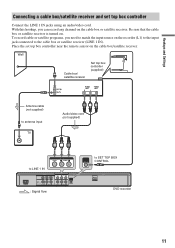
...PB PR PCM/DTS/ MPEG/ DOLBY DIGITAL COAXIAL DIGITAL OUT L - To record cable or satellite programs, you can record any channel on the cable box or satellite receiver. AUDIO - AUDIO - R to SET TOP BOX CONTROL HDMI OUT DVD recorder 11 AUDIO - Place the set top box controller Connect the LINE 1 IN...box controller near the remote sensor on the cable box/satellite receiver. Be sure that the cable box or satellite receiver is turned on the recorder (L1) to the input jack connected to the cable box or satellite receiver (LINE 1 IN). AUDIO - Wall Cable box/ satellite ...
...PB PR PCM/DTS/ MPEG/ DOLBY DIGITAL COAXIAL DIGITAL OUT L - To record cable or satellite programs, you can record any channel on the cable box or satellite receiver. AUDIO - AUDIO - R to SET TOP BOX CONTROL HDMI OUT DVD recorder 11 AUDIO - Place the set top box controller Connect the LINE 1 IN...box controller near the remote sensor on the cable box/satellite receiver. Be sure that the cable box or satellite receiver is turned on the recorder (L1) to the input jack connected to the cable box or satellite receiver (LINE 1 IN). AUDIO - Wall Cable box/ satellite ...

Operating Instructions
Page 12
... : Signal flow HDMI cord (not supplied) C TV, projector, or audio component 12 R SET TOP BOX CONTROL VIDEO L - R LINE OUT to COMPONENT VIDEO OUT (blue) (red) DVD recorder HDMI OUT to LINE OUT (VIDEO) ~AC IN COMPONENT Y VIDEO OUT PB PR PCM/DTS/ MPEG/ DOLBY DIGITAL COAXIAL DIGITAL OUT L - R AUDIO OUT VIDEO LINE...
... : Signal flow HDMI cord (not supplied) C TV, projector, or audio component 12 R SET TOP BOX CONTROL VIDEO L - R LINE OUT to COMPONENT VIDEO OUT (blue) (red) DVD recorder HDMI OUT to LINE OUT (VIDEO) ~AC IN COMPONENT Y VIDEO OUT PB PR PCM/DTS/ MPEG/ DOLBY DIGITAL COAXIAL DIGITAL OUT L - R AUDIO OUT VIDEO LINE...
Operating Instructions
Page 13
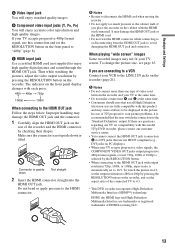
...picture in the picture. HDMI OUT b Notes • Be sure to disconnect the HDMI cord when moving the recorder. • Do not apply too much pressure to 4:3. * This DVD recorder incorporates High-Definition Multimedia Interface (HDMI™) technology. Make sure the connector is upside down or tilted. b Notes...the output resolution to 480i or 480p by the RESOLUTION button. • When connecting to the HDMI OUT jack with this model 525p DVD recorder, please contact our customer service center. • You cannot connect the HDMI OUT jack (connection C) to DVI jacks that not all...
...picture in the picture. HDMI OUT b Notes • Be sure to disconnect the HDMI cord when moving the recorder. • Do not apply too much pressure to 4:3. * This DVD recorder incorporates High-Definition Multimedia Interface (HDMI™) technology. Make sure the connector is upside down or tilted. b Notes...the output resolution to 480i or 480p by the RESOLUTION button. • When connecting to the HDMI OUT jack with this model 525p DVD recorder, please contact our customer service center. • You cannot connect the HDMI OUT jack (connection C) to DVI jacks that not all...
Operating Instructions
Page 14
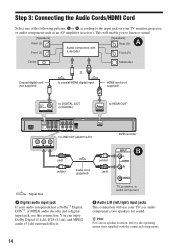
... IN COMPONENT Y VIDEO OUT PB PR PCM/DTS/ MPEG/ DOLBY DIGITAL COAXIAL DIGITAL OUT L - AUDIO - AUDIO - R SET TOP BOX CONTROL VIDEO L - R LINE OUT (red) (white) DVD recorder B (white) Audio cord (supplied) (red) : Signal flow A Digital audio input jack If your audio component has a Dolby*1 Digital, DTS*2, or MPEG audio decoder and a digital...
... IN COMPONENT Y VIDEO OUT PB PR PCM/DTS/ MPEG/ DOLBY DIGITAL COAXIAL DIGITAL OUT L - AUDIO - AUDIO - R SET TOP BOX CONTROL VIDEO L - R LINE OUT (red) (white) DVD recorder B (white) Audio cord (supplied) (red) : Signal flow A Digital audio input jack If your audio component has a Dolby*1 Digital, DTS*2, or MPEG audio decoder and a digital...
Operating Instructions
Page 16
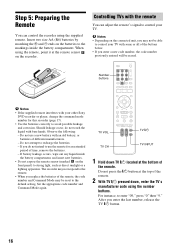
...8226; Do not expose the remote sensor (marked on the batteries to the default setting. Controlling TVs with the remote You can control the recorder using the remote, point it at the bottom of different manufacturers. - Observe the following: - For instance, to recharge the batteries. -... Preparing the Remote You can adjust the remote's signal to control your TV with bare hands. The recorder may not respond to use a new battery with your other Sony DVD recorder or player, change the command mode number for an extended period of the remote, the code number ...
...8226; Do not expose the remote sensor (marked on the batteries to the default setting. Controlling TVs with the remote You can control the recorder using the remote, point it at the bottom of different manufacturers. - Observe the following: - For instance, to recharge the batteries. -... Preparing the Remote You can adjust the remote's signal to control your TV with bare hands. The recorder may not respond to use a new battery with your other Sony DVD recorder or player, change the command mode number for an extended period of the remote, the code number ...
Operating Instructions
Page 17
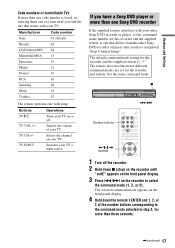
... if different command modes are set the command mode number for this recorder and the supplied remote is listed, try entering them one at a time until you find the one that works with your other Sony DVD recorder or player after you have completed "Step 6: Initial Setup." TV ...CH +/- The default command mode setting for this recorder and the supplied remote to one that differs from the other Sony DVD recorder or player, set for more than three seconds. ,continued 17 The selected command mode appears on your TV's ...
... if different command modes are set the command mode number for this recorder and the supplied remote is listed, try entering them one at a time until you find the one that works with your other Sony DVD recorder or player after you have completed "Step 6: Initial Setup." TV ...CH +/- The default command mode setting for this recorder and the supplied remote to one that differs from the other Sony DVD recorder or player, set for more than three seconds. ,continued 17 The selected command mode appears on your TV's ...

Operating Instructions
Page 21
... with the connected equipment. Connecting to the LINE 2 IN jacks Connect a VCR or similar recording device to the LINE 2 IN jacks of this recorder. OUTPUT VIDEO AUDIO L R Audio/video cord (not supplied) to LINE 2 IN : Signal flow DVD recorder z Hint When the connected equipment outputs only monaural sound, use audio cords that distribute monaural...
... with the connected equipment. Connecting to the LINE 2 IN jacks Connect a VCR or similar recording device to the LINE 2 IN jacks of this recorder. OUTPUT VIDEO AUDIO L R Audio/video cord (not supplied) to LINE 2 IN : Signal flow DVD recorder z Hint When the connected equipment outputs only monaural sound, use audio cords that distribute monaural...
Operating Instructions
Page 22
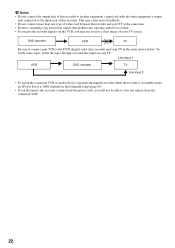
... Be sure to connect your VCR to the DVD (digital video disc) recorder and your TV screen. Line input 1 VCR DVD recorder TV Line input 2 • To watch the tapes through the recorder while the recorder is in standby mode, set [Power Save] to view the signals from the connected VCR. 22 This ...second line input on your TV in the [General] setup (page 63). • If you disconnect the recorder's mains lead (the power cord), you will not be recorded. • If you pass the recorder signals via the VCR, you may cause noise (feedback). • Do not connect more than one type of...
... Be sure to connect your VCR to the DVD (digital video disc) recorder and your TV screen. Line input 1 VCR DVD recorder TV Line input 2 • To watch the tapes through the recorder while the recorder is in standby mode, set [Power Save] to view the signals from the connected VCR. 22 This ...second line input on your TV in the [General] setup (page 63). • If you disconnect the recorder's mains lead (the power cord), you will not be recorded. • If you pass the recorder signals via the VCR, you may cause noise (feedback). • Do not connect more than one type of...
Operating Instructions
Page 23
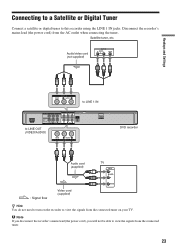
... satellite or digital tuner to LINE OUT (VIDEO/AUDIO) VIDEO LINE 1 IN L - Disconnect the recorder's mains lead (the power cord) from the connected tuner. 23 Satellite tuner, etc. R LINE OUT HDMI OUT DVD recorder Audio cord (supplied) : Signal flow Video cord (supplied) TV INPUT L AUDIO R VIDEO z... Hint You do not need to turn on the recorder to LINE 1 IN COMPONENT Y VIDEO OUT PB PR ~AC IN PCM/...
... satellite or digital tuner to LINE OUT (VIDEO/AUDIO) VIDEO LINE 1 IN L - Disconnect the recorder's mains lead (the power cord) from the connected tuner. 23 Satellite tuner, etc. R LINE OUT HDMI OUT DVD recorder Audio cord (supplied) : Signal flow Video cord (supplied) TV INPUT L AUDIO R VIDEO z... Hint You do not need to turn on the recorder to LINE 1 IN COMPONENT Y VIDEO OUT PB PR ~AC IN PCM/...
Operating Instructions
Page 24
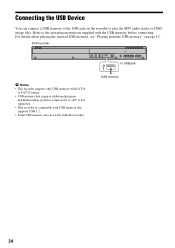
... memory, see "Playing from the USB memory" on the recorder to play the MP3 audio tracks or JPEG image files. Refer to the operating instructions supplied with this recorder. DVD recorder b Notes • This recorder supports only USB memory with FAT16 or FAT32 format. •...; USB memory that requires additional program installation when you have connected it to a PC is not supported. • This recorder is compatible with USB memory...
... memory, see "Playing from the USB memory" on the recorder to play the MP3 audio tracks or JPEG image files. Refer to the operating instructions supplied with this recorder. DVD recorder b Notes • This recorder supports only USB memory with FAT16 or FAT32 format. •...; USB memory that requires additional program installation when you have connected it to a PC is not supported. • This recorder is compatible with USB memory...
Operating Instructions
Page 25
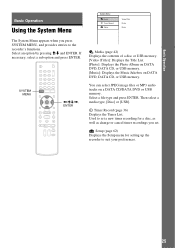
If necessary, select a sub option and press ENTER. Select an option by pressing M/m and ENTER. SYSTEM MENU 123 456 789 0 Basic Operation Basic Operation Using the System Menu System Menu Media Timer Record Setup Video(Title) Photo Music The System Menu appears when you press SYSTEM MENU, and provides entries to the recorder's functions.
If necessary, select a sub option and press ENTER. Select an option by pressing M/m and ENTER. SYSTEM MENU 123 456 789 0 Basic Operation Basic Operation Using the System Menu System Menu Media Timer Record Setup Video(Title) Photo Music The System Menu appears when you press SYSTEM MENU, and provides entries to the recorder's functions.

Operating Instructions
Page 26
Z OPEN/ CLOSE SYSTEM MENU 123 456 789 0 "/1 You can also reformat a DVD+RW or DVD-RW to format the disc. Inserting and Formatting a Disc +RW -RWVR -RWVideo +R -R When you first insert a new disc, the recorder will ask you to create a blank disc. Follow the steps below to format the disc.
Z OPEN/ CLOSE SYSTEM MENU 123 456 789 0 "/1 You can also reformat a DVD+RW or DVD-RW to format the disc. Inserting and Formatting a Disc +RW -RWVR -RWVideo +R -R When you first insert a new disc, the recorder will ask you to create a blank disc. Follow the steps below to format the disc.
Operating Instructions
Page 29
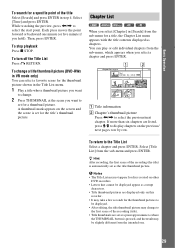
While watching the preview, press Basic Operation To search for a specific point of the title Select [Search] and press ENTER in step 4. Select [Time] and press ENTER.
While watching the preview, press Basic Operation To search for a specific point of the title Select [Search] and press ENTER in step 4. Select [Time] and press ENTER.
Operating Instructions
Page 59
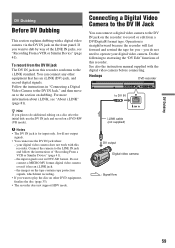
... input only. Do not connect a MICRO MV format digital video camera even if it has an i.LINK jack. - Hookups DVD recorder to operate your digital video camera does not work with this recorder. your digital video camera. you do additional editing on a disc after the initial dub, use the DV IN jack when... Video Camera to the DV IN Jack," and then move on to the DV IN Jack You can connect any other DVD equipment, finalize the disc (page 33). • The recorder does not support HDV mode. the input signal is for you plan to do not need to DV IN i.LINK cable...
... input only. Do not connect a MICRO MV format digital video camera even if it has an i.LINK jack. - Hookups DVD recorder to operate your digital video camera does not work with this recorder. your digital video camera. you do additional editing on a disc after the initial dub, use the DV IN jack when... Video Camera to the DV IN Jack," and then move on to the DV IN Jack You can connect any other DVD equipment, finalize the disc (page 33). • The recorder does not support HDV mode. the input signal is for you plan to do not need to DV IN i.LINK cable...
Operating Instructions
Page 77
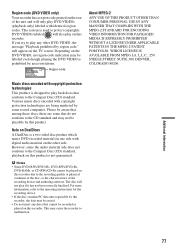
...to the Compact Disc (CD) standard, playback on this product is a two sided disc product which mates DVD recorded material on one side with copyright protection technologies are some record companies. will not play any discs that cannot be playable by some that conform to the CD standard and... aware that among those discs, there are being marketed by this recorder. This may cause the recorder to play if it has not been correctly finalised. Additional Information 77 b Notes • Some DVD+RWs/DVD+Rs, DVD-RWs/DVD-Rs, DVD-RAMs, or CD-RWs/CD-Rs cannot be labeled even though ...
...to the Compact Disc (CD) standard, playback on this product is a two sided disc product which mates DVD recorded material on one side with copyright protection technologies are some record companies. will not play any discs that cannot be playable by some that conform to the CD standard and... aware that among those discs, there are being marketed by this recorder. This may cause the recorder to play if it has not been correctly finalised. Additional Information 77 b Notes • Some DVD+RWs/DVD+Rs, DVD-RWs/DVD-Rs, DVD-RAMs, or CD-RWs/CD-Rs cannot be labeled even though ...


