Product Manual (PMW320 Operating Instruction)
Page 5
... Locations and Functions of Parts and Controls 14 Power Supply 14 Accessory Attachments 14 Operating and Connectors Section 16 Monochrome LCD Panel 25 Auto Focus Lens (Supplied with the PMW-320K 26 Viewfinder 27 Viewfinder Screen Display 29 Chapter 2 : Preparations Preparing a Power Supply 33 Using a Battery Pack 33 Using AC Power... 37 Attaching a 5-inch Electronic Viewfinder 38 Setting the Area of Use 40 Setting the Date/Time of the Internal Clock 41 Mounting and Adjusting the Lens 41 Adjusting the Flange Focal Length 42 Table of Contents 5
... Locations and Functions of Parts and Controls 14 Power Supply 14 Accessory Attachments 14 Operating and Connectors Section 16 Monochrome LCD Panel 25 Auto Focus Lens (Supplied with the PMW-320K 26 Viewfinder 27 Viewfinder Screen Display 29 Chapter 2 : Preparations Preparing a Power Supply 33 Using a Battery Pack 33 Using AC Power... 37 Attaching a 5-inch Electronic Viewfinder 38 Setting the Area of Use 40 Setting the Date/Time of the Internal Clock 41 Mounting and Adjusting the Lens 41 Adjusting the Flange Focal Length 42 Table of Contents 5
Product Manual (PMW320 Operating Instruction)
Page 8
...0 switch 131 Functions that can be assigned to the ASSIGN. 2 switch 132 Functions that can be assigned to the RET button on the lens...... 134 Adjusting Picture Characteristics to the ASSIGN. 1 and 3 switches, the ASSIGNABLE 4 and 5 switches, and the COLOR TEMP. button 132 ... and Loading Scene Files 138 Saving Scene Files 138 Loading Scene Files 138 Saving and Loading Lens Files 139 Setting Lens File Data 139 Saving Lens Files 139 Loading Lens Files 140 Loading Lens Files Automatically 140 Chapter 8 : Connecting External Devices Connecting External Monitors 141 8 Table of ...
...0 switch 131 Functions that can be assigned to the ASSIGN. 2 switch 132 Functions that can be assigned to the RET button on the lens...... 134 Adjusting Picture Characteristics to the ASSIGN. 1 and 3 switches, the ASSIGNABLE 4 and 5 switches, and the COLOR TEMP. button 132 ... and Loading Scene Files 138 Saving Scene Files 138 Loading Scene Files 138 Saving and Loading Lens Files 139 Setting Lens File Data 139 Saving Lens Files 139 Loading Lens Files 140 Loading Lens Files Automatically 140 Chapter 8 : Connecting External Devices Connecting External Monitors 141 8 Table of ...

Product Manual (PMW320 Operating Instruction)
Page 9
... the Battery of the Internal Clock 158 Specifications 158 General 158 Camera Block 159 Audio Block 159 Display 159 Media Block 160 Inputs/Outputs 160 Lens Block (PMW-320K only 160 Supplied Accessories 161 Recommended Additional Equipment 161 Chart of Optional Components and Accessories 163 About i.LINK 164 MPEG-2 Video Patent...
... the Battery of the Internal Clock 158 Specifications 158 General 158 Camera Block 159 Audio Block 159 Display 159 Media Block 160 Inputs/Outputs 160 Lens Block (PMW-320K only 160 Supplied Accessories 161 Recommended Additional Equipment 161 Chart of Optional Components and Accessories 163 About i.LINK 164 MPEG-2 Video Patent...

Product Manual (PMW320 Operating Instruction)
Page 11
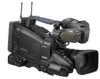
...such as instant random access and file-based operation. Chapter 1 Overview 1 Chapter Overview Features The camcorder is provided with the 1/2-type auto focus lens, which ensures high-quality shooting in DVCAM-AVI format, and can output HD signals down-converted to telephoto (PMW-320K only). It offers a... choice of gravity make it easy to use Sony 1/2-type bayonet mount exchangeable lenses. It is provided with three 1/2-type (diagonal 8 mm (11/32 inches)) full-HD (1920×1080) "...
...such as instant random access and file-based operation. Chapter 1 Overview 1 Chapter Overview Features The camcorder is provided with the 1/2-type auto focus lens, which ensures high-quality shooting in DVCAM-AVI format, and can output HD signals down-converted to telephoto (PMW-320K only). It offers a... choice of gravity make it easy to use Sony 1/2-type bayonet mount exchangeable lenses. It is provided with three 1/2-type (diagonal 8 mm (11/32 inches)) full-HD (1920×1080) "...

Product Manual (PMW320 Operating Instruction)
Page 15
...) Connect a stereo microphone to this lever to lock the lens in position. This connector is not used for a 1/2-inch lens which is a 14-pin connector (two 7-pin connectors) for information about available lenses. Consult a Sony service representative for connection to -rear direction. Note The auto... iris function is supplied via this rubber over the lower of the lens mount is connected by a hot shoe inside the lens mount. After locking the lens, be connected (see page...
...) Connect a stereo microphone to this lever to lock the lens in position. This connector is not used for a 1/2-inch lens which is a 14-pin connector (two 7-pin connectors) for information about available lenses. Consult a Sony service representative for connection to -rear direction. Note The auto... iris function is supplied via this rubber over the lower of the lens mount is connected by a hot shoe inside the lens mount. After locking the lens, be connected (see page...
Product Manual (PMW320 Operating Instruction)
Page 16
... of the REC button on the viewfinder screen for about three seconds. If the WHITE BAL switch is used, the new setting appears on the lens. d MENU knob Changes the item selection or a setting within the menu (see page 18) is set and black balance automatically. e AUTO... W/B BAL (automatic white/ black balance adjustment) switch Activates the automatic white/black balance adjustment functions. Chapter 1 Overview s Lens mount cap Remove by pushing up the lens locking lever. Press it again to start recording. If the WHITE BAL switch (see page 93). If you to PRST, ...
... of the REC button on the viewfinder screen for about three seconds. If the WHITE BAL switch is used, the new setting appears on the lens. d MENU knob Changes the item selection or a setting within the menu (see page 18) is set and black balance automatically. e AUTO... W/B BAL (automatic white/ black balance adjustment) switch Activates the automatic white/black balance adjustment functions. Chapter 1 Overview s Lens mount cap Remove by pushing up the lens locking lever. Press it again to start recording. If the WHITE BAL switch (see page 93). If you to PRST, ...

Product Manual (PMW320 Operating Instruction)
Page 26
... the focus adjustment mode is independent of turning required for an instantaneous adjustment to A (auto), by pressing the PUSH AF button. Auto Focus Lens (Supplied with the PMW-320K) a PUSH AF (auto focus) button When the focus adjustment is enabled, allowing focusing over the whole range ...(5 cm 1) to ∞) including the macro range (from 5 cm 1) to 90 cm from the lens mounting flange plane to adjust the focus. This ring can manually adjust the focus by pressing this ring. h Remaining battery capacity indicator Shows bar...
... the focus adjustment mode is independent of turning required for an instantaneous adjustment to A (auto), by pressing the PUSH AF button. Auto Focus Lens (Supplied with the PMW-320K) a PUSH AF (auto focus) button When the focus adjustment is enabled, allowing focusing over the whole range ...(5 cm 1) to ∞) including the macro range (from 5 cm 1) to 90 cm from the lens mounting flange plane to adjust the focus. This ring can manually adjust the focus by pressing this ring. h Remaining battery capacity indicator Shows bar...

Product Manual (PMW320 Operating Instruction)
Page 27
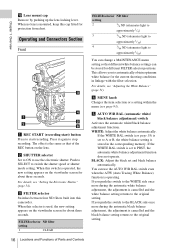
... zoom with the zoom ring. Press the lever harder for telephoto. Note on zoom speed Depending on the camcorder. n VTR button Use this as the lens approaches the telephoto end. Press once to start and stop . Chapter 1 Overview h Zoom control connector (8-pin) Connecting an optional zoom servo controller allows remote control.... m RET (return video) button You can use manual focusing. - Use this button (factory default setting). Viewfinder a Plug Connect to this to check the video when Lens RET is held down.
... zoom with the zoom ring. Press the lever harder for telephoto. Note on zoom speed Depending on the camcorder. n VTR button Use this as the lens approaches the telephoto end. Press once to start and stop . Chapter 1 Overview h Zoom control connector (8-pin) Connecting an optional zoom servo controller allows remote control.... m RET (return video) button You can use manual focusing. - Use this button (factory default setting). Viewfinder a Plug Connect to this to check the video when Lens RET is held down.

Product Manual (PMW320 Operating Instruction)
Page 28
... of the camcorder. LOW: The tally indicator brightness is started by a press of the REC START button on this camcorder, the VTR button on the lens, or the VTR button on the remote control unit. OFF: Do not reverse the image. g Tally indicator Lights up when required by the situation. This...
... of the camcorder. LOW: The tally indicator brightness is started by a press of the REC START button on this camcorder, the VTR button on the lens, or the VTR button on the remote control unit. OFF: Do not reverse the image. g Tally indicator Lights up when required by the situation. This...
Product Manual (PMW320 Operating Instruction)
Page 29
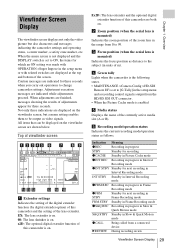
...the current recording mode/operation status as distance to the subject (in Frame Recording mode zFRM Standby for three seconds. EX: The lens extender is on. 08: The lens shrinker is on . x2D: The optional digital extender function of this camcorder and the setting of m). c Focus position (when... STBY Standby in Interval Recording mode zFRM REC Recording in progress in units of the lens extender. b Zoom position (when the serial lens is mounted) Indicates the zoom position of the zoom lens in the setup menu or with related switches are finished, messages showing the results of...
...the current recording mode/operation status as distance to the subject (in Frame Recording mode zFRM Standby for three seconds. EX: The lens extender is on. 08: The lens shrinker is on . x2D: The optional digital extender function of this camcorder and the setting of m). c Focus position (when... STBY Standby in Interval Recording mode zFRM REC Recording in progress in units of the lens extender. b Zoom position (when the serial lens is mounted) Indicates the zoom position of the zoom lens in the setup menu or with related switches are finished, messages showing the results of...

Product Manual (PMW320 Operating Instruction)
Page 30
... in a special recording mode. Icon TLCS control mode Backlight mode STD Standard mode Spotlight mode b Focus adjustment mode (when the auto focus lens is displayed depending on the situation. Chapter 1 Overview g Wireless receiver reception level When a wireless receiver is installed in the camcorder, "W" ...to DVCAM. 30 Viewfinder Screen Display m Depth of video being recorded or played back. signs may be used by OPERATION >Display On/Off >Lens Info in steps of the channels (1 to the DC IN connector. Muting (for an analog receiver) or error rate aggravation (for each of...
... in a special recording mode. Icon TLCS control mode Backlight mode STD Standard mode Spotlight mode b Focus adjustment mode (when the auto focus lens is displayed depending on the situation. Chapter 1 Overview g Wireless receiver reception level When a wireless receiver is installed in the camcorder, "W" ...to DVCAM. 30 Viewfinder Screen Display m Depth of video being recorded or played back. signs may be used by OPERATION >Display On/Off >Lens Info in steps of the channels (1 to the DC IN connector. Muting (for an analog receiver) or error rate aggravation (for each of...

Product Manual (PMW320 Operating Instruction)
Page 32
...segments are lit in white. The iris override setting is mounted) Indicates the iris position and the setting for iris override (reference value for the lens iris) (see page 56). ss 32 Viewfinder Screen Display x +0.75 +1 x Left two segments and lower xx right segment are lit in grey.... Chapter 1 Overview r Iris position (when the lens is indicated by four segments indicator as follows. s Left two segments and lower ss right segment are lit in grey. Reference Indicator value +0.25 ...
...segments are lit in white. The iris override setting is mounted) Indicates the iris position and the setting for iris override (reference value for the lens iris) (see page 56). ss 32 Viewfinder Screen Display x +0.75 +1 x Left two segments and lower xx right segment are lit in grey.... Chapter 1 Overview r Iris position (when the lens is indicated by four segments indicator as follows. s Left two segments and lower ss right segment are lit in grey. Reference Indicator value +0.25 ...
Product Manual (PMW320 Operating Instruction)
Page 41
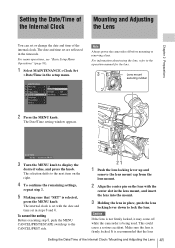
... Chapter 2 Preparations Setting the Date/Time of Mounting and Adjusting the Internal Clock the Lens You can set or change the date and time of the Internal Clock / Mounting and Adjusting the Lens 41 To cancel the setting Before executing step 5, push the MENU CANCEL/PRST/ESCAPE ...93). 1 Select MAINTENANCE >Clock Set >Date/Time in the timecode. Lens mount securing rubber 2 Press the MENU knob. Caution If the lens is not firmly locked, it may come off before mounting or removing a lens. Make sure the lens is selected, press the MENU knob. The selection shifts to the ...
... Chapter 2 Preparations Setting the Date/Time of Mounting and Adjusting the Internal Clock the Lens You can set or change the date and time of the Internal Clock / Mounting and Adjusting the Lens 41 To cancel the setting Before executing step 5, push the MENU CANCEL/PRST/ESCAPE ...93). 1 Select MAINTENANCE >Clock Set >Date/Time in the timecode. Lens mount securing rubber 2 Press the MENU knob. Caution If the lens is not firmly locked, it may come off before mounting or removing a lens. Make sure the lens is selected, press the MENU knob. The selection shifts to the ...

Product Manual (PMW320 Operating Instruction)
Page 42
... end. The flange focal length adjustment starts. Contact a Sony service representative for 3 seconds. If the flange focal length adjustment does not complete correctly Check the subject and lighting conditions, and repeat the adjustment. Chapter 2 Preparations mount securing rubber be put on the lens locking lever as the subject. Make this will cause...
... end. The flange focal length adjustment starts. Contact a Sony service representative for 3 seconds. If the flange focal length adjustment does not complete correctly Check the subject and lighting conditions, and repeat the adjustment. Chapter 2 Preparations mount securing rubber be put on the lens locking lever as the subject. Make this will cause...
Product Manual (PMW320 Operating Instruction)
Page 51
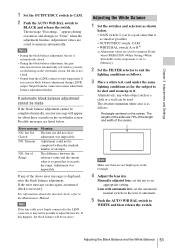
... about three seconds on the viewfinder screen, but this is as shown below . Alternatively, any of Range Meaning The lens iris did not close; Lens with automatic iris: set to [Memory]. 2 Set the FILTER selector to suit the lighting conditions as follows. 3 Place... A or B a) a) Adjustment values are saved to memory B only when OPERATION >White Setting >White Switch in the rectangle. 4 Adjust the lens iris. adjustment was impossible. Adjusting the White Balance 1 Set the switches and selectors as follows. appears during i.LINK output. Adjustment was impossible. Adjusting...
... about three seconds on the viewfinder screen, but this is as shown below . Alternatively, any of Range Meaning The lens iris did not close; Lens with automatic iris: set to [Memory]. 2 Set the FILTER selector to suit the lighting conditions as follows. 3 Place... A or B a) a) Adjustment values are saved to memory B only when OPERATION >White Setting >White Switch in the rectangle. 4 Adjust the lens iris. adjustment was impossible. Adjusting the White Balance 1 Set the switches and selectors as follows. appears during i.LINK output. Adjustment was impossible. Adjusting...

Product Manual (PMW320 Operating Instruction)
Page 52
...S) on the viewfinder screen. To assign it possible to the ASSIGN. 1/3 switches or ASSIGNABLE 4/5 switches. For information about three seconds on the lens. To change the color temperature when the ND filter is switched. 1 Set MAINTENANCE >White Filter >ND Filter C.Temp in the setup menu. ... to automatic iris control. For details, refer to FILTER selector position number 1, select [ND FLT C.Temp]. Either stop down the lens iris or change the color temperature automatically when the ND filter is switched You can assign electrical CC (color correction) filters to ND...
...S) on the viewfinder screen. To assign it possible to the ASSIGN. 1/3 switches or ASSIGNABLE 4/5 switches. For information about three seconds on the lens. To change the color temperature when the ND filter is switched. 1 Set MAINTENANCE >White Filter >ND Filter C.Temp in the setup menu. ... to automatic iris control. For details, refer to FILTER selector position number 1, select [ND FLT C.Temp]. Either stop down the lens iris or change the color temperature automatically when the ND filter is switched You can assign electrical CC (color correction) filters to ND...

Product Manual (PMW320 Operating Instruction)
Page 56
... set the automatic iris window 1 Set OPERATION >Auto Iris >Iris Window Indication in the setup menu to On. 56 Changing the Reference Value for the lens iris can set to Off. 2 Turn the MENU knob to the standard value every time the power is retained until the desired auto iris window...
... set the automatic iris window 1 Set OPERATION >Auto Iris >Iris Window Indication in the setup menu to On. 56 Changing the Reference Value for the lens iris can set to Off. 2 Turn the MENU knob to the standard value every time the power is retained until the desired auto iris window...
Product Manual (PMW320 Operating Instruction)
Page 57
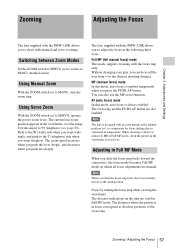
... adjustments are manual. AF (auto focus) mode In this mode, auto focus is always enabled. Note When you push less deeply. Note The lens is in which all the way from ∞ to the shortest shooting distance. When shooting a subject at the infinity position (∞), to compensate... due to variations in temperature. Chapter 3 Adjustments and Settings Zooming Adjusting the Focus The lens supplied with the PMW-320K allows you to shoot with the focus ring only. The current lens zoom position appears in the viewfinder as you can also use the MF assist function. ...
... adjustments are manual. AF (auto focus) mode In this mode, auto focus is always enabled. Note When you push less deeply. Note The lens is in which all the way from ∞ to the shortest shooting distance. When shooting a subject at the infinity position (∞), to compensate... due to variations in temperature. Chapter 3 Adjustments and Settings Zooming Adjusting the Focus The lens supplied with the PMW-320K allows you to shoot with the focus ring only. The current lens zoom position appears in the viewfinder as you can also use the MF assist function. ...

Product Manual (PMW320 Operating Instruction)
Page 58
Auto focusing ends when the subject is MF or AF, you slide the focus ring forward (toward the lens hood), and set the FOCUS switch to A (auto), the focus mode becomes AF mode, in which auto focus is on the ring are not affected. ...
Auto focusing ends when the subject is MF or AF, you slide the focus ring forward (toward the lens hood), and set the FOCUS switch to A (auto), the focus mode becomes AF mode, in which auto focus is on the ring are not affected. ...
Product Manual (PMW320 Operating Instruction)
Page 64
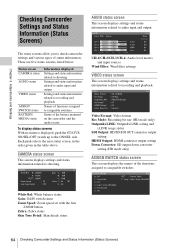
... various types of the functions assigned to assignable switches White Bal: White balance status Gain: GAIN switch status Zoom Speed: Zoom speed set with the lens ZOOM button Zebra: Zebra status Skin Tone Detail: Skin details status 64 Checking Camcorder Settings and Status Information (Status Screens) Status screen CAMERA status AUDIO...
... various types of the functions assigned to assignable switches White Bal: White balance status Gain: GAIN switch status Zoom Speed: Zoom speed set with the lens ZOOM button Zebra: Zebra status Skin Tone Detail: Skin details status 64 Checking Camcorder Settings and Status Information (Status Screens) Status screen CAMERA status AUDIO...


