Operating Instructions
Page 3
...of contents Basic Operations 4 Playing a CD 6 Listening to the radio 8 Playing a tape 10 Recording on a tape The CD Player 13 Using the display 14 Locating a specific track 15 Playing tracks repeatedly (Repeat Play) 16 Playing tracks in random order (Shuffle Play) 17 Creating your own program (Program ... 25 Waking up to music 28 Timer-recording radio programs 31 Falling asleep to music Setting Up 32 Hooking up the system 37 Saving power 38 Connecting optional components Additional Information 41 Precautions 43 Troubleshooting 46 Maintenance 47 Specifications Back cover Index Introduction 3
...of contents Basic Operations 4 Playing a CD 6 Listening to the radio 8 Playing a tape 10 Recording on a tape The CD Player 13 Using the display 14 Locating a specific track 15 Playing tracks repeatedly (Repeat Play) 16 Playing tracks in random order (Shuffle Play) 17 Creating your own program (Program ... 25 Waking up to music 28 Timer-recording radio programs 31 Falling asleep to music Setting Up 32 Hooking up the system 37 Saving power 38 Connecting optional components Additional Information 41 Precautions 43 Troubleshooting 46 Maintenance 47 Specifications Back cover Index Introduction 3

Operating Instructions
Page 4
With the label side up 2 Press u. Track number Playing time 4 Basic Operations Display (On the remote, press N on the CD tray. Basic Operations Playing a CD 2 1 For hookup instructions, see pages 32 - 36. 1 Press Z CD OPEN/CLOSE (direct power-on) and place the CD on the CD section.) The CD tray closes and the player plays all the tracks once.
With the label side up 2 Press u. Track number Playing time 4 Basic Operations Display (On the remote, press N on the CD tray. Basic Operations Playing a CD 2 1 For hookup instructions, see pages 32 - 36. 1 Press Z CD OPEN/CLOSE (direct power-on) and place the CD on the CD section.) The CD tray closes and the player plays all the tracks once.
Operating Instructions
Page 6
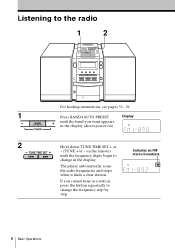
If you want appears in the display (direct power-on the remote) until the band you cannot tune in the display. change the frequency step by step. 6 Basic Operations on ). 2 Hold down TUNE TIME SET + or - (TUNE + or - The player automatically scans the radio frequencies and stops when it finds a clear station. Listening to the radio 1 2 For hookup instructions, see pages 32 - 36. 1 Press BAND•AUTO PRESET Display until the frequency digits begin to change in a station, press the button repeatedly to Indicates an FM stereo broadcast.
If you want appears in the display (direct power-on the remote) until the band you cannot tune in the display. change the frequency step by step. 6 Basic Operations on ). 2 Hold down TUNE TIME SET + or - (TUNE + or - The player automatically scans the radio frequencies and stops when it finds a clear station. Listening to the radio 1 2 For hookup instructions, see pages 32 - 36. 1 Press BAND•AUTO PRESET Display until the frequency digits begin to change in a station, press the button repeatedly to Indicates an FM stereo broadcast.

Operating Instructions
Page 7
Basic Operations Use these buttons for additional operations POWER MODE VOLUME +, - If the FM broadcast is noisy, press MODE until "MONO" appears in the display and the radio will play in "FM1" and "FM2". • If the FM broadcast is still noisy, disconnect the FM lead antenna and connect the ...
Basic Operations Use these buttons for additional operations POWER MODE VOLUME +, - If the FM broadcast is noisy, press MODE until "MONO" appears in the display and the radio will play in "FM1" and "FM2". • If the FM broadcast is still noisy, disconnect the FM lead antenna and connect the ...

Operating Instructions
Page 8
Display Tape counter Playing a tape 3 1, 2 For hookup instructions, see pages 32 - 36. 1 Press Z PUSH OPEN/CLOSE to With the side you want open the tape compartment and to close the compartment. 3 8 Basic Operations Press N. (On the remote, press TAPE N.) The player turns on (direct power-on) and starts playing. Use TYPE I (normal), TYPE II (high position) and TYPE IV (metal) tapes. 2 Press Z PUSH OPEN/CLOSE to play facing up insert a recorded tape.
Display Tape counter Playing a tape 3 1, 2 For hookup instructions, see pages 32 - 36. 1 Press Z PUSH OPEN/CLOSE to With the side you want open the tape compartment and to close the compartment. 3 8 Basic Operations Press N. (On the remote, press TAPE N.) The player turns on (direct power-on) and starts playing. Use TYPE I (normal), TYPE II (high position) and TYPE IV (metal) tapes. 2 Press Z PUSH OPEN/CLOSE to play facing up insert a recorded tape.

Operating Instructions
Page 9
To adjust the volume stop playback play one side of the tape Display shows both sides of the tape from the upper side to a tape, just press N or n. Basic Operations Use these buttons for additional operations POWER TAPE m, M Z ...
To adjust the volume stop playback play one side of the tape Display shows both sides of the tape from the upper side to a tape, just press N or n. Basic Operations Use these buttons for additional operations POWER TAPE m, M Z ...

Operating Instructions
Page 10
Use TYPE I (normal) tape only. Display To record from the radio: Tune in the station you want (see page 38). 1 Press Z PUSH OPEN/CLOSE to With the side you want to ... - 36. Press Z PUSH OPEN/CLOSE again to close the compartment. 2 Select the program source you want to record on a MiniDisc or DAT recorder, connect the component (see page 6). 10 Basic Operations To record on facing up open the tape compartment, and insert a blank tape. Recording on the CD section.
Use TYPE I (normal) tape only. Display To record from the radio: Tune in the station you want (see page 38). 1 Press Z PUSH OPEN/CLOSE to With the side you want to ... - 36. Press Z PUSH OPEN/CLOSE again to close the compartment. 2 Select the program source you want to record on a MiniDisc or DAT recorder, connect the component (see page 6). 10 Basic Operations To record on facing up open the tape compartment, and insert a blank tape. Recording on the CD section.

Operating Instructions
Page 11
When is displayed: If the tape is displayed: If the tape reaches to the following procedure. When is reversed with the recording of the track unfinished, the player will record the track again ...
When is displayed: If the tape is displayed: If the tape reaches to the following procedure. When is reversed with the recording of the track unfinished, the player will record the track again ...
Operating Instructions
Page 12
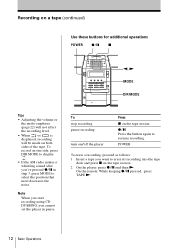
...POWER z/X x n, N MODE DIR MODE Tips • Adjusting the volume or the audio emphasis (page 22) will not affect the recording level. • When or is displayed, recording will be made on the tape section. 2 On the player: press z/X and then N. Note When you start recording using CD DUBBING, you cannot set.../off the player Press x on one side, press DIR MODE to resume recording. To record on the tape section z/X Press the button again to display . • If the AM radio makes a whistling sound after you want to select the position that most decreases the noise.
...POWER z/X x n, N MODE DIR MODE Tips • Adjusting the volume or the audio emphasis (page 22) will not affect the recording level. • When or is displayed, recording will be made on the tape section. 2 On the player: press z/X and then N. Note When you start recording using CD DUBBING, you cannot set.../off the player Press x on one side, press DIR MODE to resume recording. To record on the tape section z/X Press the button again to display . • If the AM radio makes a whistling sound after you want to select the position that most decreases the noise.

Operating Instructions
Page 13
...the current track number and playing time Press DISPLAY once twice three times * For a track whose number is more than 20 the remaining time appears as "- -:- -". DISPLAY The CD Player Checking the total track number and playing time Press DISPLAY in stop mode. Total track number Total ...playing time Checking the remaining time Press DISPLAY while playing a CD. The CD Player 13 The CD Player Using...
...the current track number and playing time Press DISPLAY once twice three times * For a track whose number is more than 20 the remaining time appears as "- -:- -". DISPLAY The CD Player Checking the total track number and playing time Press DISPLAY in stop mode. Total track number Total ...playing time Checking the remaining time Press DISPLAY while playing a CD. The CD Player 13 The CD Player Using...

Operating Instructions
Page 14
Example: To play track number 23, press >10 first, then 2 and 3. or > in pause and hold down until you find a specific point in the display. Turn off the indication by pressing x on the CD section. or > while playing and hold down until you find the point. . Number buttons ., > Note You ... over 10, press >10 first, then the corresponding number buttons. To locate a specific track directly a point while listening to the sound a point while observing the display Press number button of the track. . You can quickly locate any track using the number buttons.
Example: To play track number 23, press >10 first, then 2 and 3. or > in pause and hold down until you find a specific point in the display. Turn off the indication by pressing x on the CD section. or > while playing and hold down until you find the point. . Number buttons ., > Note You ... over 10, press >10 first, then the corresponding number buttons. To locate a specific track directly a point while listening to the sound a point while observing the display Press number button of the track. . You can quickly locate any track using the number buttons.

Operating Instructions
Page 15
all the tracks 1 Press MODE until "REP" disappears from the display. To cancel Repeat Play Press MODE until "REP ALL" appears. 2 Press u. The CD Player Playing tracks repeatedly (Repeat Play) You can play tracks repeatedly in ... 17). 3 Press u. tracks in normal, single, shuffle or program play modes (see step 3 on the CD section. The CD Player 15 "CD" appears in the display. 2 Proceed as follows: To repeat Do this a single track 1 Press MODE until "REP" and "PGM" appear. 2 Program tracks (see pages 16 - 18). ., > x u MODE On the...
all the tracks 1 Press MODE until "REP" disappears from the display. To cancel Repeat Play Press MODE until "REP ALL" appears. 2 Press u. The CD Player Playing tracks repeatedly (Repeat Play) You can play tracks repeatedly in ... 17). 3 Press u. tracks in normal, single, shuffle or program play modes (see step 3 on the CD section. The CD Player 15 "CD" appears in the display. 2 Proceed as follows: To repeat Do this a single track 1 Press MODE until "REP" and "PGM" appear. 2 Program tracks (see pages 16 - 18). ., > x u MODE On the...

Operating Instructions
Page 16
x u MODE On the remote Use N instead of u. 1 Press x on the CD section. To cancel Shuffle Play Press MODE until "SHUF" appears in the display. 3 Press u. Playing tracks in random order (Shuffle Play) You can play tracks in the display. 2 Press MODE until "SHUF" disappears from the display. 16 The CD Player "CD" appears in random order.
x u MODE On the remote Use N instead of u. 1 Press x on the CD section. To cancel Shuffle Play Press MODE until "SHUF" appears in the display. 3 Press u. Playing tracks in random order (Shuffle Play) You can play tracks in the display. 2 Press MODE until "SHUF" disappears from the display. 16 The CD Player "CD" appears in random order.

Operating Instructions
Page 17
...can arrange the playing order of up to 20 tracks on the CD section. or > to select the track you want to program in the display. 3 Press the number buttons for the tracks you want to program, and press ENTER MEMORY. Track number Playing order continued The CD Player 17... "CD" appears in the display. 2 Press MODE until "PGM" appears in the order you want . 4 Press N. 1 Press x on a CD. ., > x ENTER MEMORY MODE On the remote 1 Press x. 2 Press MODE until...
...can arrange the playing order of up to 20 tracks on the CD section. or > to select the track you want to program in the display. 3 Press the number buttons for the tracks you want to program, and press ENTER MEMORY. Track number Playing order continued The CD Player 17... "CD" appears in the display. 2 Press MODE until "PGM" appears in the order you want . 4 Press N. 1 Press x on a CD. ., > x ENTER MEMORY MODE On the remote 1 Press x. 2 Press MODE until...

Operating Instructions
Page 18
... have created the program, insert a blank tape into the tape compartment. 2 Press CD DUBBING. To cancel Program Play Press MODE until "PGM" disappears from the display. To check the order of tracks before play Press ENTER MEMORY on the CD section once if the CD is stopped and twice if the...
... have created the program, insert a blank tape into the tape compartment. 2 Press CD DUBBING. To cancel Program Play Press MODE until "PGM" disappears from the display. To check the order of tracks before play Press ENTER MEMORY on the CD section once if the CD is stopped and twice if the...
Operating Instructions
Page 19
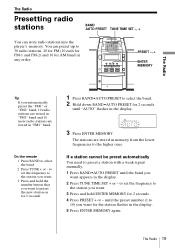
...The Radio 19 On the remote 1 Press BAND to select the band. 2 Hold down BAND•AUTO PRESET for 2 seconds until "AUTO" flashes in the display. 3 Press ENTER MEMORY. to set the frequency to the station you automatically preset the "FM1" or "FM2" band, 10 radio stations are stored in "FM1..." band and 10 more radio stations are stored in "FM2" band. until the band you want appears in the display. 5 Press ENTER MEMORY again. You can store radio stations into the player's memory. PRESET -, + ENTER MEMORY The Radio Tip If you want to preset ...
...The Radio 19 On the remote 1 Press BAND to select the band. 2 Hold down BAND•AUTO PRESET for 2 seconds until "AUTO" flashes in the display. 3 Press ENTER MEMORY. to set the frequency to the station you automatically preset the "FM1" or "FM2" band, 10 radio stations are stored in "FM1..." band and 10 more radio stations are stored in "FM2" band. until the band you want appears in the display. 5 Press ENTER MEMORY again. You can store radio stations into the player's memory. PRESET -, + ENTER MEMORY The Radio Tip If you want to preset ...

Operating Instructions
Page 20
BAND AUTO PRESET PRESET -, + On the remote 1 Press BAND to select the band. 2 Press the number button to display the preset number of the station you want . 1 Press BAND•AUTO PRESET to tune in your favorite stations. on the player or the number buttons on the remote to select the band. 2 Press PRESET + or - Preset number 20 The Radio to display the preset number of the station you 've preset the stations, use PRESET +, - Playing preset radio stations Once you want .
BAND AUTO PRESET PRESET -, + On the remote 1 Press BAND to select the band. 2 Press the number button to display the preset number of the station you want . 1 Press BAND•AUTO PRESET to tune in your favorite stations. on the player or the number buttons on the remote to select the band. 2 Press PRESET + or - Preset number 20 The Radio to display the preset number of the station you 've preset the stations, use PRESET +, - Playing preset radio stations Once you want .

Operating Instructions
Page 22
... SOUND to select the audio emphasis you are listening to normal sound, press the button again. 22 The Audio Emphasis "MEGA BASS" appears in the display. To return to .
... SOUND to select the audio emphasis you are listening to normal sound, press the button again. 22 The Audio Emphasis "MEGA BASS" appears in the display. To return to .

Operating Instructions
Page 23
Before you begin, hook up the system (see pages 32 36). 1 Press and hold CLOCK until you are on daylight saving time, press SUMMER TIME. 4 Press ENTER MEMORY. to set the hour ... starts from 00 seconds. continued The Timer 23 CLOCK TUNE TIME SET -, + AThuediToimEmerphasis/The Timer ENTER MEMORY SUMMER TIME Tip The time display system of this player is the 12-hour system. to set the minutes. 3 If you set the clock. m 2 Press TUNE TIME SET + or - The Timer Setting the clock "- -:- -" indication appears...
Before you begin, hook up the system (see pages 32 36). 1 Press and hold CLOCK until you are on daylight saving time, press SUMMER TIME. 4 Press ENTER MEMORY. to set the hour ... starts from 00 seconds. continued The Timer 23 CLOCK TUNE TIME SET -, + AThuediToimEmerphasis/The Timer ENTER MEMORY SUMMER TIME Tip The time display system of this player is the 12-hour system. to set the minutes. 3 If you set the clock. m 2 Press TUNE TIME SET + or - The Timer Setting the clock "- -:- -" indication appears...

Operating Instructions
Page 24
"SUMMER OFF" appears in the display for a few seconds. To cancel the summer time indication Press and hold SUMMER TIME for 2 seconds. "SUMMER ON" appears in the display for a few seconds. 24 The Timer Setting the clock (continued) To change the display to the daylight saving time (summer time) indication Press and hold SUMMER TIME again.
"SUMMER OFF" appears in the display for a few seconds. To cancel the summer time indication Press and hold SUMMER TIME for 2 seconds. "SUMMER ON" appears in the display for a few seconds. 24 The Timer Setting the clock (continued) To change the display to the daylight saving time (summer time) indication Press and hold SUMMER TIME again.


