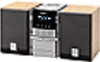
Operating Instructions
Page 2
... operating and maintenance (servicing) instructions in a particular installation. Information For customers in this manual could void your Sony dealer regarding this equipment does cause harmful interference to the presence of the left speaker. Once fully charged, the backup battery will increase eye hazard. Owner's Record The model number and the serial number are cautioned that to radio 2 Introduction communications. This symbol is connected to be determined by turning...
... operating and maintenance (servicing) instructions in a particular installation. Information For customers in this manual could void your Sony dealer regarding this equipment does cause harmful interference to the presence of the left speaker. Once fully charged, the backup battery will increase eye hazard. Owner's Record The model number and the serial number are cautioned that to radio 2 Introduction communications. This symbol is connected to be determined by turning...
Operating Instructions
Page 3
... CD Player 13 Using the display 14 Locating a specific track 15 Playing tracks repeatedly (Repeat Play) 16 Playing tracks in random order (Shuffle Play) 17 Creating your own program (Program Play) The Radio 19 Presetting radio stations 20 Playing preset radio stations The Tape Player 21 Finding the beginning of a track The Audio Emphasis 22 Selecting the audio emphasis (SOUND/MEGA BASS) The Timer 23 Setting the clock 25 Waking up to music 28 Timer-recording radio programs 31 Falling asleep to music Setting Up 32 Hooking up the system 37 Saving power 38 Connecting optional components...
... CD Player 13 Using the display 14 Locating a specific track 15 Playing tracks repeatedly (Repeat Play) 16 Playing tracks in random order (Shuffle Play) 17 Creating your own program (Program Play) The Radio 19 Presetting radio stations 20 Playing preset radio stations The Tape Player 21 Finding the beginning of a track The Audio Emphasis 22 Selecting the audio emphasis (SOUND/MEGA BASS) The Timer 23 Setting the clock 25 Waking up to music 28 Timer-recording radio programs 31 Falling asleep to music Setting Up 32 Hooking up the system 37 Saving power 38 Connecting optional components...
Operating Instructions
Page 6
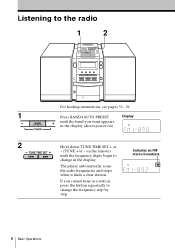
If you want appears in the display (direct power-on the remote) until the band you cannot tune in the display. change the frequency step by step. 6 Basic Operations on ). 2 Hold down TUNE TIME SET + or - (TUNE + or - The player automatically scans the radio frequencies and stops when it finds a clear station. Listening to the radio 1 2 For hookup instructions, see pages 32 - 36. 1 Press BAND•AUTO PRESET Display until the frequency digits begin to change in a station, press the button repeatedly to Indicates an FM stereo broadcast.
If you want appears in the display (direct power-on the remote) until the band you cannot tune in the display. change the frequency step by step. 6 Basic Operations on ). 2 Hold down TUNE TIME SET + or - (TUNE + or - The player automatically scans the radio frequencies and stops when it finds a clear station. Listening to the radio 1 2 For hookup instructions, see pages 32 - 36. 1 Press BAND•AUTO PRESET Display until the frequency digits begin to change in a station, press the button repeatedly to Indicates an FM stereo broadcast.

Operating Instructions
Page 7
on the remote) POWER To improve broadcast reception FM: Keep the FM lead antenna as horizontal as possible from the player and reorient it . To adjust the volume turn on automatically and starts playing the previous station. If the FM broadcast is noisy, press MODE until "MONO" appears in the display and the radio will play in monaural. • Next time you want separately in...
on the remote) POWER To improve broadcast reception FM: Keep the FM lead antenna as horizontal as possible from the player and reorient it . To adjust the volume turn on automatically and starts playing the previous station. If the FM broadcast is noisy, press MODE until "MONO" appears in the display and the radio will play in monaural. • Next time you want separately in...

Operating Instructions
Page 10
Display To record from the radio: Tune in the station you want (see pages 32 - 36. Use TYPE I (normal) tape only. Press Z PUSH OPEN/CLOSE again to record on facing up open the tape compartment, and insert a blank tape. To record from the CD player: Insert a CD (see page 38). 1 Press Z PUSH OPEN/CLOSE to With the side you want to close the compartment. 2 Select the program source you want...
Display To record from the radio: Tune in the station you want (see pages 32 - 36. Use TYPE I (normal) tape only. Press Z PUSH OPEN/CLOSE again to record on facing up open the tape compartment, and insert a blank tape. To record from the CD player: Insert a CD (see page 38). 1 Press Z PUSH OPEN/CLOSE to With the side you want to close the compartment. 2 Select the program source you want...
Operating Instructions
Page 12
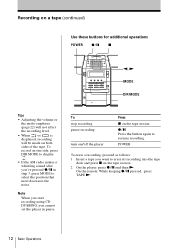
.... 2 On the player: press z/X and then N. To record on both sides of the tape. Recording on a tape (continued) Use these buttons for additional operations POWER z/X x n, N MODE DIR MODE Tips • Adjusting the volume or the audio emphasis (page 22) will not affect the recording level. • When or is displayed, recording will be made on one side, press DIR MODE to display . • If the AM radio makes a whistling sound after you...
.... 2 On the player: press z/X and then N. To record on both sides of the tape. Recording on a tape (continued) Use these buttons for additional operations POWER z/X x n, N MODE DIR MODE Tips • Adjusting the volume or the audio emphasis (page 22) will not affect the recording level. • When or is displayed, recording will be made on one side, press DIR MODE to display . • If the AM radio makes a whistling sound after you...

Operating Instructions
Page 14
... point. 14 The CD Player Locating a specific track You can also find a specific point in a track while playing a CD. Turn off the indication by pressing x on the CD section. Number buttons ., > Note You cannot locate a specific track if "SHUF" or "PGM" is lit in pause and hold down until you locate a track numbered over 10, press >10 first, then the corresponding number buttons. or > in the display. Tip When...
... point. 14 The CD Player Locating a specific track You can also find a specific point in a track while playing a CD. Turn off the indication by pressing x on the CD section. Number buttons ., > Note You cannot locate a specific track if "SHUF" or "PGM" is lit in pause and hold down until you locate a track numbered over 10, press >10 first, then the corresponding number buttons. or > in the display. Tip When...
Operating Instructions
Page 26
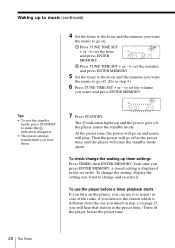
... MEMORY. Then the power will enter the standby mode again. to set the volume you want the music to go off the player before a timer playback starts If you turn on and music will go off at the preset time.) Turn off . (Do as usual ( in case of the radio, if you listen to the station which is displayed in step 1 on . 1 Press TUNE TIME SET + or - To change the setting, display the setting...
... MEMORY. Then the power will enter the standby mode again. to set the volume you want the music to go off the player before a timer playback starts If you turn on and music will go off at the preset time.) Turn off . (Do as usual ( in case of the radio, if you listen to the station which is displayed in step 1 on . 1 Press TUNE TIME SET + or - To change the setting, display the setting...
Operating Instructions
Page 28
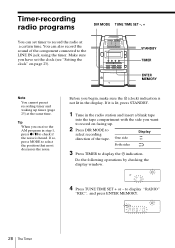
..., press STANDBY. 1 Tune in the radio station and insert a blank tape into the tape compartment with the side you receive the AM program in the display. One side Display Both sides 3 Press TIMER to select recording direction of the component connected to display "RADIO" "REC", and press ENTER MEMORY. 28 The Timer Timer-recording radio programs DIR MODE TUNE TIME SET -, + You can also record the sound of the tape. Make sure you begin, make sure the (clock) indication is...
..., press STANDBY. 1 Tune in the radio station and insert a blank tape into the tape compartment with the side you receive the AM program in the display. One side Display Both sides 3 Press TIMER to select recording direction of the component connected to display "RADIO" "REC", and press ENTER MEMORY. 28 The Timer Timer-recording radio programs DIR MODE TUNE TIME SET -, + You can also record the sound of the tape. Make sure you begin, make sure the (clock) indication is...

Operating Instructions
Page 30
... want to change and re-enter it as usual. Before the preset time, tune in the set order. To stop timer-recording Turn off the power. To use the player before a timer-recording starts If you press ENTER MEMORY, a stored setting is displayed in the station you can use it . To change the recording timer settings Press TIMER, then ENTER MEMORY. Each time you turn off the power. 30 The Timer Timer-recording radio programs (continued) Note During timer-recording, the SNOOZE function does not work.
... want to change and re-enter it as usual. Before the preset time, tune in the set order. To stop timer-recording Turn off the power. To use the player before a timer-recording starts If you press ENTER MEMORY, a stored setting is displayed in the station you can use it . To change the recording timer settings Press TIMER, then ENTER MEMORY. Each time you turn off the power. 30 The Timer Timer-recording radio programs (continued) Note During timer-recording, the SNOOZE function does not work.

Operating Instructions
Page 32
... the POWER IN jack of the player before connecting/ disconnecting the AC power cord. • Connect the supplied speakers to this player. If you connect any other speakers or equipment, a malfunction may occur. to a wall outlet 1 Audio connecting cord 3AC power cord 1 Speaker cord 1 Hooking up the system According to turn off the power of the player. 32 Setting Up Connect the AC power cord last. 2 AM loop antenna 2 FM lead antenna 1 Power cord Left speaker Right speaker...
... the POWER IN jack of the player before connecting/ disconnecting the AC power cord. • Connect the supplied speakers to this player. If you connect any other speakers or equipment, a malfunction may occur. to a wall outlet 1 Audio connecting cord 3AC power cord 1 Speaker cord 1 Hooking up the system According to turn off the power of the player. 32 Setting Up Connect the AC power cord last. 2 AM loop antenna 2 FM lead antenna 1 Power cord Left speaker Right speaker...

Operating Instructions
Page 35
continued Setting Up 35 Setting Up 3 Connecting the AC power cord Connect the AC power cord of the left speaker to a wall outlet 4 Inserting batteries into the remote Insert two AA (size R6) batteries (not supplied) Replacing batteries With normal use, the batteries should last for about six months. to a wall outlet. When the remote no longer operates the player, replace all the batteries with new ones.
continued Setting Up 35 Setting Up 3 Connecting the AC power cord Connect the AC power cord of the left speaker to a wall outlet 4 Inserting batteries into the remote Insert two AA (size R6) batteries (not supplied) Replacing batteries With normal use, the batteries should last for about six months. to a wall outlet. When the remote no longer operates the player, replace all the batteries with new ones.

Operating Instructions
Page 37
The player enters the lower power consumption standby mode. To make the time indication appear, press and hold DISPLAY for about 2 seconds when the player is turned off. Setting Up Setting Up 37 DISPLAY When power is turned off , this player consumes about 7.4 W for time indication, timer operation and remote control reception. Saving power Even when power is turned off , press and hold DISPLAY for about 2 seconds. If you use the saving power function, you can reduce power consumption to less than 1W.
The player enters the lower power consumption standby mode. To make the time indication appear, press and hold DISPLAY for about 2 seconds when the player is turned off. Setting Up Setting Up 37 DISPLAY When power is turned off , this player consumes about 7.4 W for time indication, timer operation and remote control reception. Saving power Even when power is turned off , press and hold DISPLAY for about 2 seconds. If you use the saving power function, you can reduce power consumption to less than 1W.
Operating Instructions
Page 38
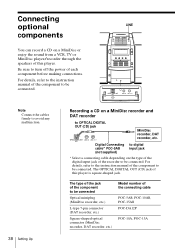
... OPTICAL DIGITAL OUT (CD) jack of this player. The type of the jack of the component to turn off the power of each component before making connections. Be sure to be connected. For details, refer to the instruction manual of the component to OPTICAL DIGITAL OUT (CD) jack MiniDisc recorder, DAT recorder, etc. Note Connect the cables firmly to avoid any malfunction. 38 Setting Up Recording a CD on a MiniDisc or enjoy the sound from...
... OPTICAL DIGITAL OUT (CD) jack of this player. The type of the jack of the component to turn off the power of each component before making connections. Be sure to be connected. For details, refer to the instruction manual of the component to OPTICAL DIGITAL OUT (CD) jack MiniDisc recorder, DAT recorder, etc. Note Connect the cables firmly to avoid any malfunction. 38 Setting Up Recording a CD on a MiniDisc or enjoy the sound from...

Operating Instructions
Page 39
... MiniDisc player/ recorder to line output jack 1 Connect the LINE IN jack of this player with the digital input jack of the MiniDisc recorder or other component using the digital connecting cable (not supplied) . 2 Turn on the power of this player and the connected component. 3 Make the connected component ready for recording. 4 Start playing a CD on this player and the connected component. 3 Press LINE and start playing sound on the power of this player. continued Setting Up 39 to LINE IN jack Audio connecting cable For MiniDisc recorder...
... MiniDisc player/ recorder to line output jack 1 Connect the LINE IN jack of this player with the digital input jack of the MiniDisc recorder or other component using the digital connecting cable (not supplied) . 2 Turn on the power of this player and the connected component. 3 Make the connected component ready for recording. 4 Start playing a CD on this player and the connected component. 3 Press LINE and start playing sound on the power of this player. continued Setting Up 39 to LINE IN jack Audio connecting cable For MiniDisc recorder...

Operating Instructions
Page 40
Connecting optional components (continued) Listening through the speakers of other audio equipment Amplifier to LINE OUT jack Audio connecting cable RK-G129 (1.5 m) (not supplied) to analog line input jack 1 Connect the LINE OUT jack of this player with the analog line input jack of the amplifier using the audio connecting cable (not supplied) . 2 Turn on the power of this player and the amplifier and start playing sound on this player. 40 Setting Up
Connecting optional components (continued) Listening through the speakers of other audio equipment Amplifier to LINE OUT jack Audio connecting cable RK-G129 (1.5 m) (not supplied) to analog line input jack 1 Connect the LINE OUT jack of this player with the analog line input jack of the amplifier using the audio connecting cable (not supplied) . 2 Turn on the power of this player and the amplifier and start playing sound on this player. 40 Setting Up

Operating Instructions
Page 41
...; If the player has not been used for a long time, set it in the playback mode to choose a location in the car where the player will not operate properly. Refer servicing to prevent possible damage from the wall outlet when it any further. In this occur, the player will not be used for the speakers, keep personal credit cards using magnetic coding or springwound watches...
...; If the player has not been used for a long time, set it in the playback mode to choose a location in the car where the player will not operate properly. Refer servicing to prevent possible damage from the wall outlet when it any further. In this occur, the player will not be used for the speakers, keep personal credit cards using magnetic coding or springwound watches...

Operating Instructions
Page 43
... the power cord to the POWER IN of the player to switch the function of the player (see page 32). • Connect the audio connecting cord correctly (see page 33). • Adjust the volume. • Unplug the headphones when listening through speakers. • Someone is using a personal computer (CD-R, etc.). Remedy • Press POWER to turn on the CD section to "CD". • Reduce the volume. • Clean the CD, or replace it...
... the power cord to the POWER IN of the player to switch the function of the player (see page 32). • Connect the audio connecting cord correctly (see page 33). • Adjust the volume. • Unplug the headphones when listening through speakers. • Someone is using a personal computer (CD-R, etc.). Remedy • Press POWER to turn on the CD section to "CD". • Reduce the volume. • Clean the CD, or replace it...

Operating Instructions
Page 47
... channelminimum RMS power, with Sony cassette C-60 Frequency response TYPE I (normal): 50 - 14,000 Hz General Speaker Full range: 8 cm (3 1⁄4 in AC operation. Other Specifications CD player section System Compact disc digital audio system Laser diode properties Material: GaAlAs Wave length: 780 nm Emission duration: Continuous Laser output: Less than 10 % total harmonic distortion in .) dia., 4 ohms, cone type x 2 Input LINE IN jack (stereo minijack) Minimum input level 440 mV Outputs Headphones jack (stereo minijack...
... channelminimum RMS power, with Sony cassette C-60 Frequency response TYPE I (normal): 50 - 14,000 Hz General Speaker Full range: 8 cm (3 1⁄4 in AC operation. Other Specifications CD player section System Compact disc digital audio system Laser diode properties Material: GaAlAs Wave length: 780 nm Emission duration: Continuous Laser output: Less than 10 % total harmonic distortion in .) dia., 4 ohms, cone type x 2 Input LINE IN jack (stereo minijack) Minimum input level 440 mV Outputs Headphones jack (stereo minijack...
Operating Instructions
Page 48
... 16 tracks repeatedly 15 Presetting radio stations 19 Program Play 17 R Radio stations playing 6 presetting 19 Recording all the tracks on CD 11 on a tape 10 on an MD or a DAT 38 programed tracks 18 timer-recording radio programs 28 Repeat Play 15 S Selecting audio emphasis 22 direction of the tape 9 Setting the clock 23 Setting up 32 Shuffle Play 16 SNOOZE 27 SOUND 22 SUMMER TIME 23 T Tape player 21 Timer Falling asleep to music 31 Timer-recording radio programs 28 Waking up to music 25 Troubleshooting 43 U, V, W, X, Y, Z Using the display 13 Sony Corporation...
... 16 tracks repeatedly 15 Presetting radio stations 19 Program Play 17 R Radio stations playing 6 presetting 19 Recording all the tracks on CD 11 on a tape 10 on an MD or a DAT 38 programed tracks 18 timer-recording radio programs 28 Repeat Play 15 S Selecting audio emphasis 22 direction of the tape 9 Setting the clock 23 Setting up 32 Shuffle Play 16 SNOOZE 27 SOUND 22 SUMMER TIME 23 T Tape player 21 Timer Falling asleep to music 31 Timer-recording radio programs 28 Waking up to music 25 Troubleshooting 43 U, V, W, X, Y, Z Using the display 13 Sony Corporation...


