
VAIO User Guide
Page 3
Contents Welcome 5 Locating Controls and Connectors 7 Front Panel Overview 7 Back Panel Overview 10 VAIO Action Setup 13 Shortcut Keys 13 To Change the Sony Software Window Design 15 VAIO AV Applications 17 Overview of Preinstalled Software 17 DigitalPrint Software 19 DVgate Software 27 MovieShaker Software 30 PictureGear Software 37 Smart Capture Software 40 SonicStage Software 49 VisualFlow Software 56 Configuring Your VAIO Computer 59 Hard Disk Drive Partition 59 i.LINK (IEEE1394) Compatibility 60 To Enable Ethernet Connectivity 61 3
Contents Welcome 5 Locating Controls and Connectors 7 Front Panel Overview 7 Back Panel Overview 10 VAIO Action Setup 13 Shortcut Keys 13 To Change the Sony Software Window Design 15 VAIO AV Applications 17 Overview of Preinstalled Software 17 DigitalPrint Software 19 DVgate Software 27 MovieShaker Software 30 PictureGear Software 37 Smart Capture Software 40 SonicStage Software 49 VisualFlow Software 56 Configuring Your VAIO Computer 59 Hard Disk Drive Partition 59 i.LINK (IEEE1394) Compatibility 60 To Enable Ethernet Connectivity 61 3

VAIO User Guide
Page 4
VAIO Digital Studio Computer User Guide System, Application, and Driver Recovery CD(s 63 To Use the System Recovery CD(s 63 To Use the Application Recovery CD(s 65 To Use the Driver Recovery CD 66 Troubleshooting 67 Topics 67 Notes on Use 79 For Answers to Your Software Questions 84 Resources 87 Index 89 4
VAIO Digital Studio Computer User Guide System, Application, and Driver Recovery CD(s 63 To Use the System Recovery CD(s 63 To Use the Application Recovery CD(s 65 To Use the Driver Recovery CD 66 Troubleshooting 67 Topics 67 Notes on Use 79 For Answers to Your Software Questions 84 Resources 87 Index 89 4

VAIO User Guide
Page 5
VAIO Digital Studio Computer User Guide Welcome Thank you to become familiar with the hardware and software applications included with your Sony VAIO® computer! The information provided here is a superb blend of high technology and easy-to help you for purchasing your system. 5 Your new computer is designed to -use functionality.
VAIO Digital Studio Computer User Guide Welcome Thank you to become familiar with the hardware and software applications included with your Sony VAIO® computer! The information provided here is a superb blend of high technology and easy-to help you for purchasing your system. 5 Your new computer is designed to -use functionality.
VAIO User Guide
Page 7
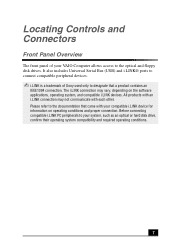
... system, and compatible i.LINK devices. Please refer to the documentation that a product contains an IEEE1394 connection. Before connecting compatible i.LINK PC peripherals to your VAIO Computer allows access to the optical and floppy disk drives. It also includes Universal Serial Bus (USB) and i.LINK® ports to connect compatible peripheral devices...or hard disk drive, confirm their operating system compatibility and required operating conditions. 7 Locating Controls and Connectors Front Panel Overview The front panel of Sony used only to designate that came with each other.
... system, and compatible i.LINK devices. Please refer to the documentation that a product contains an IEEE1394 connection. Before connecting compatible i.LINK PC peripherals to your VAIO Computer allows access to the optical and floppy disk drives. It also includes Universal Serial Bus (USB) and i.LINK® ports to connect compatible peripheral devices...or hard disk drive, confirm their operating system compatibility and required operating conditions. 7 Locating Controls and Connectors Front Panel Overview The front panel of Sony used only to designate that came with each other.

VAIO User Guide
Page 8
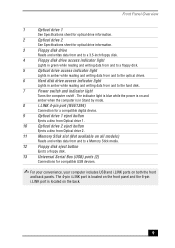
VAIO Digital Studio Computer User Guide Front panel ✍ Your computer may not be supplied with all of the features listed, depending on the system configuration you purchased. 8
VAIO Digital Studio Computer User Guide Front panel ✍ Your computer may not be supplied with all of the features listed, depending on the system configuration you purchased. 8
VAIO User Guide
Page 9
... 6-pin i.LINK port is in amber while reading and writing data from and to the hard disk. 7 Power switch and indicator light Turns the computer on/off . Front Panel Overview 1 Optical drive 1 See Specifications sheet for optical drive information. 2 Optical drive 2 See Specifications sheet for optical ...button Ejects a floppy disk. 13 Universal Serial Bus (USB) ports (2) Connections for compatible USB devices. ✍ For your convenience, your computer includes USB and i.LINK ports on both the front and back panels. The indicator light is blue while the power is on and amber ...
... 6-pin i.LINK port is in amber while reading and writing data from and to the hard disk. 7 Power switch and indicator light Turns the computer on/off . Front Panel Overview 1 Optical drive 1 See Specifications sheet for optical drive information. 2 Optical drive 2 See Specifications sheet for optical ...button Ejects a floppy disk. 13 Universal Serial Bus (USB) ports (2) Connections for compatible USB devices. ✍ For your convenience, your computer includes USB and i.LINK ports on both the front and back panels. The indicator light is blue while the power is on and amber ...
VAIO User Guide
Page 10
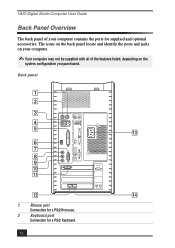
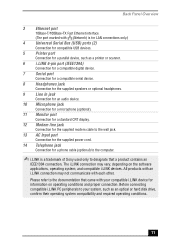
... and identify the ports and jacks on the system configuration you purchased. VAIO Digital Studio Computer User Guide Back Panel Overview The back panel of your computer. ✍ Your computer may not be supplied with all of the features listed, depending on your computer contains the ports for a PS/2 Keyboard. 10 Back panel KEYBOARD MOUSE...
... and identify the ports and jacks on the system configuration you purchased. VAIO Digital Studio Computer User Guide Back Panel Overview The back panel of your computer. ✍ Your computer may not be supplied with all of the features listed, depending on your computer contains the ports for a PS/2 Keyboard. 10 Back panel KEYBOARD MOUSE...
VAIO User Guide
Page 11
... to the wall jack. 13 AC Input port Connection for the supplied power cord. 14 Telephone jack Connection for a phone cable (optional) to the computer. ✍ i.LINK is for LAN connections only.) 4 Universal Serial Bus (USB) ports (2) Connection for compatible USB devices. 5 Printer port Connection ...connection. Back Panel Overview 3 Ethernet port 10Base-T/100Base-TX Fast Ethernet interface. (The port marked with (Network) is a trademark of Sony used only to the documentation that a product contains an IEEE1394 connection. The i.LINK connection may not communicate with each other.
... to the wall jack. 13 AC Input port Connection for the supplied power cord. 14 Telephone jack Connection for a phone cable (optional) to the computer. ✍ i.LINK is for LAN connections only.) 4 Universal Serial Bus (USB) ports (2) Connection for compatible USB devices. 5 Printer port Connection ...connection. Back Panel Overview 3 Ethernet port 10Base-T/100Base-TX Fast Ethernet interface. (The port marked with (Network) is a trademark of Sony used only to the documentation that a product contains an IEEE1394 connection. The i.LINK connection may not communicate with each other.

VAIO User Guide
Page 13
...conditions and proper connection. The i.LINK connection may not communicate with each other applications. ✍ i.LINK is a trademark of Sony used only to the documentation that a product contains an IEEE1394 connection. Outlook® Express ❑ S2 - PictureGear™ ...Demo You can reprogram the S keys to launch other . Before connecting compatible i.LINK PC peripherals to your computer's Shortcut keys (S Keys). VAIO Action Setup VAIO Action Setup manages the settings for information on the software applications, operating system, and compatible i.LINK devices. ...
...conditions and proper connection. The i.LINK connection may not communicate with each other applications. ✍ i.LINK is a trademark of Sony used only to the documentation that a product contains an IEEE1394 connection. Outlook® Express ❑ S2 - PictureGear™ ...Demo You can reprogram the S keys to launch other . Before connecting compatible i.LINK PC peripherals to your computer's Shortcut keys (S Keys). VAIO Action Setup VAIO Action Setup manages the settings for information on the software applications, operating system, and compatible i.LINK devices. ...
VAIO User Guide
Page 14
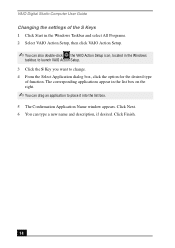
... appear in the list box on the right. ✍ You can also double-click the VAIO Action Setup icon, located in the Windows Taskbar and select All Programs. 2 Select VAIO Action Setup, then click VAIO Action Setup. ✍ You can drag an application to change. 4 From the Select Application... type of the S Keys 1 Click Start in the Windows taskbar, to launch VAIO Action Setup. 3 Click the S Key you want to place it into the list box. 5 The Confirmation Application Name window appears. VAIO Digital Studio Computer User Guide Changing the settings of function. Click Next. 6 You can type a...
... appear in the list box on the right. ✍ You can also double-click the VAIO Action Setup icon, located in the Windows Taskbar and select All Programs. 2 Select VAIO Action Setup, then click VAIO Action Setup. ✍ You can drag an application to change. 4 From the Select Application... type of the S Keys 1 Click Start in the Windows taskbar, to launch VAIO Action Setup. 3 Click the S Key you want to place it into the list box. 5 The Confirmation Application Name window appears. VAIO Digital Studio Computer User Guide Changing the settings of function. Click Next. 6 You can type a...
VAIO User Guide
Page 15
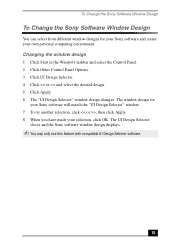
... window design displays. ✍ You may only use this feature with compatible UI Design Selector software. 15 The window design for your Sony software and create your selection, click OK. Changing the window design 1 Click Start in the Windows taskbar and select the Control Panel.... design. 5 Click Apply. 6 The "UI Design Selector" window design changes. To Change the Sony Software Window Design To Change the Sony Software Window Design You can select from different window designs for your Sony software will match the "UI Design Selector" window. 7 To try another selection, click >, then...
... window design displays. ✍ You may only use this feature with compatible UI Design Selector software. 15 The window design for your Sony software and create your selection, click OK. Changing the window design 1 Click Start in the Windows taskbar and select the Control Panel.... design. 5 Click Apply. 6 The "UI Design Selector" window design changes. To Change the Sony Software Window Design To Change the Sony Software Window Design You can select from different window designs for your Sony software will match the "UI Design Selector" window. 7 To try another selection, click >, then...

VAIO User Guide
Page 17
... recorder to -use advanced multimedia technology. Media Bar® DVD Player Sony Electronics Inc. Digital Print can also be supplied with all of the software applications listed, depending on the specific computer model you purchased. Your computer's visual presentation of the VAIO AV applications may not be used to any ordinary DVD player, to...
... recorder to -use advanced multimedia technology. Media Bar® DVD Player Sony Electronics Inc. Digital Print can also be supplied with all of the software applications listed, depending on the specific computer model you purchased. Your computer's visual presentation of the VAIO AV applications may not be used to any ordinary DVD player, to...

VAIO User Guide
Page 18
VAIO Digital Studio Computer User Guide MovieShaker™ Sony Electronics Inc. Sony's original MovieShaker software creates personal movies that supports the i.LINK interface. This image management software displays images from your hard ... audio storage, SonicStage sports a new Music Visualizer, a sleek new player skin design, audio CD burning capability, and a parametric equalizer for computer, digital audio/video and network convergence. VisualFlow™ Sony Electronics Inc. Continuing to take advantage of new features to send multimedia messages via e-mail. PictureGear™...
VAIO Digital Studio Computer User Guide MovieShaker™ Sony Electronics Inc. Sony's original MovieShaker software creates personal movies that supports the i.LINK interface. This image management software displays images from your hard ... audio storage, SonicStage sports a new Music Visualizer, a sleek new player skin design, audio CD burning capability, and a parametric equalizer for computer, digital audio/video and network convergence. VisualFlow™ Sony Electronics Inc. Continuing to take advantage of new features to send multimedia messages via e-mail. PictureGear™...
VAIO User Guide
Page 19
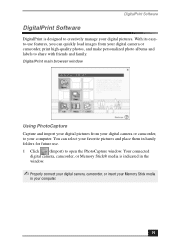
...favorite pictures and place them in your digital pictures. Your connected digital camera, camcorder, or Memory Stick® media is designed to creatively manage your computer. 19 You can quickly load images from your digital camera or camcorder, to your digital camera or camcorder, print high-quality photos, and make ...personalized photo albums and labels to open the PhotoCapture window. DigitalPrint main browser window Using PhotoCapture Capture and import your digital pictures from your computer. With its easyto-use . 1 Click (Import) to share with friends and family.
...favorite pictures and place them in your digital pictures. Your connected digital camera, camcorder, or Memory Stick® media is designed to creatively manage your computer. 19 You can quickly load images from your digital camera or camcorder, to your digital camera or camcorder, print high-quality photos, and make ...personalized photo albums and labels to open the PhotoCapture window. DigitalPrint main browser window Using PhotoCapture Capture and import your digital pictures from your computer. With its easyto-use . 1 Click (Import) to share with friends and family.
VAIO User Guide
Page 20
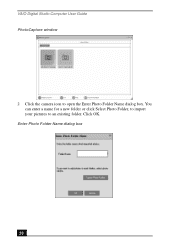
Click OK. You can enter a name for a new folder or click Select Photo Folder, to import your pictures to open the Enter Photo Folder Name dialog box. Enter Photo Folder Name dialog box 20 VAIO Digital Studio Computer User Guide PhotoCapture window 2 Click the camera icon to an existing folder.
Click OK. You can enter a name for a new folder or click Select Photo Folder, to import your pictures to open the Enter Photo Folder Name dialog box. Enter Photo Folder Name dialog box 20 VAIO Digital Studio Computer User Guide PhotoCapture window 2 Click the camera icon to an existing folder.
VAIO User Guide
Page 21
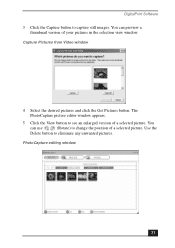
You can preview a thumbnail version of a selected picture. Use the Delete button to see an enlarged version of a selected picture. You can use (Rotate) to capture still images. Capture Pictures from Video window 4 Select the desired pictures and click the Get Pictures button. PhotoCapture editing window 21 The PhotoCapture picture editor window appears. 5 Click the View button to eliminate any unwanted pictures. DigitalPrint Software 3 Click the Capture button to change the position of your pictures in the selection view window.
You can preview a thumbnail version of a selected picture. Use the Delete button to see an enlarged version of a selected picture. You can use (Rotate) to capture still images. Capture Pictures from Video window 4 Select the desired pictures and click the Get Pictures button. PhotoCapture editing window 21 The PhotoCapture picture editor window appears. 5 Click the View button to eliminate any unwanted pictures. DigitalPrint Software 3 Click the Capture button to change the position of your pictures in the selection view window.

VAIO User Guide
Page 22
... to print. 3 Click the Photo Print button at the top of prints you want to open the PhotoCollection window. Select the number of the window. VAIO Digital Studio Computer User Guide Using PhotoCollection You can select and print your favorite digital pictures, using your...
... to print. 3 Click the Photo Print button at the top of prints you want to open the PhotoCollection window. Select the number of the window. VAIO Digital Studio Computer User Guide Using PhotoCollection You can select and print your favorite digital pictures, using your...
VAIO User Guide
Page 23
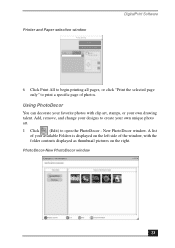
PhotoDecor-New PhotoDecor window 23 Printer and Paper selection window DigitalPrint Software 6 Click Print All to begin printing all pages, or click "Print the selected page only" to print a specific page of the window, with clip art, stamps, or your own drawing talent. A list of your own unique photo art. 1 Click (Edit) to create your available Folders is displayed on the left side of photos. Add, remove, and change your designs to open the PhotoDecor - New PhotoDecor window. Using PhotoDecor You can decorate your favorite photos with the folder contents displayed as ...
PhotoDecor-New PhotoDecor window 23 Printer and Paper selection window DigitalPrint Software 6 Click Print All to begin printing all pages, or click "Print the selected page only" to print a specific page of the window, with clip art, stamps, or your own drawing talent. A list of your own unique photo art. 1 Click (Edit) to create your available Folders is displayed on the left side of photos. Add, remove, and change your designs to open the PhotoDecor - New PhotoDecor window. Using PhotoDecor You can decorate your favorite photos with the folder contents displayed as ...
VAIO User Guide
Page 24
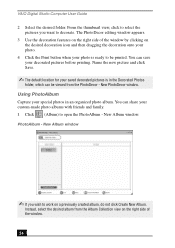
.... Name the new picture and click Save. ✍ The default location for your special photos in the Decorated Photos folder, which can be printed. VAIO Digital Studio Computer User Guide 2 Select the desired folder. New Album window ✍ If you want to be viewed from the Album Collection view on the desired...
.... Name the new picture and click Save. ✍ The default location for your special photos in the Decorated Photos folder, which can be printed. VAIO Digital Studio Computer User Guide 2 Select the desired folder. New Album window ✍ If you want to be viewed from the Album Collection view on the desired...
VAIO User Guide
Page 25
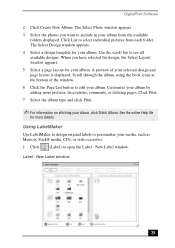
A preview of the window. 6 Click the Page List button to select individual pictures from the available folders displayed. New Label window. Click Print. 7 Select the album type and click Print. ✍ For information on stitching your selected design and page layout is displayed. Label - New Label window 25 DigitalPrint Software 2 Click Create New Album. Use the scroll bar to include in your album. Customize your album. Click List to edit your album by adding more details. Scroll through the album, using the book icons at the bottom of your album, click Stitch Album....
A preview of the window. 6 Click the Page List button to select individual pictures from the available folders displayed. New Label window. Click Print. 7 Select the album type and click Print. ✍ For information on stitching your selected design and page layout is displayed. Label - New Label window 25 DigitalPrint Software 2 Click Create New Album. Use the scroll bar to include in your album. Customize your album. Click List to edit your album by adding more details. Scroll through the album, using the book icons at the bottom of your album, click Stitch Album....