System Reference Manual
Page 11
Configuring Your System 15 Accessing the BIOS Setup Utility 16 Changing Power Management Settings 17 xi Identifying Components 1 Front View...2 Drives ...3 Buttons and Switches 4 Indicators 5 Connectors 6 Rear View ...7 Icon Labels 8 I/O Connectors 10 ...
Configuring Your System 15 Accessing the BIOS Setup Utility 16 Changing Power Management Settings 17 xi Identifying Components 1 Front View...2 Drives ...3 Buttons and Switches 4 Indicators 5 Connectors 6 Rear View ...7 Icon Labels 8 I/O Connectors 10 ...
System Reference Manual
Page 29
Chapter 2 Configuring Your System This chapter contains information on configuring your system. ❑ Making changes to the BIOS settings. ❑ Making changes to the display's power management settings. 15
Chapter 2 Configuring Your System This chapter contains information on configuring your system. ❑ Making changes to the BIOS settings. ❑ Making changes to the display's power management settings. 15
System Reference Manual
Page 30
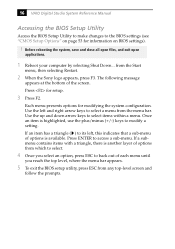
... to select. 4 Once you reach the top level, where the menu bar appears. 5 To exit the BIOS setup utility, press ESC from the Start menu, then selecting Restart. 2 When the Sony logo appears, press F3. If a submenu contains items with a triangle, there is available. Each menu presents...save and close all open files, and exit open applications. 1 Reboot your computer by selecting Shut Down... 16 VAIO Digital Studio System Reference Manual Accessing the BIOS Setup Utility Access the BIOS Setup Utility to make changes to the BIOS settings (see "CMOS Setup Options" on page 53 for information on...
... to select. 4 Once you reach the top level, where the menu bar appears. 5 To exit the BIOS setup utility, press ESC from the Start menu, then selecting Restart. 2 When the Sony logo appears, press F3. If a submenu contains items with a triangle, there is available. Each menu presents...save and close all open files, and exit open applications. 1 Reboot your computer by selecting Shut Down... 16 VAIO Digital Studio System Reference Manual Accessing the BIOS Setup Utility Access the BIOS Setup Utility to make changes to the BIOS settings (see "CMOS Setup Options" on page 53 for information on...
System Reference Manual
Page 44
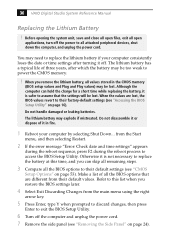
... after which the battery may explode if mistreated. from their default settings (see "Accessing the BIOS Setup Utility" on page 53). Do not handle damaged or leaking batteries. 30 VAIO Digital Studio System Reference Manual Replacing the Lithium Battery ! The lithium battery has a typical life... not disassemble it or dispose of three years, after turning it in the CMOS memory (BIOS setup values and Plug and Play values) may need to access the BIOS Setup Utility. Although the computer can skip all remaining steps. 3 Compare all open applications, turn off . Before opening ...
... after which the battery may explode if mistreated. from their default settings (see "Accessing the BIOS Setup Utility" on page 53). Do not handle damaged or leaking batteries. 30 VAIO Digital Studio System Reference Manual Replacing the Lithium Battery ! The lithium battery has a typical life... not disassemble it or dispose of three years, after turning it in the CMOS memory (BIOS setup values and Plug and Play values) may need to access the BIOS Setup Utility. Although the computer can skip all remaining steps. 3 Compare all open applications, turn off . Before opening ...

System Reference Manual
Page 46
... are now restored. If no error message displays, the computer's BIOS settings were retained during the reboot process to exit the BIOS Setup Utility. appears during the reboot sequence, press F2 during...skip the remaining steps. 17 Refer to the list you made in step 3 and restore any non-default BIOS settings (see "CMOS Setup Options" on page 53). 18 Select Exit Saving Changes from the main menu...Y when prompted to discard changes, then press Enter to access the BIOS Setup Utility. 32 VAIO Digital Studio System Reference Manual 16 If the error message "Error: Check date and time settings."
... are now restored. If no error message displays, the computer's BIOS settings were retained during the reboot process to exit the BIOS Setup Utility. appears during the reboot sequence, press F2 during...skip the remaining steps. 17 Refer to the list you made in step 3 and restore any non-default BIOS settings (see "CMOS Setup Options" on page 53). 18 Select Exit Saving Changes from the main menu...Y when prompted to discard changes, then press Enter to access the BIOS Setup Utility. 32 VAIO Digital Studio System Reference Manual 16 If the error message "Error: Check date and time settings."
System Reference Manual
Page 48
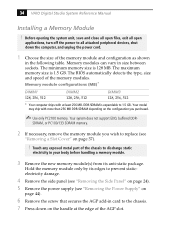
...size is 1.5 GB. The BIOS automatically detects the type, size and speed of the memory module and configuration as shown in size between sockets. Your model may ship with at the edge of the AGP slot. Hold the memory module only by its anti-static package. 34 VAIO Digital Studio System Reference... the AGP add-in card to 1.5 GB. Memory module configurations (MB)* DIMM1 128, 256, 512 DIMM2 128, 256, 512 DIMM3 128, 256, 512 * Your computer ships with more than 256 MB DDR-SDRAM depending on the handle at least 256 MB. Memory modules can vary in the following table. Your...
...size is 1.5 GB. The BIOS automatically detects the type, size and speed of the memory module and configuration as shown in size between sockets. Your model may ship with at the edge of the AGP slot. Hold the memory module only by its anti-static package. 34 VAIO Digital Studio System Reference... the AGP add-in card to 1.5 GB. Memory module configurations (MB)* DIMM1 128, 256, 512 DIMM2 128, 256, 512 DIMM3 128, 256, 512 * Your computer ships with more than 256 MB DDR-SDRAM depending on the handle at least 256 MB. Memory modules can vary in the following table. Your...
System Reference Manual
Page 65
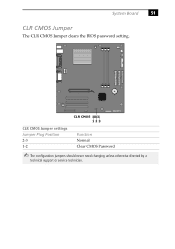
CLR CMOS 1 2 3 CLR CMOS Jumper settings Jumper Plug Position 2-3 1-2 Function Normal Clear CMOS Password ✍ The configuration jumpers should never need changing unless otherwise directed by a technical support or service technician. System Board 51 CLR CMOS Jumper The CLR CMOS Jumper clears the BIOS password setting.
CLR CMOS 1 2 3 CLR CMOS Jumper settings Jumper Plug Position 2-3 1-2 Function Normal Clear CMOS Password ✍ The configuration jumpers should never need changing unless otherwise directed by a technical support or service technician. System Board 51 CLR CMOS Jumper The CLR CMOS Jumper clears the BIOS password setting.

System Reference Manual
Page 67
... enclosed in brackets cannot be changed. Chapter 5 CMOS Setup Options This chapter describes each item are context-sensitive (they occur when you select). The Award BIOS setup has five menu items on page 16). A small triangle ( ) indicates that is a sub-menu with additional information and options. The information and ... and down arrow keys to select an option in this guide is the option currently set for each screen in the Award BIOS Setup Utility (see "Accessing the BIOS Setup Utility" on the menu bar. Use the up and down arrow keys to choose the selection. key to the main...
... enclosed in brackets cannot be changed. Chapter 5 CMOS Setup Options This chapter describes each item are context-sensitive (they occur when you select). The Award BIOS setup has five menu items on page 16). A small triangle ( ) indicates that is a sub-menu with additional information and options. The information and ... and down arrow keys to select an option in this guide is the option currently set for each screen in the Award BIOS Setup Utility (see "Accessing the BIOS Setup Utility" on the menu bar. Use the up and down arrow keys to choose the selection. key to the main...
System Reference Manual
Page 91
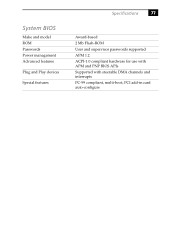
System BIOS Make and model ROM Passwords Power management Advanced features Plug and Play devices Special features Specifications 77 Award-based 2 Mb Flash-ROM User and supervisor passwords supported APM 1.2 ACPI-1.0 compliant hardware for use with APM and PNP BIOS APIs Supported with steerable DMA channels and interrupts PC-99 compliant, multi-boot, PCI add-in card auto-configure
System BIOS Make and model ROM Passwords Power management Advanced features Plug and Play devices Special features Specifications 77 Award-based 2 Mb Flash-ROM User and supervisor passwords supported APM 1.2 ACPI-1.0 compliant hardware for use with APM and PNP BIOS APIs Supported with steerable DMA channels and interrupts PC-99 compliant, multi-boot, PCI add-in card auto-configure
System Reference Manual
Page 93
...address map, system 69 AGP bus specifications 73 audio specifications 75 B battery - See lithium battery beep codes 65 BIOS Setup Utility See CMOS Setup Utility BIOS setup utility advanced screen 57 boot screen 60 exit screen 61 main screen 55 options 53 power screen 59 screens... error messages beep codes 65 PCI configuration 66 expansion slots 14 specifications for 76 expansion slots - See Also BIOS CMOS Setup Utility 16 codes, beeps 65 communications, specifications 75 computer lithium battery viii configuring power management 17 connectors i.LINK 6 monitor 11 power 49 USB 6 cover, slot...
...address map, system 69 AGP bus specifications 73 audio specifications 75 B battery - See lithium battery beep codes 65 BIOS Setup Utility See CMOS Setup Utility BIOS setup utility advanced screen 57 boot screen 60 exit screen 61 main screen 55 options 53 power screen 59 screens... error messages beep codes 65 PCI configuration 66 expansion slots 14 specifications for 76 expansion slots - See Also BIOS CMOS Setup Utility 16 codes, beeps 65 communications, specifications 75 computer lithium battery viii configuring power management 17 connectors i.LINK 6 monitor 11 power 49 USB 6 cover, slot...


