
VAIO User Guide
Page 10
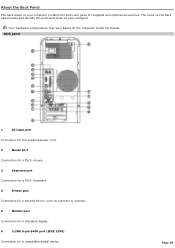
... for a compatible digital device. The icons on the back panel locate and identify the ports and jacks on the computer model purchased. Page 10 Back panel 1 AC Input port Connection for the supplied power cord. 2 Mouse port Connection for a PS/2® mouse. 3 Keyboard port Connection for a PS/2® keyboard. 4 Printer port Connection for...
... for a compatible digital device. The icons on the back panel locate and identify the ports and jacks on the computer model purchased. Page 10 Back panel 1 AC Input port Connection for the supplied power cord. 2 Mouse port Connection for a PS/2® mouse. 3 Keyboard port Connection for a PS/2® keyboard. 4 Printer port Connection for...

VAIO User Guide
Page 12
...may s upply 5 .1 s peakers as an optical or hard disk drive, confirm their operating system compatibility and required operating conditions. i.LINK is a trademark of Sony used only to order (C T O ) may not communicate with c ertain V A I O c omputers that are c onfigured to designate that came with your...Speaker s ys tem c onnec tions vary by model and manufac turer. Page 12 12 Speaker DC Out jack Connection for the speaker power cable (supplied 2-channel speakers). 13 S/PDIF Optical Out port Connection for a digital audio or optical device. 14 Ethernet port Connection for a 10BASE...
...may s upply 5 .1 s peakers as an optical or hard disk drive, confirm their operating system compatibility and required operating conditions. i.LINK is a trademark of Sony used only to order (C T O ) may not communicate with c ertain V A I O c omputers that are c onfigured to designate that came with your...Speaker s ys tem c onnec tions vary by model and manufac turer. Page 12 12 Speaker DC Out jack Connection for the speaker power cable (supplied 2-channel speakers). 13 S/PDIF Optical Out port Connection for a digital audio or optical device. 14 Ethernet port Connection for a 10BASE...
VAIO User Guide
Page 19
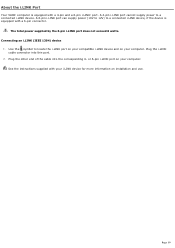
...the corresponding 4- Page 19 The total power supplied by the 6-pin i.LINK port does not exceed 6 watts. Plug the other end of the cable into this port. 2. About the i.LINK Port Your VAIO® computer is equipped with a 6-pin connector. A 6-pin i.LINK port can supply power (10V to 12V) to a ...connected i.LINK device, if the device is equipped with your i.LINK device for more information on your computer. Use the symbol to a connected i.LINK ...
...the corresponding 4- Page 19 The total power supplied by the 6-pin i.LINK port does not exceed 6 watts. Plug the other end of the cable into this port. 2. About the i.LINK Port Your VAIO® computer is equipped with a 6-pin connector. A 6-pin i.LINK port can supply power (10V to 12V) to a ...connected i.LINK device, if the device is equipped with your i.LINK device for more information on your computer. Use the symbol to a connected i.LINK ...

VAIO User Guide
Page 22
... Speakers Your VAIO® computer is supplied with a 5.1 speaker system, or you may vary. For information about supplied accessories, go to the Sony online support Web site at http://www.sony.com/pcsupport to view your 5.1 (6-channel) speaker system. To connect the speakers Connecting 5.1 (6-Channel) Speaker Systems Certain VAIO® computers that supplies power to -order (CTO), are supplied with 2-channel...
... Speakers Your VAIO® computer is supplied with a 5.1 speaker system, or you may vary. For information about supplied accessories, go to the Sony online support Web site at http://www.sony.com/pcsupport to view your 5.1 (6-channel) speaker system. To connect the speakers Connecting 5.1 (6-Channel) Speaker Systems Certain VAIO® computers that supplies power to -order (CTO), are supplied with 2-channel...
VAIO User Guide
Page 90
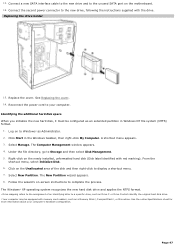
6. See Replacing the cover. 8. Page 90 Attach any internal cables that the card requires. Turn on card. 7. Replace the cover. Reconnect the power cord and all peripheral devices. 9. See the instructions supplied with the add-on the computer.
6. See Replacing the cover. 8. Page 90 Attach any internal cables that the card requires. Turn on card. 7. Replace the cover. Reconnect the power cord and all peripheral devices. 9. See the instructions supplied with the add-on the computer.
VAIO User Guide
Page 96
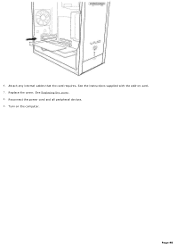
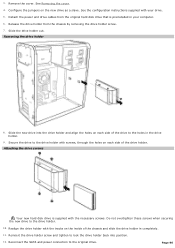
...8. Attaching the driv e screws Your new hard disk drive is preinstalled in your drive. 5. Realign the drive holder with your computer. 6. See the configuration instructions supplied with the tracks on each side of the drive holder. Slide the new drive into position. 12. Do not overtighten these screws... Page 96 Configure the jumpers on each side of the chassis and slide the drive holder in the drive holder. 9. Detach the power and drive cables from the chassis by removing the drive holder screw. 7. Reinsert the drive holder screw and tighten to the drive holder...
...8. Attaching the driv e screws Your new hard disk drive is preinstalled in your drive. 5. Realign the drive holder with your computer. 6. See the configuration instructions supplied with the tracks on each side of the drive holder. Slide the new drive into position. 12. Do not overtighten these screws... Page 96 Configure the jumpers on each side of the chassis and slide the drive holder in the drive holder. 9. Detach the power and drive cables from the chassis by removing the drive holder screw. 7. Reinsert the drive holder screw and tighten to the drive holder...
VAIO User Guide
Page 97
...16. From the shortcut menu, select Initialize Disk. 6. The Computer Management window appears. 4. The New Partition wizard appears. 8. Page 97 Under the file directory, go to the new drive, following the instructions supplied with the drive. Follow the wizard's on the Unallocated area... about your computer. Click Start in Windows NT file system (NTFS) format. 1. Right-click on the motherboard. 14. Connect a new SATA interface cable to the new drive and to a s pec ific drive, s uc h as Administrator. 2. A shortcut menu appears. 3. Reconnect the power cord to ...
...16. From the shortcut menu, select Initialize Disk. 6. The Computer Management window appears. 4. The New Partition wizard appears. 8. Page 97 Under the file directory, go to the new drive, following the instructions supplied with the drive. Follow the wizard's on the Unallocated area... about your computer. Click Start in Windows NT file system (NTFS) format. 1. Right-click on the motherboard. 14. Connect a new SATA interface cable to the new drive and to a s pec ific drive, s uc h as Administrator. 2. A shortcut menu appears. 3. Reconnect the power cord to ...
VAIO User Guide
Page 99
...VAIO Computer Functions My computer does not start. Verify that the computer is plugged into an appropriate power source and that the computer is turned on. Verify that the brightness or contrast control dials are adjusted correctly. (See the manual supplied with a floppy dis k drive. If your display for details.) Confirm that the computer... is not in an optical drive (unless you plugged the computer into a power strip or Uninterruptible Power Supply (UPS), make sure the power strip or UPS is turned on and working...
...VAIO Computer Functions My computer does not start. Verify that the computer is plugged into an appropriate power source and that the computer is turned on. Verify that the brightness or contrast control dials are adjusted correctly. (See the manual supplied with a floppy dis k drive. If your display for details.) Confirm that the computer... is not in an optical drive (unless you plugged the computer into a power strip or Uninterruptible Power Supply (UPS), make sure the power strip or UPS is turned on and working...

VAIO User Guide
Page 100
... adjusted correctly. (See the manual supplied with a floppy dis k drive. Page 100 Y ou c an purc has e this equipment s eparately. About VAIO Computer Functions My computer does not start. Verify that the computer is plugged into a power source and that it is plugged into a power source and turned on. Check that the power indicator is lit on the...
... adjusted correctly. (See the manual supplied with a floppy dis k drive. Page 100 Y ou c an purc has e this equipment s eparately. About VAIO Computer Functions My computer does not start. Verify that the computer is plugged into a power source and that it is plugged into a power source and turned on. Check that the power indicator is lit on the...

VAIO User Guide
Page 148
... to your computer caused by power surges. To remove power from the computer, you do not intend to use the computer for a long time. Do not attempt to open the power supply. Always reinstall the cover before turning it on the power cord. Do not operate the computer with a ...surge protector. There are no user-serviceable parts in voltage differences that can purchase a power strip with the cover removed. This device...
... to your computer caused by power surges. To remove power from the computer, you do not intend to use the computer for a long time. Do not attempt to open the power supply. Always reinstall the cover before turning it on the power cord. Do not operate the computer with a ...surge protector. There are no user-serviceable parts in voltage differences that can purchase a power strip with the cover removed. This device...

VAIO User Guide
Page 149
... Do not exceed a maximum distance of 2 feet between your VAIO® computer and your wireless device. Verify that are not magnetically shielded &#...the supplied AA batteries are properly installed in your computer. Wireless devices Wireless devices, such as rugs or blankets) or near your computer. Your computer, keyboard...Sony computer in a location subject to your home or office and determines that your computer. Do not use cut or damaged connection cables. Always switch the power off before connecting your computer to have the computer...
... Do not exceed a maximum distance of 2 feet between your VAIO® computer and your wireless device. Verify that are not magnetically shielded &#...the supplied AA batteries are properly installed in your computer. Wireless devices Wireless devices, such as rugs or blankets) or near your computer. Your computer, keyboard...Sony computer in a location subject to your home or office and determines that your computer. Do not use cut or damaged connection cables. Always switch the power off before connecting your computer to have the computer...

Welcome Mat
Page 1
... the monitor ports may vary, depending on the power. Meet your new PCV-RS700 Series Thank you to become familiar with your computer's operating system and preinstalled software. Part No. 2-345-580-02 © 2004 Sony Electronics Inc. Printed in USA. C B E... VAIO® computer models. A System unit B Keyboard C Speakers D Power cord E Video adapter* F TV coaxial cable* G Mouse H Remote control* I G D F J Your VAIO® computer is designed to recover your computer and supplied accessories. Use the VAIO Recovery Wizard utility program to help you for supplied ...
... the monitor ports may vary, depending on the power. Meet your new PCV-RS700 Series Thank you to become familiar with your computer's operating system and preinstalled software. Part No. 2-345-580-02 © 2004 Sony Electronics Inc. Printed in USA. C B E... VAIO® computer models. A System unit B Keyboard C Speakers D Power cord E Video adapter* F TV coaxial cable* G Mouse H Remote control* I G D F J Your VAIO® computer is designed to recover your computer and supplied accessories. Use the VAIO Recovery Wizard utility program to help you for supplied ...


