PCV-RS Series Hard Disk Drive Replacement Instructions
Page 1
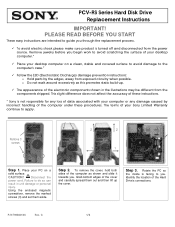
...desktop computer on a solid surface. Using the enclosed magnetic screwdriver, remove the marked screws (3) and set them out and then lift up . 9 The appearance of the Hard Drive's connections. PLEASE READ BEFORE YOU START These easy instructions are intended to you through the replacement...shown in unit damage or personal injury. PCV-RS Series Hard Disk Drive Replacement Instructions IMPORTANT! Place your computer or any loss of data associated with your... . Grab bottom edges of the computer under these instructions. * Sony is turned off and disconnected from the components shipped...
...desktop computer on a solid surface. Using the enclosed magnetic screwdriver, remove the marked screws (3) and set them out and then lift up . 9 The appearance of the Hard Drive's connections. PLEASE READ BEFORE YOU START These easy instructions are intended to you through the replacement...shown in unit damage or personal injury. PCV-RS Series Hard Disk Drive Replacement Instructions IMPORTANT! Place your computer or any loss of data associated with your... . Grab bottom edges of the computer under these instructions. * Sony is turned off and disconnected from the components shipped...
PCV-RS Series Hard Disk Drive Replacement Instructions
Page 2
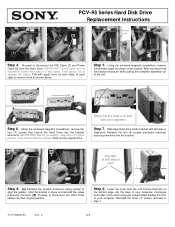
... into the base of each side) are in alignment. PCV-RS Series Hard Disk Drive Replacement Instructions Remove screw [2] [1] Step 4. Compress both sides of the cables. With one hand hold the bracket enclosure while pulling the complete assembly out of your computer. Step 5. IMPORTANT! Slide New Hard drive inside the bracket. Reinstall the four (4) screws previously removed...
... into the base of each side) are in alignment. PCV-RS Series Hard Disk Drive Replacement Instructions Remove screw [2] [1] Step 4. Compress both sides of the cables. With one hand hold the bracket enclosure while pulling the complete assembly out of your computer. Step 5. IMPORTANT! Slide New Hard drive inside the bracket. Reinstall the four (4) screws previously removed...

VAIO User Guide (primary manual)
Page 88
... Sony. Make sure you observe the proper safety precautions when you replace the original hard disk drive, the preinstalled VAIO Recovery Wizard utility program cannot restore the drive partitions, operating system, or original software programs. Before replacing the hard disk drive, create a VAIO Recovery Media Kit or purchase a kit from the original hard disk drive that is active. About Hard Disk Drive Installation Your computer...
... Sony. Make sure you observe the proper safety precautions when you replace the original hard disk drive, the preinstalled VAIO Recovery Wizard utility program cannot restore the drive partitions, operating system, or original software programs. Before replacing the hard disk drive, create a VAIO Recovery Media Kit or purchase a kit from the original hard disk drive that is active. About Hard Disk Drive Installation Your computer...

VAIO User Guide (primary manual)
Page 89
... overtighten these screws when securing the new drive to the original drive. 13. Attaching the driv e screws Your new hard disk drive is supplied with the drive. 8. Connect the second power connector to the new drive. Connect the second drive connector to the new drive, following the instructions supplied with the necessary screws. Replacing the driv e holder Page 89
... overtighten these screws when securing the new drive to the original drive. 13. Attaching the driv e screws Your new hard disk drive is supplied with the drive. 8. Connect the second power connector to the new drive. Connect the second drive connector to the new drive, following the instructions supplied with the necessary screws. Replacing the driv e holder Page 89

VAIO User Guide (primary manual)
Page 90
Replace the cover. Reconnect the power cord to a s pec ific drive, s uc h as Drive C or Drive D whic h identify the original hard dis k drive. 2 Y our c omputer may be configured as Administrator. 2. The Computer Management window appears. 4. Page 90 15. Identifying the additional hard disk space When you initialize the new hard...tem Referenc e M anual is not available for more information about your computer. The Windows® XP operating system recognizes the new hard disk drive and applies the NTFS format. 1 Drive mapping refers to the as a M emory Stic k®, SmartM ...
Replace the cover. Reconnect the power cord to a s pec ific drive, s uc h as Drive C or Drive D whic h identify the original hard dis k drive. 2 Y our c omputer may be configured as Administrator. 2. The Computer Management window appears. 4. Page 90 15. Identifying the additional hard disk space When you initialize the new hard...tem Referenc e M anual is not available for more information about your computer. The Windows® XP operating system recognizes the new hard disk drive and applies the NTFS format. 1 Drive mapping refers to the as a M emory Stic k®, SmartM ...


