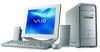
PCV-RS Series Hard Disk Drive Replacement Instructions
Page 1
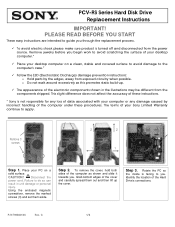
... from exposed circuitry when possible. The terms of data associated with your desktop computer on a clean, stable and covered surface to avoid damage to avoid scratching the surface of your desktop computer.* 9 Place your computer or any loss of your PC on a solid surface. Remove 3 ...of the computer under these instructions. * Sony is turned off and disconnected from the components shipped. To remove the cover, hold both sides of the Hard Drive's connections. Failure to apply. PCV-RS Series Hard Disk Drive Replacement Instructions IMPORTANT! Place your Sony Limited ...
... from exposed circuitry when possible. The terms of data associated with your desktop computer on a clean, stable and covered surface to avoid damage to avoid scratching the surface of your desktop computer.* 9 Place your computer or any loss of your PC on a solid surface. Remove 3 ...of the computer under these instructions. * Sony is turned off and disconnected from the components shipped. To remove the cover, hold both sides of the Hard Drive's connections. Failure to apply. PCV-RS Series Hard Disk Drive Replacement Instructions IMPORTANT! Place your Sony Limited ...
PCV-RS Series Hard Disk Drive Replacement Instructions
Page 2
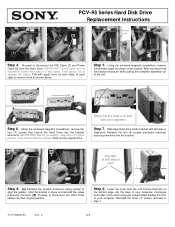
... bracket enclosure being careful to Reconnect the Hard Drive cables into the base of the Drive inside bracket with equal force on the picture. Slide out the original drive. Reinstall the three (3) screws removed in alignment. PCV-RS Series Hard Disk Drive Replacement Instructions Remove screw [2] [1] Step 4. ... of your computer. P/N T99860136 Rev. Hold the bracket in alignment Step 7. C 2/2 Using the enclosed magnetic screwdriver, remove the four (4) screws that all holes in step 1. Reinstall the four (4) screws previously removed, securing new drive into the ...
... bracket enclosure being careful to Reconnect the Hard Drive cables into the base of the Drive inside bracket with equal force on the picture. Slide out the original drive. Reinstall the three (3) screws removed in alignment. PCV-RS Series Hard Disk Drive Replacement Instructions Remove screw [2] [1] Step 4. ... of your computer. P/N T99860136 Rev. Hold the bracket in alignment Step 7. C 2/2 Using the enclosed magnetic screwdriver, remove the four (4) screws that all holes in step 1. Reinstall the four (4) screws previously removed, securing new drive into the ...

VAIO User Guide (primary manual)
Page 88
... Web site at http://www.sony.com/pcsupport. Release the drive holder from Sony. About Hard Disk Drive Installation Your computer comes with your drive. 5. Hard disk drive recovery When you replace the original hard disk drive, the preinstalled VAIO Recovery Wizard utility program cannot restore the drive partitions, operating system, or original software programs. Before replacing the hard disk drive, create a VAIO Recovery Media Kit or purchase...
... Web site at http://www.sony.com/pcsupport. Release the drive holder from Sony. About Hard Disk Drive Installation Your computer comes with your drive. 5. Hard disk drive recovery When you replace the original hard disk drive, the preinstalled VAIO Recovery Wizard utility program cannot restore the drive partitions, operating system, or original software programs. Before replacing the hard disk drive, create a VAIO Recovery Media Kit or purchase...

VAIO User Guide (primary manual)
Page 89
... side of the chassis and slide the drive holder in the drive holder. 9. Secure the drive to the holes in completely. 11. Attaching the driv e screws Your new hard disk drive is supplied with screws, through the holes on the inside of the drive to the drive holder with the necessary screws. Replacing the driv e holder Page 89
... side of the chassis and slide the drive holder in the drive holder. 9. Secure the drive to the holes in completely. 11. Attaching the driv e screws Your new hard disk drive is supplied with screws, through the holes on the inside of the drive to the drive holder with the necessary screws. Replacing the driv e holder Page 89

VAIO User Guide (primary manual)
Page 90
...Computer Management window appears. 4. The Windows® XP operating system recognizes the new hard disk drive and applies the NTFS format. 1 Drive mapping refers to the as a M emory Stic k®, SmartM edia , C ompac tFlas h®, or M ic rodrive media s lot. 15. Replace the cover. Click on the newly installed, unformatted hard... wizard appears. 8. See Replacing the cover. 16. Reconnect the power cord to display a shortcut menu. 7. Log on -screen instructions to a s pec ific drive, s uc h as Drive C or Drive D whic h identify the original hard dis k drive. 2 Y our c omputer...
...Computer Management window appears. 4. The Windows® XP operating system recognizes the new hard disk drive and applies the NTFS format. 1 Drive mapping refers to the as a M emory Stic k®, SmartM edia , C ompac tFlas h®, or M ic rodrive media s lot. 15. Replace the cover. Click on the newly installed, unformatted hard... wizard appears. 8. See Replacing the cover. 16. Reconnect the power cord to display a shortcut menu. 7. Log on -screen instructions to a s pec ific drive, s uc h as Drive C or Drive D whic h identify the original hard dis k drive. 2 Y our c omputer...


