Operating Instructions
Page 2
... rain or moisture. PCGA-UVC11A Serial No For customers in Canada This Class B digital apparatus complies with Part 15 of Conformity Trade Name: SONY Model No.: PCGA-UVC11A Responsible Party: Sony Electronics Inc. These ... tested and found to comply with the limits for a Class B digital device, pursuant to radio communications. Operation is for help. Cet appareil numérique de la classe B est conforme à... the receiver is no guarantee that may cause harmful interference to Part 15 of the camera. You are located on , the user is encouraged to try to this equipment. ...
... rain or moisture. PCGA-UVC11A Serial No For customers in Canada This Class B digital apparatus complies with Part 15 of Conformity Trade Name: SONY Model No.: PCGA-UVC11A Responsible Party: Sony Electronics Inc. These ... tested and found to comply with the limits for a Class B digital device, pursuant to radio communications. Operation is for help. Cet appareil numérique de la classe B est conforme à... the receiver is no guarantee that may cause harmful interference to Part 15 of the camera. You are located on , the user is encouraged to try to this equipment. ...
Operating Instructions
Page 3
... to a tripod 19 Disconnecting the camera 20 Using the Camera 21 Capturing images with the camera 21 Capturing images backward ......... 23 Setting the camera microphone volume 23 If you cannot record with the camera microphone 24 Precautions 26 Maintenance 27 Getting Help 28 Specifications 29 Troubleshooting 30 3 GB and Canada. • Sony, VAIO, , and the Eco Info...
... to a tripod 19 Disconnecting the camera 20 Using the Camera 21 Capturing images with the camera 21 Capturing images backward ......... 23 Setting the camera microphone volume 23 If you cannot record with the camera microphone 24 Precautions 26 Maintenance 27 Getting Help 28 Specifications 29 Troubleshooting 30 3 GB and Canada. • Sony, VAIO, , and the Eco Info...
Operating Instructions
Page 4
...real time. Introduction You can also capture still images with the Web Camera mode of the camera at the interval that are then saved on your friends and family through e-mail. You can use with Sony VAIO computers running the preinstalled Windows 2000, Windows Me, or Windows XP operating... systems, or VAIO computers that you to share images and movies captured with the camera with Windows Messenger or NetMeeting. Before Using This Product...
...real time. Introduction You can also capture still images with the Web Camera mode of the camera at the interval that are then saved on your friends and family through e-mail. You can use with Sony VAIO computers running the preinstalled Windows 2000, Windows Me, or Windows XP operating... systems, or VAIO computers that you to share images and movies captured with the camera with Windows Messenger or NetMeeting. Before Using This Product...
Operating Instructions
Page 5
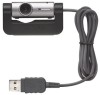
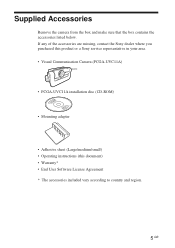
... sure that the box contains the accessories listed below. If any of the accessories are missing, contact the Sony dealer where you purchased this product or a Sony service representative in your area. • Visual Communication Camera (PCGA-UVC11A) • PCGA-UVC11A installation disc (CD-ROM) • Mounting adapter • Adhesive sheet (Large/medium/small) • Operating instructions (this document...
... sure that the box contains the accessories listed below. If any of the accessories are missing, contact the Sony dealer where you purchased this product or a Sony service representative in your area. • Visual Communication Camera (PCGA-UVC11A) • PCGA-UVC11A installation disc (CD-ROM) • Mounting adapter • Adhesive sheet (Large/medium/small) • Operating instructions (this document...
Operating Instructions
Page 6
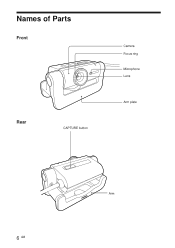
Names of Parts Front Rear CAPTURE button Camera Focus ring Microphone Lens Arm plate Arm 6 GB
Names of Parts Front Rear CAPTURE button Camera Focus ring Microphone Lens Arm plate Arm 6 GB
Operating Instructions
Page 7
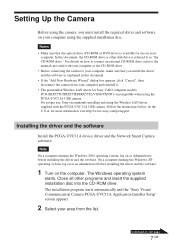
...U.S.A, for Sony VAIO computer models PCG-SRX55TC/SRX55TH/SRX55TL/VX89/VX89P is referred to your computer, make sure that the optical drive (CD-ROM or DVD drive) is available for use , Sony recommends installing and using the PCGA-UVC11A USB camera. Continued ...on as explained in this document, the CD-ROM drive or other programs and insert the supplied installation disc into the CD-ROM drive. The installation program starts automatically and the "Sony Visual Communication Camera PCGA-UVC11A ...
...U.S.A, for Sony VAIO computer models PCG-SRX55TC/SRX55TH/SRX55TL/VX89/VX89P is referred to your computer, make sure that the optical drive (CD-ROM or DVD drive) is available for use , Sony recommends installing and using the PCGA-UVC11A USB camera. Continued ...on as explained in this document, the CD-ROM drive or other programs and insert the supplied installation disc into the CD-ROM drive. The installation program starts automatically and the "Sony Visual Communication Camera PCGA-UVC11A ...

Operating Instructions
Page 8
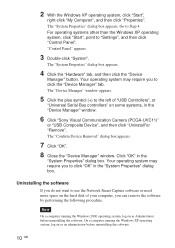
...system, click "Start", point to Step 4. The "Device Manager" window appears. 8 GB 3 Make sure that the software that the driver is installed 1 Connect the camera to your computer appears, click "Yes". Checking that you to your computer may require you can begin using the... to "Settings", and then click "Control Panel". Your operating system may appear. If it does, click "Yes". 5 Connect the camera to restart your computer. "Control Panel" appears. 3 Double-click "System". z Hint When the installation is complete, a message prompting you want to click the "Device ...
...system, click "Start", point to Step 4. The "Device Manager" window appears. 8 GB 3 Make sure that the software that the driver is installed 1 Connect the camera to your computer appears, click "Yes". Checking that you to your computer may require you can begin using the... to "Settings", and then click "Control Panel". Your operating system may appear. If it does, click "Yes". 5 Connect the camera to restart your computer. "Control Panel" appears. 3 Double-click "System". z Hint When the installation is complete, a message prompting you want to click the "Device ...
Operating Instructions
Page 9
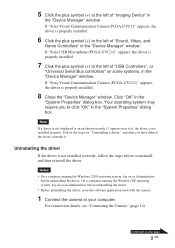
... uninstalling the driver, close the software application used with the camera. 1 Connect the camera to the left of "Imaging Device" in the "System Properties" dialog box. If "Sony Visual Communication Camera PCGA-UVC11" appears, the driver is not installed correctly, follow the steps below to the left of "USB Controllers", or "Universal Serial Bus controllers" on some systems...
... uninstalling the driver, close the software application used with the camera. 1 Connect the camera to the left of "Imaging Device" in the "System Properties" dialog box. If "Sony Visual Communication Camera PCGA-UVC11" appears, the driver is not installed correctly, follow the steps below to the left of "USB Controllers", or "Universal Serial Bus controllers" on some systems...
Operating Instructions
Page 10
..., click "Start", right-click "My Computer", and then click "Properties". Click "OK" in the "Device Manager" window. 6 Click "Sony Visual Communication Camera (PCGA-UVC11)" or "USB Composite Device", and then click "Uninstall"or "Remove". "Control Panel" appears. 3 Double-click "System". Your operating system may require you to...dialog box appears. The "Device Manager" window appears. 5 Click the plus symbol (+) to Step 4. Go to the left of "USB Controllers", or "Universal Serial Bus controllers" on the hard disk of your computer, you do not want to "Settings", and then click "...
..., click "Start", right-click "My Computer", and then click "Properties". Click "OK" in the "Device Manager" window. 6 Click "Sony Visual Communication Camera (PCGA-UVC11)" or "USB Composite Device", and then click "Uninstall"or "Remove". "Control Panel" appears. 3 Double-click "System". Your operating system may require you to...dialog box appears. The "Device Manager" window appears. 5 Click the plus symbol (+) to Step 4. Go to the left of "USB Controllers", or "Universal Serial Bus controllers" on the hard disk of your computer, you do not want to "Settings", and then click "...
Operating Instructions
Page 14
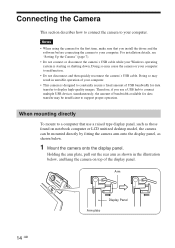
... details, see "Setting Up the Camera" (page 7). • Do not connect or disconnect the camera's USB cable while your computer. Doing so may be mounted directly by fitting the camera arm onto the display panel, as those found on top of USB bandwidth for data transfer may result ...display panel. Therefore, if you install the driver and the software before connecting the camera to your Windows operating system is designed to malfunction. • Do not disconnect and then quickly reconnect the camera's USB cable. When mounting directly To mount to a computer that you use a raised...
... details, see "Setting Up the Camera" (page 7). • Do not connect or disconnect the camera's USB cable while your computer. Doing so may be mounted directly by fitting the camera arm onto the display panel, as those found on top of USB bandwidth for data transfer may result ...display panel. Therefore, if you install the driver and the software before connecting the camera to your Windows operating system is designed to malfunction. • Do not disconnect and then quickly reconnect the camera's USB cable. When mounting directly To mount to a computer that you use a raised...
Operating Instructions
Page 15
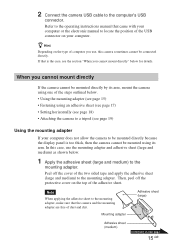
...and medium) to be mounted directly because the display panel is too thick, then the camera cannot be mounted using its arm. 2 Connect the camera USB cable to the operating instructions manual that the camera and the mounting adapter are free of dust and dirt. z Hint Depending on your computer... or the electronic manual to locate the position of the USB connector on the type of the steps...
...and medium) to be mounted directly because the display panel is too thick, then the camera cannot be mounted using its arm. 2 Connect the camera USB cable to the operating instructions manual that the camera and the mounting adapter are free of dust and dirt. z Hint Depending on your computer... or the electronic manual to locate the position of the USB connector on the type of the steps...
Operating Instructions
Page 16
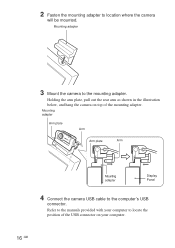
Holding the arm plate, pull out the rear arm as shown in the illustration below, and hang the camera on top of the USB connector on your computer. 16 GB Mounting adapter 3 Mount the camera to the computer's USB connector. Refer to the manuals provided with your computer to location where the camera will be mounted. Mounting adapter Arm plate Arm Arm plate Arm Mounting adapter Display Panel 4 Connect the camera USB cable to the mounting adapter. 2 Fasten the mounting adapter to locate the position of the mounting adapter.
Holding the arm plate, pull out the rear arm as shown in the illustration below, and hang the camera on top of the USB connector on your computer. 16 GB Mounting adapter 3 Mount the camera to the computer's USB connector. Refer to the manuals provided with your computer to location where the camera will be mounted. Mounting adapter Arm plate Arm Arm plate Arm Mounting adapter Display Panel 4 Connect the camera USB cable to the mounting adapter. 2 Fasten the mounting adapter to locate the position of the mounting adapter.
Operating Instructions
Page 17
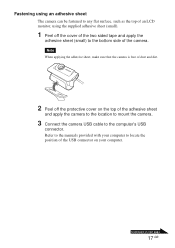
... dust and dirt. 2 Peel off the cover of the two sided tape and apply the adhesive sheet (small) to the computer's USB connector. Fastening using an adhesive sheet The camera can be fastened to any flat surface, such as the top of an LCD monitor, using the supplied adhesive sheet (small). 1 ... protective cover on the top of the adhesive sheet and apply the camera to the location to mount the camera. 3 Connect the camera USB cable to the bottom side of the camera. Continued on your computer to locate the position of the USB connector on next page 17 GB Refer to the manuals provided with...
... dust and dirt. 2 Peel off the cover of the two sided tape and apply the adhesive sheet (small) to the computer's USB connector. Fastening using an adhesive sheet The camera can be fastened to any flat surface, such as the top of an LCD monitor, using the supplied adhesive sheet (small). 1 ... protective cover on the top of the adhesive sheet and apply the camera to the location to mount the camera. 3 Connect the camera USB cable to the bottom side of the camera. Continued on your computer to locate the position of the USB connector on next page 17 GB Refer to the manuals provided with...
Operating Instructions
Page 18
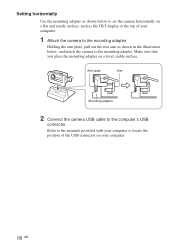
... on your computer. 18 GB Arm plate Arm Mounting adapter 2 Connect the camera USB cable to the computer's USB connector. Holding the arm plate, pull out the rear arm as shown in the illustration below to set the camera horizontally on a flat and steady surface, such as shown below , and ...attach the camera to the mounting adapter. Refer to the manuals provided with your computer. 1 Attach the camera to the mounting adapter. Setting horizontally Use the mounting adapter as the CRT display or the top of your computer to locate the position of the USB connector on a level,...
... on your computer. 18 GB Arm plate Arm Mounting adapter 2 Connect the camera USB cable to the computer's USB connector. Holding the arm plate, pull out the rear arm as shown in the illustration below to set the camera horizontally on a flat and steady surface, such as shown below , and ...attach the camera to the mounting adapter. Refer to the manuals provided with your computer. 1 Attach the camera to the mounting adapter. Setting horizontally Use the mounting adapter as the CRT display or the top of your computer to locate the position of the USB connector on a level,...
Operating Instructions
Page 19
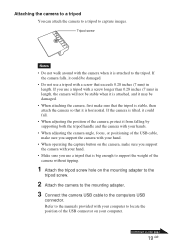
... could be damaged. • When attaching the camera, first make sure you support the camera with your computer. Continued on your computer to the tripod. Attaching the camera to a tripod You can attach the camera to a tripod to the computers USB connector. Refer to the manuals provided with your... operating the capture button on the mounting adapter to the tripod screw. 2 Attach the camera to the mounting adapter. 3 Connect the camera USB cable to capture images. If you use a tripod with the camera when it may be damaged. • Do not use a tripod that is big ...
... could be damaged. • When attaching the camera, first make sure you support the camera with your computer. Continued on your computer to the tripod. Attaching the camera to a tripod You can attach the camera to a tripod to the computers USB connector. Refer to the manuals provided with your... operating the capture button on the mounting adapter to the tripod screw. 2 Attach the camera to the mounting adapter. 3 Connect the camera USB cable to capture images. If you use a tripod with the camera when it may be damaged. • Do not use a tripod that is big ...
Operating Instructions
Page 20
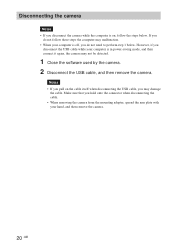
...when disconnecting the cable. • When removing the camera from the mounting adapter, spread the arm plate with your computer is on the cable itself when disconnecting the USB cable, you disconnect the USB cable while your hand, and then remove the camera. 20 GB However, if you may not be ...detected. 1 Close the software used by the camera. 2 Disconnect the USB cable, and then remove the camera. Disconnecting the camera Notes • If you do not follow the steps below . If you do not need to perform step 1 below . Notes • If you ...
...when disconnecting the cable. • When removing the camera from the mounting adapter, spread the arm plate with your computer is on the cable itself when disconnecting the USB cable, you disconnect the USB cable while your hand, and then remove the camera. 20 GB However, if you may not be ...detected. 1 Close the software used by the camera. 2 Disconnect the USB cable, and then remove the camera. Disconnecting the camera Notes • If you do not follow the steps below . If you do not need to perform step 1 below . Notes • If you ...
Operating Instructions
Page 21
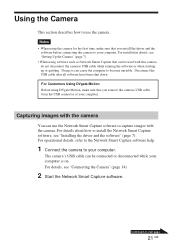
... your computer is on next page 21 GB The camera's USB cable can use the camera. For Customers Using DVgate Motion Before using the camera for the first time, make sure that you remove the cameras USB cable from the USB connector of your computer. Capturing images with the camera. For operational details, refer to the Network Smart...
... your computer is on next page 21 GB The camera's USB cable can use the camera. For Customers Using DVgate Motion Before using the camera for the first time, make sure that you remove the cameras USB cable from the USB connector of your computer. Capturing images with the camera. For operational details, refer to the Network Smart...
Operating Instructions
Page 22
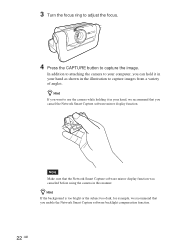
... ring to adjust the focus. 4 Press the CAPTURE button to capture images from a variety of angles. In addition to attaching the camera to your computer, you want to use the camera while holding it in your hand as shown in your hand, we recommend that the Network Smart Capture software mirror display... function was canceled before using the camera in this manner. z Hint If you can hold it in the illustration to capture the image. z Hint If the background is too bright or the...
... ring to adjust the focus. 4 Press the CAPTURE button to capture images from a variety of angles. In addition to attaching the camera to your computer, you want to use the camera while holding it in your hand as shown in your hand, we recommend that the Network Smart Capture software mirror display... function was canceled before using the camera in this manner. z Hint If you can hold it in the illustration to capture the image. z Hint If the background is too bright or the...

Operating Instructions
Page 23
...GB Continued on the operating system that you to capture images backward without having to reposition the camera. The "Properties" dialog box appears. Capturing images backward You can rotate the camera as illustrated below, allowing you are using . 1 Double-click ( depending on your operating ...system) on the taskbar at the bottom of the screen. Camera Setting the camera microphone volume Note Names and screens displayed may differ...
...GB Continued on the operating system that you to capture images backward without having to reposition the camera. The "Properties" dialog box appears. Capturing images backward You can rotate the camera as illustrated below, allowing you are using . 1 Double-click ( depending on your operating ...system) on the taskbar at the bottom of the screen. Camera Setting the camera microphone volume Note Names and screens displayed may differ...
Operating Instructions
Page 24
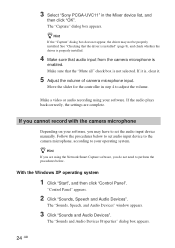
... is not selected. With the Windows XP operating system 1 Click "Start", and then click "Control Panel". 3 Select "Sony PCGA-UVC11" in step 4 to perform the procedures below to set audio input device to the camera microphone, according to set the audio input device manually. The "Capture" dialog box appears. z Hint If the "Capture...
... is not selected. With the Windows XP operating system 1 Click "Start", and then click "Control Panel". 3 Select "Sony PCGA-UVC11" in step 4 to perform the procedures below to set audio input device to the camera microphone, according to set the audio input device manually. The "Capture" dialog box appears. z Hint If the "Capture...


