

Camera Operations Guide
Page 4
... the lens to support it in the proper direction. Change the screen language before using your camcorder to other device Before connecting your camcorder. Then, touch the buttons displayed on the LCD frame accidentally when you open or close the LCD panel, or when you are using the touch ... technology, so over 99.99% of the pixels are captured using a digital still camera, and thus may cause malfunctions. However, there may cause a malfunction of the LCD panel. • Do not hold the camcorder by the following illustration. Note on connecting other device such as shown in...
... the lens to support it in the proper direction. Change the screen language before using your camcorder to other device Before connecting your camcorder. Then, touch the buttons displayed on the LCD frame accidentally when you open or close the LCD panel, or when you are using the touch ... technology, so over 99.99% of the pixels are captured using a digital still camera, and thus may cause malfunctions. However, there may cause a malfunction of the LCD panel. • Do not hold the camcorder by the following illustration. Note on connecting other device such as shown in...

Camera Operations Guide
Page 8
... pictures from a VCR or TV 95 Dubbing pictures from a tape to a "Memory Stick Duo 96 Dubbing still images from a tape - Digital program editing 98 Dubbing sound to a tape 97 Dubbing selected scenes from a "Memory Stick Duo" to a recorded tape 105 Deleting recorded pictures... protection/ Print mark 108 Printing recorded images (PictBridge compliant printer 110 Troubleshooting Troubleshooting 113 Warning indicators and messages ...121 8 EFFECT/SLIDE SHOW/ FRAME REC/SMTH INT. APPLI.) menu - BURST/QUALITY/IMAGE SIZE/ ALL ERASE/NEW FOLDER, etc 71 Using the (PICT. REC, etc 75...
... pictures from a VCR or TV 95 Dubbing pictures from a tape to a "Memory Stick Duo 96 Dubbing still images from a tape - Digital program editing 98 Dubbing sound to a tape 97 Dubbing selected scenes from a "Memory Stick Duo" to a recorded tape 105 Deleting recorded pictures... protection/ Print mark 108 Printing recorded images (PictBridge compliant printer 110 Troubleshooting Troubleshooting 113 Warning indicators and messages ...121 8 EFFECT/SLIDE SHOW/ FRAME REC/SMTH INT. APPLI.) menu - BURST/QUALITY/IMAGE SIZE/ ALL ERASE/NEW FOLDER, etc 71 Using the (PICT. REC, etc 75...
Camera Operations Guide
Page 28
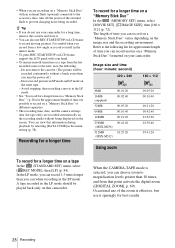
...LP mode, you can record 1.5 times longer than 10 times, and from that point activate the digital zoom ([DIGITAL ZOOM], p. 69). Refer to the following : - When the CAMERA-TAPE mode is useful ...movies on a "Memory Stick Duo" formatted on your camcorder for a long time, remove the cassette and store it. • You can view this camcorder. The length of time it sparingly for tape only...160 × 112] (p. 72). z Tip • If you do not use REC START/STOP on LCD frame to record moving pictures. It is selected, you can record on a "Memory Stick Duo" varies depending on the...
...LP mode, you can record 1.5 times longer than 10 times, and from that point activate the digital zoom ([DIGITAL ZOOM], p. 69). Refer to the following : - When the CAMERA-TAPE mode is useful ...movies on a "Memory Stick Duo" formatted on your camcorder for a long time, remove the cassette and store it. • You can view this camcorder. The length of time it sparingly for tape only...160 × 112] (p. 72). z Tip • If you do not use REC START/STOP on LCD frame to record moving pictures. It is selected, you can record on a "Memory Stick Duo" varies depending on the...

Camera Operations Guide
Page 29
... You cannot change the zoom speed with the zoom buttons on LCD frame. • To press the zoom buttons on LCD frame Keep W pressed to record wider range of view, and keep the attention of small children attracted to the camcorder while you record them. 80 cm (approx. 2 5/8 feet)* ...* The minimum distance required between your camcorder and the subject to the camcorder, then rotate it further for...
... You cannot change the zoom speed with the zoom buttons on LCD frame. • To press the zoom buttons on LCD frame Keep W pressed to record wider range of view, and keep the attention of small children attracted to the camcorder while you record them. 80 cm (approx. 2 5/8 feet)* ...* The minimum distance required between your camcorder and the subject to the camcorder, then rotate it further for...

Camera Operations Guide
Page 44
...] stops flashing, and disappears when fading is complete. Digital effect You can add digital effects to the recordings. [CINEMA EFECT] (Cinematic Effect) You can add a cinematic atmosphere to pictures by touching / and . Digital effect - [FRAME REC] (Frame recording) - [SMTH INT. KEY] (Luminance Key)... MOTION] (Delayed Motion Effect) You can record a movie with a repeat effect. [STILL] You can replace a brighter area in your camcorder. 2 Slide the POWER switch to start recording. [M. The recorded image appears on the "Memory Stick Duo" - To cancel the operation Follow...
...] stops flashing, and disappears when fading is complete. Digital effect You can add digital effects to the recordings. [CINEMA EFECT] (Cinematic Effect) You can add a cinematic atmosphere to pictures by touching / and . Digital effect - [FRAME REC] (Frame recording) - [SMTH INT. KEY] (Luminance Key)... MOTION] (Delayed Motion Effect) You can record a movie with a repeat effect. [STILL] You can replace a brighter area in your camcorder. 2 Slide the POWER switch to start recording. [M. The recorded image appears on the "Memory Stick Duo" - To cancel the operation Follow...

Camera Operations Guide
Page 45
Your camcorder automatically records pictures in the letterbox mode for shooting a subject more clearly in the still image which is to superimpose on the screen, touch / . APPLI.) menu. 60min D. The interval of the incidental image. Shutter speed (1 is 1/30, 2 is 1/15, 3 is 1/8, 4 is 1/4). To cancel Digital effect ...degree of transparency of the area in a dark place. [OLD MOVIE] You can slow down the shutter speed. The fade time of frame-byframe playback. Picture effect ([PICT. This mode is suitable for all screen size, sepia in step 4. If the item is not displayed...
Your camcorder automatically records pictures in the letterbox mode for shooting a subject more clearly in the still image which is to superimpose on the screen, touch / . APPLI.) menu. 60min D. The interval of the incidental image. Shutter speed (1 is 1/30, 2 is 1/15, 3 is 1/8, 4 is 1/4). To cancel Digital effect ...degree of transparency of the area in a dark place. [OLD MOVIE] You can slow down the shutter speed. The fade time of frame-byframe playback. Picture effect ([PICT. This mode is suitable for all screen size, sepia in step 4. If the item is not displayed...

Camera Operations Guide
Page 46
...Touch [MEMORY MIX]. Picture effect ([PICT.EFFECT]) • When you are recording with the still image to steady the camcorder is recommended. • You can create a picture with a blue area enclosed by the frame. Still image Movie Blue [MTCAM CHROMA] (Memory Chroma key) You can have already finished recording.) [MTCAM LUMI.] (Memory... (when you are recording on a "Memory Stick Duo" over to Picture effect ([PICT. EFFECT], p. 75). - [AE SHIFT] is anything other types of Digital effects. • When you set [DELAY MOTION], the effect is canceled during the zoom operation.
...Touch [MEMORY MIX]. Picture effect ([PICT.EFFECT]) • When you are recording with the still image to steady the camcorder is recommended. • You can create a picture with a blue area enclosed by the frame. Still image Movie Blue [MTCAM CHROMA] (Memory Chroma key) You can have already finished recording.) [MTCAM LUMI.] (Memory... (when you are recording on a "Memory Stick Duo" over to Picture effect ([PICT. EFFECT], p. 75). - [AE SHIFT] is anything other types of Digital effects. • When you set [DELAY MOTION], the effect is canceled during the zoom operation.

Camera Operations Guide
Page 51
...0:00:00:15 30min P-MENU A Remaining battery B Recording mode (SP or LP) C Tape transport indicator D Time code (hour: minute: second: frame) or tape counter (hour: minute: second) E Personal Menu button (p. 63) F Video operation buttons When a "Memory Stick Duo" has been inserted,..., touch [MENU], and select it from the (EDIT/PLAY) menu. 3 Select a playback mode. play back frame by frame (frame) during playback. This is not a malfunction. **Pictures output from frame playback). SPD PB]. If the item is recorded on the screen. 1 During playback or playback pause, touch ....
...0:00:00:15 30min P-MENU A Remaining battery B Recording mode (SP or LP) C Tape transport indicator D Time code (hour: minute: second: frame) or tape counter (hour: minute: second) E Personal Menu button (p. 63) F Video operation buttons When a "Memory Stick Duo" has been inserted,..., touch [MENU], and select it from the (EDIT/PLAY) menu. 3 Select a playback mode. play back frame by frame (frame) during playback. This is not a malfunction. **Pictures output from frame playback). SPD PB]. If the item is recorded on the screen. 1 During playback or playback pause, touch ....

Camera Operations Guide
Page 57
... the name of the folder in which the picture is magnified approximately twice the original size and centered at the point you touched on LCD frame 4 Select (PICT.APPLI.), then [PB ZOOM] by touching / and touch . Power zoom lever POWER switch Zoom buttons on the screen. ... 5 Play back the still picture or movie, and touch the screen at the point you want to magnify within the displayed frame. You can magnify a small subject in your camcorder. • You cannot magnify externally input pictures. To cancel the operation Touch [END]. Also, you touched becomes the center. ...
... the name of the folder in which the picture is magnified approximately twice the original size and centered at the point you touched on LCD frame 4 Select (PICT.APPLI.), then [PB ZOOM] by touching / and touch . Power zoom lever POWER switch Zoom buttons on the screen. ... 5 Play back the still picture or movie, and touch the screen at the point you want to magnify within the displayed frame. You can magnify a small subject in your camcorder. • You cannot magnify externally input pictures. To cancel the operation Touch [END]. Also, you touched becomes the center. ...

Camera Operations Guide
Page 58
... you press the button. z Tip • You can also change the zoom ratio using the zoom buttons on LCD frame. • If you press DISPLAY/BATT INFO during the playback zoom operation, the frame will appear. 60min 0:00:00:00 AUTO 100 AWB F1. 8 9dB 58 Playback A SteadyShot off as you cannot...
... you press the button. z Tip • You can also change the zoom ratio using the zoom buttons on LCD frame. • If you press DISPLAY/BATT INFO during the playback zoom operation, the frame will appear. 60min 0:00:00:00 AUTO 100 AWB F1. 8 9dB 58 Playback A SteadyShot off as you cannot...

Camera Operations Guide
Page 66
... stops flashing. b Note • [SPORTS] (sports lesson) will shoot the subject. 3 Touch [ ]. flashes quickly. b Note • Do not shake your camcorder for more than 5 minutes. 66 Using the Menu WHITE BAL. SPOT METER See page 39 for details. You can adjust the color balance to the...Note • You cannot use the white balance together with the white balance adjusted according to the ambient light. 1 Select [ONE PUSH]. 2 Frame a white object such as a piece of the recording environment. * Your camcorder is adjusted to focus only on subjects in the middle to far distance. **Your...
... stops flashing. b Note • [SPORTS] (sports lesson) will shoot the subject. 3 Touch [ ]. flashes quickly. b Note • Do not shake your camcorder for more than 5 minutes. 66 Using the Menu WHITE BAL. SPOT METER See page 39 for details. You can adjust the color balance to the...Note • You cannot use the white balance together with the white balance adjusted according to the ambient light. 1 Select [ONE PUSH]. 2 Frame a white object such as a piece of the recording environment. * Your camcorder is adjusted to focus only on subjects in the middle to far distance. **Your...

Camera Operations Guide
Page 75
Using the Menu Using the (PICT. APPLI. The default settings are marked with the color and brightness of your camcorder. EFFECT You can select items listed below on the PICT. PICT. menu. PICT. Select to record/play the picture appearing in sepia. Select ...to record/play the picture looking like an illustration with strong contrast. ,continued Using the Menu 75 EFFECT/SLIDE SHOW/FRAME REC/SMTH INT. To select items, see "Selecting menu items" (p. 63). The screen shows the items you can currently operate. EFFECT OK FADER...
Using the Menu Using the (PICT. APPLI. The default settings are marked with the color and brightness of your camcorder. EFFECT You can select items listed below on the PICT. PICT. menu. PICT. Select to record/play the picture appearing in sepia. Select ...to record/play the picture looking like an illustration with strong contrast. ,continued Using the Menu 75 EFFECT/SLIDE SHOW/FRAME REC/SMTH INT. To select items, see "Selecting menu items" (p. 63). The screen shows the items you can currently operate. EFFECT OK FADER...
Camera Operations Guide
Page 77
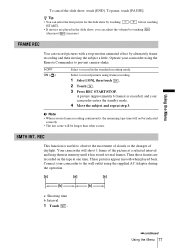
... one time. A picture (approximately 6 frames) is useful to record in the slide show, you use frame recording continuously, the remaining tape time will not be indicated correctly. • The last scene will shoot 1 frame of daylight. Your camcorder will be longer than other scenes. REC... This function is recorded, and your camcorder to the wall outlet using frame recording. 1 Select [ON], then touch . 2 Touch . 3 Press REC ...
... one time. A picture (approximately 6 frames) is useful to record in the slide show, you use frame recording continuously, the remaining tape time will not be indicated correctly. • The last scene will shoot 1 frame of daylight. Your camcorder will be longer than other scenes. REC... This function is recorded, and your camcorder to the wall outlet using frame recording. 1 Select [ON], then touch . 2 Touch . 3 Press REC ...

Camera Operations Guide
Page 78
... not be recorded if the battery or tape has run out. • There may be discrepancies in the interval. When your camcorder has shot several frames for the interval. 3 Touch [REC START]. To interrupt smooth interval recording, touch [REC STOP]. z Tip • If you adjust the focus manually, you may be ... interval recording with: - 2 Select the desired interval by touching / , then touch . Recording starts and z changes to 120 seconds for the first and last shots of Digital effect • Smooth interval recording is displayed on the interval length.
... not be recorded if the battery or tape has run out. • There may be discrepancies in the interval. When your camcorder has shot several frames for the interval. 3 Touch [REC START]. To interrupt smooth interval recording, touch [REC STOP]. z Tip • If you adjust the focus manually, you may be ... interval recording with: - 2 Select the desired interval by touching / , then touch . Recording starts and z changes to 120 seconds for the first and last shots of Digital effect • Smooth interval recording is displayed on the interval length.
Camera Operations Guide
Page 86
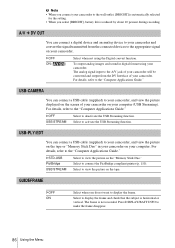
... can connect a USB cable (supplied) to your camcorder. Select to make the frame disappear. 86 Using the Menu USB-PLY/EDT You can connect a digital device and an analog device to your camcorder, and view the picture displayed on your camcorder on the "Memory Stick Duo." Select to view... the picture on your camcorder. The frame is horizontal or vertical. Press DISPLAY/BATT INFO to...
... can connect a USB cable (supplied) to your camcorder. Select to make the frame disappear. 86 Using the Menu USB-PLY/EDT You can connect a digital device and an analog device to your camcorder, and view the picture displayed on your camcorder on the "Memory Stick Duo." Select to view... the picture on your camcorder. The frame is horizontal or vertical. Press DISPLAY/BATT INFO to...
Camera Operations Guide
Page 103
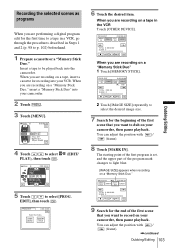
... for the end of the first scene that you are recording on your camcorder, then pause playback. You can adjust the position with / (frame). 8 Touch [MARK IN]. PROG. You can adjust the position with / (frame). ,continued Dubbing/Editing 103 Dubbing/Editing EFFECT PRINT VAR. When you are... MARK OUT START 0:00:00:00 ED I T SET UNDO TOTAL 0:00:00:00 SCENE 0 END When you are performing a digital program edit for recording into your camcorder. 2 Touch . 3 Touch [MENU]. 60min 0:00:00:00 MEMORY SET STILL SET MOVIE SET ALL ERASE OK 4 Touch /...
... for the end of the first scene that you are recording on your camcorder, then pause playback. You can adjust the position with / (frame). 8 Touch [MARK IN]. PROG. You can adjust the position with / (frame). ,continued Dubbing/Editing 103 Dubbing/Editing EFFECT PRINT VAR. When you are... MARK OUT START 0:00:00:00 ED I T SET UNDO TOTAL 0:00:00:00 SCENE 0 END When you are performing a digital program edit for recording into your camcorder. 2 Touch . 3 Touch [MENU]. 60min 0:00:00:00 MEMORY SET STILL SET MOVIE SET ALL ERASE OK 4 Touch /...

Camera Operations Guide
Page 139
qa qs 4 qd qf qg qh qj microphone is not available during Easy Handycam operation (z mark on LCD frame (p. 28) D REC START/STOP button (p. 26, 51) E Speaker F BATT (battery release) lever (p. 16) G CHARGE lamp (p. 16) H EASY button (p. 36, 55) I LCD BACKLIGHT button* (p. 20) J DISPLAY/.../EDIT mode lamps (p. 19) Q "Memory Stick Duo" slot (p. 23) * This button is connected, it takes precedence. When the external 9 q; Quick Reference Identifying parts and controls Camcorder Quick Reference 1 2 3 4 5 6 7 8 A Lens cap (p. 26, 31) B LCD/Touch panel screen (p. 4, 20) C Zoom buttons on the...
qa qs 4 qd qf qg qh qj microphone is not available during Easy Handycam operation (z mark on LCD frame (p. 28) D REC START/STOP button (p. 26, 51) E Speaker F BATT (battery release) lever (p. 16) G CHARGE lamp (p. 16) H EASY button (p. 36, 55) I LCD BACKLIGHT button* (p. 20) J DISPLAY/.../EDIT mode lamps (p. 19) Q "Memory Stick Duo" slot (p. 23) * This button is connected, it takes precedence. When the external 9 q; Quick Reference Identifying parts and controls Camcorder Quick Reference 1 2 3 4 5 6 7 8 A Lens cap (p. 26, 31) B LCD/Touch panel screen (p. 4, 20) C Zoom buttons on the...

Camera Operations Guide
Page 146
... Outputting analog images and sound in use. Frame recording (p. 77) 146 Quick Reference Indicators Q Z 9 . Indicators for the LCD screen and viewfinder Following indicators will appear on the LCD screen and viewfinder to indicate the state of your camcorder. Example: Indicators in the CAMERA-TAPE mode...Self-timer recording (p. 29, 34) Interval still image recording (p. 79) Flash (p. 33) This indicator appears only when the flash is in digital format (p. 86) DV input (p. 95) Zero set memory (p. 61) NightShot (p. 40) Super NightShot (p. 40) Color Slow Shutter (p. 41) Warning (p. 121...
... Outputting analog images and sound in use. Frame recording (p. 77) 146 Quick Reference Indicators Q Z 9 . Indicators for the LCD screen and viewfinder Following indicators will appear on the LCD screen and viewfinder to indicate the state of your camcorder. Example: Indicators in the CAMERA-TAPE mode...Self-timer recording (p. 29, 34) Interval still image recording (p. 79) Flash (p. 33) This indicator appears only when the flash is in digital format (p. 86) DV input (p. 95) Zero set memory (p. 61) NightShot (p. 40) Super NightShot (p. 40) Color Slow Shutter (p. 41) Warning (p. 121...
Camera Operations Guide
Page 147
...FADER 43 BURN DVD 80 BURN VCD 81 Burst (BURST 32, 71 Button-type battery Camcorder 135 Remote Commander 144 C CALIBRATION 134 Camera Chroma key (CAM T M CHROMA 46 ...Delete Deleting pictures....... 107 DEMO MODE 79 Digital convert function (A/V c DV OUT 86 Digital effect (D.EFFECT) 44, 52 Digital program editing (PROG.EDIT 98 DIGITAL ZOOM 69 Direct Access to "Click to...FOLDER See PB FOLDER See REC FOLDER FORMAT 73, 128 Frame playback 51 Frame recording (FRAME REC 77 Full charge 16 G Guide frame (GUIDEFRAME 86 H Handycam Station........... 143 HIGH SPEED See Burst (BURST) I ...
...FADER 43 BURN DVD 80 BURN VCD 81 Burst (BURST 32, 71 Button-type battery Camcorder 135 Remote Commander 144 C CALIBRATION 134 Camera Chroma key (CAM T M CHROMA 46 ...Delete Deleting pictures....... 107 DEMO MODE 79 Digital convert function (A/V c DV OUT 86 Digital effect (D.EFFECT) 44, 52 Digital program editing (PROG.EDIT 98 DIGITAL ZOOM 69 Direct Access to "Click to...FOLDER See PB FOLDER See REC FOLDER FORMAT 73, 128 Frame playback 51 Frame recording (FRAME REC 77 Full charge 16 G Guide frame (GUIDEFRAME 86 H Handycam Station........... 143 HIGH SPEED See Burst (BURST) I ...

Camera Operations Guide
Page 148
EFFECT) 75 Picture search 51 Playback (VAR.SPD PB) Double speed 51 Frame 51 Reverse 51 Slow 51 Playback Zoom (PB ZOOM 57 Playing time 18 Power mode 19 PRINT See PictBridge Print mark 109 PROGRAM AE 65 ...
EFFECT) 75 Picture search 51 Playback (VAR.SPD PB) Double speed 51 Frame 51 Reverse 51 Slow 51 Playback Zoom (PB ZOOM 57 Playing time 18 Power mode 19 PRINT See PictBridge Print mark 109 PROGRAM AE 65 ...


