Nav-u Map Update Installation Instructions
Page 1
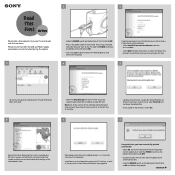
... DVD-ROM drive and select your NV-U70. Select the region in the power cable to the NV-U70. In some cases your NV-U70! • Select OK. Slide the POWER switch on your language. If not, please continue below. • Select Install PC connection software from both the...NV-U70. 4 5 • Verify that the partnership between PC and NV-U70 has been activated. 6 • Select the Map Manager to select which you agree to these terms Select Yes. 8 Notice that both the power cord and the USB cable. • Slide the POWER switch on the bottom of the Sony Personal Navigation...
... DVD-ROM drive and select your NV-U70. Select the region in the power cable to the NV-U70. In some cases your NV-U70! • Select OK. Slide the POWER switch on your language. If not, please continue below. • Select Install PC connection software from both the...NV-U70. 4 5 • Verify that the partnership between PC and NV-U70 has been activated. 6 • Select the Map Manager to select which you agree to these terms Select Yes. 8 Notice that both the power cord and the USB cable. • Slide the POWER switch on the bottom of the Sony Personal Navigation...
Nav-u Map Update Installation Instructions
Page 2
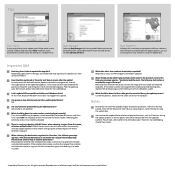
...particular 'Favorite' and re-register it with the revised map data. Cancel the process, reconnect the cable and restart the process. Sony cannot be responsible for you currently do when trying to load a route saved in part without written permission is outside the range of... boxes and then select NEXT. Please confirm whether the selected destination is within the range of the installed and selected map data, register the destination data again after updating the NV-U70? In many cases this update disc. If the selected destination is a setting indicating 'USA-All States...
...particular 'Favorite' and re-register it with the revised map data. Cancel the process, reconnect the cable and restart the process. Sony cannot be responsible for you currently do when trying to load a route saved in part without written permission is outside the range of... boxes and then select NEXT. Please confirm whether the selected destination is within the range of the installed and selected map data, register the destination data again after updating the NV-U70? In many cases this update disc. If the selected destination is a setting indicating 'USA-All States...
Quick Start Guide
Page 2
...Navigation System. Thank you can be determined by one or more information, see the manual for your authority to at any guarantee for users with the instructions, may contact: Sony Customer Information Services Center Call: 1-(800)-222-7669 Address: 12451 Gateway Blvd., Fort Myers, FL 33913 URL: www.sony.com/nav... installation, connections and basic operations. Welcome ! Consult the dealer or an experienced radio/TV technician for voice guidance and on the supplied Application Disc. • Contents of Conformity Trade Name: Sony Model No.: NV-U70 Responsible Party: Sony ...
...Navigation System. Thank you can be determined by one or more information, see the manual for your authority to at any guarantee for users with the instructions, may contact: Sony Customer Information Services Center Call: 1-(800)-222-7669 Address: 12451 Gateway Blvd., Fort Myers, FL 33913 URL: www.sony.com/nav... installation, connections and basic operations. Welcome ! Consult the dealer or an experienced radio/TV technician for voice guidance and on the supplied Application Disc. • Contents of Conformity Trade Name: Sony Model No.: NV-U70 Responsible Party: Sony ...
Quick Start Guide
Page 3
Table of Contents Warning 4 Getting Started 6 Checking the contents 6 Installing the unit 7 Location of controls 11 Turning the unit on 12 Starting up the navigation 12 Receiving GPS signals 12 Basic Operations 13 Menu operations 13 Keyboard operations 13 Route Searching 14 Setting the destination and starting guidance 14 Other ways to set ...
Table of Contents Warning 4 Getting Started 6 Checking the contents 6 Installing the unit 7 Location of controls 11 Turning the unit on 12 Starting up the navigation 12 Receiving GPS signals 12 Basic Operations 13 Menu operations 13 Keyboard operations 13 Route Searching 14 Setting the destination and starting guidance 14 Other ways to set ...
Quick Start Guide
Page 4
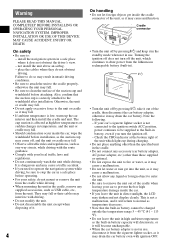
...adapter, etc.) other than the specified unit in use , disconnect it from the unit. IMPROPER INSTALLATION OR USE OF THIS DEVICE MAY CAUSE ACCIDENT, INJURY OR DEATH. install the navigation system in a safe place where it in the standby mode when not in the cradle. &#...Do not let water or rain get inside the car, wipe the windshield before attaching. Warning PLEASE READ THIS MANUAL COMPLETELY BEFORE INSTALLING OR OPERATING YOUR PERSONAL NAVIGATION SYSTEM. Cradle connector RESET CHG OPFOFWEORN • Turn the unit off by pressing ?/1 and keep it does not obstruct the driver...
...adapter, etc.) other than the specified unit in use , disconnect it from the unit. IMPROPER INSTALLATION OR USE OF THIS DEVICE MAY CAUSE ACCIDENT, INJURY OR DEATH. install the navigation system in a safe place where it in the standby mode when not in the cradle. &#...Do not let water or rain get inside the car, wipe the windshield before attaching. Warning PLEASE READ THIS MANUAL COMPLETELY BEFORE INSTALLING OR OPERATING YOUR PERSONAL NAVIGATION SYSTEM. Cradle connector RESET CHG OPFOFWEORN • Turn the unit off by pressing ?/1 and keep it does not obstruct the driver...
Quick Start Guide
Page 5
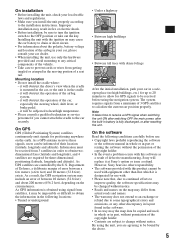
...; Do not install the cradle where: - Department of Defense, a deliberate margin of error between 10 meters (32.8 feet) and about the polarity, battery voltage and location of between a few meters (a few feet) and 10 meters (32.8 feet) exists. As a result, the GPS navigation system may the... the driver's view when the cradle is mounted in part, without notice. it at Sony's option or issue a refund. Improper installation may be sure to turn the ignition switch to the installation instructions. it will replace it will obstruct the operation of the copyright holder. •...
...; Do not install the cradle where: - Department of Defense, a deliberate margin of error between 10 meters (32.8 feet) and about the polarity, battery voltage and location of between a few meters (a few feet) and 10 meters (32.8 feet) exists. As a result, the GPS navigation system may the... the driver's view when the cradle is mounted in part, without notice. it at Sony's option or issue a refund. Improper installation may be sure to turn the ignition switch to the installation instructions. it will replace it will obstruct the operation of the copyright holder. •...
Quick Start Guide
Page 7
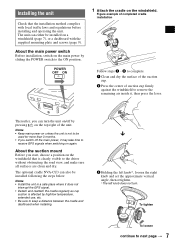
... you switch off by pressing ?/1 on the top right of suction cup firmly against the windshield to keep a distance between the cradle and dashboard when installing. x 3 Holding the left knob*, loosen the right knob and set the approximate vertical angle, then retighten. *The left knob does not turn the unit... the main power by high/low temperature, extended use, etc. • Be sure to remove the remaining air inside it does not interrupt the GPS signal. • Detach and reattach the cradle regularly as cup suction is affected by sliding the POWER switch to next page t To tighten To ...
... you switch off by pressing ?/1 on the top right of suction cup firmly against the windshield to keep a distance between the cradle and dashboard when installing. x 3 Holding the left knob*, loosen the right knob and set the approximate vertical angle, then retighten. *The left knob does not turn the unit... the main power by high/low temperature, extended use, etc. • Be sure to remove the remaining air inside it does not interrupt the GPS signal. • Detach and reattach the cradle regularly as cup suction is affected by sliding the POWER switch to next page t To tighten To ...

Quick Start Guide
Page 8
... the windshield permanently The suction cup is securely locked in high/low temperatures and may not be possible. If you turn the ignition on after installation. DC IN 5.2V 3 Align the 2 slots on the size or shape of the cigarette lighter socket, connection may come off. Note Depending on the underside...
... the windshield permanently The suction cup is securely locked in high/low temperatures and may not be possible. If you turn the ignition on after installation. DC IN 5.2V 3 Align the 2 slots on the size or shape of the cigarette lighter socket, connection may come off. Note Depending on the underside...

Quick Start Guide
Page 9
.... RELEASE CHG The unit pops out of the cradle. 2 Take the unit out of the mounting plate using a screwdriver. Choose a position carefully before installation. 1 Choose a position to attach the mounting plate on the dashboard, then clean and dry the surface of the dashboard. 2 Remove the cover of... the adhesive tape, then firmly press down the mounting plate on the dashboard Note The adhesive tape is difficult to next page t 9 About the installation on the dashboard. 1 2 Mounting plate Adhesive tape 3 Secure the supplied 3 screws of the cradle. To detach the unit from the cradle 1 ...
.... RELEASE CHG The unit pops out of the cradle. 2 Take the unit out of the mounting plate using a screwdriver. Choose a position carefully before installation. 1 Choose a position to attach the mounting plate on the dashboard, then clean and dry the surface of the dashboard. 2 Remove the cover of... the adhesive tape, then firmly press down the mounting plate on the dashboard Note The adhesive tape is difficult to next page t 9 About the installation on the dashboard. 1 2 Mounting plate Adhesive tape 3 Secure the supplied 3 screws of the cradle. To detach the unit from the cradle 1 ...

Quick Start Guide
Page 10
x 10 4 Attach the cradle on the mounting plate. 1 Clean and dry the surface of the suction cup. 2 Press the center of dropping, use the supplied adhesive tape on the suction cup. If you want to fix the cradle on the mounting plate more securely to prevent risk of the suction cup firmly down on page 7, to 5 of "About the suction mount" on the mounting plate, then press the lever. 3 Holding the left knob*, tighten the right knob. *The left knob does not turn. Follow steps 2 to complete the installation.
x 10 4 Attach the cradle on the mounting plate. 1 Clean and dry the surface of the suction cup. 2 Press the center of dropping, use the supplied adhesive tape on the suction cup. If you want to fix the cradle on the mounting plate more securely to prevent risk of the suction cup firmly down on page 7, to 5 of "About the suction mount" on the mounting plate, then press the lever. 3 Holding the left knob*, tighten the right knob. *The left knob does not turn. Follow steps 2 to complete the installation.
Quick Start Guide
Page 12
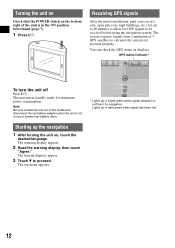
...to prevent car battery drain. * Lights up the navigation 1 After turning the unit on, touch the desired language. The top menu appears. 12 Turning the unit on Check that the POWER switch on displays. Receiving GPS signals After the initial installation, park your car in a safe, open place ...(no high buildings, etc.) for navigation. The system requires signals from a minimum of the cradle and disconnect the car battery...
...to prevent car battery drain. * Lights up the navigation 1 After turning the unit on, touch the desired language. The top menu appears. 12 Turning the unit on Check that the POWER switch on displays. Receiving GPS signals After the initial installation, park your car in a safe, open place ...(no high buildings, etc.) for navigation. The system requires signals from a minimum of the cradle and disconnect the car battery...
Quick Start Guide
Page 19
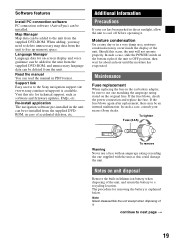
...battery to OFF position, then wait for on unit disposal Remove the built-in direct sunlight, allow the unit to the Sony navigation support site (www.sony.com/nav-u/support) is explained below. Language Manager Language data for about an hour until the moisture has evaporated. If the fuse blows...PDF format. Support link Easy access to cool off before operating it . Read the manual You can be re-installed from the unit. Additional Information Precautions If your nearest Sony dealer. Notes on -screen display and voice guidance can be added to free up memory space. In such a...
...battery to OFF position, then wait for on unit disposal Remove the built-in direct sunlight, allow the unit to the Sony navigation support site (www.sony.com/nav-u/support) is explained below. Language Manager Language data for about an hour until the moisture has evaporated. If the fuse blows...PDF format. Support link Easy access to cool off before operating it . Read the manual You can be re-installed from the unit. Additional Information Precautions If your nearest Sony dealer. Notes on -screen display and voice guidance can be added to free up memory space. In such a...
Quick Start Guide
Page 21
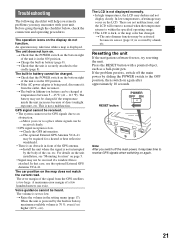
...The built-in battery cannot be charged at temperatures between 5 - 45 ºC (41 - 113 ºF). GPS signal cannot be required for a heated or heat reflective windshield. • There is an obstacle in battery, ... 17). The error margin of the unit is in the ON position. Resetting the unit If the navigation software freezes, try resetting the unit. t Check that the POWER switch on the bottom right of...pointed object, such as a ball-point pen. For details on the unit installation, see "Mounting location" on the display do not function. t Check that the unit is securely attached ...
...The built-in battery cannot be charged at temperatures between 5 - 45 ºC (41 - 113 ºF). GPS signal cannot be required for a heated or heat reflective windshield. • There is an obstacle in battery, ... 17). The error margin of the unit is in the ON position. Resetting the unit If the navigation software freezes, try resetting the unit. t Check that the POWER switch on the bottom right of...pointed object, such as a ball-point pen. For details on the unit installation, see "Mounting location" on the display do not function. t Check that the unit is securely attached ...
Read This First
Page 1
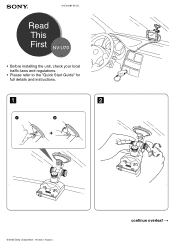
2-676-681-11 (1) Read This First NV-U70 • Before installing the unit, check your local traffic laws and regulations. • Please refer to the "Quick Start Guide" for full details and instructions. 1 2 x © 2005 Sony Corporation Printed in Thailand continue overleaf t
2-676-681-11 (1) Read This First NV-U70 • Before installing the unit, check your local traffic laws and regulations. • Please refer to the "Quick Start Guide" for full details and instructions. 1 2 x © 2005 Sony Corporation Printed in Thailand continue overleaf t

Read This First
Page 2
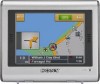
DC IN 5.2V RESET CHG OPFOFWEORN POWER OFF ON 1st click 2nd click After the initial installation, park your car in a safe, open place (no high buildings, etc.) for up to 20 minutes to allow for GPS signals to be received before using the navigation system.
DC IN 5.2V RESET CHG OPFOFWEORN POWER OFF ON 1st click 2nd click After the initial installation, park your car in a safe, open place (no high buildings, etc.) for up to 20 minutes to allow for GPS signals to be received before using the navigation system.
User Manual
Page 10
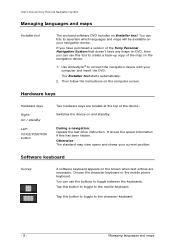
... keyboard. Use ActiveSync® to the character keyboard. - 8 - Otherwise: The standard map view opens and shows your navigation device. User's manual Sony Personal Navigation System Managing languages and maps Installer tool The enclosed software DVD includes an Installer tool. You can use this has been hidden. Managing languages and maps Tap this button to toggle...
... keyboard. Use ActiveSync® to the character keyboard. - 8 - Otherwise: The standard map view opens and shows your navigation device. User's manual Sony Personal Navigation System Managing languages and maps Installer tool The enclosed software DVD includes an Installer tool. You can use this has been hidden. Managing languages and maps Tap this button to toggle...

User Manual
Page 81
Select map Select map User's manual Sony Personal Navigation System In the SELECT MAP screen you can edit the maps that should be found on the supplied software DVD. This can be available by using the Installer tool. Follow the on the Map field and select a ...and the point of arrival. To do this, tap on -screen instructions. The Installer tool starts automatically. You can choose a different map from your computer and insert the DVD. Configuring the Sony Personal Navigation System - 79 - Route information Route info On the ROUTE INFORMATION screen, you need...
Select map Select map User's manual Sony Personal Navigation System In the SELECT MAP screen you can edit the maps that should be found on the supplied software DVD. This can be available by using the Installer tool. Follow the on the Map field and select a ...and the point of arrival. To do this, tap on -screen instructions. The Installer tool starts automatically. You can choose a different map from your computer and insert the DVD. Configuring the Sony Personal Navigation System - 79 - Route information Route info On the ROUTE INFORMATION screen, you need...
User Manual
Page 85
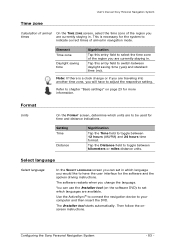
... Distance Signification Tap the Time field to your computer and then insert the DVD. You can set which languages are available. The Installer tool starts automatically. User's manual Sony Personal Navigation System Time zone Calculation of arrival times On the TIME ZONE screen, select the time zone of the region you are currently...
... Distance Signification Tap the Time field to your computer and then insert the DVD. You can set which languages are available. The Installer tool starts automatically. User's manual Sony Personal Navigation System Time zone Calculation of arrival times On the TIME ZONE screen, select the time zone of the region you are currently...