

User Guide
Page 1
NSR-500 Series © 2011 Sony Corporation 4-272-495-16 (1) Network Surveillance Server User's Guide Software Version 1.6 and Later Before operating the unit, please read this manual thoroughly and retain it for future reference.
NSR-500 Series © 2011 Sony Corporation 4-272-495-16 (1) Network Surveillance Server User's Guide Software Version 1.6 and Later Before operating the unit, please read this manual thoroughly and retain it for future reference.

User Guide
Page 3
... 62 Configuring Settings Related to Storage 63 Configuring Storage Settings 63 Configuring Settings Related to Deleting Recording Data 66 Configuring Recording Schedules 69 Configuring Schedules Manually 69 Configuring Alarm Recording and Event Recording 71 Configuring Sensor Inputs 76 Changing Settings of Sensor Input Pins of NSR 76 Changing Settings of Sensor...
... 62 Configuring Settings Related to Storage 63 Configuring Storage Settings 63 Configuring Settings Related to Deleting Recording Data 66 Configuring Recording Schedules 69 Configuring Schedules Manually 69 Configuring Alarm Recording and Event Recording 71 Configuring Sensor Inputs 76 Changing Settings of Sensor Input Pins of NSR 76 Changing Settings of Sensor...

User Guide
Page 4
... Pins of Camera 79 Changing Settings of Alarm Output Pins of Barionet 80 Setting Items of the [Alarm Out] Tab 80 Configuring Action Settings 82 Manual Action 82 Event/Alarm Actions 85 Configuring Mail Notification Settings 89 Configuring System Alert Settings 90 Registering Users 91 User Levels and Permissions 91 Registering...
... Pins of Camera 79 Changing Settings of Alarm Output Pins of Barionet 80 Setting Items of the [Alarm Out] Tab 80 Configuring Action Settings 82 Manual Action 82 Event/Alarm Actions 85 Configuring Mail Notification Settings 89 Configuring System Alert Settings 90 Registering Users 91 User Levels and Permissions 91 Registering...

User Guide
Page 5
...the text. Before using the unit, be sure to Your New Libraries 130 Index 132 Trademarks • "IPELA" and are trademarks of Sony Corporation. • The terms HDMI and HDMI High-Definition Multimedia Interface, and the HDMI Logo are trademarks or registered trademarks of HDMI ...Licensing LLC in the United States and other countries. • Other products or system names appearing in this manual. 5 Table of their respec- Exporting Log Files 116 Chapter 6 Appendix END-USER LICENSE AGREEMENT 118 Concerning GPL-LPGL 119 MPEG-4 Video ...
...the text. Before using the unit, be sure to Your New Libraries 130 Index 132 Trademarks • "IPELA" and are trademarks of Sony Corporation. • The terms HDMI and HDMI High-Definition Multimedia Interface, and the HDMI Logo are trademarks or registered trademarks of HDMI ...Licensing LLC in the United States and other countries. • Other products or system names appearing in this manual. 5 Table of their respec- Exporting Log Files 116 Chapter 6 Appendix END-USER LICENSE AGREEMENT 118 Concerning GPL-LPGL 119 MPEG-4 Video ...
User Guide
Page 7
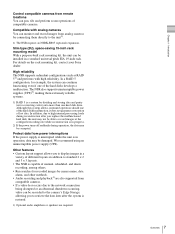
... can pan, tilt, and perform zoom operations of the hard disks develops a malfunction. For details on the rack mounting kit, contact your Sony dealer. The NSR also supports uninterruptible power supplies (UPS)2), making them extremely reliable systems. 1) RAID 5 is a system for dividing and storing... data and parity (error correcting codes) onto more than one of the hard disks malfunction, it does not guarantee restoration of manual, scheduled, and alarm recording, among others. • Run searches for example, the system can continue functioning even if one of compatible...
... can pan, tilt, and perform zoom operations of the hard disks develops a malfunction. For details on the rack mounting kit, contact your Sony dealer. The NSR also supports uninterruptible power supplies (UPS)2), making them extremely reliable systems. 1) RAID 5 is a system for dividing and storing... data and parity (error correcting codes) onto more than one of the hard disks malfunction, it does not guarantee restoration of manual, scheduled, and alarm recording, among others. • Run searches for example, the system can continue functioning even if one of compatible...
User Guide
Page 9
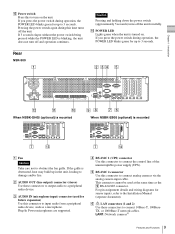
...) connector (stereo) Use these connectors to 3 seconds. LAN1: Network cameras1) 9 Features and Functions F LAN connectors (1 and 2) Use these connectors to output audio to the Installation Manual (separate document). If you press the power switch during this to input audio from a peripheral audio device, such as the I RS-422/485 connector. N POWER...
...) connector (stereo) Use these connectors to 3 seconds. LAN1: Network cameras1) 9 Features and Functions F LAN connectors (1 and 2) Use these connectors to output audio to the Installation Manual (separate document). If you press the power switch during this to input audio from a peripheral audio device, such as the I RS-422/485 connector. N POWER...
User Guide
Page 10
...OUT (alarm output) connector Use this connector to connect the analog camera input cable. For details, see "Configuring Settings Related to the Installation Manual (separate document). M HDMI monitor connector Use this connector to radiation noise. Caution If the optional NSBK-DH05 is mounted. Monitor connector 2 ... to radiation noise. Monitor connector 2 and the HDMI monitor connector cannot be used when using iSCSI storage, contact your Sony dealer. For connection details and a wiring diagram for Remote Client] setting (either LAN1 or LAN2) in the Server Configuration screen.
...OUT (alarm output) connector Use this connector to connect the analog camera input cable. For details, see "Configuring Settings Related to the Installation Manual (separate document). M HDMI monitor connector Use this connector to radiation noise. Caution If the optional NSBK-DH05 is mounted. Monitor connector 2 ... to radiation noise. Monitor connector 2 and the HDMI monitor connector cannot be used when using iSCSI storage, contact your Sony dealer. For connection details and a wiring diagram for Remote Client] setting (either LAN1 or LAN2) in the Server Configuration screen.
User Guide
Page 15
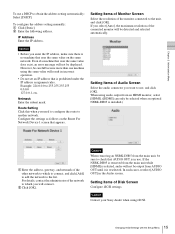
...OUT until it is installed.) 1 Enter the address, gateway, and netmask of the connected monitor will not be sure to use . Caution Contact your Sony dealer when using the same value will result in incorrect operation. • Do not set an IP address that AUDIO OUT is selected, audio will... audio connector you enter the IP address, make sure there is removed from the main unit, be displayed. To configure the address setting manually: 1 Click [Static]. 2 Enter the following address. IP Address Enter the IP address. Setting Items of Disk Screen Configure iSCSI settings.
...OUT until it is installed.) 1 Enter the address, gateway, and netmask of the connected monitor will not be sure to use . Caution Contact your Sony dealer when using the same value will result in incorrect operation. • Do not set an IP address that AUDIO OUT is selected, audio will... audio connector you enter the IP address, make sure there is removed from the main unit, be displayed. To configure the address setting manually: 1 Click [Static]. 2 Enter the following address. IP Address Enter the IP address. Setting Items of Disk Screen Configure iSCSI settings.
User Guide
Page 16
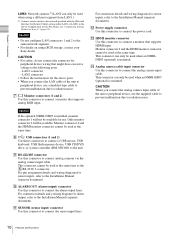
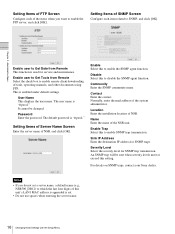
... to Get Data from Remote Select the check box to enable remote client downloading of this to which the last four digits of tools, operating manuals, and other documents using FTP. Setting Items of Server Name Screen Enter the server name of the items when you do not set . &#...8226; Do not use spaces when entering the server name. 16 Changing Initial Settings with the Setup Menu For details on SNMP traps, contact your Sony dealer. Notes • If you want to Get Tools from Remote This function is used for SNMP trap transmission. Setting Items of SNMP Screen ...
... to Get Data from Remote Select the check box to enable remote client downloading of this to which the last four digits of tools, operating manuals, and other documents using FTP. Setting Items of Server Name Screen Enter the server name of the items when you do not set . &#...8226; Do not use spaces when entering the server name. 16 Changing Initial Settings with the Setup Menu For details on SNMP traps, contact your Sony dealer. Notes • If you want to Get Tools from Remote This function is used for SNMP trap transmission. Setting Items of SNMP Screen ...

User Guide
Page 19
...configured automatically via an Internet connection, for example, from RealShot Manager Advanced (Client). Setting Items of whether [Auto Setting] or [Manual Setting] is selected, router configuration is not necessary if the UPnP function is changed, a message appears and the system restarts. ... remote client. Auto Setting Automatically configures settings for the download server. Download Server Configure the port number for the router. Select [Manual Setting] if you must be sure to [Slave], register a user other than "admin" on external networks. After configuring each setting...
...configured automatically via an Internet connection, for example, from RealShot Manager Advanced (Client). Setting Items of whether [Auto Setting] or [Manual Setting] is selected, router configuration is not necessary if the UPnP function is changed, a message appears and the system restarts. ... remote client. Auto Setting Automatically configures settings for the download server. Download Server Configure the port number for the router. Select [Manual Setting] if you must be sure to [Slave], register a user other than "admin" on external networks. After configuring each setting...
User Guide
Page 20
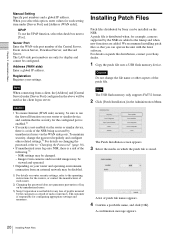
... on patch file distribution, contact your settings. The LAN-side port numbers are only for example, cameras supported by unauthorized users. 3) Sony Corporation is not liable for the configured port is enabled.1) • If security is not enabled via the router or similar device, there... a global IP address. A list of the Central Server, Event Action Server, Download Server, and Record Server. Chapter 2 Administration Menu Manual Setting Specify port numbers and a global IP address. Caution Do not change the password regularly and configure other aspects of profits incurred by...
... on patch file distribution, contact your settings. The LAN-side port numbers are only for example, cameras supported by unauthorized users. 3) Sony Corporation is not liable for the configured port is enabled.1) • If security is not enabled via the router or similar device, there... a global IP address. A list of the Central Server, Event Action Server, Download Server, and Record Server. Chapter 2 Administration Menu Manual Setting Specify port numbers and a global IP address. Caution Do not change the password regularly and configure other aspects of profits incurred by...
User Guide
Page 22
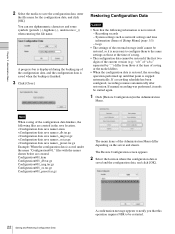
... performed up of the Administration Menu differ depending on the server and clients. If a recording schedule has been configured, recording resumes automatically after restoration. If manual recording was performed, it is necessary to configure them to the same settings as network settings and time information (Items of the configuration data finishes...
... performed up of the Administration Menu differ depending on the server and clients. If a recording schedule has been configured, recording resumes automatically after restoration. If manual recording was performed, it is necessary to configure them to the same settings as network settings and time information (Items of the configuration data finishes...

User Guide
Page 27
... a few simple operations. Logon Screen Administration Menu Recorder Settings Screen Main Screen Configuration Screen Note Click [Automatic Record Settings] or [Easy Setup] to the Installation Manual (separate document). 27 Basic Window Operations The unit includes a Main screen for monitoring images, a configuration screen for configuring various settings, and an Administration Menu for...
... a few simple operations. Logon Screen Administration Menu Recorder Settings Screen Main Screen Configuration Screen Note Click [Automatic Record Settings] or [Easy Setup] to the Installation Manual (separate document). 27 Basic Window Operations The unit includes a Main screen for monitoring images, a configuration screen for configuring various settings, and an Administration Menu for...
User Guide
Page 32
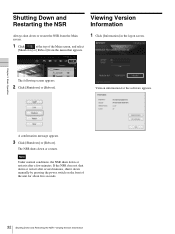
... appears. 2 Click [Shutdown] or [Reboot]. Version information for about five seconds. 32 Shutting Down and Restarting the NSR / Viewing Version Information The NSR shuts down manually by pressing the power switch on the front of the Main screen, and select [Shutdown] or [Reboot] from the menu that appears. 1 Click [Information] in...
... appears. 2 Click [Shutdown] or [Reboot]. Version information for about five seconds. 32 Shutting Down and Restarting the NSR / Viewing Version Information The NSR shuts down manually by pressing the power switch on the front of the Main screen, and select [Shutdown] or [Reboot] from the menu that appears. 1 Click [Information] in...

User Guide
Page 33
...configure cameras with a few simple operations. In addition, the trigger will become trigger of event/alarm Recording/Action Corresponding to the Installation Manual (separate document). 33 Alarms and Events / Displaying Configuration Window As shown in the table below, you to be determined as alarms... the hot spot. • You can confirm alarms and events separately in the event/alarm log. a a - (alarm) (event) Manual action - - For details on Automatic Record Settings and Easy Setup, refer to Event/Alarm Recording setting Action setting Event Alarm Camera Client record...
...configure cameras with a few simple operations. In addition, the trigger will become trigger of event/alarm Recording/Action Corresponding to the Installation Manual (separate document). 33 Alarms and Events / Displaying Configuration Window As shown in the table below, you to be determined as alarms... the hot spot. • You can confirm alarms and events separately in the event/alarm log. a a - (alarm) (event) Manual action - - For details on Automatic Record Settings and Easy Setup, refer to Event/Alarm Recording setting Action setting Event Alarm Camera Client record...
User Guide
Page 34
... are saved as NSR automatically, select the cameras to register, and then register them simultaneously. Notes • When using non-Sony IP cameras (network cameras) or ONVIF (Open Network Video Interface Forum) cameras, simultaneous registration through basic configuration and automatic detection ...multiple cameras simultaneously. • A blank is necessary to control pan, tilt, and zoom on the operation, refer to the Installation Manual (separate document). Chapter 4 Application Settings The Configuration window appears. 3 Click the button of the item you want to set multiple ...
... are saved as NSR automatically, select the cameras to register, and then register them simultaneously. Notes • When using non-Sony IP cameras (network cameras) or ONVIF (Open Network Video Interface Forum) cameras, simultaneous registration through basic configuration and automatic detection ...multiple cameras simultaneously. • A blank is necessary to control pan, tilt, and zoom on the operation, refer to the Installation Manual (separate document). Chapter 4 Application Settings The Configuration window appears. 3 Click the button of the item you want to set multiple ...
User Guide
Page 38
...the camera side for the proxy server. Port Enter the port number for when connecting with the camera. For details, refer to the instruction manual of the device to perform monitoring directly from a Web browser. It can use a global ID to specify the cameras to be resolved. ... for connecting to 32 characters and ASCII characters (upper or lower case alphanumeric characters and symbols Global ID Enter a number for registering a device manually. Cancel This cancels the settings. Name Enter up to 32 characters (excluding to assign a name to the device to be up to 32 ...
...the camera side for the proxy server. Port Enter the port number for when connecting with the camera. For details, refer to the instruction manual of the device to perform monitoring directly from a Web browser. It can use a global ID to specify the cameras to be resolved. ... for connecting to 32 characters and ASCII characters (upper or lower case alphanumeric characters and symbols Global ID Enter a number for registering a device manually. Cancel This cancels the settings. Name Enter up to 32 characters (excluding to assign a name to the device to be up to 32 ...
User Guide
Page 39
.... This displays the serial number of the device to be replaced with the results obtained with the automatic search. For details, refer to the instruction manual of the device. Mac address This displays the MAC address of the values you entered up until now will not be displayed in which the...
.... This displays the serial number of the device to be replaced with the results obtained with the automatic search. For details, refer to the instruction manual of the device. Mac address This displays the MAC address of the values you entered up until now will not be displayed in which the...

User Guide
Page 40
...the host name for connecting to the device. Select the check boxes of Add Device Dialog Box Enter the setting items when registering a device manually. Chapter 4 Application Settings User Name Enter the user name for the camera. Enter the port number on the camera side for the following items... Dialog Box This dialog box allows you want to be accessed via automatic search. The default setting is "80." Proxy Set this manually, select the model name. Enable Select the check box, and configure the following setting items when registering devices detected via a proxy server.
...the host name for connecting to the device. Select the check boxes of Add Device Dialog Box Enter the setting items when registering a device manually. Chapter 4 Application Settings User Name Enter the user name for the camera. Enter the port number on the camera side for the following items... Dialog Box This dialog box allows you want to be accessed via automatic search. The default setting is "80." Proxy Set this manually, select the model name. Enable Select the check box, and configure the following setting items when registering devices detected via a proxy server.

User Guide
Page 41
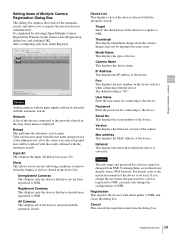
... to "Setting Items of [Video] Tab" (page 42). 3 Click [Apply]. The setting items and selectable values differ depending on configurations. For details, refer to the manual for your camera. 1 Click [Device] at the top of the Configuration window, and select the camera for which you want to 32 characters and consist...
... to "Setting Items of [Video] Tab" (page 42). 3 Click [Apply]. The setting items and selectable values differ depending on configurations. For details, refer to the manual for your camera. 1 Click [Device] at the top of the Configuration window, and select the camera for which you want to 32 characters and consist...


