
User Guide
Page 7
... kit, the unit can be installed in a standard universal pitch EIA 19-inch rack. For details on the rack mounting kit, contact your Sony dealer. Protect data from analog cameras by camera name, date, alarm, and other methods. • Audio recording and playback1) are required. ...configuration, for dividing and storing data and parity (error correcting codes) onto more than one hard disk drive. We recommend using an uninterruptible power supply (UPS). Other features • Custom layout support allows you replace the malfunctioned hard disk, the unit may not be able to record...
... kit, the unit can be installed in a standard universal pitch EIA 19-inch rack. For details on the rack mounting kit, contact your Sony dealer. Protect data from analog cameras by camera name, date, alarm, and other methods. • Audio recording and playback1) are required. ...configuration, for dividing and storing data and parity (error correcting codes) onto more than one hard disk drive. We recommend using an uninterruptible power supply (UPS). Other features • Custom layout support allows you replace the malfunctioned hard disk, the unit may not be able to record...
User Guide
Page 9
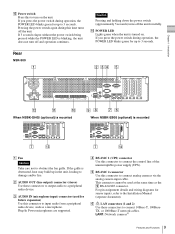
...time as a microphone. If 3 seconds elapse without the power switch being pressed while the POWER LED is mounted 7 qd 7 qf A Fan Caution Take care not to 3 seconds. If you press the power switch during operation, the POWER LED blinks green for up in the unit, leading to... sensor inputs, refer to input audio from a peripheral audio device, such as the I RS-422/485 connector. Chapter 1 Introduction M Power switch Press this time turns off the unit. For pin assignment details and wiring diagrams for future expansion) Use this connector to the Installation...
...time as a microphone. If 3 seconds elapse without the power switch being pressed while the POWER LED is mounted 7 qd 7 qf A Fan Caution Take care not to 3 seconds. If you press the power switch during operation, the POWER LED blinks green for up in the unit, leading to... sensor inputs, refer to input audio from a peripheral audio device, such as the I RS-422/485 connector. Chapter 1 Introduction M Power switch Press this time turns off the unit. For pin assignment details and wiring diagrams for future expansion) Use this connector to the Installation...
User Guide
Page 10
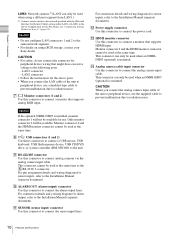
...10 Features and Functions Caution If the optional NSBK-DH05 is installed, monitor connector 1 will be used when using iSCSI storage, contact your Sony dealer. Only monitor connector 2 will not be used when an NSBKDH05 (optional) is mounted. For connection details and a wiring diagram ...for alarm output, refer to connect a monitor that supports analog RGB input. L Power supply connector Use this connector to connect the power cord. I RS-422/485 connector Use this connector to connect analog cameras via the analog camera input cable. This...
...10 Features and Functions Caution If the optional NSBK-DH05 is installed, monitor connector 1 will be used when using iSCSI storage, contact your Sony dealer. Only monitor connector 2 will not be used when an NSBKDH05 (optional) is mounted. For connection details and a wiring diagram ...for alarm output, refer to connect a monitor that supports analog RGB input. L Power supply connector Use this connector to connect the power cord. I RS-422/485 connector Use this connector to connect analog cameras via the analog camera input cable. This...
User Guide
Page 11
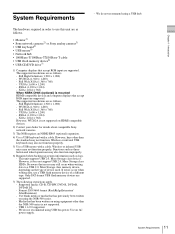
...may also function improperly. 6) Required when backing up system information such as logs. - Be aware that has previously been written on using USB bus power. Use an AC power supply. - WUXGA (1,920 × 1,200) - UXGA (1,600 × 1,200) - Supported media: CD-R, CD-RW, DVD-R, DVD+R,...- XGA (1,024 × 768) When NSBK-DH05 (optional) is not supported on HDMI-compatible devices. 2) Contact your dealer for details about compatible Sony network cameras. 3) The NSR requires an NSBK-EB05 (optional) expansion. 4) Use a USB keyboard with a cable. We do not recommend using equipment ...
...may also function improperly. 6) Required when backing up system information such as logs. - Be aware that has previously been written on using USB bus power. Use an AC power supply. - WUXGA (1,920 × 1,200) - UXGA (1,600 × 1,200) - Supported media: CD-R, CD-RW, DVD-R, DVD+R,...- XGA (1,024 × 768) When NSBK-DH05 (optional) is not supported on HDMI-compatible devices. 2) Contact your dealer for details about compatible Sony network cameras. 3) The NSR requires an NSBK-EB05 (optional) expansion. 4) Use a USB keyboard with a cable. We do not recommend using equipment ...

User Guide
Page 17
...click [OK]. (This screen only appears when an optional NSBK-EB05 is selected, select the type of UPS to be used from when a power cut is detected until shutdown to start. Caution For details on the auto logon function, refer to "Logging On to the NSR" (page 25.... Setting Items of UPS. Chapter 2 Administration Menu Setting Items of Serial Port (Analog Camera) Screen Configure settings related to the analog camera connection. Power off suddenly during operation, the data may be connected, and click [OK]. (This screen only appears when an optional NSBK-EB05 is restored, contact...
...click [OK]. (This screen only appears when an optional NSBK-EB05 is selected, select the type of UPS to be used from when a power cut is detected until shutdown to start. Caution For details on the auto logon function, refer to "Logging On to the NSR" (page 25.... Setting Items of UPS. Chapter 2 Administration Menu Setting Items of Serial Port (Analog Camera) Screen Configure settings related to the analog camera connection. Power off suddenly during operation, the data may be connected, and click [OK]. (This screen only appears when an optional NSBK-EB05 is restored, contact...

User Guide
Page 25
... for and playing back recorded images, see Chapter 4 "Application Settings" (page 33). Before you can use the NSR, you must first log on. 1 Press the power switch on the front of the NSR to the NSR Note The fan noise may be loud after turning on . After startup, the logon screen...
... for and playing back recorded images, see Chapter 4 "Application Settings" (page 33). Before you can use the NSR, you must first log on. 1 Press the power switch on the front of the NSR to the NSR Note The fan noise may be loud after turning on . After startup, the logon screen...
User Guide
Page 32
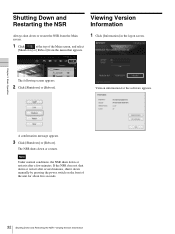
... appears. 3 Click [Shutdown] or [Reboot]. Note Under normal conditions, the NSR shuts down or restarts after several minutes, shut it down manually by pressing the power switch on the front of the Main screen, and select [Shutdown] or [Reboot] from the menu that appears. 1 Click [Information] in the logon screen. If...
... appears. 3 Click [Shutdown] or [Reboot]. Note Under normal conditions, the NSR shuts down or restarts after several minutes, shut it down manually by pressing the power switch on the front of the Main screen, and select [Shutdown] or [Reboot] from the menu that appears. 1 Click [Information] in the logon screen. If...

User Guide
Page 72
... the cameras for recording images, and motion detection of camera A and sensor input of camera B are configured as triggers to record images. 8 Click [OK]. NSR POWER NETWORK 1 2 3 HDD 1 2 3 4 STATUS 1 2 3 4 ERROR REC or or or or or 72 Configuring Recording Schedules About Relationship Between Sensor and Camera when Alarm Occurs When [Record...
... the cameras for recording images, and motion detection of camera A and sensor input of camera B are configured as triggers to record images. 8 Click [OK]. NSR POWER NETWORK 1 2 3 HDD 1 2 3 4 STATUS 1 2 3 4 ERROR REC or or or or or 72 Configuring Recording Schedules About Relationship Between Sensor and Camera when Alarm Occurs When [Record...
