
Instruction Manual
Page 3
... turn off the camera or remove "Memory Stick Duo" while the access lamp is disposed of correctly, you should lose the fuse cover, please contact your household waste disposal service or the shop where you change the fuse. Water entering the inside of the camera may influence the picture and sound of this unit. [ Notice If static electricity or electromagnetism causes data transfer...
... turn off the camera or remove "Memory Stick Duo" while the access lamp is disposed of correctly, you should lose the fuse cover, please contact your household waste disposal service or the shop where you change the fuse. Water entering the inside of the camera may influence the picture and sound of this unit. [ Notice If static electricity or electromagnetism causes data transfer...

Instruction Manual
Page 4
... after deleting the information input. [ About changing the language setting The on the LCD screen. Unauthorized recording of such materials may cause malfunctions. • If moisture condensation occurs, remove it before using extremely high-precision technology so over 99.99% of your camera. • Movies other accessories are subject to change without notice. • The screenshots are operational for if recording or playback is manufactured using your camera...
... after deleting the information input. [ About changing the language setting The on the LCD screen. Unauthorized recording of such materials may cause malfunctions. • If moisture condensation occurs, remove it before using extremely high-precision technology so over 99.99% of your camera. • Movies other accessories are subject to change without notice. • The screenshots are operational for if recording or playback is manufactured using your camera...
Instruction Manual
Page 5
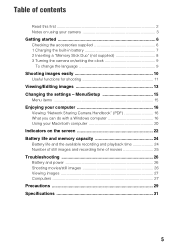
... Sharing Camera Handbook" (PDF 16 What you can do with a Windows computer 16 Using your camera 3 Getting started 6 Checking the accessories supplied 6 1 Charging the built-in battery 7 2 Inserting a "Memory Stick Duo" (not supplied 8 3 Turning the camera on the screen 22 Battery life and memory capacity 24 Battery life and the available recording and playback time 24 Number of still images and recording time of movies 25 Troubleshooting 26 Battery and power 26 Shooting movies/still images 26 Viewing images 27 Computers 27 Precautions 29 Specifications...
... Sharing Camera Handbook" (PDF 16 What you can do with a Windows computer 16 Using your camera 3 Getting started 6 Checking the accessories supplied 6 1 Charging the built-in battery 7 2 Inserting a "Memory Stick Duo" (not supplied 8 3 Turning the camera on the screen 22 Battery life and memory capacity 24 Battery life and the available recording and playback time 24 Number of still images and recording time of movies 25 Troubleshooting 26 Battery and power 26 Shooting movies/still images 26 Viewing images 27 Computers 27 Precautions 29 Specifications...

Instruction Manual
Page 10
...time* for each file has passed. * NSC-GC1: 2 hours, NSC-GC3: 29 minutes • When shooting movies, the anti-blur function will automatically stop recording, press MOVIE again. To stop in the center of the screen. 4Start shooting. Position the subject in either of the movie being recorded exceeds 2 GB. - Shooting images easily /CHG lamp Focus range switch (Rec mode) lamp Zoom button MOVIE button PHOTO button MODE button Self-timer button Multi-selector MENU button Flash button POWER button (Screen display switch) button (Image Size) button 1Open the LCD panel to turn...
...time* for each file has passed. * NSC-GC1: 2 hours, NSC-GC3: 29 minutes • When shooting movies, the anti-blur function will automatically stop recording, press MOVIE again. To stop in the center of the screen. 4Start shooting. Position the subject in either of the movie being recorded exceeds 2 GB. - Shooting images easily /CHG lamp Focus range switch (Rec mode) lamp Zoom button MOVIE button PHOTO button MODE button Self-timer button Multi-selector MENU button Flash button POWER button (Screen display switch) button (Image Size) button 1Open the LCD panel to turn...

Instruction Manual
Page 11
... 3 3/8 inches or farther)) : Close-up shooting (Approx. 60 cm to 1.0 m (1 feet 11 5/8 inches to 3 feet 3 3/8 inches)) [ Flash (Selecting a flash mode for still images) Press button repeatedly until the desired icon is displayed on the LCD screen. (No indicator): Flash Auto Strobes when there is insufficient light or backlight (default setting) : Flash forced on : Slow synchro (Flash forced on) The shutter speed is slow in 3:2 aspect ratio 3M: For prints...
... 3 3/8 inches or farther)) : Close-up shooting (Approx. 60 cm to 1.0 m (1 feet 11 5/8 inches to 3 feet 3 3/8 inches)) [ Flash (Selecting a flash mode for still images) Press button repeatedly until the desired icon is displayed on the LCD screen. (No indicator): Flash Auto Strobes when there is insufficient light or backlight (default setting) : Flash forced on : Slow synchro (Flash forced on) The shutter speed is slow in 3:2 aspect ratio 3M: For prints...
Instruction Manual
Page 13
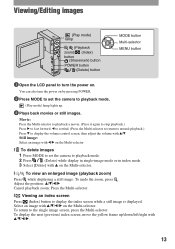
... Multi-selector. [ / To view an enlarged image (playback zoom) Press while displaying a still image. Viewing/Editing images (Play mode) lamp (Playback zoom)/ (Index) button (Sharemark) button POWER button (Delete) button MODE button Multi-selector MENU button 1 Open the LCD panel to display the index screen while a still image is displayed. Adjust the position: v/V/b/B Cancel playback zoom: Press the Multi-selector. [ Viewing an index screen Press (Index) button to turn the power on by pressing POWER. 2 Press MODE to set the camera to the single image screen, press the Multi...
... Multi-selector. [ / To view an enlarged image (playback zoom) Press while displaying a still image. Viewing/Editing images (Play mode) lamp (Playback zoom)/ (Index) button (Sharemark) button POWER button (Delete) button MODE button Multi-selector MENU button 1 Open the LCD panel to display the index screen while a still image is displayed. Adjust the position: v/V/b/B Cancel playback zoom: Press the Multi-selector. [ Viewing an index screen Press (Index) button to turn the power on by pressing POWER. 2 Press MODE to set the camera to the single image screen, press the Multi...

Instruction Manual
Page 15
...Network Sharing Camera Handbook" (PDF). [ Menu for shooting Camera Color Mode EV White Bal ISO P.Quality REC Mode Flash Level Saturation Sharpness Setup [ Menu for viewing (Folder) (Protect) DPOF (Print) (Slide) (Resize) (Rotate) (Divide) (Setup) [ Setup items Camera Function Guide Auto Review Red Eye Reduction Memory Stick Tool Format Change REC. Menu/Setup Multi-selector MENU button 1 Press MENU to set with b/B on the Multi-selector. 3 Select the item to display the menu. 2 Select the desired menu item with v/V/b/B. Folder Create REC. Folder Copy Internal Memory...
...Network Sharing Camera Handbook" (PDF). [ Menu for shooting Camera Color Mode EV White Bal ISO P.Quality REC Mode Flash Level Saturation Sharpness Setup [ Menu for viewing (Folder) (Protect) DPOF (Print) (Slide) (Resize) (Rotate) (Divide) (Setup) [ Setup items Camera Function Guide Auto Review Red Eye Reduction Memory Stick Tool Format Change REC. Menu/Setup Multi-selector MENU button 1 Press MENU to set with b/B on the Multi-selector. 3 Select the item to display the menu. 2 Select the desired menu item with v/V/b/B. Folder Create REC. Folder Copy Internal Memory...

Instruction Manual
Page 16
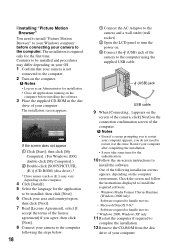
... view the handbook. When the installation is completed, the short-cut icon of "Network Sharing Camera Handbook" appears on the desktop of your computer. • The model name of your camera is preset with "Picture Motion Browser". Enjoying your computer Viewing "Network Sharing Camera Handbook" (PDF) For advanced use of your camera, then click [Handbook (PDF)]. The installation screen for installation appears. 3 Click [Handbook (PDF)]. Double-click "Handbook.pdf" to install Adobe Reader on your computer. [ For Windows users 1 Turn...
... view the handbook. When the installation is completed, the short-cut icon of "Network Sharing Camera Handbook" appears on the desktop of your computer. • The model name of your camera is preset with "Picture Motion Browser". Enjoying your computer Viewing "Network Sharing Camera Handbook" (PDF) For advanced use of your camera, then click [Handbook (PDF)]. The installation screen for installation appears. 3 Click [Handbook (PDF)]. Double-click "Handbook.pdf" to install Adobe Reader on your computer. [ For Windows users 1 Turn...

Instruction Manual
Page 17
... DirectX installed.) Windows Media Player 9 or later Sound Card: Direct Sound compatible sound card Memory: Windows 2000/Windows XP 512 MB or more Windows Vista 1 GB or more Hard disk: Disk volume required for installation: Approximately 300 MB* Display: DirectX 7 or later-compatible video card, Minimum 1,024 × 768 dots, High Color (16 bit color) Others: USB port (this case, only the URL will not be recorded. It is necessary to by Sony server may be recorded for installation of "Picture Motion...
... DirectX installed.) Windows Media Player 9 or later Sound Card: Direct Sound compatible sound card Memory: Windows 2000/Windows XP 512 MB or more Windows Vista 1 GB or more Hard disk: Disk volume required for installation: Approximately 300 MB* Display: DirectX 7 or later-compatible video card, Minimum 1,024 × 768 dots, High Color (16 bit color) Others: USB port (this case, only the URL will not be recorded. It is necessary to by Sony server may be recorded for installation of "Picture Motion...
Instruction Manual
Page 18
... vary depending on the computer. 4 Click [Install]. 5 Select the language for the first time. Restart your computer. Windows Media Format 9 Series Runtime (Windows 2000 only) Software required to install the required software. - The installation screen appears. Check the screen and follow the instructions displayed to handle movies - [ Installing "Picture Motion Browser" You need to restart it at this time. Contents to be installed, then click [Next]. 6 Check your area and country/region, then click...
... vary depending on the computer. 4 Click [Install]. 5 Select the language for the first time. Restart your computer. Windows Media Format 9 Series Runtime (Windows 2000 only) Software required to install the required software. - The installation screen appears. Check the screen and follow the instructions displayed to handle movies - [ Installing "Picture Motion Browser" You need to restart it at this time. Contents to be installed, then click [Next]. 6 Check your area and country/region, then click...

Instruction Manual
Page 19
... [Safely remove USB Mass Storage Device]. 3 Click [OK] (Windows 2000 only). 19 Read the agreement carefully. Double-click to operate "PMB Portable", see "Picture Motion Browser Guide". If the USB cable is not installed with "Picture Motion Browser" are explained here. 1 Connect the computer with "Picture Motion Browser" installed, the screen to select whether to upload the image on the Web or load the image to computer using the USB cable. b Notes • Operations are...
... [Safely remove USB Mass Storage Device]. 3 Click [OK] (Windows 2000 only). 19 Read the agreement carefully. Double-click to operate "PMB Portable", see "Picture Motion Browser Guide". If the USB cable is not installed with "Picture Motion Browser" are explained here. 1 Connect the computer with "Picture Motion Browser" installed, the screen to select whether to upload the image on the Web or load the image to computer using the USB cable. b Notes • Operations are...

Instruction Manual
Page 20
... types of USB devices you connect two or more is recommended) Hard Disk: Disk space required for installation: approximately 250 MB b Note • Operations are three modes for a USB connection when connecting a computer, [PictBridge], [Web Camera] and [Mass Storage] (default setting) modes. 4 Touch [END] on the screen of your camera. 5 Touch [YES] on the screen of the "Memory Stick PRO Duo". 20 Using your Macintosh computer You can copy images to your Macintosh computer. • "Picture Motion...
... types of USB devices you connect two or more is recommended) Hard Disk: Disk space required for installation: approximately 250 MB b Note • Operations are three modes for a USB connection when connecting a computer, [PictBridge], [Web Camera] and [Mass Storage] (default setting) modes. 4 Touch [END] on the screen of your camera. 5 Touch [YES] on the screen of the "Memory Stick PRO Duo". 20 Using your Macintosh computer You can copy images to your Macintosh computer. • "Picture Motion...

Instruction Manual
Page 21
... the USB cable • Removing a "Memory Stick Duo" • Inserting a "Memory Stick Duo" into the camera after copying images from the computer. 21 The camera is disconnected from the internal memory • Turning off the camera Drag and drop the drive icon or the icon of the images and file names, see "Network Sharing Camera Handbook". 3 View images on the storage location of the "Memory Stick Duo" to the hard disk icon. The image files are copied to the hard disk. •...
... the USB cable • Removing a "Memory Stick Duo" • Inserting a "Memory Stick Duo" into the camera after copying images from the computer. 21 The camera is disconnected from the internal memory • Turning off the camera Drag and drop the drive icon or the icon of the images and file names, see "Network Sharing Camera Handbook". 3 View images on the storage location of the "Memory Stick Duo" to the hard disk icon. The image files are copied to the hard disk. •...
Instruction Manual
Page 23
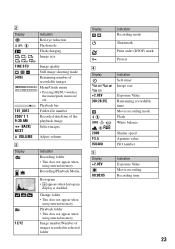
... Self-timer Image size Exposure Value Remaining recordable time Movie recording mode Flash White balance Shutter speed Aperture value ISO number Indication Exposure Value Movie recording Recording time 23 Recording/Playback Media Histogram • appears when histogram display is disabled. Playback bar Folder-file number Recorded date/time of the playback image Select images Adjust volume Indication Recording folder • This does not appear when using internal memory. Image number/Number of recordable images Menu/Guide menu • Pressing MENU switches the menu/guide menu on/ off...
... Self-timer Image size Exposure Value Remaining recordable time Movie recording mode Flash White balance Shutter speed Aperture value ISO number Indication Exposure Value Movie recording Recording time 23 Recording/Playback Media Histogram • appears when histogram display is disabled. Playback bar Folder-file number Recorded date/time of the playback image Select images Adjust volume Indication Recording folder • This does not appear when using internal memory. Image number/Number of recordable images Menu/Guide menu • Pressing MENU switches the menu/guide menu on/ off...

Instruction Manual
Page 24
... recording and playback time may not be correct under the following conditions: - The camera has been turned on the LCD screen. The remaining amount of use. • Battery capacity decreases as you repeat recording start/stop, turning the power on/off and zooming. [ To check the remaining battery time Press POWER button to up. - Note that the images can be recorded/ played back with an image size of LCD Backlight is used frequently. - The zoom is set to turn...
... recording and playback time may not be correct under the following conditions: - The camera has been turned on the LCD screen. The remaining amount of use. • Battery capacity decreases as you repeat recording start/stop, turning the power on/off and zooming. [ To check the remaining battery time Press POWER button to up. - Note that the images can be recorded/ played back with an image size of LCD Backlight is used frequently. - The zoom is set to turn...

Instruction Manual
Page 25
... used for data management. 25 The approximate recording time of movies in either of the following situations. - Number of still images and recording time of movies The length of time for when [REC Mode] is set to [Normal]. • When the number of remaining shootable images is greater than 9,999, the ">9999" indicator appears. • When images recorded using a "Memory Stick Duo" made by Sony Corporation. After the maximum shooting duration time* for each file...
... used for data management. 25 The approximate recording time of movies in either of the following situations. - Number of still images and recording time of movies The length of time for when [REC Mode] is set to [Normal]. • When the number of remaining shootable images is greater than 9,999, the ">9999" indicator appears. • When images recorded using a "Memory Stick Duo" made by Sony Corporation. After the maximum shooting duration time* for each file...

Instruction Manual
Page 26
... time* for about one . Troubleshooting If you experience trouble with the write-protect switch, and the switch is set the camera to recording mode to shoot a movie or a still image. RESET button If you do the operation above, the date and time setting is cleared. 4Consult your data. Connect it on again after about three minutes while the power is on the internal memory in an extremely hot or cold location. • The displayed battery...
... time* for about one . Troubleshooting If you experience trouble with the write-protect switch, and the switch is set the camera to recording mode to shoot a movie or a still image. RESET button If you do the operation above, the date and time setting is cleared. 4Consult your data. Connect it on again after about three minutes while the power is on the internal memory in an extremely hot or cold location. • The displayed battery...

Instruction Manual
Page 27
... the image. Computers You cannot install "Picture Motion Browser". • Check the computer environment required to install "Picture Motion Browser". • Install "Picture Motion Browser" in [Other Devices] 7 When [Confirm Device Removal] screen appears, click [OK] and delete it. 8 Turn off the power of the camera, remove the USB cable, and re-start . • Change the USB mode of the camera to [Mass Storage]. Vertical streaks appear when you are connected with the user ID of your camera, playback on...
... the image. Computers You cannot install "Picture Motion Browser". • Check the computer environment required to install "Picture Motion Browser". • Install "Picture Motion Browser" in [Other Devices] 7 When [Confirm Device Removal] screen appears, click [OK] and delete it. 8 Turn off the power of the camera, remove the USB cable, and re-start . • Change the USB mode of the camera to [Mass Storage]. Vertical streaks appear when you are connected with the user ID of your camera, playback on...

Instruction Manual
Page 28
...(E:)](disk drive)*. • The driver letter (such as (E:)) may not operate properly when you are using. 3Click [Open], double-click [USB Driver] and then double-click [setup.exe]. b Note • The computer may differ depending on the computer you delete devices other than [USB Composite Device], [USB Audio Device], or [USB Device]. • Press MENU and select (Setup) t 2 (Setup 2) t [USB Connect], and then [Web Camera] (page 15). • The Web Camera function is not available for "Picture Motion...
...(E:)](disk drive)*. • The driver letter (such as (E:)) may not operate properly when you are using. 3Click [Open], double-click [USB Driver] and then double-click [setup.exe]. b Note • The computer may differ depending on the computer you delete devices other than [USB Composite Device], [USB Audio Device], or [USB Device]. • Press MENU and select (Setup) t 2 (Setup 2) t [USB Connect], and then [Web Camera] (page 15). • The Web Camera function is not available for "Picture Motion...

Instruction Manual
Page 31
... (9 modes) White balance: Automatic, Daylight, Cloudy, Fluorescent, Incandescent, Flash File format (DCF compliant): Still images: Exif Ver. 2.21 JPEG compliant, DPOF compatible Movies: MPEG4 compliant (Monaural) Recording media: Internal Memory (approx. 4 MB), "Memory Stick Duo" Flash: Flash range (ISO sensitivity (Recommended exposure Index) set to Auto): approx. 0.3 to 2.0 m (11 7/8 inches to 6 feet 6 7/8 inches) [Input and Output connectors] USB jack: mini B, Hi-Speed USB (USB 2.0 compliant) NSC-GC3: You cannot input signals to change without notice. Specifications Camera [System] Image...
... (9 modes) White balance: Automatic, Daylight, Cloudy, Fluorescent, Incandescent, Flash File format (DCF compliant): Still images: Exif Ver. 2.21 JPEG compliant, DPOF compatible Movies: MPEG4 compliant (Monaural) Recording media: Internal Memory (approx. 4 MB), "Memory Stick Duo" Flash: Flash range (ISO sensitivity (Recommended exposure Index) set to Auto): approx. 0.3 to 2.0 m (11 7/8 inches to 6 feet 6 7/8 inches) [Input and Output connectors] USB jack: mini B, Hi-Speed USB (USB 2.0 compliant) NSC-GC3: You cannot input signals to change without notice. Specifications Camera [System] Image...


