
Handycam® Handbook
Page 1
4-257-862-11(1) Interchangeable Lens Digital HD Video Camera Recorder "Handycam" Handbook Table of contents Sample images Menu Index NEX-VG10/VG10E GB © 2010 Sony Corporation
4-257-862-11(1) Interchangeable Lens Digital HD Video Camera Recorder "Handycam" Handbook Table of contents Sample images Menu Index NEX-VG10/VG10E GB © 2010 Sony Corporation
Handycam® Handbook
Page 12
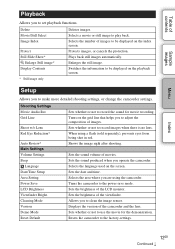
... Sets the date and time. Index 12GB Continued r Switches the information to set playback functions. Sets the brightness of movies. Sets whether or not to record the sound for the demonstration. Plays back still images automatically. Cleaning Mode Version Demo Mode Reset Default Sets whether or not to use the movie... Image Index Protect Still Slide Show* Enlarge Still image* DiusrpinlagypClaoynbteacnkts Deletes images. Sets whether or not to the power save mode. Turns the camcorder to record images when there is no lens. Sets the brightness of the camcorder and the...
... Sets the date and time. Index 12GB Continued r Switches the information to set playback functions. Sets the brightness of movies. Sets whether or not to record the sound for the demonstration. Plays back still images automatically. Cleaning Mode Version Demo Mode Reset Default Sets whether or not to use the movie... Image Index Protect Still Slide Show* Enlarge Still image* DiusrpinlagypClaoynbteacnkts Deletes images. Sets whether or not to the power save mode. Turns the camcorder to record images when there is no lens. Sets the brightness of the camcorder and the...
Handycam® Handbook
Page 17
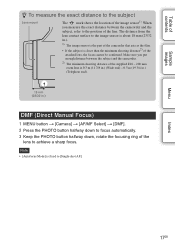
... film. • If the subject is fixed to [Single-shot AF]. The distance from the lens contact surface to the image sensor is about 18 mm (23/32 in .) DMF (Direct Manual Focus) 1 MENU button t [Camera] t [AF/MF Select] t [DMF]. 2 Press the PHOTO button halfway down to focus automatically.... 3 Keep the PHOTO button halfway down, rotate the focusing ring of the lens to achieve a sharp focus. Table of contents Sample images z To measure the...
... film. • If the subject is fixed to [Single-shot AF]. The distance from the lens contact surface to the image sensor is about 18 mm (23/32 in .) DMF (Direct Manual Focus) 1 MENU button t [Camera] t [AF/MF Select] t [DMF]. 2 Press the PHOTO button halfway down to focus automatically.... 3 Keep the PHOTO button halfway down, rotate the focusing ring of the lens to achieve a sharp focus. Table of contents Sample images z To measure the...

Handycam® Handbook
Page 25
... range that is automatically adjusted to the telephoto side. Aperture (F-number) Notes • If proper exposure cannot be obtained after the setup in still image recording mode, when you open the aperture wider than F6.3 (a smaller F-value), such as F3.5, the F-value becomes F6.3 as it is, resetting is ...front of and beyond the subject. 1 Press the control dial and select [Aperture Priority]. In the case of the supplied E18 - 200 mm zoom lens, even if you press the PHOTO button halfway down the aperture) widens the range that is blurred. • Larger F-value: The subject and ...
... range that is automatically adjusted to the telephoto side. Aperture (F-number) Notes • If proper exposure cannot be obtained after the setup in still image recording mode, when you open the aperture wider than F6.3 (a smaller F-value), such as F3.5, the F-value becomes F6.3 as it is, resetting is ...front of and beyond the subject. 1 Press the control dial and select [Aperture Priority]. In the case of the supplied E18 - 200 mm zoom lens, even if you press the PHOTO button halfway down the aperture) widens the range that is blurred. • Larger F-value: The subject and ...

Handycam® Handbook
Page 32
...selected when using the following functions: - [Hand-held Twilight] - [Anti Motion Blur] • [Active] can be selected when recording movies using a lens with optical SteadyShot complying with more powerful effect. This setting is attached. Table of contents Sample images SteadyShot Sets whether or not you... SteadyShot with Active SteadyShot. • You cannot set [SteadyShot] when an E16 mm F2.8 lens (sold separately) or an A-mount lens (sold separately) is recommended when you use the SteadyShot function of the lens. 1 MENU button t [Camera] t [SteadyShot] t desired setting.
...selected when using the following functions: - [Hand-held Twilight] - [Anti Motion Blur] • [Active] can be selected when recording movies using a lens with optical SteadyShot complying with more powerful effect. This setting is attached. Table of contents Sample images SteadyShot Sets whether or not you... SteadyShot with Active SteadyShot. • You cannot set [SteadyShot] when an E16 mm F2.8 lens (sold separately) or an A-mount lens (sold separately) is recommended when you use the SteadyShot function of the lens. 1 MENU button t [Camera] t [SteadyShot] t desired setting.
Handycam® Handbook
Page 37
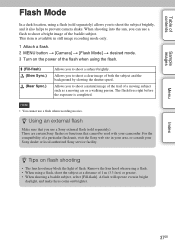
... you to prevent camera shake. There are certain Sony flashes or functions that you use a flash when recording movies. z Tips on the power of the flash when using the flash. (Fill-flash) (Slow Sync.) (Rear Sync.) Allows you to shoot a subject brightly. Remove the lens hood when using...Index 37GB The flash fires right before the exposure is available in still image recording mode only. 1 Attach a flash. 2 MENU button t [Camera] t [Flash Mode] t desired mode. 3 Turn on flash shooting • The lens hood may block the light of flash. For the compatibility of a particular ...
... you to prevent camera shake. There are certain Sony flashes or functions that you use a flash when recording movies. z Tips on the power of the flash when using the flash. (Fill-flash) (Slow Sync.) (Rear Sync.) Allows you to shoot a subject brightly. Remove the lens hood when using...Index 37GB The flash fires right before the exposure is available in still image recording mode only. 1 Attach a flash. 2 MENU button t [Camera] t [Flash Mode] t desired mode. 3 Turn on flash shooting • The lens hood may block the light of flash. For the compatibility of a particular ...
Handycam® Handbook
Page 54
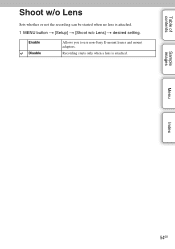
Sample images Menu Index 54GB Enable Disable Allows you to use non-Sony E-mount lenses and mount adaptors. Recording starts only when a lens is attached. 1 MENU button t [Setup] t [Shoot w/o Lens] t desired setting. Table of contents Shoot w/o Lens Sets whether or not the recording can be started when no lens is attached.
Sample images Menu Index 54GB Enable Disable Allows you to use non-Sony E-mount lenses and mount adaptors. Recording starts only when a lens is attached. 1 MENU button t [Setup] t [Shoot w/o Lens] t desired setting. Table of contents Shoot w/o Lens Sets whether or not the recording can be started when no lens is attached.

Handycam® Handbook
Page 65
... only when the battery level is activated automatically. 3 Turn off . The message "After cleaning, turn camera off the camcorder and detach the lens. 4 Use a blower to clean the image sensor surface and the surrounding area. 5 Attach the lens. appears. 2 Confirm [OK]. Table of the blower does not touch the image sensor. • Hold...
... only when the battery level is activated automatically. 3 Turn off . The message "After cleaning, turn camera off the camcorder and detach the lens. 4 Use a blower to clean the image sensor surface and the surrounding area. 5 Attach the lens. appears. 2 Confirm [OK]. Table of the blower does not touch the image sensor. • Hold...

Handycam® Handbook
Page 66
Confirm the version when a firmware update is (3 remaining battery icons) or more. Note • An update can be performed only when the battery level is released. 1 MENU button t [Setup] t [Version]. We recommend that you use a sufficient battery or the AC Adaptor. 66GB Table of contents Sample images Menu Index Version Displays the version of your camcorder and lens.
Confirm the version when a firmware update is (3 remaining battery icons) or more. Note • An update can be performed only when the battery level is released. 1 MENU button t [Setup] t [Version]. We recommend that you use a sufficient battery or the AC Adaptor. 66GB Table of contents Sample images Menu Index Version Displays the version of your camcorder and lens.
Handycam® Handbook
Page 77
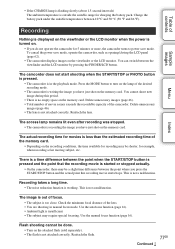
...of the camcorder. Delete unnecessary images (page 46). • The lens is not a malfunction. The image is not attached correctly. Check the minimum focal distance of contents Sample images Menu Index Recording Nothing is displayed on the viewfinder or the LCD monitor when the power...lamp of the memory card. • Depending on the recording conditions, the time available for recording may be done. • Turn on the memory card. Reattach the flash. 77GB Continued r Reattach the lens. Table of the lens. • You are shooting in the playback mode. ...
...of the camcorder. Delete unnecessary images (page 46). • The lens is not a malfunction. The image is not attached correctly. Check the minimum focal distance of contents Sample images Menu Index Recording Nothing is displayed on the viewfinder or the LCD monitor when the power...lamp of the memory card. • Depending on the recording conditions, the time available for recording may be done. • Turn on the memory card. Reattach the flash. 77GB Continued r Reattach the lens. Table of the lens. • You are shooting in the playback mode. ...

Handycam® Handbook
Page 78
... area selected with the following recording mode: - [Bracket: Cont.] - [Hand-held Twilight] - [Anti Motion Blur] - Adjust the setting again. Blurring of light appears on the LCD monitor. • This is not a malfunction. The optical properties of some lenses may partially appear in camera shake. Dots appear and remain...too dark for the metering range of the image to the subject, and shoot the subject within the flash range using the zoom lens, attach a lens hood. Depending on the LCD monitor. • The subject is flashing on the thickness of the filter and improper attachment of ...
... area selected with the following recording mode: - [Bracket: Cont.] - [Hand-held Twilight] - [Anti Motion Blur] - Adjust the setting again. Blurring of light appears on the LCD monitor. • This is not a malfunction. The optical properties of some lenses may partially appear in camera shake. Dots appear and remain...too dark for the metering range of the image to the subject, and shoot the subject within the flash range using the zoom lens, attach a lens hood. Depending on the LCD monitor. • The subject is flashing on the thickness of the filter and improper attachment of ...

Handycam® Handbook
Page 80
... authorized Sony service facility. After making a USB connection, "PMB" does not start automatically. • Make the USB connection after compression change depending on a memory card. • The memory card is full. Format it in the viewfinder is not clear. • Move the viewfinder lens adjustment ...Insert it on . • The camcorder has been left unused for about an hour before using "PMB" and play it . Cannot record on the image when you charge the battery pack, the internal rechargeable battery may be exhausted. The image in the correct direction. The number...
... authorized Sony service facility. After making a USB connection, "PMB" does not start automatically. • Make the USB connection after compression change depending on a memory card. • The memory card is full. Format it in the viewfinder is not clear. • Move the viewfinder lens adjustment ...Insert it on . • The camcorder has been left unused for about an hour before using "PMB" and play it . Cannot record on the image when you charge the battery pack, the internal rechargeable battery may be exhausted. The image in the correct direction. The number...
Handycam® Handbook
Page 83
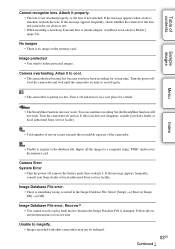
... File. You can continue recording but the SteadyShot function will not work . Import all the images to delete protected images. If the message appears frequently, check whether the contacts of contents Cannot recognize lens. If this icon does not disappear, consult your Sony dealer or local authorized Sony service facility. Camera Error System Error •...
... File. You can continue recording but the SteadyShot function will not work . Import all the images to delete protected images. If the message appears frequently, check whether the contacts of contents Cannot recognize lens. If this icon does not disappear, consult your Sony dealer or local authorized Sony service facility. Camera Error System Error •...

Handycam® Handbook
Page 91
For the compatibility of a particular A-mount lens, visit the Sony web site in your area, or consult your camcorder. You may not be slower. 91GB For details, refer to your Sony dealer or local authorized Sony service facility. • The continuous shooting speed of still images will be... able to use the auto focus function. Notes • When an A-mount lens is attached, you can attach an A-mount lens to the operating instructions supplied...
For the compatibility of a particular A-mount lens, visit the Sony web site in your area, or consult your camcorder. You may not be slower. 91GB For details, refer to your Sony dealer or local authorized Sony service facility. • The continuous shooting speed of still images will be... able to use the auto focus function. Notes • When an A-mount lens is attached, you can attach an A-mount lens to the operating instructions supplied...

Handycam® Handbook
Page 92
... soft cloth slightly moistened with water, then wipe the surface with rubber or vinyl for a long time. Do not spray lens cleaning solution directly onto the lens surface. 92GB For details on your hand. - Do not leave the camcorder in a spiral pattern from inside of the ...camcorder, such as thinner, or benzine. • When cleaning the lens surface, remove dust using a commercially available blower*. Table of contents Sample images Menu Index Cleaning Cleaning the camcorder • Do not touch the...
... soft cloth slightly moistened with water, then wipe the surface with rubber or vinyl for a long time. Do not spray lens cleaning solution directly onto the lens surface. 92GB For details on your hand. - Do not leave the camcorder in a spiral pattern from inside of the ...camcorder, such as thinner, or benzine. • When cleaning the lens surface, remove dust using a commercially available blower*. Table of contents Sample images Menu Index Cleaning Cleaning the camcorder • Do not touch the...

Handycam® Handbook
Page 94
Menu 10 Brightness/Color 11 Camera 11 Playback 12 Rec Mode/Image Size 11 Setup 12 Shoot Mode 10 Metering Mode 42 Movie Audio Rec 52 Movie/Still Select 47 Multi ... 37 Rec Mode 38 Recover Image DB 70 Red Eye Reduction 55 Reset Default 68 S Saturation 41 Self-timer 35 Setup 12 Sharpness 41 Shoot w/o Lens 54 Shutter Priority 26 Shutter speed 26 Single-shot AF 31 Slow Sync 37 Spot 42 SteadyShot 32 Still Slide Show 50 T Troubleshooting 76 V Version...
Menu 10 Brightness/Color 11 Camera 11 Playback 12 Rec Mode/Image Size 11 Setup 12 Shoot Mode 10 Metering Mode 42 Movie Audio Rec 52 Movie/Still Select 47 Multi ... 37 Rec Mode 38 Recover Image DB 70 Red Eye Reduction 55 Reset Default 68 S Saturation 41 Self-timer 35 Setup 12 Sharpness 41 Shoot w/o Lens 54 Shutter Priority 26 Shutter speed 26 Single-shot AF 31 Slow Sync 37 Spot 42 SteadyShot 32 Still Slide Show 50 T Troubleshooting 76 V Version...


