
Handycam® Handbook
Page 1
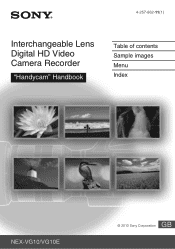
4-257-862-11(1) Interchangeable Lens Digital HD Video Camera Recorder "Handycam" Handbook Table of contents Sample images Menu Index NEX-VG10/VG10E GB © 2010 Sony Corporation
4-257-862-11(1) Interchangeable Lens Digital HD Video Camera Recorder "Handycam" Handbook Table of contents Sample images Menu Index NEX-VG10/VG10E GB © 2010 Sony Corporation

Handycam® Handbook
Page 3
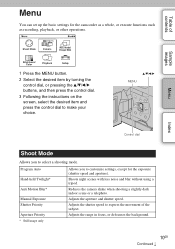
Table of contents Sample images Menu Index Table of contents Notes on using the camcorder How to use this handbook 2 Sample images 5 Basic operations Using the operating buttons 8 Menu 10 Using functions with the buttons on the control panel DISP (Display Contents 14 FOCUS (AF/MF Select 16 GAIN (Gain 18 ISO 19 (Exposure Comp 20 WB (White Balance 21 (Image Index 23 Using functions in the menu Shoot Mode 10 Camera 11 Rec Mode/Image Size 11 Brightness/Color 11 Playback 12 Setup 12 3GB Continued r
Table of contents Sample images Menu Index Table of contents Notes on using the camcorder How to use this handbook 2 Sample images 5 Basic operations Using the operating buttons 8 Menu 10 Using functions with the buttons on the control panel DISP (Display Contents 14 FOCUS (AF/MF Select 16 GAIN (Gain 18 ISO 19 (Exposure Comp 20 WB (White Balance 21 (Image Index 23 Using functions in the menu Shoot Mode 10 Camera 11 Rec Mode/Image Size 11 Brightness/Color 11 Playback 12 Setup 12 3GB Continued r
Handycam® Handbook
Page 6
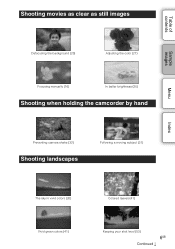
Shooting movies as clear as still images Table of contents Sample images 25 Defocusing the background (25) 16 Focusing manually (16) 21 Adjusting the color (21) 20 In better brightness (20) Shooting when holding the camcorder by hand Menu Index 32 Preventing camera shake (32) Shooting landscapes 31 Following a moving subject (31) 20 The sky in vivid colors (20) 41 Vivid green colors (41) 41 Colored leaves (41) 53 Keeping your shot level (53) 6GB Continued r
Shooting movies as clear as still images Table of contents Sample images 25 Defocusing the background (25) 16 Focusing manually (16) 21 Adjusting the color (21) 20 In better brightness (20) Shooting when holding the camcorder by hand Menu Index 32 Preventing camera shake (32) Shooting landscapes 31 Following a moving subject (31) 20 The sky in vivid colors (20) 41 Vivid green colors (41) 41 Colored leaves (41) 53 Keeping your shot level (53) 6GB Continued r

Handycam® Handbook
Page 7
Table of contents Sample images Shooting clear still images 29 In candle light (29) 36 The same scene with different brightness (36) 44 Light outdoors shot from a dark interior (44) 28 Holding the camera by hand (28) 44 Scenery with a wide range of brightness (44) 34 Capturing the best moment (34) Menu Index 7GB
Table of contents Sample images Shooting clear still images 29 In candle light (29) 36 The same scene with different brightness (36) 44 Light outdoors shot from a dark interior (44) 28 Holding the camera by hand (28) 44 Scenery with a wide range of brightness (44) 34 Capturing the best moment (34) Menu Index 7GB
Handycam® Handbook
Page 10
Reduces the camera shake when shooting a slightly dark indoor scene or a telephoto. Table of the subject. Shoots night scenes with less noise and blur without using a tripod. Adjusts ...* Manual Exposure Shutter Priority Aperture Priority * Still image only Allows you to customize settings, except for the camcorder as a whole, or execute functions such as recording, playback, or other operations. Adjusts the aperture and shutter speed. Adjusts the shutter speed to make your choice.
Reduces the camera shake when shooting a slightly dark indoor scene or a telephoto. Table of the subject. Shoots night scenes with less noise and blur without using a tripod. Adjusts ...* Manual Exposure Shutter Priority Aperture Priority * Still image only Allows you to customize settings, except for the camcorder as a whole, or execute functions such as recording, playback, or other operations. Adjusts the aperture and shutter speed. Adjusts the shutter speed to make your choice.
Handycam® Handbook
Page 11
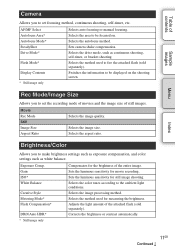
...self-timer, etc. Movie Rec Mode Still Image Size Aspect Ratio Selects the image quality. Sets the luminous sensitivity for movie recording. Index 11GB Continued r Selects the method used for the brightness of the entire image. Selects the image processing method. Selects...the luminous sensitivity for still image shooting. Corrects the brightness or contrast automatically. Selects the area to be displayed on . Sets camera shake compensation. Gain ISO* White Balance Creative Style Metering Mode* Flash Compensation* DRO/Auto HDR* * Still image only Compensates...
...self-timer, etc. Movie Rec Mode Still Image Size Aspect Ratio Selects the image quality. Sets the luminous sensitivity for movie recording. Index 11GB Continued r Selects the method used for the brightness of the entire image. Selects the image processing method. Selects...the luminous sensitivity for still image shooting. Corrects the brightness or contrast automatically. Selects the area to be displayed on . Sets camera shake compensation. Gain ISO* White Balance Creative Style Metering Mode* Flash Compensation* DRO/Auto HDR* * Still image only Compensates...

Handycam® Handbook
Page 14
... Using functions with the buttons on the control panel DISP (Display Contents) Using the button: 1 Press the DISP button repeatedly to recording condition. Using the menu: 1 During shooting, MENU button t [Camera] t [Display Contents]. No Disp. Histogram Displays the luminance distribution graphically, in addition to select the desired mode. Menu Index 14GB Continued...
... Using functions with the buttons on the control panel DISP (Display Contents) Using the button: 1 Press the DISP button repeatedly to recording condition. Using the menu: 1 During shooting, MENU button t [Camera] t [Display Contents]. No Disp. Histogram Displays the luminance distribution graphically, in addition to select the desired mode. Menu Index 14GB Continued...
Handycam® Handbook
Page 16
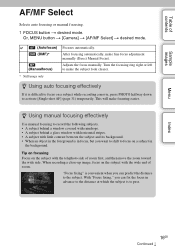
Or, MENU button t [Camera] t [AF/MF Select] t desired mode. (Autofocus) (DMF)* (Manualfocus) * Still image only Focuses automatically. Tip on focusing Focus on the subject with the telephoto side of ...] (page 31) temporarily. With "Focus fixing," you can predict the distance to make the subject look clearer. z Using manual focusing effectively Use manual focusing to record the following subjects. • A subject behind a window covered with raindrops. • A subject behind a glass window with horizontal stripes. • A subject with little contrast between the...
Or, MENU button t [Camera] t [AF/MF Select] t desired mode. (Autofocus) (DMF)* (Manualfocus) * Still image only Focuses automatically. Tip on focusing Focus on the subject with the telephoto side of ...] (page 31) temporarily. With "Focus fixing," you can predict the distance to make the subject look clearer. z Using manual focusing effectively Use manual focusing to record the following subjects. • A subject behind a window covered with raindrops. • A subject behind a glass window with horizontal stripes. • A subject with little contrast between the...
Handycam® Handbook
Page 17
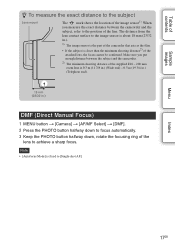
Note • [Autofocus Mode] is about 18 mm (23/32 in .) DMF (Direct Manual Focus) 1 MENU button t [Camera] t [AF/MF Select] t [DMF]. 2 Press the PHOTO button halfway down to focus automatically. 3 Keep the PHOTO button halfway down, rotate the focusing ring of the ...
Note • [Autofocus Mode] is about 18 mm (23/32 in .) DMF (Direct Manual Focus) 1 MENU button t [Camera] t [AF/MF Select] t [DMF]. 2 Press the PHOTO button halfway down to focus automatically. 3 Keep the PHOTO button halfway down, rotate the focusing ring of the ...

Handycam® Handbook
Page 18
... gain according to compensate for low Gain/ISO sensitivity. Even when the exposure is switched to [Manual Exposure] with the [Auto] setting. 1 In movie recording mode, GAIN button t desired setting. However, increasing Gain/ISO sensitivity will be increased with the [Auto] setting, it is the same, images differ depending... captured with an appropriate brightness even under insufficient exposure. However, the shutter speed may slow down to your shooting conditions. You should take camera shake or movement of recording media that incorporates an image sensor that receives light.
... gain according to compensate for low Gain/ISO sensitivity. Even when the exposure is switched to [Manual Exposure] with the [Auto] setting. 1 In movie recording mode, GAIN button t desired setting. However, increasing Gain/ISO sensitivity will be increased with the [Auto] setting, it is the same, images differ depending... captured with an appropriate brightness even under insufficient exposure. However, the shutter speed may slow down to your shooting conditions. You should take camera shake or movement of recording media that incorporates an image sensor that receives light.
Handycam® Handbook
Page 19
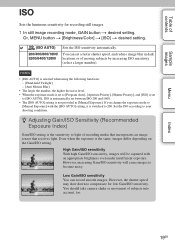
...to become noisy. High Gain/ISO sensitivity With high Gain/ISO sensitivity, images will cause images to your shooting conditions. You should take camera shake or movement of contents Sample images Menu ISO Sets the luminous sensitivity for low Gain/ISO sensitivity. Table of subjects into account,... t [Brightness/Color] t [ISO] t desired setting. (ISO AUTO) 200/400/800/1600/ 3200/6400/12800 Sets the ISO sensitivity automatically. You can record smooth images. z Adjusting Gain/ISO Sensitivity (Recommended Exposure Index) Gain/ISO setting is not provided in dark locations or of...
...to become noisy. High Gain/ISO sensitivity With high Gain/ISO sensitivity, images will cause images to your shooting conditions. You should take camera shake or movement of contents Sample images Menu ISO Sets the luminous sensitivity for low Gain/ISO sensitivity. Table of subjects into account,... t [Brightness/Color] t [ISO] t desired setting. (ISO AUTO) 200/400/800/1600/ 3200/6400/12800 Sets the ISO sensitivity automatically. You can record smooth images. z Adjusting Gain/ISO Sensitivity (Recommended Exposure Index) Gain/ISO setting is not provided in dark locations or of...
Handycam® Handbook
Page 26
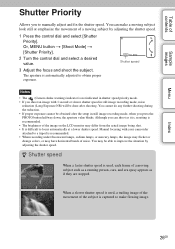
...shutter speed is used , each frame of a moving subject by adjusting the shutter speed. Notes • The (Camera shake warning) indicator is not indicated in still image recording mode, when you press the PHOTO button halfway down, the aperture value blinks. You may be able to obtain proper... NR) will be obtained after shooting. Table of contents Sample images Menu Shutter Priority Allows you to a tripod is recommended. • When recording under fluorescent lamps, sodium lamps, or mercury lamps, the image may flicker or change colors, or may have horizontal bands of noise. Or...
...shutter speed is used , each frame of a moving subject by adjusting the shutter speed. Notes • The (Camera shake warning) indicator is not indicated in still image recording mode, when you press the PHOTO button halfway down, the aperture value blinks. You may be able to obtain proper... NR) will be obtained after shooting. Table of contents Sample images Menu Shutter Priority Allows you to a tripod is recommended. • When recording under fluorescent lamps, sodium lamps, or mercury lamps, the image may flicker or change colors, or may have horizontal bands of noise. Or...

Handycam® Handbook
Page 27
... setting by the camcorder 4 Adjust the focus and shoot the subject. Check the exposure value at (metered manual). Aperture (F-value) Exposure value Notes • The (Camera shake warning) indicator is not indicated in manual exposure mode. • In manual exposure mode, the [Gain] setting [Auto] is set to [0dB], and the...
... setting by the camcorder 4 Adjust the focus and shoot the subject. Check the exposure value at (metered manual). Aperture (F-value) Exposure value Notes • The (Camera shake warning) indicator is not indicated in manual exposure mode. • In manual exposure mode, the [Gain] setting [Auto] is set to [0dB], and the...
Handycam® Handbook
Page 28
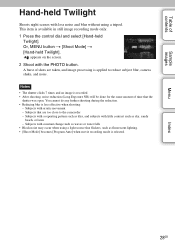
... Subjects with the PHOTO button. You cannot do any further shooting during the reduction. • Reducing blur is available in still image recording mode only. 1 Press the control dial and select [Hand-held Twilight]. Notes • The shutter clicks 7 times and an image is... that flickers, such as fluorescent lighting. • [Shoot Mode] becomes [Program Auto] when movie recording mode is applied to the camcorder - A burst of shots are too close to reduce subject blur, camera shake, and noise. Subjects with constant change such as waves or water falls • Block noise...
... Subjects with the PHOTO button. You cannot do any further shooting during the reduction. • Reducing blur is available in still image recording mode only. 1 Press the control dial and select [Hand-held Twilight]. Notes • The shutter clicks 7 times and an image is... that flickers, such as fluorescent lighting. • [Shoot Mode] becomes [Program Auto] when movie recording mode is applied to the camcorder - A burst of shots are too close to reduce subject blur, camera shake, and noise. Subjects with constant change such as waves or water falls • Block noise...

Handycam® Handbook
Page 29
..., block noise may occur. • The noise reduction function does not work. • [Shoot Mode] becomes [Program Auto] when movie recording mode is selected. 29GB Table of contents Sample images Menu Index Anti Motion Blur This is suitable for indoor shots without using a light source that... are too close to reduce the subject blur. The camcorder combines 6 shots at high sensitivity into 1 still image, so camera shake is reduced while preventing noise. Subjects with the PHOTO button. Subjects with little contrast such as waves or water falls. • When ...
..., block noise may occur. • The noise reduction function does not work. • [Shoot Mode] becomes [Program Auto] when movie recording mode is selected. 29GB Table of contents Sample images Menu Index Anti Motion Blur This is suitable for indoor shots without using a light source that... are too close to reduce the subject blur. The camcorder combines 6 shots at high sensitivity into 1 still image, so camera shake is reduced while preventing noise. Subjects with the PHOTO button. Subjects with little contrast such as waves or water falls. • When ...

Handycam® Handbook
Page 30
...buttons. AF range finder frame (Flexible Spot) Moves the focusing area to get the proper focus in auto focus mode. 1 MENU button t [Camera] t [Autofocus Area] t desired mode. (Multi) (Center) The camcorder determines which of contents Sample images Autofocus Area Selects the focusing area.... When you press the PHOTO button halfway down in still image recording mode, a green frame is displayed around the area that is selected when using the following functions: - [Hand-held Twilight] - ...
...buttons. AF range finder frame (Flexible Spot) Moves the focusing area to get the proper focus in auto focus mode. 1 MENU button t [Camera] t [Autofocus Area] t desired mode. (Multi) (Center) The camcorder determines which of contents Sample images Autofocus Area Selects the focusing area.... When you press the PHOTO button halfway down in still image recording mode, a green frame is displayed around the area that is selected when using the following functions: - [Hand-held Twilight] - ...
Handycam® Handbook
Page 31
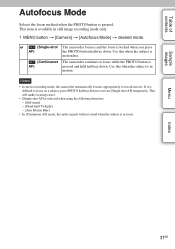
...] - [Anti Motion Blur] • In [Continuous AF] mode, the audio signals will make focusing easier. • [Single-shot AF] is in still image recording mode only. 1 MENU button t [Camera] t [Autofocus Mode] t desired mode. (Single-shot AF) (Continuous AF) The camcorder focuses and the focus is motionless. Table of contents Sample images Autofocus.... Use this when the subject is locked when you press the PHOTO button halfway down. This item is available in focus. Notes • In movie recording mode, the camcorder automatically focuses appropriately to...
...] - [Anti Motion Blur] • In [Continuous AF] mode, the audio signals will make focusing easier. • [Single-shot AF] is in still image recording mode only. 1 MENU button t [Camera] t [Autofocus Mode] t desired mode. (Single-shot AF) (Continuous AF) The camcorder focuses and the focus is motionless. Table of contents Sample images Autofocus.... Use this when the subject is locked when you press the PHOTO button halfway down. This item is available in focus. Notes • In movie recording mode, the camcorder automatically focuses appropriately to...

Handycam® Handbook
Page 32
.... Menu Index 32GB Notes • [Standard] is selected when using the following functions: - [Hand-held Twilight] - [Anti Motion Blur] • [Active] can be selected when recording movies using a lens with optical SteadyShot complying with more powerful effect. Table of the lens. 1 MENU button...
.... Menu Index 32GB Notes • [Standard] is selected when using the following functions: - [Hand-held Twilight] - [Anti Motion Blur] • [Active] can be selected when recording movies using a lens with optical SteadyShot complying with more powerful effect. Table of the lens. 1 MENU button...

Handycam® Handbook
Page 33
... of exposure (page 36). Note • You cannot change the setting when using the following shots. This item is available in still image recording mode only. 1 MENU button t [Camera] t [Drive Mode] t desired mode. (Single-shot Adv.) (Continuous Adv.) (Self-timer) (Bracket: Cont.) Shoots 1 still image.... of the first shot are used for the following functions: - [Hand-held Twilight] - [Anti Motion Blur] - [Auto HDR] - Movie recording Menu Index 33GB Shoots 3 images, each with different degrees of contents Sample images Drive Mode You can set the drive mode, such as continuous, ...
... of exposure (page 36). Note • You cannot change the setting when using the following shots. This item is available in still image recording mode only. 1 MENU button t [Camera] t [Drive Mode] t desired mode. (Single-shot Adv.) (Continuous Adv.) (Self-timer) (Bracket: Cont.) Shoots 1 still image.... of the first shot are used for the following functions: - [Hand-held Twilight] - [Anti Motion Blur] - [Auto HDR] - Movie recording Menu Index 33GB Shoots 3 images, each with different degrees of contents Sample images Drive Mode You can set the drive mode, such as continuous, ...

Handycam® Handbook
Page 34
Table of the first shot are used for the following functions. - [Hand-held Twilight] - [Anti Motion Blur] - [Auto HDR] • Focus and brightness settings of contents Sample images Menu Index Continuous Adv. Shoots images continuously while you press and hold down the PHOTO button. 1 MENU button t [Camera] t [Drive Mode] t [Continuous Adv.]. Notes • You cannot use [Continuous Adv.] with the following shots. 34GB
Table of the first shot are used for the following functions. - [Hand-held Twilight] - [Anti Motion Blur] - [Auto HDR] • Focus and brightness settings of contents Sample images Menu Index Continuous Adv. Shoots images continuously while you press and hold down the PHOTO button. 1 MENU button t [Camera] t [Drive Mode] t [Continuous Adv.]. Notes • You cannot use [Continuous Adv.] with the following shots. 34GB


