
α Handbook
Page 3
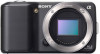
Table of contents Sample photo Menu search search Index Table of contents Notes on using the camera How to use this handbook 2 Sample photo search 5 Identifying parts 11 List of icons on the screen 15 Basic operations Using the control wheel and soft keys 17 Menu search 19 Shooting images 23 Playing ... wheel DISP (Display Contents 29 (Flash Mode 31 (Exposure Comp 32 (Drive Mode 33 (Image Index 40 Using functions in the menu Shoot Mode 19 Camera 20 Image Size 20 Brightness/Color 20 Playback 21 Setup 21 3GB Continued r
Table of contents Sample photo Menu search search Index Table of contents Notes on using the camera How to use this handbook 2 Sample photo search 5 Identifying parts 11 List of icons on the screen 15 Basic operations Using the control wheel and soft keys 17 Menu search 19 Shooting images 23 Playing ... wheel DISP (Display Contents 29 (Flash Mode 31 (Exposure Comp 32 (Drive Mode 33 (Image Index 40 Using functions in the menu Shoot Mode 19 Camera 20 Image Size 20 Brightness/Color 20 Playback 21 Setup 21 3GB Continued r
α Handbook
Page 11
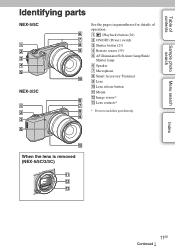
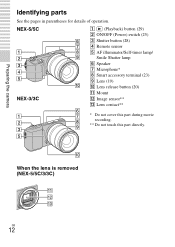
Table of contents Sample photo Menu search search Identifying parts NEX-5/5C NEX-3/3C See the pages in parentheses for details of operation. A (Playback) button (26) B ON/OFF (Power) switch C Shutter button (23) D Remote sensor (39) E AF illuminator/Self-timer lamp/Smile Shutter lamp F Speaker G Microphone H Smart Accessory Terminal I Lens J Lens release button K Mount L Image sensor* M Lens contacts* * Do not touch this part directly. When the lens is removed (NEX-5/5C/3/3C) Index 11GB Continued r
Table of contents Sample photo Menu search search Identifying parts NEX-5/5C NEX-3/3C See the pages in parentheses for details of operation. A (Playback) button (26) B ON/OFF (Power) switch C Shutter button (23) D Remote sensor (39) E AF illuminator/Self-timer lamp/Smile Shutter lamp F Speaker G Microphone H Smart Accessory Terminal I Lens J Lens release button K Mount L Image sensor* M Lens contacts* * Do not touch this part directly. When the lens is removed (NEX-5/5C/3/3C) Index 11GB Continued r
α Handbook
Page 13
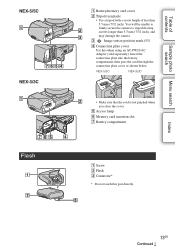
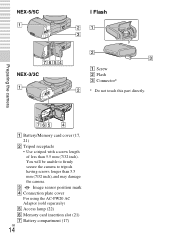
NEX-5/5C NEX-3/3C • Make sure that the cord is not pinched when you close the cover. C Image sensor position mark (53) D Connection plate cover Use this part directly. 13GB Continued r Index Sample photo Menu search search Table of less than 5.5 mm (7/32 inch), and may damage the camera. ... pass the cord through the connection plate cover as shown below. You will be unable to firmly secure the camera to tripods having screws longer than 5.5 mm (7/32 inch). NEX-5/5C NEX-3/3C Flash A Battery/memory card cover B Tripod receptacle • Use a tripod with a screw length of...
NEX-5/5C NEX-3/3C • Make sure that the cord is not pinched when you close the cover. C Image sensor position mark (53) D Connection plate cover Use this part directly. 13GB Continued r Index Sample photo Menu search search Table of less than 5.5 mm (7/32 inch), and may damage the camera. ... pass the cord through the connection plate cover as shown below. You will be unable to firmly secure the camera to tripods having screws longer than 5.5 mm (7/32 inch). NEX-5/5C NEX-3/3C Flash A Battery/memory card cover B Tripod receptacle • Use a tripod with a screw length of...

α Handbook
Page 14
Table of contents Sample photo Menu search search Index Lens On the E18 - 200 mm lens, refer to the instruction manual of the E18 - 200 mm lens (supplied). E18 - 55 mm F3.5-5.6 OSS (supplied with NEX-5A/5CA/3A/3CA) A Converter index* B Focusing ring C Lens contacts** D Mounting index * A converter is sold separately. ** Do not touch this part directly. E16 mm F2.8 (supplied with NEX-5D/5CD/5K/5CK/3D/ 3CD/3K/3CK) A Hood index B Focusing ring C Zoom ring D Focal-length scale E Focal-length index F Lens contacts* G Mounting index * Do not touch this part directly. 14GB
Table of contents Sample photo Menu search search Index Lens On the E18 - 200 mm lens, refer to the instruction manual of the E18 - 200 mm lens (supplied). E18 - 55 mm F3.5-5.6 OSS (supplied with NEX-5A/5CA/3A/3CA) A Converter index* B Focusing ring C Lens contacts** D Mounting index * A converter is sold separately. ** Do not touch this part directly. E16 mm F2.8 (supplied with NEX-5D/5CD/5K/5CK/3D/ 3CD/3K/3CK) A Hood index B Focusing ring C Zoom ring D Focal-length scale E Focal-length index F Lens contacts* G Mounting index * Do not touch this part directly. 14GB
α Handbook
Page 17
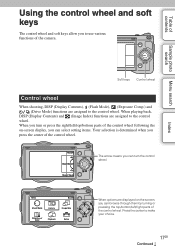
..., you can browse through them by turning or pressing the top/bottom/left /top/bottom parts of the control wheel following the on-screen display, you can turn or press the right/left /right parts of the camera. When you can select setting items. Your selection is determined when you press the center...
..., you can browse through them by turning or pressing the top/bottom/left /top/bottom parts of the control wheel following the on-screen display, you can turn or press the right/left /right parts of the camera. When you can select setting items. Your selection is determined when you press the center...
α Handbook
Page 19
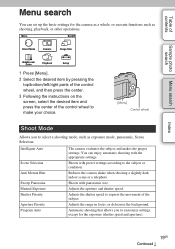
Sample photo Menu search search Index 1 Press [Menu]. 2 Select the desired item by pressing the top/bottom/left/right parts of the control wheel, and then press the center. 3 Following the instructions on the screen, select the desired item and press the ...shutter speed and aperture). 19GB Continued r Intelligent Auto Scene Selection Anti Motion Blur Sweep Panorama Manual Exposure Shutter Priority Aperture Priority Program Auto The camera evaluates the subject and makes the proper settings. Automatic shooting that allows you to the subject or condition. Adjusts the range in focus, or ...
Sample photo Menu search search Index 1 Press [Menu]. 2 Select the desired item by pressing the top/bottom/left/right parts of the control wheel, and then press the center. 3 Following the instructions on the screen, select the desired item and press the ...shutter speed and aperture). 19GB Continued r Intelligent Auto Scene Selection Anti Motion Blur Sweep Panorama Manual Exposure Shutter Priority Aperture Priority Program Auto The camera evaluates the subject and makes the proper settings. Automatic shooting that allows you to the subject or condition. Adjusts the range in focus, or ...

α Handbook
Page 46
...the shooting. • Since several images are stitched together, the stitched part will not be successful. Subjects with AE/AF lock are much camera shake. 46GB Continued r There is not suitable when shooting: - This part will not be recorded smoothly. • Under low light conditions, ...panoramic images may be discontinued in which you to create a panoramic image from composed images. You pan the camera too fast or too slow. - Subjects are moving....
...the shooting. • Since several images are stitched together, the stitched part will not be successful. Subjects with AE/AF lock are much camera shake. 46GB Continued r There is not suitable when shooting: - This part will not be recorded smoothly. • Under low light conditions, ...panoramic images may be discontinued in which you to create a panoramic image from composed images. You pan the camera too fast or too slow. - Subjects are moving....

α Handbook
Page 53
When you measure the exact distance between the subject and the camera. NEX-5/5C NEX-3/3C 18 mm (23/32 in .). * The image sensor is the part of the horizontal line. Turn the focusing ring right or left to make fine focus adjustment manually (Direct Manual Focus). With "Focus ... turn the focusing ring when [Manualfocus] or [DMF] is selected, the image is convenient when you can prevent the image from the lens contact surface to check focus area easier. z Using manual focusing effectively "Focus fixing" is enlarged automatically to enable you put enough distance between the...
When you measure the exact distance between the subject and the camera. NEX-5/5C NEX-3/3C 18 mm (23/32 in .). * The image sensor is the part of the horizontal line. Turn the focusing ring right or left to make fine focus adjustment manually (Direct Manual Focus). With "Focus ... turn the focusing ring when [Manualfocus] or [DMF] is selected, the image is convenient when you can prevent the image from the lens contact surface to check focus area easier. z Using manual focusing effectively "Focus fixing" is enlarged automatically to enable you put enough distance between the...

α Handbook
Page 71
Table of contents Sample photo Menu search search Metering Mode Selects the metering mode that sets which part of the subject to measure to other than [Multi], the [Face Detection] function cannot be used. • [Multi] is strong contrast between the subject and ...
Table of contents Sample photo Menu search search Metering Mode Selects the metering mode that sets which part of the subject to measure to other than [Multi], the [Face Detection] function cannot be used. • [Multi] is strong contrast between the subject and ...

α Handbook
Page 74
Use this function when the subject is completed after you can record from bright parts to the blur. Do not recompose. • You may not obtain good HDR images. If the camera detects such situation, is indicated on the recorded image to inform you may not obtain a desired...Menu search search Auto HDR Widens the range (gradations) so that you shoot. • You cannot use this function with [Auto HDR] selected, the camera will temporarily use the DRO setting. • Since the shutter is released three times for one overlaid image are recorded. 1 [Menu] t [Brightness/Color...
Use this function when the subject is completed after you can record from bright parts to the blur. Do not recompose. • You may not obtain good HDR images. If the camera detects such situation, is indicated on the recorded image to inform you may not obtain a desired...Menu search search Auto HDR Widens the range (gradations) so that you shoot. • You cannot use this function with [Auto HDR] selected, the camera will temporarily use the DRO setting. • Since the shutter is released three times for one overlaid image are recorded. 1 [Menu] t [Brightness/Color...
α Handbook
Page 93
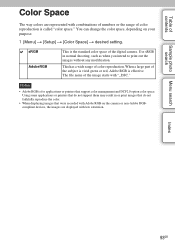
... faithfully reproduce the color. • When displaying images that support color management and DCF2.0 option color space. When a large part of the digital camera. You can change the color space, depending on the camera or non-Adobe RGBcompliant devices, the images are represented with "_DSC." Notes • Adobe RGB is effective. The file name...
... faithfully reproduce the color. • When displaying images that support color management and DCF2.0 option color space. When a large part of the digital camera. You can change the color space, depending on the camera or non-Adobe RGBcompliant devices, the images are represented with "_DSC." Notes • Adobe RGB is effective. The file name...
α Handbook
Page 156
...23 Movie 23 Still image 23 Shooting Tip List 62 Continued r 156GB Index Sample photo Menu search search Table of contents I Icons 15 Identifying parts 11 Image Data Converter SR 128 Image Data Lightbox SR 129 Image Index 40, 79 Image Size 63 "InfoLITHIUM" battery pack 149 Install 127 Intelligent... LCD Brightness 105 Long Exposure NR 96 M Macintosh 128 Macro 43 Manual Exposure 48 Manualfocus 53 Memory card 147 Menu 19 Brightness/Color 20 Camera 20 Image Size 20 Playback 21 Setup 21 Shoot Mode 19 Metering Mode 71 MF Assist 92 Movie Audio Rec 98 MP4 67 Multi 55...
...23 Movie 23 Still image 23 Shooting Tip List 62 Continued r 156GB Index Sample photo Menu search search Table of contents I Icons 15 Identifying parts 11 Image Data Converter SR 128 Image Data Lightbox SR 129 Image Index 40, 79 Image Size 63 "InfoLITHIUM" battery pack 149 Install 127 Intelligent... LCD Brightness 105 Long Exposure NR 96 M Macintosh 128 Macro 43 Manual Exposure 48 Manualfocus 53 Memory card 147 Menu 19 Brightness/Color 20 Camera 20 Image Size 20 Playback 21 Setup 21 Shoot Mode 19 Metering Mode 71 MF Assist 92 Movie Audio Rec 98 MP4 67 Multi 55...
3D functions provided by firmware update 02
Page 4
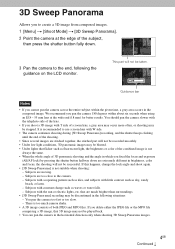
...angle of the shooting. • Since several images are stitched together, the stitched part will not be stopped. that 3D image may be taken. You should pan the camera slower with the telephoto side of the lens. • If you shoot a 3D image with little contrast such as fluorescent light... you to create a 3D image from composed images. 1 [Menu] t [Shoot Mode] t [3D Sweep Panorama]. 2 Point the camera at the wide end (18 mm) for better results. This part will not be recorded smoothly. • Under low light conditions, 3D panoramic images may be blurred. • Under lights that...
...angle of the shooting. • Since several images are stitched together, the stitched part will not be stopped. that 3D image may be taken. You should pan the camera slower with the telephoto side of the lens. • If you shoot a 3D image with little contrast such as fluorescent light... you to create a 3D image from composed images. 1 [Menu] t [Shoot Mode] t [3D Sweep Panorama]. 2 Point the camera at the wide end (18 mm) for better results. This part will not be recorded smoothly. • Under low light conditions, 3D panoramic images may be blurred. • Under lights that...

Instruction Manual
Page 3
... device that may not cause harmful interference, and (2) this unit only, and should not be used with the same or equivalent type recommended by Sony. • Dispose of rechargeable batteries, call toll free 1-800-822-8837, or visit http://www.rbrc.org/ Caution: Do not handle damaged ... Keep the battery pack out of the reach of the FCC Rules. Operation is connected to the wall outlet (wall socket). This Class B digital apparatus complies with Part 15 of small children. • Keep the battery pack dry. • Replace only with this device must accept any other unit. GB ...
... device that may not cause harmful interference, and (2) this unit only, and should not be used with the same or equivalent type recommended by Sony. • Dispose of rechargeable batteries, call toll free 1-800-822-8837, or visit http://www.rbrc.org/ Caution: Do not handle damaged ... Keep the battery pack out of the reach of the FCC Rules. Operation is connected to the wall outlet (wall socket). This Class B digital apparatus complies with Part 15 of small children. • Keep the battery pack dry. • Replace only with this device must accept any other unit. GB ...

Instruction Manual
Page 5
... and receiver. - Connect the equipment into an outlet on , the user is Sony Deutschland GmbH, Hedelfinger Strasse 61, 70327 Stuttgart, Germany. This product has been tested and found to comply with the limits for a digital device pursuant to Subpart B of Part 15 of FCC Rules. For any service or guarantee matters please refer...
... and receiver. - Connect the equipment into an outlet on , the user is Sony Deutschland GmbH, Hedelfinger Strasse 61, 70327 Stuttgart, Germany. This product has been tested and found to comply with the limits for a digital device pursuant to Subpart B of Part 15 of FCC Rules. For any service or guarantee matters please refer...

Instruction Manual
Page 7
Table of contents Preparing the camera Checking the accessories supplied 10 Identifying parts 12 Preparing the battery pack 16 Attaching/removing the lens 19 Inserting a memory card (sold separately 21 Attaching the flash 23 Turning on the camera and setting up the date 25 Mastering the basic operation ... 28 Playing back images 29 Deleting images 30 Using the control wheel and soft keys 32 Using the guide function of the camera 34 Using the recording functions Defocusing the background easily (Background Defocus Control 35 Selecting the flash mode 36 Adjusting the brightness of...
Table of contents Preparing the camera Checking the accessories supplied 10 Identifying parts 12 Preparing the battery pack 16 Attaching/removing the lens 19 Inserting a memory card (sold separately 21 Attaching the flash 23 Turning on the camera and setting up the date 25 Mastering the basic operation ... 28 Playing back images 29 Deleting images 30 Using the control wheel and soft keys 32 Using the guide function of the camera 34 Using the recording functions Defocusing the background easily (Background Defocus Control 35 Selecting the flash mode 36 Adjusting the brightness of...
Instruction Manual
Page 12
NEX-5/5C NEX-3/3C A (Playback) button (29) B ON/OFF (Power) switch (25) C Shutter button (28) D Remote sensor E AF illuminator/Self-timer lamp/ Smile Shutter lamp F Speaker G Microphone* H Smart accessory terminal (23) I Lens (19) J Lens release button (20) K Mount L Image sensor** M Lens contact** * Do not cover this part during movie recording. ** Do not touch this part directly. When the lens is removed (NEX-5/5C/3/3C) GB 12 Preparing the camera Identifying parts See the pages in parentheses for details of operation.
NEX-5/5C NEX-3/3C A (Playback) button (29) B ON/OFF (Power) switch (25) C Shutter button (28) D Remote sensor E AF illuminator/Self-timer lamp/ Smile Shutter lamp F Speaker G Microphone* H Smart accessory terminal (23) I Lens (19) J Lens release button (20) K Mount L Image sensor** M Lens contact** * Do not cover this part during movie recording. ** Do not touch this part directly. When the lens is removed (NEX-5/5C/3/3C) GB 12 Preparing the camera Identifying parts See the pages in parentheses for details of operation.
Instruction Manual
Page 14
You will be unable to firmly secure the camera to tripods having screws longer than 5.5 mm (7/32 inch). A Battery/Memory card cover (17, 21) B Tripod receptacle • Use a tripod with a screw length of less than 5.5 mm (7/32 inch), and may damage the camera. C Image sensor position mark D Connection plate cover For using the AC-PW20 AC Adaptor (sold separately) E Access lamp (22) F Memory card insertion slot (21) G Battery compartment (17) GB 14 NEX-5/5C x Flash Preparing the camera NEX-3/3C A Screw B Flash C Connector* * Do not touch this part directly.
You will be unable to firmly secure the camera to tripods having screws longer than 5.5 mm (7/32 inch). A Battery/Memory card cover (17, 21) B Tripod receptacle • Use a tripod with a screw length of less than 5.5 mm (7/32 inch), and may damage the camera. C Image sensor position mark D Connection plate cover For using the AC-PW20 AC Adaptor (sold separately) E Access lamp (22) F Memory card insertion slot (21) G Battery compartment (17) GB 14 NEX-5/5C x Flash Preparing the camera NEX-3/3C A Screw B Flash C Connector* * Do not touch this part directly.

Instruction Manual
Page 15
Preparing the camera A Hood index B Focusing ring C Zooming ring D Focal-length scale E Focal-length index F Lens contacts* G Mounting index * Do not touch this part directly. x Lens On the E18 - 200 mm lens, refer to the instruction manual of the E18 - 200 mm lens (supplied). GB 15 E18 - 55 mm F3.5-5.6 OSS (supplied with NEX-5D/ 5CD/5K/5CK/3D/3CD/3K/ 3CK) E16 mm F2.8 (supplied with NEX-5A/5CA/3A/3CA) A Converter index* B Focusing ring C Lens contacts** D Mounting index * A converter is sold separately. ** Do not touch this part directly.
Preparing the camera A Hood index B Focusing ring C Zooming ring D Focal-length scale E Focal-length index F Lens contacts* G Mounting index * Do not touch this part directly. x Lens On the E18 - 200 mm lens, refer to the instruction manual of the E18 - 200 mm lens (supplied). GB 15 E18 - 55 mm F3.5-5.6 OSS (supplied with NEX-5D/ 5CD/5K/5CK/3D/3CD/3K/ 3CK) E16 mm F2.8 (supplied with NEX-5A/5CA/3A/3CA) A Converter index* B Focusing ring C Lens contacts** D Mounting index * A converter is sold separately. ** Do not touch this part directly.

Instruction Manual
Page 21
...function, to prevent dust from dusty locations. • Do not leave the camera with the lens removed. Inserting a memory card (sold separately) 1 Open the cover. NEX-3/3C Check on the direction of the notched corner. NEX-5/5C Check on the direction of the notched corner. GB 21 Notes •...; When changing the lens, if dust or debris gets inside the camera and adheres to the image sensor. However, attach or remove the lens quickly somewhere away from adhering to the surface of the image sensor (the part that acts as illustrated.
...function, to prevent dust from dusty locations. • Do not leave the camera with the lens removed. Inserting a memory card (sold separately) 1 Open the cover. NEX-3/3C Check on the direction of the notched corner. NEX-5/5C Check on the direction of the notched corner. GB 21 Notes •...; When changing the lens, if dust or debris gets inside the camera and adheres to the image sensor. However, attach or remove the lens quickly somewhere away from adhering to the surface of the image sensor (the part that acts as illustrated.