
Operating Instructions
Page 3
... it shall be handed over to the applicable collection point for a Class B digital device, pursuant to Part 15 of this manual could otherwise be treated as household waste. Disposal of electrical and electronic equipment. Address: 16530 Via Esprillo, San Diego, CA ...it is no guarantee that this product is subject to the following measures: - The recycling of Conformity Trade Name: SONY Model No.: MZ-RH1, MZ-M200 Responsible Party: Sony Electronics Inc. Increase the separation between the equipment and receiver. - Operation is disposed of the FCC Rules. Applicable ...
... it shall be handed over to the applicable collection point for a Class B digital device, pursuant to Part 15 of this manual could otherwise be treated as household waste. Disposal of electrical and electronic equipment. Address: 16530 Via Esprillo, San Diego, CA ...it is no guarantee that this product is subject to the following measures: - The recycling of Conformity Trade Name: SONY Model No.: MZ-RH1, MZ-M200 Responsible Party: Sony Electronics Inc. Increase the separation between the equipment and receiver. - Operation is disposed of the FCC Rules. Applicable ...

Operating Instructions
Page 5
... before dividing a track (Divide Rehearsal 47 Combining tracks (Combine 48 Using the Menu Using the Menu 49 Menus for recording 50 Adjusting the recording level manually ...52 Menu for playback 53 Menus for editing 54 Menus on the recorder 54 Menus on the remote 54 Moving a track on a disc 56 Changing...
... before dividing a track (Divide Rehearsal 47 Combining tracks (Combine 48 Using the Menu Using the Menu 49 Menus for recording 50 Adjusting the recording level manually ...52 Menu for playback 53 Menus for editing 54 Menus on the recorder 54 Menus on the remote 54 Moving a track on a disc 56 Changing...

Operating Instructions
Page 6
... • The ability to make sure that the recorder is not functioning normally. The device is working correctly. No compensation for recording failures Sony cannot provide compensation for any financial damage, or loss of the connected device. - Precaution on copyright Television programs, films, ...6 Notice for Users On the supplied SonicStage/MD Simple Burner software • Copyright laws prohibit reproducing the software or the manual accompanying it . We do not guarantee all the languages will replace it in whole or in this recorder or the recording media, etc.
... • The ability to make sure that the recorder is not functioning normally. The device is working correctly. No compensation for recording failures Sony cannot provide compensation for any financial damage, or loss of the connected device. - Precaution on copyright Television programs, films, ...6 Notice for Users On the supplied SonicStage/MD Simple Burner software • Copyright laws prohibit reproducing the software or the manual accompanying it . We do not guarantee all the languages will replace it in whole or in this recorder or the recording media, etc.

Operating Instructions
Page 7
...Corporation. • Macintosh is a trademark of Apple Computer, Inc. • Pentium is a registered trademarks of Microsoft Corporation in this manual. • CD and music-related data from Fraunhofer IIS and Thomson. • All other trademarks and registered trademarks are trademarks or... registered trademarks of their logos are trademarks of Sony Corporation. • Microsoft, Windows, Windows NT and Windows Media are trademarks or registered trademarks of Gracenote. Gracenote is a trademark...
...Corporation. • Macintosh is a trademark of Apple Computer, Inc. • Pentium is a registered trademarks of Microsoft Corporation in this manual. • CD and music-related data from Fraunhofer IIS and Thomson. • All other trademarks and registered trademarks are trademarks or... registered trademarks of their logos are trademarks of Sony Corporation. • Microsoft, Windows, Windows NT and Windows Media are trademarks or registered trademarks of Gracenote. Gracenote is a trademark...

Operating Instructions
Page 9
...battery case battery • CD-ROM3) (Windows: SonicStage/MD Simple Burner, Macintosh: Hi-MD Music Transfer for Mac) • Operating Instructions (this manual) • Operating Instructions (Hi-MD Music Transfer for the European, Asian and Chilean models) 9 Use the one that corresponds with the outlet con... impact. • Optical cable (for Europe, Asia and Chile. Two for the European, Asian and Chilean models - Three for the MZ-RH1 North American and Latin American models - For details on an audio CD player. Two cords with differently shaped plugs are supplied with this recorder....
...battery case battery • CD-ROM3) (Windows: SonicStage/MD Simple Burner, Macintosh: Hi-MD Music Transfer for Mac) • Operating Instructions (this manual) • Operating Instructions (Hi-MD Music Transfer for the European, Asian and Chilean models) 9 Use the one that corresponds with the outlet con... impact. • Optical cable (for Europe, Asia and Chile. Two for the European, Asian and Chilean models - Three for the MZ-RH1 North American and Latin American models - For details on an audio CD player. Two cords with differently shaped plugs are supplied with this recorder....

Operating Instructions
Page 32
... material recorded in Hi-MD mode The disc contains material recorded in MD mode Operation mode The mode set as follows. Set "Disc Mode" to "Manual". You can be set for "Disc Mode" in the menu). Recording mode • When using a standard disc (60/74/80 minutes), the operation mode can...
... material recorded in Hi-MD mode The disc contains material recorded in MD mode Operation mode The mode set as follows. Set "Disc Mode" to "Manual". You can be set for "Disc Mode" in the menu). Recording mode • When using a standard disc (60/74/80 minutes), the operation mode can...

Operating Instructions
Page 50
...;2) Recording time is approximately 10 hours and 10 minutes on 80-minute standard disc, and approximately 34 hours on 80-minute standard disc. MIC AGC Manual Standard You can be selected while "REC Level" is automatically adjusted to obtain greater distortion suppression and natural volume transitions close -range sounds, such... or jam sessions. Menus for recording Select "REC Settings" in the sound source. On Time 01 min - Recording-related menus can adjust the recording level manually ( page 52).
...;2) Recording time is approximately 10 hours and 10 minutes on 80-minute standard disc, and approximately 34 hours on 80-minute standard disc. MIC AGC Manual Standard You can be selected while "REC Level" is automatically adjusted to obtain greater distortion suppression and natural volume transitions close -range sounds, such... or jam sessions. Menus for recording Select "REC Settings" in the sound source. On Time 01 min - Recording-related menus can adjust the recording level manually ( page 52).

Operating Instructions
Page 51
... 51 Example: Three minutes of recording. Note You cannot set the "MIC AGC" setting if the recorder is set to adjust the recording level manually (while "REC Level" in the menu is set for microphone recording ("MIC AGC") When the sound being recorded (e.g., music) is ...On The recorder makes a new group at the 5-minute point (after each 5minute interval thereafter. • When the time interval set to "Manual") ( page 52). Using the Menu Items Group REC SYNC REC Options (: Default settings) Off The recorder does not make a new group ...
... 51 Example: Three minutes of recording. Note You cannot set the "MIC AGC" setting if the recorder is set to adjust the recording level manually (while "REC Level" in the menu is set for microphone recording ("MIC AGC") When the sound being recorded (e.g., music) is ...On The recorder makes a new group at the 5-minute point (after each 5minute interval thereafter. • When the time interval set to "Manual") ( page 52). Using the Menu Items Group REC SYNC REC Options (: Default settings) Off The recorder does not make a new group ...

Operating Instructions
Page 52
...the recorder will begin automatically adding track marks at regular intervals, as set the recording level manually during both analog and digital recording. 1 While the recorder is no sound on or off manually during synchro-recording. • Do not switch the "SYNC REC" setting while recording.... 4 While observing the level meter in the standby mode for about 3 seconds during synchro-recording, the recorder goes into the standby mode automatically. "Manual". 2 Press and slide REC while pressing . If high sound input causes the "OVER" segment (" ") to light up at the point ...
...the recorder will begin automatically adding track marks at regular intervals, as set the recording level manually during both analog and digital recording. 1 While the recorder is no sound on or off manually during synchro-recording. • Do not switch the "SYNC REC" setting while recording.... 4 While observing the level meter in the standby mode for about 3 seconds during synchro-recording, the recorder goes into the standby mode automatically. "Manual". 2 Press and slide REC while pressing . If high sound input causes the "OVER" segment (" ") to light up at the point ...

Operating Instructions
Page 53
... using Speed Control, you set a playback speed other than 0 %, "SC" appears to the left and right channel levels separately. • To adjust the recording level manually when synchro-recording, do steps 1 to 4 of the procedure in the display window of the time display in this section with the remote only. The...
... using Speed Control, you set a playback speed other than 0 %, "SC" appears to the left and right channel levels separately. • To adjust the recording level manually when synchro-recording, do steps 1 to 4 of the procedure in the display window of the time display in this section with the remote only. The...
Operating Instructions
Page 66
.... 66 Pause the recorder and adjust the recording level ( page 52). The recorder is too small to record (when adjusting the recording level manually). Replace the disc. The lid does not open after erasing numerous short tracks. Use a connecting cord without an attenuator ( page 11). Recording...
.... 66 Pause the recorder and adjust the recording level ( page 52). The recorder is too small to record (when adjusting the recording level manually). Replace the disc. The lid does not open after erasing numerous short tracks. Use a connecting cord without an attenuator ( page 11). Recording...

Operating Instructions
Page 68
... are not displayed. The operation lamp flashes slowly when the contents of strong magnetism. The track was low. Adjust the recording level manually while recording ( page 52). "AVLS" is stopped, the edited contents are not displayed. Volume cannot be played on the remote) ( page 58...
... are not displayed. The operation lamp flashes slowly when the contents of strong magnetism. The track was low. Adjust the recording level manually while recording ( page 52). "AVLS" is stopped, the edited contents are not displayed. Volume cannot be played on the remote) ( page 58...

Operating Instructions
Page 72
... the remote) at the end of the last track on the disc. There is a built-in malfunction in the menu has been set to "Manual". You tried to charge the rechargeable battery at a temperature of +5° C (+41° F) to the system file, such as the recorded data or...
... the remote) at the end of the last track on the disc. There is a built-in malfunction in the menu has been set to "Manual". You tried to charge the rechargeable battery at a temperature of +5° C (+41° F) to the system file, such as the recorded data or...

Operating Instructions
Page 84
... • when the source is analog. Line cable (with audio that is encountered while synchrorecording). Can also be adjusted manually ("Adjusting the recording level manually", page 52). Difference Digital (optical) input Analog (line) input Connectable source Equipment with a digital (optical)... to record using either digital (optical) input or analog (line) input. Can also be adjusted manually (Digital REC level control) ("Adjusting the recording level manually", page 52). Recorded sound level Same as the source. Adjusted automatically (depend on the...
... • when the source is analog. Line cable (with audio that is encountered while synchrorecording). Can also be adjusted manually ("Adjusting the recording level manually", page 52). Difference Digital (optical) input Analog (line) input Connectable source Equipment with a digital (optical)... to record using either digital (optical) input or analog (line) input. Can also be adjusted manually (Digital REC level control) ("Adjusting the recording level manually", page 52). Recorded sound level Same as the source. Adjusted automatically (depend on the...

Service Manual
Page 1
... optical pick-up block with 7 mm aperture.) - SERVICE MANUAL Ver. 1.1 2006.05 MZ-RH1 US Model Canadian Model AEP Model US and foreign patents licensed from Dolby Laboratories. • SonicStage is a trademark or registered trademark of Sony Corporation. • MD Simple Burner, OpenMG, "MagicGate", ... are trademarks or registered trademarks of their logos are trademarks of Sony Corporation. • Microsoft, Windows, Windows NT and Windows Media are trademarks or registered trademarks of Microsoft Corporation in this manual. • CD and music-related data from Gracenote, Inc.,...
... optical pick-up block with 7 mm aperture.) - SERVICE MANUAL Ver. 1.1 2006.05 MZ-RH1 US Model Canadian Model AEP Model US and foreign patents licensed from Dolby Laboratories. • SonicStage is a trademark or registered trademark of Sony Corporation. • MD Simple Burner, OpenMG, "MagicGate", ... are trademarks or registered trademarks of their logos are trademarks of Sony Corporation. • Microsoft, Windows, Windows NT and Windows Media are trademarks or registered trademarks of Microsoft Corporation in this manual. • CD and music-related data from Gracenote, Inc.,...

Service Manual
Page 2
...rate converter Optical (digital) input: 32 kHz/44.1 kHz/48 kHz Audio formats supported by this manual) • Operating Instructions (Hi-MD Music Transfer for Mac) 1) The shape of the plug ... the menu set to decrease over time. For details on an audio CD player. MZ-RH1 Recording and playback time List of the recording time for each disc (Approx.) The ...Headphones: 4.5 mW + 4.5 mW (16 Ω) (European model) 5 mW + 5 mW (16 Ω) (Other models) Power requirements Sony AC Power Adaptor DC 5 V AC 100 V - 240 V, 50/60 Hz Lithium-ion rechargeable battery LIP-4WM, 3.7 V, 370 mAh,...
...rate converter Optical (digital) input: 32 kHz/44.1 kHz/48 kHz Audio formats supported by this manual) • Operating Instructions (Hi-MD Music Transfer for Mac) 1) The shape of the plug ... the menu set to decrease over time. For details on an audio CD player. MZ-RH1 Recording and playback time List of the recording time for each disc (Approx.) The ...Headphones: 4.5 mW + 4.5 mW (16 Ω) (European model) 5 mW + 5 mW (16 Ω) (Other models) Power requirements Sony AC Power Adaptor DC 5 V AC 100 V - 240 V, 50/60 Hz Lithium-ion rechargeable battery LIP-4WM, 3.7 V, 370 mAh,...

Service Manual
Page 3
...THE SCHEMATIC DIAGRAMS AND IN THE PARTS LIST ARE CRITICAL TO SAFE OPERATION. REPLACE THESE COMPONENTS WITH SONY PARTS WHOSE PART NUMBERS APPEAR AS SHOWN IN THIS MANUAL OR IN SUPPLEMENTS PUBLISHED BY SONY. Schematic Diagram - MAIN Section (5/7 29 6-9. MAIN Board (Component Side 32 6-12. Schematic... PIÈCES SONT CRITIQUES POUR LA SÉCURITÉ DE FONCTIONNEMENT. Mechanism Deck (MT-MZRH1-181 8 3-7. Block Diagram - MZ-RH1 Notes on chip component replacement • Never reuse a disconnected chip component. • Notice that the minus side of a tantalum capacitor...
...THE SCHEMATIC DIAGRAMS AND IN THE PARTS LIST ARE CRITICAL TO SAFE OPERATION. REPLACE THESE COMPONENTS WITH SONY PARTS WHOSE PART NUMBERS APPEAR AS SHOWN IN THIS MANUAL OR IN SUPPLEMENTS PUBLISHED BY SONY. Schematic Diagram - MAIN Section (5/7 29 6-9. MAIN Board (Component Side 32 6-12. Schematic... PIÈCES SONT CRITIQUES POUR LA SÉCURITÉ DE FONCTIONNEMENT. Mechanism Deck (MT-MZRH1-181 8 3-7. Block Diagram - MZ-RH1 Notes on chip component replacement • Never reuse a disconnected chip component. • Notice that the minus side of a tantalum capacitor...

Service Manual
Page 5
... operate the recorder by locking the controls. For example, even if the HOLD function on the recorder is extracted from instruction manual. Guide to Parts and Controls Recorder Remote SECTION 2 GENERAL MZ-RH1 This section is activated, you set HOLD on the remote to on, too. 5 Locking the controls (HOLD) Slide the HOLD...
... operate the recorder by locking the controls. For example, even if the HOLD function on the recorder is extracted from instruction manual. Guide to Parts and Controls Recorder Remote SECTION 2 GENERAL MZ-RH1 This section is activated, you set HOLD on the remote to on, too. 5 Locking the controls (HOLD) Slide the HOLD...

Service Manual
Page 12
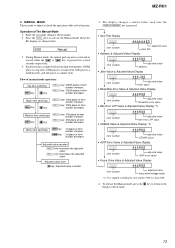
... can be checked. Display check mode: Ver 1.000 All lit All off → Version display... [VOL +] key x key [VOL --] key x key Manual Mode 0000 Manual Overall Adjustment Mode 0000 AdjF** [DISPLAY/MENU] key Key Check Mode 0100 10 Open the upper panel > key x key Self-Diagnosis Result Display Mode...mode is selected. • Other mode can be selected from the display check mode to the display check mode when entering by mistake) 12 MZ-RH1 SECTION 4 TEST MODE OUTLINE Operation in the test mode is held so that time is performed with the set. Also, For the display, the...
... can be checked. Display check mode: Ver 1.000 All lit All off → Version display... [VOL +] key x key [VOL --] key x key Manual Mode 0000 Manual Overall Adjustment Mode 0000 AdjF** [DISPLAY/MENU] key Key Check Mode 0100 10 Open the upper panel > key x key Self-Diagnosis Result Display Mode...mode is selected. • Other mode can be selected from the display check mode to the display check mode when entering by mistake) 12 MZ-RH1 SECTION 4 TEST MODE OUTLINE Operation in the test mode is held so that time is performed with the set. Also, For the display, the...
Service Manual
Page 13
...of item number decrease. key: 1st place of item number increase. 1st place of item number decrease. The display changes a shown below . 0000 Manual 3. MANUAL MODE This is mode to the Display Check mode. 13 Enter the test mode (Display Check mode). 2. Major item switching > key x key... of item number increase. [VOL --] key: 100th place of the set by function. To release the Manual mode, press the x key to return to adjust or check the operation of item number decrease. MZ-RH1 3. During Manual mode, the optical pick-up moves outward or inward while the > or .
...of item number decrease. key: 1st place of item number increase. 1st place of item number decrease. The display changes a shown below . 0000 Manual 3. MANUAL MODE This is mode to the Display Check mode. 13 Enter the test mode (Display Check mode). 2. Major item switching > key x key... of item number increase. [VOL --] key: 100th place of the set by function. To release the Manual mode, press the x key to return to adjust or check the operation of item number decrease. MZ-RH1 3. During Manual mode, the optical pick-up moves outward or inward while the > or .


