
Operating Instructions
Page 2
...instructions, may be prohibited. This equipment generates, uses, and can be replaced by one or more of optical instruments with this manual could void your nearest Sony Service Center. WARNING To prevent fire or shock hazard, do not open the cabinet. Do not install the appliance in a... radio/TV technician for a Class B digital device, pursuant to correct the interference by qualified personnel only. For the Sony Service Center nearest you call 1-800-222-SONY (United States only). Reorient or relocate the receiving antenna. - To avoid electrical shock, do not expose the unit ...
...instructions, may be prohibited. This equipment generates, uses, and can be replaced by one or more of optical instruments with this manual could void your nearest Sony Service Center. WARNING To prevent fire or shock hazard, do not open the cabinet. Do not install the appliance in a... radio/TV technician for a Class B digital device, pursuant to correct the interference by qualified personnel only. For the Sony Service Center nearest you call 1-800-222-SONY (United States only). Reorient or relocate the receiving antenna. - To avoid electrical shock, do not expose the unit ...

Operating Instructions
Page 4
... various operations during playback, recording, and editing, as well as when the recorder is flashing. There is done automatically. MZ-R90 About the i/LINE OUT jack on the recorder. MZ-R91 Notes • When the "AUDIO OUT" parameter is for the i/LINE OUT jack must be used to "HeadPhone" ...when you turn off the power. Then press the jog lever to "LINE OUT", the VOL +/- The parameter ("AUDIO OUT") for models MZR90 and MZ-R91. This manual is set ...
... various operations during playback, recording, and editing, as well as when the recorder is flashing. There is done automatically. MZ-R90 About the i/LINE OUT jack on the recorder. MZ-R91 Notes • When the "AUDIO OUT" parameter is for the i/LINE OUT jack must be used to "HeadPhone" ...when you turn off the power. Then press the jog lever to "LINE OUT", the VOL +/- The parameter ("AUDIO OUT") for models MZR90 and MZ-R91. This manual is set ...

Operating Instructions
Page 6
... with the source player (Synchro-recording) ...16 Recording from a microphone ...17 Recording in monaural for double the normal recording time ...17 Adjusting the recording level manually (Manual recording) ...18 Checking the remaining time or the recording position ...19 On the recorder ...19 On the remote control ...21 Setting the clock to stamp...
... with the source player (Synchro-recording) ...16 Recording from a microphone ...17 Recording in monaural for double the normal recording time ...17 Adjusting the recording level manually (Manual recording) ...18 Checking the remaining time or the recording position ...19 On the recorder ...19 On the remote control ...21 Setting the clock to stamp...

Operating Instructions
Page 14
...the original disc. You can erase unnecessary marks after recording ("Erasing a track mark", page 32). Can also be adjusted manually ("Adjusting the recording level manually (Manual recording)", page 18). 1) When recording a CD or an MD, track numbers are automatically marked in shuffle or program ... CD) is connected, the signal sent to the recorder is paused while recording. Can also be adjusted manually (Digital REC level control) ("Adjusting the recording level manually (Manual recording)", page 18). In this recorder works as the source. Connect the recorder to a CD player ...
...the original disc. You can erase unnecessary marks after recording ("Erasing a track mark", page 32). Can also be adjusted manually ("Adjusting the recording level manually (Manual recording)", page 18). 1) When recording a CD or an MD, track numbers are automatically marked in shuffle or program ... CD) is connected, the signal sent to the recorder is paused while recording. Can also be adjusted manually (Digital REC level control) ("Adjusting the recording level manually (Manual recording)", page 18). In this recorder works as the source. Connect the recorder to a CD player ...
Operating Instructions
Page 16
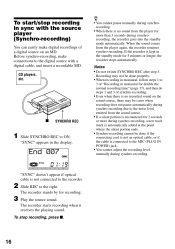
...REC after step 3. Before synchro-recording, make connections to the MIC (PLUG IN POWER) jack. • You cannot adjust the recording level manually during synchro-recording due to the noise level emitted from the sound source. • If a silent portion is connected to the digital source ...¢¢7 "SYNC" doesn't appear if optical cable is no recorded sound on an MD. CD players, etc. • You cannot pause manually during synchrorecording, the recorder goes into the standby mode automatically. The recorder stands by for double the normal recording time" (page 17), and then ...
...REC after step 3. Before synchro-recording, make connections to the MIC (PLUG IN POWER) jack. • You cannot adjust the recording level manually during synchro-recording due to the noise level emitted from the sound source. • If a silent portion is connected to the digital source ...¢¢7 "SYNC" doesn't appear if optical cable is no recorded sound on an MD. CD players, etc. • You cannot pause manually during synchrorecording, the recorder goes into the standby mode automatically. The recorder stands by for double the normal recording time" (page 17), and then ...
Operating Instructions
Page 18
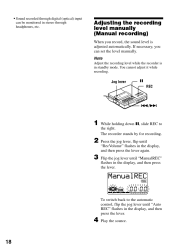
...) When you can be monitored in stereo through digital (optical) input can set the level manually. Jog lever X REC ./> 1 2 3 While holding down X, slide REC to the automatic control, flip the jog lever until "ManualREC" flashes in the display, and then press ...
...) When you can be monitored in stereo through digital (optical) input can set the level manually. Jog lever X REC ./> 1 2 3 While holding down X, slide REC to the automatic control, flip the jog lever until "ManualREC" flashes in the display, and then press ...

Operating Instructions
Page 19
... level meter just barely reaches the (OVER) mark beneath the display window. Then do the procedure from step 5. • You cannot adjust the recording level manually during stop recording, press x. The recording level control is too high, lower the recording level until "DISPLAY" flashes in progress. A B C While recording A LapTime RecRemain Clock...
... level meter just barely reaches the (OVER) mark beneath the display window. Then do the procedure from step 5. • You cannot adjust the recording level manually during stop recording, press x. The recording level control is too high, lower the recording level until "DISPLAY" flashes in progress. A B C While recording A LapTime RecRemain Clock...


