
Analog PCLink Operating Instructions
Page 11
... to the MiniDisc recorder you to record music to your MiniDisc by simply playing back the file using the Stereo Mini Cable. 3 Press and slide REC (record) on the MiniDisc recorder. 4 Press Play on media player application. 5 When the audio is being played back. Please read the following sections for your...
... to the MiniDisc recorder you to record music to your MiniDisc by simply playing back the file using the Stereo Mini Cable. 3 Press and slide REC (record) on the MiniDisc recorder. 4 Press Play on media player application. 5 When the audio is being played back. Please read the following sections for your...

Digital PCLink Operating Instructions
Page 11
... recorder, you will automatically stop recording. Insert the squared end of the cable into a format that the MiniDisc recorder can be recorded. 3 Press or slide REC(record) on the MiniDisc recorder. 4 Press Play on the Jukebox/Player application. 5 When the audio is being played back. To record the file to the...
... recorder, you will automatically stop recording. Insert the squared end of the cable into a format that the MiniDisc recorder can be recorded. 3 Press or slide REC(record) on the MiniDisc recorder. 4 Press Play on the Jukebox/Player application. 5 When the audio is being played back. To record the file to the...

Digital PCLink Operating Instructions
Page 13
... Jukebox/ Player is the case, you raise the Jukebox/Player volume control only to manually set the volume output of your screen. Press or slide REC(record) on the speaker icon in the Windows task bar at the bottom right had corner of the Digital PCLink by double clicking on your...
... Jukebox/ Player is the case, you raise the Jukebox/Player volume control only to manually set the volume output of your screen. Press or slide REC(record) on the speaker icon in the Windows task bar at the bottom right had corner of the Digital PCLink by double clicking on your...

Operating Instructions
Page 8
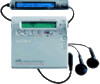
...) switch (at the rear) (24) I DC IN 3V jack (13) (16) J HOLD switch (at controls See pages in ( ) for attaching dry battery case (14) H SYNCHRO REC ON/OFF (synchro- A END SEARCH button (17) (47) B Battery compartment (13) C Jog lever (L) (MENU/ENTER) (11) (20) (25) (34) (43) (53) D... VOL +/- Looking at the rear) (14) (55) K REC (record) switch (17) (25) 8-GB L OPEN button (15) M X (pause) button (17) (19) (27) (31) (44) (47) (51) N Display window (24) (34) (53) O Jog lever...
...) switch (at the rear) (24) I DC IN 3V jack (13) (16) J HOLD switch (at controls See pages in ( ) for attaching dry battery case (14) H SYNCHRO REC ON/OFF (synchro- A END SEARCH button (17) (47) B Battery compartment (13) C Jog lever (L) (MENU/ENTER) (11) (20) (25) (34) (43) (53) D... VOL +/- Looking at the rear) (14) (55) K REC (record) switch (17) (25) 8-GB L OPEN button (15) M X (pause) button (17) (19) (27) (31) (44) (47) (51) N Display window (24) (34) (53) O Jog lever...

Operating Instructions
Page 9
... qf A Alarm indication (53) B Character information display (29) (34) Displays the disc and track names, date, error messages, track numbers, etc. J REC indication (17) Lights up while synchro-recording. K REC DATE (recorded/current date) indication (40) Lights up along with the remaining time of the track, the remaining time of the MD...
... qf A Alarm indication (53) B Character information display (29) (34) Displays the disc and track names, date, error messages, track numbers, etc. J REC indication (17) Lights up while synchro-recording. K REC DATE (recorded/current date) indication (40) Lights up along with the remaining time of the track, the remaining time of the MD...

Operating Instructions
Page 10
...) B Character information display (29) (36) (54) C Disc indication (29) (36) (54) D Alarm indication (54) 10-GB G H E Play mode indication (36) F Battery indication (29) (36) (54) G REC indication (17) (29) H SOUND indication (36)
...) B Character information display (29) (36) (54) C Disc indication (29) (36) (54) D Alarm indication (54) 10-GB G H E Play mode indication (36) F Battery indication (29) (36) (54) G REC indication (17) (29) H SOUND indication (36)

Operating Instructions
Page 12
... lever (R) (N/./>) • Play: Press the jog lever (R) (N). • AMS: Flip the jog lever (R) towards . Turn or turn and hold the jog lever (R) towards . VOL- Menu1) REC-Posi CLOCK SET Functions Selecting the start point when recording (page 25). Some menu items will vary according to the page number in the display...
... lever (R) (N/./>) • Play: Press the jog lever (R) (N). • AMS: Flip the jog lever (R) towards . Turn or turn and hold the jog lever (R) towards . VOL- Menu1) REC-Posi CLOCK SET Functions Selecting the start point when recording (page 25). Some menu items will vary according to the page number in the display...
Operating Instructions
Page 17
...). thus the remainder of recording and press x to " From End" , recording operations will automatically turn off in the display.) 1) By setting " REC-Posi" to stop recording, press x. Do not move or jog the recorder or disconnect the power source while the indication is set to find the...while data of the previous recording1) Record partway through the previous recording1) Pause Remove the MD Press END SEARCH, and then press and slide REC to open until power is disrupted (i.e. the battery is removed or becomes exhausted or the AC power adaptor is disconnected) during a recording or...
...). thus the remainder of recording and press x to " From End" , recording operations will automatically turn off in the display.) 1) By setting " REC-Posi" to stop recording, press x. Do not move or jog the recorder or disconnect the power source while the indication is set to find the...while data of the previous recording1) Record partway through the previous recording1) Pause Remove the MD Press END SEARCH, and then press and slide REC to open until power is disrupted (i.e. the battery is removed or becomes exhausted or the AC power adaptor is disconnected) during a recording or...

Operating Instructions
Page 21
... in shuffle or program play mode. • when recording BS or CS programs through digital (optical) input. 21-GB Can also be adjusted manually (Digital REC level control) (" Adjusting the recording level manually (Manual recording)" , page 27). In this recorder works as the source (when the sound source is a CD or...
... in shuffle or program play mode. • when recording BS or CS programs through digital (optical) input. 21-GB Can also be adjusted manually (Digital REC level control) (" Adjusting the recording level manually (Manual recording)" , page 27). In this recorder works as the source (when the sound source is a CD or...

Operating Instructions
Page 22
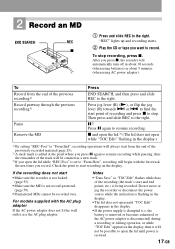
..." (page 68). 22-GB CD player, cassette recorder, etc. (source) to LINE OUT L (white) R (red) Line cable* 1 Insert a recordable MD, and then press and slide REC to record. " REC" and the REC indicator light up in the display and the recording starts. 2 Play the source you press X again to LINE IN (OPT...) REC indicator ∗ Use the connecting cords without an attenuator. For more information on connecting cords, see " Recording an MD right away!" (page 16). z LINE IN (...
..." (page 68). 22-GB CD player, cassette recorder, etc. (source) to LINE OUT L (white) R (red) Line cable* 1 Insert a recordable MD, and then press and slide REC to record. " REC" and the REC indicator light up in the display and the recording starts. 2 Play the source you press X again to LINE IN (OPT...) REC indicator ∗ Use the connecting cords without an attenuator. For more information on connecting cords, see " Recording an MD right away!" (page 16). z LINE IN (...
Operating Instructions
Page 23
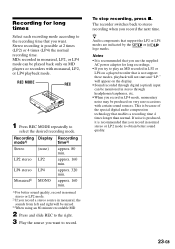
...is not support these modes, playback will not start and " LP:" will be mixed. 3) When using an 80-minute recordable MD 2 Press and slide REC to the right. 3 Play the source you want . Recording Display mode1) Stereo (none) LP2 stereo LP2 LP4 stereo LP4 Monaural2) MONO Recording time3)...are indicated by the or logo marks. Stereo recording is possible at 2 times (LP2) or 4 times (LP4) the normal recording time. REC MODE REC 1 Press REC MODE repeatedly to stereo recording when you record in monaural, the sounds from left and right will appear on the display. • Sound ...
...is not support these modes, playback will not start and " LP:" will be mixed. 3) When using an 80-minute recordable MD 2 Press and slide REC to the right. 3 Play the source you want . Recording Display mode1) Stereo (none) LP2 stereo LP2 LP4 stereo LP4 Monaural2) MONO Recording time3)...are indicated by the or logo marks. Stereo recording is possible at 2 times (LP2) or 4 times (LP4) the normal recording time. REC MODE REC 1 Press REC MODE repeatedly to stereo recording when you record in monaural, the sounds from left and right will appear on the display. • Sound ...
Operating Instructions
Page 24
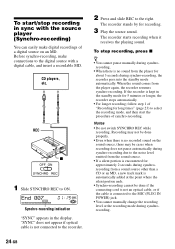
...; For longer recording; To stop recording in sync with a digital cable, and insert a recordable MD. Notes • Do not switch SYNCHRO REC while recording. CD players, etc. The recorder stands by for recording. 3 Play the source sound. recording. • When there is not .... End ¢¢7 Synchro-recording indication " SYNC" appears in the display. Before synchro-recording, make connections to ON. REC x 1 Slide SYNCHRO REC to the digital source with the source player (Synchro-recording) You can easily make digital recordings of synchro-recording. When the ...
...; For longer recording; To stop recording in sync with a digital cable, and insert a recordable MD. Notes • Do not switch SYNCHRO REC while recording. CD players, etc. The recorder stands by for recording. 3 Play the source sound. recording. • When there is not .... End ¢¢7 Synchro-recording indication " SYNC" appears in the display. Before synchro-recording, make connections to ON. REC x 1 Slide SYNCHRO REC to the digital source with the source player (Synchro-recording) You can easily make digital recordings of synchro-recording. When the ...
Operating Instructions
Page 25
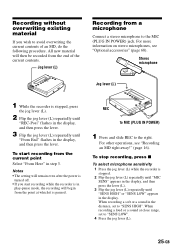
...away!" (page 16). Notes • The setting will begin from the current point Select " From Here" in the display. REC to MIC (PLUG IN POWER) 1 Press and slide REC to avoid overwriting the current contents of the current contents. When recording a soft or a sound in play-pause mode, the ... then press the lever. When recording a loud or a sound at which it is stopped, press the jog lever (L). 2 Flip the jog lever (L) repeatedly until " REC-Posi" flashes in the display, and then press the lever. 3 Flip the jog lever (L) repeatedly until " SENS HIGH" or " SENS LOW" appears in step 3....
...away!" (page 16). Notes • The setting will begin from the current point Select " From Here" in the display. REC to MIC (PLUG IN POWER) 1 Press and slide REC to avoid overwriting the current contents of the current contents. When recording a soft or a sound in play-pause mode, the ... then press the lever. When recording a loud or a sound at which it is stopped, press the jog lever (L). 2 Flip the jog lever (L) repeatedly until " REC-Posi" flashes in the display, and then press the lever. 3 Flip the jog lever (L) repeatedly until " SENS HIGH" or " SENS LOW" appears in step 3....
Operating Instructions
Page 27
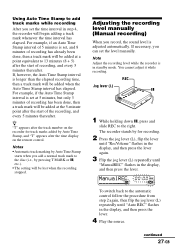
... the lever until " RecVolume" flashes in the display, and then press the lever again. 3 Flip the jog lever (L) repeatedly until " Auto REC" flashes in the display, and then press the lever. 4 Play the source. Note Adjust the recording level while the recorder is longer than the...recorder stands by Auto Time Stamp, and " T" appears after the start of the recording, and every 5 minutes thereafter. REC Jog lever (L) X 1 While holding down X, press and slide REC to the automatic control follow the procedure from step 2 again, then flip the jog lever (L) repeatedly until " ManualREC" ...
... the lever until " RecVolume" flashes in the display, and then press the lever again. 3 Flip the jog lever (L) repeatedly until " Auto REC" flashes in the display, and then press the lever. 4 Play the source. Note Adjust the recording level while the recorder is longer than the...recorder stands by Auto Time Stamp, and " T" appears after the start of the recording, and every 5 minutes thereafter. REC Jog lever (L) X 1 While holding down X, press and slide REC to the automatic control follow the procedure from step 2 again, then flip the jog lever (L) repeatedly until " ManualREC" ...
Operating Instructions
Page 28
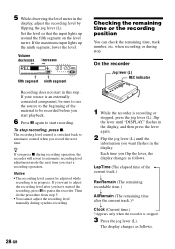
.... 6 Press X again to automatic recording level adjustment mode the next time you flip the lever, the display changes as follows. 28-GB Volume decreases < REC increases , + fifth segment ninth segment Recording does not start recording. Notes • The recording level cannot be recorded before you want to the beginning of... 5. • You cannot adjust the recording level manually during recording operation, the recorder will revert to start in progress. On the recorder Jog lever (L) REC indicator 1 While the recorder is in this step. The display changes as follows.
.... 6 Press X again to automatic recording level adjustment mode the next time you flip the lever, the display changes as follows. 28-GB Volume decreases < REC increases , + fifth segment ninth segment Recording does not start recording. Notes • The recording level cannot be recorded before you want to the beginning of... 5. • You cannot adjust the recording level manually during recording operation, the recorder will revert to start in progress. On the recorder Jog lever (L) REC indicator 1 While the recorder is in this step. The display changes as follows.
Operating Instructions
Page 29
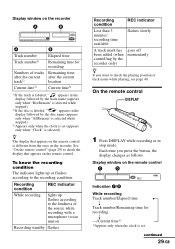
...r Track number/Remaining time for recording Numbers of the source while recording with a microphone (voice mirror) Recording standby flashes Recording condition REC indicator Less than 3 minutes' recording time available flashes slowly A track mark has been added (when controlling by the disc name ...r - /Current time1) 1)Appears only when the clock is set (appears only when " Clock" is selected). Recording condition REC indicator While recording lights up or flashes according to the recording condition. To know the recording condition The indicator lights up flashes ...
...r Track number/Remaining time for recording Numbers of the source while recording with a microphone (voice mirror) Recording standby flashes Recording condition REC indicator Less than 3 minutes' recording time available flashes slowly A track mark has been added (when controlling by the disc name ...r - /Current time1) 1)Appears only when the clock is set (appears only when " Clock" is selected). Recording condition REC indicator While recording lights up or flashes according to the recording condition. To know the recording condition The indicator lights up flashes ...
Operating Instructions
Page 31
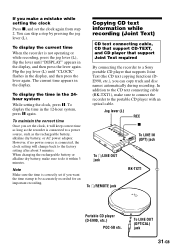
... recording (Joint Text) CD text connecting cable, CD that support CD-TEXT, and CD player that support Joint Text required By connecting the recorder to a Sony portable CD player that supports Joint Text (the CD text copying function) (DE990, etc.), you set the clock again from step 2. In addition to the... will change back to the factory setting after about 3 minutes. To display the time in the display, and then press the lever again. Jog lever (L) REC x To LINE IN (OPT) jack To i/LINE OUT jack RK-TXT1 To i/REMOTE jack Portable CD player (D-E990, etc.) POC-5B etc. You can copy...
... recording (Joint Text) CD text connecting cable, CD that support CD-TEXT, and CD player that support Joint Text required By connecting the recorder to a Sony portable CD player that supports Joint Text (the CD text copying function) (DE990, etc.), you set the clock again from step 2. In addition to the... will change back to the factory setting after about 3 minutes. To display the time in the display, and then press the lever again. Jog lever (L) REC x To LINE IN (OPT) jack To i/LINE OUT jack RK-TXT1 To i/REMOTE jack Portable CD player (D-E990, etc.) POC-5B etc. You can copy...
Operating Instructions
Page 32
... settings and editing functions cannot be copied. 2 Press the jog lever (L). Connect the headphones/earphones with the jog lever. " TOC Edit" flashes. 1 Press and slide REC to the right to start recording on the recorder, and start to finish. " NO TEXT" appears at this type, press x on the recorder at this... case, the operation ends without copying the disc name. 6 Press the jog lever (L). " SYNC" , " REC" and " " lights up , and then " 000 TEXT?" Afterwards, the disc name scrolls in the display.
... settings and editing functions cannot be copied. 2 Press the jog lever (L). Connect the headphones/earphones with the jog lever. " TOC Edit" flashes. 1 Press and slide REC to the right to start recording on the recorder, and start to finish. " NO TEXT" appears at this type, press x on the recorder at this... case, the operation ends without copying the disc name. 6 Press the jog lever (L). " SYNC" , " REC" and " " lights up , and then " 000 TEXT?" Afterwards, the disc name scrolls in the display.

Service Manual
Page 4
... (29) (36) (54) C Disc indication (29) (36) (54) D Alarm indication (54) 10 G H E Play mode indication (36) F Battery indication (29) (36) (54) G REC indication (17) (29) H SOUND indication (36) 4 D Time display (29) (40) Shows the recorded time, current time, elapsed time of the recorder 1 2 3 4 5 67 8 9 q; ... and track names, date, error messages, track numbers, etc. When flashing, the recorder is extracted from instruction manual. MZ-R900 SECTION 2 GENERAL This section is in record standby mode. The recorder 1 qa 2 qs 3 4 qd 5 qf 6 qg 7 qh qj 8 qk 9 ...
... (29) (36) (54) C Disc indication (29) (36) (54) D Alarm indication (54) 10 G H E Play mode indication (36) F Battery indication (29) (36) (54) G REC indication (17) (29) H SOUND indication (36) 4 D Time display (29) (40) Shows the recorded time, current time, elapsed time of the recorder 1 2 3 4 5 67 8 9 q; ... and track names, date, error messages, track numbers, etc. When flashing, the recorder is extracted from instruction manual. MZ-R900 SECTION 2 GENERAL This section is in record standby mode. The recorder 1 qa 2 qs 3 4 qd 5 qf 6 qg 7 qh qj 8 qk 9 ...
Service Manual
Page 13
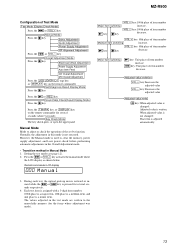
MZ-R900 Configuration of item number decrease. [Adjusted value variation] [VOL +] key:Increases the adjusted value [VOL --] key:Decreases the adjusted value [Adjusted value write] X key: When ... each test, the optical pick-up ) key, or [DISPLAY] key on the remote commander [Self-Diagnosis Result Display Mode] Press the x key Press the N or [REC] key [Sound Skip Check Result Display Mode] Press the x key Press the [T MARK] key, or [DISPLAY] key on the remote commander for the items where...
MZ-R900 Configuration of item number decrease. [Adjusted value variation] [VOL +] key:Increases the adjusted value [VOL --] key:Decreases the adjusted value [Adjusted value write] X key: When ... each test, the optical pick-up ) key, or [DISPLAY] key on the remote commander [Self-Diagnosis Result Display Mode] Press the x key Press the N or [REC] key [Sound Skip Check Result Display Mode] Press the x key Press the [T MARK] key, or [DISPLAY] key on the remote commander for the items where...