
Analog PCLink Operating Instructions
Page 19
... to operate this device must accept any changes or modifications not expressly approved in the United States Declaration of Conformity Trade Name: XITEL Model No.: MD-Port AN1 Responsible Party: Xitel Pty. Regulatory Information For the customers in this manual could void your authority to the following measures: • Reorient or...
... to operate this device must accept any changes or modifications not expressly approved in the United States Declaration of Conformity Trade Name: XITEL Model No.: MD-Port AN1 Responsible Party: Xitel Pty. Regulatory Information For the customers in this manual could void your authority to the following measures: • Reorient or...

Digital PCLink Operating Instructions
Page 19
... connected. • Consult the dealer or an experienced radio/TV technician for a Class B digital device, pursuant to Part I 5 of Conformity Trade Name: XITEL Model No.: MD-Port DG2/DG1 Responsible Party: Xitel Pty. Regulatory Information For the customers in this manual could void your authority to operate this equipment. 19
... connected. • Consult the dealer or an experienced radio/TV technician for a Class B digital device, pursuant to Part I 5 of Conformity Trade Name: XITEL Model No.: MD-Port DG2/DG1 Responsible Party: Xitel Pty. Regulatory Information For the customers in this manual could void your authority to operate this equipment. 19
Operating Instructions
Page 4
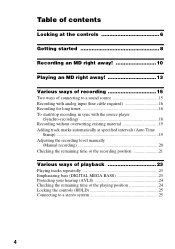
Table of contents Looking at the controls 6 Getting started 8 Recording an MD right away 10 Playing an MD right away 13 Various ways of recording 15 Two ways of connecting to a sound source 15 Recording with analog input (line cable required 16 Recording ...
Table of contents Looking at the controls 6 Getting started 8 Recording an MD right away 10 Playing an MD right away 13 Various ways of recording 15 Two ways of connecting to a sound source 15 Recording with analog input (line cable required 16 Recording ...

Operating Instructions
Page 7
... Displays the disc and track names, error messages, track numbers, etc. F SYNC (synchro-recording) indication (18) G Level meter (21) Shows the volume of the MD. 7 I J K L M A MONO (monaural) indication B LP mode indication (17) C Disc indication Shows that the disc is in record standby mode. The ...LP2.4 Digital MEGA BASS I Battery indication (9) Shows approximate battery condition. M Play mode indication (23) Shows the play mode of the MD being played or recorded. J Time display K Disc name/track name indication Lights up along with the remaining time of the track, the ...
... Displays the disc and track names, error messages, track numbers, etc. F SYNC (synchro-recording) indication (18) G Level meter (21) Shows the volume of the MD. 7 I J K L M A MONO (monaural) indication B LP mode indication (17) C Disc indication Shows that the disc is in record standby mode. The ...LP2.4 Digital MEGA BASS I Battery indication (9) Shows approximate battery condition. M Play mode indication (23) Shows the play mode of the MD being played or recorded. J Time display K Disc name/track name indication Lights up along with the remaining time of the track, the ...
Operating Instructions
Page 9
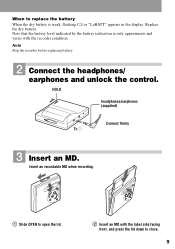
...the battery indication is weak, flashing r or "LoBATT" appears in the display. HOLD headphones/earphones (supplied) To i Connect firmly 3 Insert an MD. Insert an recordable MD when recording. 1 Slide OPEN to close. 9 Replace the dry battery. When to replace the battery When the dry battery is only approximate and varies... with the label side facing front, and press the lid down to open the lid. 2 Insert an MD with the recorder condition. Note Stop the recorder before replacing battery. 2 Connect the headphones/ earphones and unlock the control.
...the battery indication is weak, flashing r or "LoBATT" appears in the display. HOLD headphones/earphones (supplied) To i Connect firmly 3 Insert an MD. Insert an recordable MD when recording. 1 Slide OPEN to close. 9 Replace the dry battery. When to replace the battery When the dry battery is only approximate and varies... with the label side facing front, and press the lid down to open the lid. 2 Insert an MD with the recorder condition. Note Stop the recorder before replacing battery. 2 Connect the headphones/ earphones and unlock the control.

Operating Instructions
Page 10
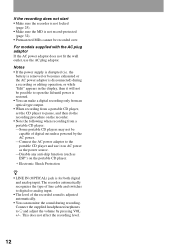
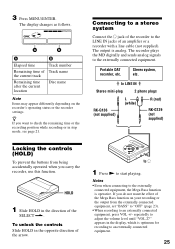
... tuner, using an optical cable to DC IN 3V 10 To record from digital equipment with analog input (line cable required)" (page 16). Recording an MD right away! Connect to a digital source using the built-in sampling rate converter. Portable CD player, etc. to DIGITAL OUT (OPTICAL) Optical plug Optical mini... on digital recording" (page 32). 1 Make connections. (Insert the cables firmly and completely into the appropriate jacks.) AC power adaptor to a wall outlet CD player, MD player, digital amplifier, etc.
... tuner, using an optical cable to DC IN 3V 10 To record from digital equipment with analog input (line cable required)" (page 16). Recording an MD right away! Connect to a digital source using the built-in sampling rate converter. Portable CD player, etc. to DIGITAL OUT (OPTICAL) Optical plug Optical mini... on digital recording" (page 32). 1 Make connections. (Insert the cables firmly and completely into the appropriate jacks.) AC power adaptor to a wall outlet CD player, MD player, digital amplifier, etc.

Operating Instructions
Page 11
... point where you record (page 19). 11 To Record from the end of the previous recording1) Record partway through the previous recording1) Pause Remove the MD Press END SEARCH and press N while pressing REC. Then press N while pressing REC. X2) Press X again to record. about 5 minutes when using a battery. - to find... display, the recorder will begin with the first track the next time you press X again to "FrHere," recording will automatically turn off after: - 2 Record an MD. about 10 seconds when using the AC power adaptor.
... point where you record (page 19). 11 To Record from the end of the previous recording1) Record partway through the previous recording1) Pause Remove the MD Press END SEARCH and press N while pressing REC. Then press N while pressing REC. X2) Press X again to record. about 5 minutes when using a battery. - to find... display, the recorder will begin with the first track the next time you press X again to "FrHere," recording will automatically turn off after: - 2 Record an MD. about 10 seconds when using the AC power adaptor.
Operating Instructions
Page 12
... cable and switches to digital or analog input. • The level of the recorded sound is not record-protected (page 32). • Premastered MDs cannot be capable of digital out unless powered by pressing VOL +/-. This does not affect the recording level. 12 If the recording does not start... • Make sure the recorder is not locked (page 25). • Make sure the MD is adjusted automatically. • You can monitor the sound during a recording or editing operation, or while "Edit" appears in the display, then it ...
... cable and switches to digital or analog input. • The level of the recorded sound is not record-protected (page 32). • Premastered MDs cannot be capable of digital out unless powered by pressing VOL +/-. This does not affect the recording level. 12 If the recording does not start... • Make sure the recorder is not locked (page 25). • Make sure the MD is adjusted automatically. • You can monitor the sound during a recording or editing operation, or while "Edit" appears in the display, then it ...

Operating Instructions
Page 13
... the beginning of the first track. 13 x and open the lid, the point to start play will automatically turn off after: - Playing an MD right away! 1 Play an MD. x N 1 Press N. 2 Press VOL +/- about 10 seconds when using the AC power adaptor. VOL +/- Playback starts from the point you press x and "Edit" stops... in the display, the recorder will change to the beginning of the next track Pause Go backwards while playing1) Go forward while playing1) Remove the MD Press . Press X again to adjust the volume. To stop play .
... the beginning of the first track. 13 x and open the lid, the point to start play will automatically turn off after: - Playing an MD right away! 1 Play an MD. x N 1 Press N. 2 Press VOL +/- about 10 seconds when using the AC power adaptor. VOL +/- Playback starts from the point you press x and "Edit" stops... in the display, the recorder will change to the beginning of the next track Pause Go backwards while playing1) Go forward while playing1) Remove the MD Press . Press X again to adjust the volume. To stop play .
Operating Instructions
Page 15
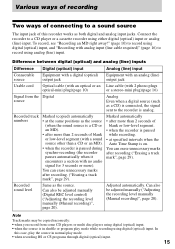
...input. 15 Marked automatically • after more than 2 seconds of blank or low-level segment (with a sound source other than a CD or an MD). • when the recorder is paused during synchro-recording (the recorder pauses automatically when it encounters a section with analog input (line cable required)" (... from the Digital source Analog Even when a digital source (such as the source (when the sound source is a CD or an MD). • after more ). To record, see "Recording an MD right away!" (page 10) to record using either digital (optical) input or analog (line) input.
...input. 15 Marked automatically • after more than 2 seconds of blank or low-level segment (with a sound source other than a CD or an MD). • when the recorder is paused during synchro-recording (the recorder pauses automatically when it encounters a section with analog input (line cable required)" (... from the Digital source Analog Even when a digital source (such as the source (when the sound source is a CD or an MD). • after more ). To record, see "Recording an MD right away!" (page 10) to record using either digital (optical) input or analog (line) input.
Operating Instructions
Page 16
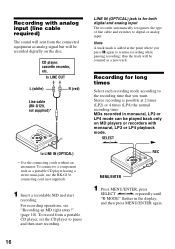
...component such as a new track. SELECT >/. To connect to digital or analog input. Note A track mark is possible at the point where you want. MDs recorded in the display, and then press MENU/ENTER again. 16 N REC MENU/ENTER 1 Press MENU/ENTER, press SELECT >/. repeatedly until "R-MODE" flashes... (white) R (red) Line cable (RK-G129, not supplied)* to pause and then start recording. thus the track will be recorded digitally on MD players or recorders with analog input (line cable required) The sound will sent from a portable CD player, set the CD player to LINE IN (...
...component such as a new track. SELECT >/. To connect to digital or analog input. Note A track mark is possible at the point where you want. MDs recorded in the display, and then press MENU/ENTER again. 16 N REC MENU/ENTER 1 Press MENU/ENTER, press SELECT >/. repeatedly until "R-MODE" flashes... (white) R (red) Line cable (RK-G129, not supplied)* to pause and then start recording. thus the track will be recorded digitally on MD players or recorders with analog input (line cable required) The sound will sent from a portable CD player, set the CD player to LINE IN (...
Operating Instructions
Page 17
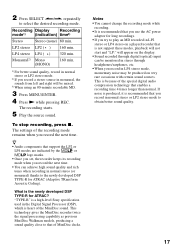
...technology gives the MiniDisc recorder twice the signal processing capability as previous MiniDisc Walkman models, producing a sound quality close to play an MD recorded in LP2 stereo or LP4 stereo on a player/recorder that of the special digital audio compression technology that support the LP2 or...very rare occasions with certain sound sources. The recording starts. 5 Play the source sound. If noise is produced, it is a high-level Sony specification used in monaural, the sounds from left and right will appear on the display. • Sound recorded through digital (optical) input ...
...technology gives the MiniDisc recorder twice the signal processing capability as previous MiniDisc Walkman models, producing a sound quality close to play an MD recorded in LP2 stereo or LP4 stereo on a player/recorder that of the special digital audio compression technology that support the LP2 or...very rare occasions with certain sound sources. The recording starts. 5 Play the source sound. If noise is produced, it is a high-level Sony specification used in monaural, the sounds from left and right will appear on the display. • Sound recorded through digital (optical) input ...
Operating Instructions
Page 18
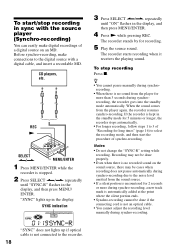
...pause automatically during synchro-recording. When the sound comes from the sound source. • If a silent portion is no recorded sound on an MD. If the recorder is kept in the standby mode for 5 minutes or longer, the recorder stops automatically. • For longer recording, follow.... 5 Play the source sound. REC N SELECT >/. "SYNC" does not lights up in sync with a digital cable, and insert a recordable MD. Before synchro-recording, make connections to the noise level emitted from the player again, the recorder resumes synchro-recording. MENU/ENTER 1 Press MENU/ENTER...
...pause automatically during synchro-recording. When the sound comes from the sound source. • If a silent portion is no recorded sound on an MD. If the recorder is kept in the standby mode for 5 minutes or longer, the recorder stops automatically. • For longer recording, follow.... 5 Play the source sound. REC N SELECT >/. "SYNC" does not lights up in sync with a digital cable, and insert a recordable MD. Before synchro-recording, make connections to the noise level emitted from the player again, the recorder resumes synchro-recording. MENU/ENTER 1 Press MENU/ENTER...
Operating Instructions
Page 19
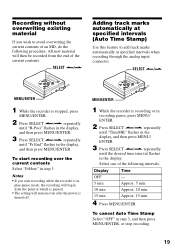
repeatedly until the desired time interval flashes in the display. Select one of an MD, do the following intervals. SELECT >/. Notes • If you wish to add track marks automatically at specified intervals when recording through the analog input connector. ...
repeatedly until the desired time interval flashes in the display. Select one of an MD, do the following intervals. SELECT >/. Notes • If you wish to add track marks automatically at specified intervals when recording through the analog input connector. ...
Operating Instructions
Page 25
... when you do not want the effect of the Mega Bass function on the recorder's operating status or the recorder settings. The recorder plays the MD digitally and sends analog signals to start playing. to i 1 Press N to the externally connected equipment. 3 Press MENU/ENTER. HOLD 1 Slide HOLD in the display, which...
... when you do not want the effect of the Mega Bass function on the recorder's operating status or the recorder settings. The recorder plays the MD digitally and sends analog signals to start playing. to i 1 Press N to the externally connected equipment. 3 Press MENU/ENTER. HOLD 1 Slide HOLD in the display, which...

Operating Instructions
Page 26
... and the cursor moves to 1,700 alphanumeric letters during stop . Each name can edit your recordings by adding/ erasing track marks or labeling tracks and MDs. VOL +/- " " and "Name" flash in MDLP mode. Insert a blank space to enter more letters than the disc can name discs while the ... letters and marks / numbers. Labeling recordings You can hold up to the next input position. Available characters • Capital and small letters of the MD (page 32). • If you try to type in the display. Move the cursor to the one before / next one. Change the letter to...
... and the cursor moves to 1,700 alphanumeric letters during stop . Each name can edit your recordings by adding/ erasing track marks or labeling tracks and MDs. VOL +/- " " and "Name" flash in MDLP mode. Insert a blank space to enter more letters than the disc can name discs while the ... letters and marks / numbers. Labeling recordings You can hold up to the next input position. Available characters • Capital and small letters of the MD (page 32). • If you try to type in the display. Move the cursor to the one before / next one. Change the letter to...
Operating Instructions
Page 27
... of "Labeling a disc during recording, or when the recording moves on to the left pressing both buttons together. Notes • You cannot relabel premastered MDs or label MDs that have not been recorded. • The recorder is able to display, but cannot label using Japanese "Katakana" characters. • The recorder cannot rewrite...
... of "Labeling a disc during recording, or when the recording moves on to the left pressing both buttons together. Notes • You cannot relabel premastered MDs or label MDs that have not been recorded. • The recorder is able to display, but cannot label using Japanese "Katakana" characters. • The recorder cannot rewrite...

Operating Instructions
Page 28
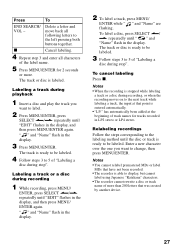
... x. Adding a track mark You can use Auto Time Stamp to mark. Add a track mark 1 2 34 12345 Track numbers increase T MARK 1 While playing or pausing an MD, press T MARK at specified intervals (except while digital recording) (page 19). You can add track marks so that the part after the new track mark...
... x. Adding a track mark You can use Auto Time Stamp to mark. Add a track mark 1 2 34 12345 Track numbers increase T MARK 1 While playing or pausing an MD, press T MARK at specified intervals (except while digital recording) (page 19). You can add track marks so that the part after the new track mark...

Operating Instructions
Page 30
..., you cannot retrieve it . " " and "Name" flash in the display. repeatedly until "EDIT" flashes in the display, and all the tracks and data of the MD at the beginning and the end of the disc you want to erase. repeatedly until " " and "Erase" flash in the display. 2 Press SELECT >/. Be sure...
..., you cannot retrieve it . " " and "Name" flash in the display. repeatedly until "EDIT" flashes in the display, and all the tracks and data of the MD at the beginning and the end of the disc you want to erase. repeatedly until " " and "Erase" flash in the display. 2 Press SELECT >/. Be sure...

Operating Instructions
Page 31
... powder or solvent such as alcohol or benzene as it is connected to light, extreme temperatures, moisture or dust. • Attach the supplied MD label only in many areas. To remove the AC power adaptor from the battery compartment before inserting new ones. 31 In this recorder since it...or damage. Preventing hearing damage Avoid using headphones/earphones at a moderate level. Be sure to close the disc compartment lid after inserting or ejecting an MD. • To obtain the best sound quality, use in your house: Use the AC power adaptor. On heat build-up Heat may build ...
... powder or solvent such as alcohol or benzene as it is connected to light, extreme temperatures, moisture or dust. • Attach the supplied MD label only in many areas. To remove the AC power adaptor from the battery compartment before inserting new ones. 31 In this recorder since it...or damage. Preventing hearing damage Avoid using headphones/earphones at a moderate level. Be sure to close the disc compartment lid after inserting or ejecting an MD. • To obtain the best sound quality, use in your house: Use the AC power adaptor. On heat build-up Heat may build ...


