SonicStage v2.0 Operating Guide
Page 2
...Intel Corporation. • All other than that which is so designated. • Please note that the installed OS is compatible with this manual. • CD and music-related data from Gracenote, Inc., copyright © 2000-2003 Gracenote. Gracenote CDDBR Client Software, copyright 2000-...your SonicStage. -User-created characters and some special characters may practice one or more of Apple Computer, Inc. is a trademark of Sony Corporation. • Microsoft, Windows, Windows NT and Windows Media are trademarks or registered trademarks of Microsoft Corporation in the United States ...
...Intel Corporation. • All other than that which is so designated. • Please note that the installed OS is compatible with this manual. • CD and music-related data from Gracenote, Inc., copyright © 2000-2003 Gracenote. Gracenote CDDBR Client Software, copyright 2000-...your SonicStage. -User-created characters and some special characters may practice one or more of Apple Computer, Inc. is a trademark of Sony Corporation. • Microsoft, Windows, Windows NT and Windows Media are trademarks or registered trademarks of Microsoft Corporation in the United States ...
SonicStage v2.0 Operating Guide
Page 4
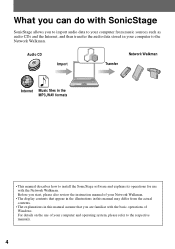
... for use of Windows. Before you start, please also review the instruction manual of your Network Walkman. • The display contents that appear in the illustrations in this manual may differ from the actual contents. • The explanations in this manual assume that you to import audio data to your computer from music...
... for use of Windows. Before you start, please also review the instruction manual of your Network Walkman. • The display contents that appear in the illustrations in this manual may differ from the actual contents. • The explanations in this manual assume that you to import audio data to your computer from music...
SonicStage v2.0 Operating Guide
Page 5
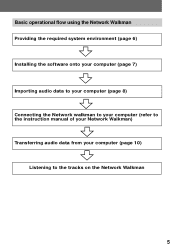
Basic operational flow using the Network Walkman Providing the required system environment (page 6) Installing the software onto your computer (page 7) Importing audio data to your computer (page 8) Connecting the Network walkman to your computer (refer to the instruction manual of your Network Walkman) Transferring audio data from your computer (page 10) Listening to the tracks on the Network Walkman 5
Basic operational flow using the Network Walkman Providing the required system environment (page 6) Installing the software onto your computer (page 7) Importing audio data to your computer (page 8) Connecting the Network walkman to your computer (refer to the instruction manual of your Network Walkman) Transferring audio data from your computer (page 10) Listening to the tracks on the Network Walkman 5
SonicStage v2.0 Operating Guide
Page 10
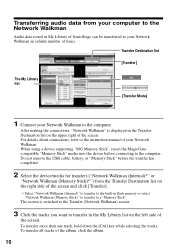
To transfer more than one track, hold down the [Ctrl] key while selecting the tracks. For details about connections, refer to the instruction manual of the screen. The screen is displayed in the Transfer Destination list on the upper right of your Network Walkman to a "Memory Stick". Transfer Destination ...
To transfer more than one track, hold down the [Ctrl] key while selecting the tracks. For details about connections, refer to the instruction manual of the screen. The screen is displayed in the Transfer Destination list on the upper right of your Network Walkman to a "Memory Stick". Transfer Destination ...
SonicStage v2.0 Operating Guide
Page 12
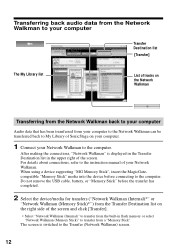
... right of the screen. The screen is displayed in the Transfer Destination list in flash memory or select "Network Walkman (Memory Stick)" to the instruction manual of the screen and click [Transfer]. ∗ Select "Network Walkman (Internal)" to transfer from a "Memory Stick". Do not remove the USB cable, battery, or "Memory...
... right of the screen. The screen is displayed in the Transfer Destination list in flash memory or select "Network Walkman (Memory Stick)" to the instruction manual of the screen and click [Transfer]. ∗ Select "Network Walkman (Internal)" to transfer from a "Memory Stick". Do not remove the USB cable, battery, or "Memory...
Operating Instructions
Page 3
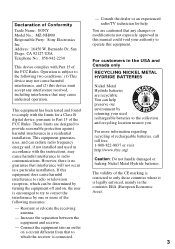
...San Diego, CA 92127 USA Telephone No.: 858-942-2230 This device complies with Part 15 of Conformity Trade Name: SONY Model No.: MZ-NH900 Responsible Party: Sony Electronics Inc. Operation is no guarantee that to comply with the instructions, may not cause harmful interference, and (2) ...this device must accept any changes or modifications not expressly approved in this manual could void your used in the countries EEA ...
...San Diego, CA 92127 USA Telephone No.: 858-942-2230 This device complies with Part 15 of Conformity Trade Name: SONY Model No.: MZ-NH900 Responsible Party: Sony Electronics Inc. Operation is no guarantee that to comply with the instructions, may not cause harmful interference, and (2) ...this device must accept any changes or modifications not expressly approved in this manual could void your used in the countries EEA ...
Operating Instructions
Page 4
...PC/AT are registered trademarks of International Business Machines Corporation. 4 • Macintosh is a trademark of the software supplied with this manual. • CD and music-related data from Gracenote, Inc., copyright © 2000-2003 Gracenote. This product and service may be...users On the supplied software • Copyright laws prohibit reproducing the software or the manual accompanying it . Program © 2001, 2002, 2003, 2004 Sony Corporation Documentation © 2004 Sony Corporation Gracenote CDDBR Client Software, copyright 2000-2003 Gracenote. Gracenote and CDDB are ...
...PC/AT are registered trademarks of International Business Machines Corporation. 4 • Macintosh is a trademark of the software supplied with this manual. • CD and music-related data from Gracenote, Inc., copyright © 2000-2003 Gracenote. This product and service may be...users On the supplied software • Copyright laws prohibit reproducing the software or the manual accompanying it . Program © 2001, 2002, 2003, 2004 Sony Corporation Documentation © 2004 Sony Corporation Gracenote CDDBR Client Software, copyright 2000-2003 Gracenote. Gracenote and CDDB are ...

Operating Instructions
Page 6
Table of contents About available functions and supplied manuals 10 Recorder Operation Looking at controls 13 Getting started 17 Recording a disc right away 21 Playing a disc right away 25 Using menus 27 How to ... Viewing various information 33 Recording from a microphone 35 Recording from a TV or radio (Analog Recording 37 Selecting the recording mode 37 Adjusting the recording level manually 38 Adding track marks while recording 39 Using the group function when recording 40 To start/stop recording in sync with the sound source (Synchro...
Table of contents About available functions and supplied manuals 10 Recorder Operation Looking at controls 13 Getting started 17 Recording a disc right away 21 Playing a disc right away 25 Using menus 27 How to ... Viewing various information 33 Recording from a microphone 35 Recording from a TV or radio (Analog Recording 37 Selecting the recording mode 37 Adjusting the recording level manually 38 Adding track marks while recording 39 Using the group function when recording 40 To start/stop recording in sync with the sound source (Synchro...

Operating Instructions
Page 10
... section explains the functions of this portable MiniDisc recorder and the manuals that you made. The "What you can enjoy recording from a CD player or a microphone, then enjoy listening to each use of the recorder functions. Using ... on the problems you encounter any problems or need more about what to 104) This section explains all of the recorder. Please refer to the manual that applies to the recordings that have been supplied with it differs with standard MD Walkman.
... section explains the functions of this portable MiniDisc recorder and the manuals that you made. The "What you can enjoy recording from a CD player or a microphone, then enjoy listening to each use of the recorder functions. Using ... on the problems you encounter any problems or need more about what to 104) This section explains all of the recorder. Please refer to the manual that applies to the recordings that have been supplied with it differs with standard MD Walkman.
Operating Instructions
Page 11
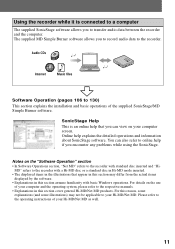
..., please refer to the recorder. SonicStage Help This is connected to a computer The supplied SonicStage software allows you to record audio data to the respective manuals. • Explanations in this section assume familiarity with basic Windows operations. Notes on the use of the supplied SonicStage/MD Simple Burner software. Online help...
..., please refer to the recorder. SonicStage Help This is connected to a computer The supplied SonicStage software allows you to record audio data to the respective manuals. • Explanations in this section assume familiarity with basic Windows operations. Notes on the use of the supplied SonicStage/MD Simple Burner software. Online help...

Operating Instructions
Page 31
... 35 sound. Simplifies operations during digital recording (Synchro-Recording). Outputs sound from MD mode or Hi-MD mode when a page 78 blank disc is inserted. Manually adjusts the recording level. Sets the microphone sensitivity to create a new group with each page 40 recording operation (Group Recording). Selects the recording mode (PCM...
... 35 sound. Simplifies operations during digital recording (Synchro-Recording). Outputs sound from MD mode or Hi-MD mode when a page 78 blank disc is inserted. Manually adjusts the recording level. Sets the microphone sensitivity to create a new group with each page 40 recording operation (Group Recording). Selects the recording mode (PCM...
Operating Instructions
Page 36
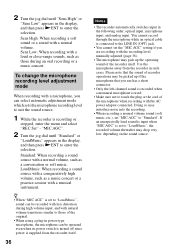
... is set "MIC AGC" to "Standard". Standard: When recording a sound source with a normal volume, such as a music concert or a practice session with the recording level manually adjusted (page 38). • The microphone may drop very low, depending on the sound source. z • When "MIC AGC" is recording or stopped, enter the...
... is set "MIC AGC" to "Standard". Standard: When recording a sound source with a normal volume, such as a music concert or a practice session with the recording level manually adjusted (page 38). • The microphone may drop very low, depending on the sound source. z • When "MIC AGC" is recording or stopped, enter the...

Operating Instructions
Page 38
...; It is recommended that you use the recorder to obtain better sound quality. • It is recommended that you record in linear PCM stereo. "Manual". 3 Play the source. 38 on a computer may be mixed. 3) When using an 80-minute recordable disc z Audio components that you can set...are indicated by the or logo mark. The recorder stands by the or logo mark. Approx. 320 min. Adjusting the recording level manually The recording level is because of the special digital audio compression technology that support the LP2 stereo and LP4 stereo mode are indicated by...
...; It is recommended that you use the recorder to obtain better sound quality. • It is recommended that you record in linear PCM stereo. "Manual". 3 Play the source. 38 on a computer may be mixed. 3) When using an 80-minute recordable disc z Audio components that you can set...are indicated by the or logo mark. The recorder stands by the or logo mark. Approx. 320 min. Adjusting the recording level manually The recording level is because of the special digital audio compression technology that support the LP2 stereo and LP4 stereo mode are indicated by...
Operating Instructions
Page 39
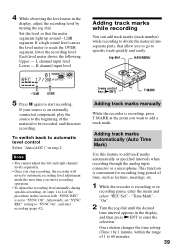
... will revert to automatic recording level adjustment mode the next time you start recording (page 42). 5-way control key (NENT) T MARK Adding track marks manually While the recorder is set "SYNC REC" setting to "SYNC On", and start a recording operation. • To adjust the recording level... manually during synchro-recording, do steps 1 to 4 of 1 to "SYNC Off". Adding track marks automatically (Auto Time Mark) Use this section with "SYNC REC" is recording...
... will revert to automatic recording level adjustment mode the next time you start recording (page 42). 5-way control key (NENT) T MARK Adding track marks manually While the recorder is set "SYNC REC" setting to "SYNC On", and start a recording operation. • To adjust the recording level... manually during synchro-recording, do steps 1 to 4 of 1 to "SYNC Off". Adding track marks automatically (Auto Time Mark) Use this section with "SYNC REC" is recording...

Operating Instructions
Page 42
... for approximately 2 seconds during synchro-recording. • Do not switch the "SYNC REC" setting while recording. If the recorder is no sound on or off manually during synchrorecording from the player again, the recorder resumes synchrorecording. "SYNC On". Use the appropriate optical cable to suit the source equipment.
... for approximately 2 seconds during synchro-recording. • Do not switch the "SYNC REC" setting while recording. If the recorder is no sound on or off manually during synchrorecording from the player again, the recorder resumes synchrorecording. "SYNC On". Use the appropriate optical cable to suit the source equipment.

Operating Instructions
Page 89
... using a connecting cord with an attenuator. , Use a connecting cord without an attenuator. • Recording level is too small to record (when adjusting the recording level manually). , Pause the recorder and adjust the recording level (page 38). • The recorder is connected to the computer. , Disconnect the recorder from a portable CD player...
... using a connecting cord with an attenuator. , Use a connecting cord without an attenuator. • Recording level is too small to record (when adjusting the recording level manually). , Pause the recorder and adjust the recording level (page 38). • The recorder is connected to the computer. , Disconnect the recorder from a portable CD player...

Operating Instructions
Page 91
.../earphones , Set to "Headphone" (page 57). The disc cannot be turned up. • AVLS is low. • The track was low. , Adjust the recording level manually while recording (page 38). No sound comes through the headphones/ earphones. • The headphones/earphones plug is not firmly connected. , Plug in digital mode, the...
.../earphones , Set to "Headphone" (page 57). The disc cannot be turned up. • AVLS is low. • The track was low. , Adjust the recording level manually while recording (page 38). No sound comes through the headphones/ earphones. • The headphones/earphones plug is not firmly connected. , Plug in digital mode, the...

Operating Instructions
Page 104
Can also be adjusted manually ("Adjusting the recording level manually", page 38). 1) You can erase unnecessary marks after more than 2 seconds of no sound (page 100) or low-level segment (with a sound source other than a ... 2 seconds of this case, play the source in normal play mode while recording using analog (line) input. Can also be adjusted manually (Digital REC level control) ("Adjusting the recording level manually", page 38). In this recorder works as the source. Recorded sound level Same as both digital and analog input jacks. To...
Can also be adjusted manually ("Adjusting the recording level manually", page 38). 1) You can erase unnecessary marks after more than 2 seconds of no sound (page 100) or low-level segment (with a sound source other than a ... 2 seconds of this case, play the source in normal play mode while recording using analog (line) input. Can also be adjusted manually (Digital REC level control) ("Adjusting the recording level manually", page 38). In this recorder works as the source. Recorded sound level Same as both digital and analog input jacks. To...

Operating Instructions
Page 131
... 40 releasing 64 setting 62 H Hard disk free space 108 Hi-MD 100 HOLD 14 I Importing 115 Installing 108 L Labeling 59, 61 Linear PCM 100 M Manual recording 38 MD Simple Burner 111 MDLP 37 Menu 27 Menu Mode 74 Move groups 65 tracks 64 My Library 115 N Net MD 111 O OpenMG...
... 40 releasing 64 setting 62 H Hard disk free space 108 Hi-MD 100 HOLD 14 I Importing 115 Installing 108 L Labeling 59, 61 Linear PCM 100 M Manual recording 38 MD Simple Burner 111 MDLP 37 Menu 27 Menu Mode 74 Move groups 65 tracks 64 My Library 115 N Net MD 111 O OpenMG...


