
Operating Instructions
Page 24
... that support these file formats are installed on a personal computer. To display the image list, double-click [Mavica.htm] in the floppy disk used with this camera as Microsoft Internet Explorer on your personal computer. Recommended OS/applications OS Windows 3.1, Windows 95, Windows 98, ...higher, Netscape Navigator, etc. A viewing application for your personal computer and application software. To play back an MPEG file with your camera on a personal computer and attach it to also see the operation manuals for Macintosh is stored in TEXT mode : GIF format. This...
... that support these file formats are installed on a personal computer. To display the image list, double-click [Mavica.htm] in the floppy disk used with this camera as Microsoft Internet Explorer on your personal computer. Recommended OS/applications OS Windows 3.1, Windows 95, Windows 98, ...higher, Netscape Navigator, etc. A viewing application for your personal computer and application software. To play back an MPEG file with your camera on a personal computer and attach it to also see the operation manuals for Macintosh is stored in TEXT mode : GIF format. This...
Operating Instructions
Page 51
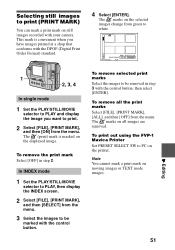
...a print mark on the printer. To remove selected print marks Select the images to be marked with the DPOF (Digital Print Order Format) standard. 4 Select [ENTER]. To print out using the FVP-1 Mavica Printer Set PRESET SELECT SW to PLAY, then display the INDEX screen. 2 Select [FILE], [PRINT MARK], and ... PC on still images recorded with the control button, then select [ENTER]. To remove the print mark Select [OFF] in step 3 with your camera. To remove all images are removed. The marks on moving images or TEXT mode images. 51 B Editing This mark is marked on the selected ...
...a print mark on the printer. To remove selected print marks Select the images to be marked with the DPOF (Digital Print Order Format) standard. 4 Select [ENTER]. To print out using the FVP-1 Mavica Printer Set PRESET SELECT SW to PLAY, then display the INDEX screen. 2 Select [FILE], [PRINT MARK], and ... PC on still images recorded with the control button, then select [ENTER]. To remove the print mark Select [OFF] in step 3 with your camera. To remove all images are removed. The marks on moving images or TEXT mode images. 51 B Editing This mark is marked on the selected ...

