Operating Instructions
Page 2
... of electric shock to qualified personnel only. NOTICE FOR THE CUSTOMERS IN THE U.S.A. CAUTION The use of optical instruments with the Dolby Btype noise reduction system*. * Manufactured under license from that may cause harmful interference to radio communications. Connect the equipment into an outlet on the rear exterior. Consult the ... of uninsulated "dangerous voltage" within the product's enclosure that to which can radiate radio frequency energy and, if not installed and used in this manual could void your authority to operate this product is located inside the unit.
... of electric shock to qualified personnel only. NOTICE FOR THE CUSTOMERS IN THE U.S.A. CAUTION The use of optical instruments with the Dolby Btype noise reduction system*. * Manufactured under license from that may cause harmful interference to radio communications. Connect the equipment into an outlet on the rear exterior. Consult the ... of uninsulated "dangerous voltage" within the product's enclosure that to which can radiate radio frequency energy and, if not installed and used in this manual could void your authority to operate this product is located inside the unit.
Operating Instructions
Page 3
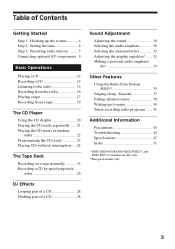
Table of Contents Getting Started Step 1: Hooking up the system 4 Step 2: Setting the time 6 Step 3: Presetting radio stations .......... 7 Connecting optional AV ... 22 Programming the CD tracks 23 Playing CDs without interruption ..... 24 The Tape Deck Recording on a tape manually 25 Recording a CD by specifying track order 26 DJ Effects Looping part of a CD 28 Flashing part...the graphic equalizer* ....... 32 Making a personal audio emphasis file 33 Other Features Using the Radio Data System (RDS 35 Singing along: Karaoke 37 Falling asleep to music 39 Waking up to music 39 Timer-...
Table of Contents Getting Started Step 1: Hooking up the system 4 Step 2: Setting the time 6 Step 3: Presetting radio stations .......... 7 Connecting optional AV ... 22 Programming the CD tracks 23 Playing CDs without interruption ..... 24 The Tape Deck Recording on a tape manually 25 Recording a CD by specifying track order 26 DJ Effects Looping part of a CD 28 Flashing part...the graphic equalizer* ....... 32 Making a personal audio emphasis file 33 Other Features Using the Radio Data System (RDS 35 Singing along: Karaoke 37 Falling asleep to music 39 Waking up to music 39 Timer-...
Operating Instructions
Page 8
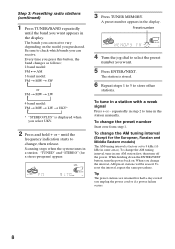
...: FM n MW n SW or FM n MW n LW 4 band model: FM n MW n LW n UKV* * "STEREO PLUS" is stored. 6 Repeat steps 1 to 5 to tune in the station manually. Preset number ALL DISCS VOLUME ß 4 Turn the jog dial to check which bands you want appears in the display. ALL DISCS MONO TUNED STEREO... in some areas). To change , then release. Tip The preset stations are retained for half a day even if you select UKV. Scanning stops when the system tunes in any AM station first, then turn the power back on the model you can receive. When you want . 5 Press ENTER/NEXT. until the...
...: FM n MW n SW or FM n MW n LW 4 band model: FM n MW n LW n UKV* * "STEREO PLUS" is stored. 6 Repeat steps 1 to 5 to tune in the station manually. Preset number ALL DISCS VOLUME ß 4 Turn the jog dial to check which bands you want appears in the display. ALL DISCS MONO TUNED STEREO... in some areas). To change , then release. Tip The preset stations are retained for half a day even if you select UKV. Scanning stops when the system tunes in any AM station first, then turn the power back on the model you can receive. When you want . 5 Press ENTER/NEXT. until the...
Operating Instructions
Page 16
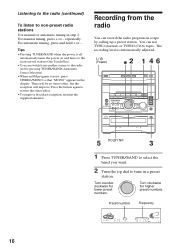
For manual tuning, press + or - Recording from another source to the radio just by calling up a preset station. repeatedly. You can switch from the radio You can ... "MONO" appears in a preset station. Preset number Frequency ALL DISCS VOLUME kHz MHz ß 16 Press the button again to non-preset radio stations Use manual or automatic tuning in step 2. For automatic tuning, press and hold + or -. Turn counterclockwise for lower preset numbers. + = Turn clockwise for higher preset numbers. Listening...
For manual tuning, press + or - Recording from another source to the radio just by calling up a preset station. repeatedly. You can switch from the radio You can ... "MONO" appears in a preset station. Preset number Frequency ALL DISCS VOLUME kHz MHz ß 16 Press the button again to non-preset radio stations Use manual or automatic tuning in step 2. For automatic tuning, press and hold + or -. Turn counterclockwise for lower preset numbers. + = Turn clockwise for higher preset numbers. Listening...

Operating Instructions
Page 17
... repeatedly to select A to hear. If you record on the remote. (Power) 3 p = + P PAUSE To stop recording Press p. in step 2 to tune in the desired station manually. • When you want to record on one side. Recording starts.
... repeatedly to select A to hear. If you record on the remote. (Power) 3 p = + P PAUSE To stop recording Press p. in step 2 to tune in the desired station manually. • When you want to record on one side. Recording starts.
Operating Instructions
Page 25
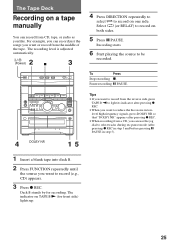
... TAPE B 9 to light its indicator after pressing r REC. • When recording from CD, tape, or radio as you like. The Tape Deck Recording on a tape manually You can record from a CD, you can record just the songs you want or record from the middle of the tape. For example, you can...
... TAPE B 9 to light its indicator after pressing r REC. • When recording from CD, tape, or radio as you like. The Tape Deck Recording on a tape manually You can record from a CD, you can record just the songs you want or record from the middle of the tape. For example, you can...

