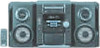
Operating Instructions
Page 2
And don't place lighted candles on a circuit different from that to operate this manual could void your authority to which can radiate radio frequency energy and, if not installed and used in cabinet. Don't throw a battery, dispose it as a ... B digital device, pursuant to rain or moisture. If this product meets the ENERGY STAR® guidelines for energy efficiency. 2 As an ENERGY STAR® Partner, Sony Corporation has determined that may cause harmful interference to comply with the limits for help. WARNING To prevent fire or shock hazard, do not Cover...
And don't place lighted candles on a circuit different from that to operate this manual could void your authority to which can radiate radio frequency energy and, if not installed and used in cabinet. Don't throw a battery, dispose it as a ... B digital device, pursuant to rain or moisture. If this product meets the ENERGY STAR® guidelines for energy efficiency. 2 As an ENERGY STAR® Partner, Sony Corporation has determined that may cause harmful interference to comply with the limits for help. WARNING To prevent fire or shock hazard, do not Cover...
Operating Instructions
Page 3
... stations 12 Listening to music - Daily Timer 18 Optional Components Connecting a video game machine ...... 19 Additional Information Precautions 20 Troubleshooting 22 Messages 24 Specifications 24 3 CD Synchro Recording/ Recording Manually 15 Timer-recording radio programs ......... 16 Sound Adjustment Adjusting ...CD tracks - Preset Tuning 13 Tape Loading a tape 14 Playing a tape 14 Recording to a tape - Sleep Timer 18 Waking up the system 6 Inserting two R6 (size AA) batteries into the remote 8 Setting the time 9 Saving the power in standby mode ........ 9 CD Loading ...
... stations 12 Listening to music - Daily Timer 18 Optional Components Connecting a video game machine ...... 19 Additional Information Precautions 20 Troubleshooting 22 Messages 24 Specifications 24 3 CD Synchro Recording/ Recording Manually 15 Timer-recording radio programs ......... 16 Sound Adjustment Adjusting ...CD tracks - Preset Tuning 13 Tape Loading a tape 14 Playing a tape 14 Recording to a tape - Sleep Timer 18 Waking up the system 6 Inserting two R6 (size AA) batteries into the remote 8 Setting the time 9 Saving the power in standby mode ........ 9 CD Loading ...
Operating Instructions
Page 12
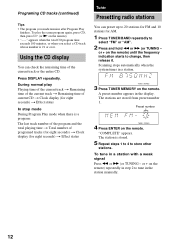
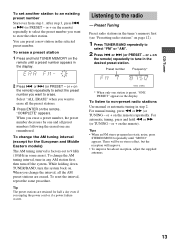
... 100 minutes, or when you made remains after Program Play finishes. Preset number 4 Press ENTER on the remote. Scanning stops automatically when the system tunes in the station manually. 12 "COMPLETE" appears. A preset number appears in a station with a weak signal Press m or M (or TUNING - During normal play the same program again, press...
... 100 minutes, or when you made remains after Program Play finishes. Preset number 4 Press ENTER on the remote. Scanning stops automatically when the system tunes in the station manually. 12 "COMPLETE" appears. A preset number appears in a station with a weak signal Press m or M (or TUNING - During normal play the same program again, press...
Operating Instructions
Page 13
... is preset, "ONE PRESET" appears in any AM station first, then turn the system back on the remote) repeatedly to select the preset number you want to an existing preset number Start over from step 1. For manual tuning, press m or M (or TUNING - Tips • When an FM ...stereo program has static noise, press STEREO/MONO repeatedly until a preset number appears in the selected preset number. While holding down TUNER/BAND, turn off the system. or + on . or > (or ...
... is preset, "ONE PRESET" appears in any AM station first, then turn the system back on the remote) repeatedly to select the preset number you want to an existing preset number Start over from step 1. For manual tuning, press m or M (or TUNING - Tips • When an FM ...stereo program has static noise, press STEREO/MONO repeatedly until a preset number appears in the selected preset number. While holding down TUNER/BAND, turn off the system. or + on . or > (or ...
Operating Instructions
Page 15
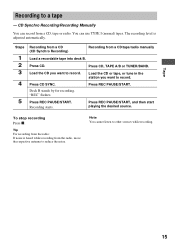
CD Synchro Recording/Recording Manually You can use TYPE I (normal) tapes. Deck B stands by for recording. Press REC PAUSE/START, and then start playing the desired source. Load the CD ... Press REC PAUSE/START. Press CD. Tip For recording from the radio, move the respective antenna to record. You can record from a CD/tape/radio manually Load a recordable tape into deck B. Load the CD or tape, or tune in the station you want to reduce the noise. The recording level is...
CD Synchro Recording/Recording Manually You can use TYPE I (normal) tapes. Deck B stands by for recording. Press REC PAUSE/START, and then start playing the desired source. Load the CD ... Press REC PAUSE/START. Press CD. Tip For recording from the radio, move the respective antenna to record. You can record from a CD/tape/radio manually Load a recordable tape into deck B. Load the CD or tape, or tune in the station you want to reduce the noise. The recording level is...


