Operating Instructions (primary manual)
Page 3
...Labeling titles through the keyboard ... 27 Operating the system through the keyboard 28 Optional Components Hooking up the optional A/V components 28 Connecting a video game machine ...... 29 Connecting a sub woofer speaker** .... 30 Connecting a DVD player 30 Additional ...Information Precautions 31 Troubleshooting 32 Messages 34 Specifications 35 * MHC-MG510AV/MG310AV only ** MHC-MG310AV only...
...Labeling titles through the keyboard ... 27 Operating the system through the keyboard 28 Optional Components Hooking up the optional A/V components 28 Connecting a video game machine ...... 29 Connecting a sub woofer speaker** .... 30 Connecting a DVD player 30 Additional ...Information Precautions 31 Troubleshooting 32 Messages 34 Specifications 35 * MHC-MG510AV/MG310AV only ** MHC-MG310AV only...
Operating Instructions (primary manual)
Page 7
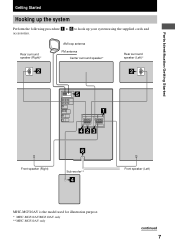
Parts Identification/Getting Started Getting Started Hooking up the system Perform the following procedure 1 to 6 to hook up your system using the supplied cords and accessories. Rear surround speaker (Right)* AM loop antenna FM antenna Center surround speaker* Rear surround speaker (Left)* Front speaker (Right) Sub woofer** Front speaker (Left) MHC-MG510AV is the model used for illustration purpose. * MHC-MG510AV/MG310AV only ** MHC-MG510AV only continued 7
Parts Identification/Getting Started Getting Started Hooking up the system Perform the following procedure 1 to 6 to hook up your system using the supplied cords and accessories. Rear surround speaker (Right)* AM loop antenna FM antenna Center surround speaker* Rear surround speaker (Left)* Front speaker (Right) Sub woofer** Front speaker (Left) MHC-MG510AV is the model used for illustration purpose. * MHC-MG510AV/MG310AV only ** MHC-MG510AV only continued 7
Operating Instructions (primary manual)
Page 8
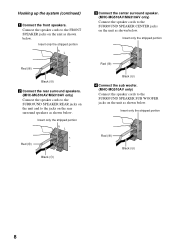
Hooking up the system (continued) 1 Connect the front speakers. Black (#) 2 Connect the rear surround speakers. (MHC-MG510AV/MG310AV only) Connect the speaker cords to the SURROUND SPEAKER REAR jacks on the unit and to the SURROUND SPEAKER SUB WOOFER jacks on the rear surround speakers as shown below . Insert only... . Black (#) 3 Connect the center surround speaker. (MHC-MG510AV/MG310AV only) Connect the speaker cords to the FRONT SPEAKER jacks on the unit as shown below . Connect the speaker cords to the SURROUND SPEAKER CENTER jacks on the unit as shown below ...
Hooking up the system (continued) 1 Connect the front speakers. Black (#) 2 Connect the rear surround speakers. (MHC-MG510AV/MG310AV only) Connect the speaker cords to the SURROUND SPEAKER REAR jacks on the unit and to the SURROUND SPEAKER SUB WOOFER jacks on the rear surround speakers as shown below . Insert only... . Black (#) 3 Connect the center surround speaker. (MHC-MG510AV/MG310AV only) Connect the speaker cords to the FRONT SPEAKER jacks on the unit as shown below . Connect the speaker cords to the SURROUND SPEAKER CENTER jacks on the unit as shown below ...
Operating Instructions (primary manual)
Page 9
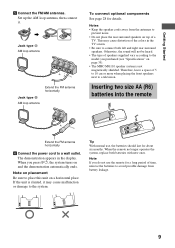
... antenna, then connect it may cause distortion of time, remove the batteries to avoid possible damage from the antennas to the system. Notes • Keep the speaker cords away from battery leakage. 9 The demonstration appears in the TV screen. • Be sure to connect both batteries ...sure to the model you press ?/1, the system turns on page 35). • The MHC-MG110 speaker system is slanted, it . Jack type A AM loop antenna AM FM 75Ω Extend the FM antenna horizontally Jack type B AM loop antenna To connect optional components See page 28 for details. When you...
... antenna, then connect it may cause distortion of time, remove the batteries to avoid possible damage from the antennas to the system. Notes • Keep the speaker cords away from battery leakage. 9 The demonstration appears in the TV screen. • Be sure to connect both batteries ...sure to the model you press ?/1, the system turns on page 35). • The MHC-MG110 speaker system is slanted, it . Jack type A AM loop antenna AM FM 75Ω Extend the FM antenna horizontally Jack type B AM loop antenna To connect optional components See page 28 for details. When you...
Operating Instructions (primary manual)
Page 10
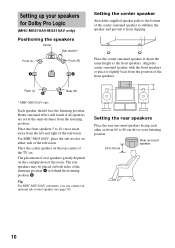
...60 to 90 cm above your speakers for Dolby Pro Logic (MHC-MG510AV/MG310AV only) Positioning the speakers Center Sub woofer* Front (L) Front (R) Setting the center speaker Attach the supplied speaker pads to the bottom of the center surround speaker to stabilize the speaker and prevent it slightly back ...right of the television. Tip For MHC-MG310AV customers, you can connect an optional sub woofer speaker (see page 30). Setting the rear speakers Place the rear surround speakers facing each other at about the same height as the front speakers. For MHC-MG510AV, place the sub woofer ...
...60 to 90 cm above your speakers for Dolby Pro Logic (MHC-MG510AV/MG310AV only) Positioning the speakers Center Sub woofer* Front (L) Front (R) Setting the center speaker Attach the supplied speaker pads to the bottom of the center surround speaker to stabilize the speaker and prevent it slightly back ...right of the television. Tip For MHC-MG310AV customers, you can connect an optional sub woofer speaker (see page 30). Setting the rear speakers Place the rear surround speakers facing each other at about the same height as the front speakers. For MHC-MG510AV, place the sub woofer ...
Operating Instructions (primary manual)
Page 11
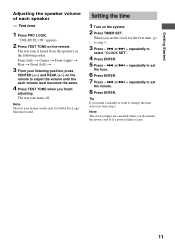
... Front (right) t Rear t Front (left) t ... 3 From your listening position, press CENTER (+/-) and REAR (+/-) on the remote to adjust the volume until the each speaker - or > + repeatedly to select "CLOCK SET". 4 Press ENTER. 5 Press - . The test tone is heard from step 1. Setting the time 1 Turn on the ... - . The test tone turns off. or > + repeatedly to set the minute. 8 Press ENTER. "DOLBY PL ON" appears. 2 Press TEST TONE on the system. 2 Press TIMER SET. Note The test tone feature works only for the first time, go to step 5. 3 Press - . Tip If you finish adjusting. or ...
... Front (right) t Rear t Front (left) t ... 3 From your listening position, press CENTER (+/-) and REAR (+/-) on the remote to adjust the volume until the each speaker - or > + repeatedly to select "CLOCK SET". 4 Press ENTER. 5 Press - . The test tone is heard from step 1. Setting the time 1 Turn on the ... - . The test tone turns off. or > + repeatedly to set the minute. 8 Press ENTER. "DOLBY PL ON" appears. 2 Press TEST TONE on the system. 2 Press TIMER SET. Note The test tone feature works only for the first time, go to step 5. 3 Press - . Tip If you finish adjusting. or ...

Operating Instructions (primary manual)
Page 25
... lights up on the display. Complete the setup and adjustments first (see page 10). Notes • You cannot use both the front and rear surround speakers. 25 Selecting the sound formation - Each time you press the button, the display changes as follows: SUR ON (SUR) y SUR OFF (off)... the same time. • When recording the sound, be canceled. Sound Adjustment Selecting the surround effect For MHC-MG510AV/MG310AV 1 Press SURROUND to turn the surround mode on or off. For MHC-MG110 Press SURROUND MODE (or SURROUND on the remote) repeatedly to turn on the surround mode. 2 Press SURROUND...
... lights up on the display. Complete the setup and adjustments first (see page 10). Notes • You cannot use both the front and rear surround speakers. 25 Selecting the sound formation - Each time you press the button, the display changes as follows: SUR ON (SUR) y SUR OFF (off)... the same time. • When recording the sound, be canceled. Sound Adjustment Selecting the surround effect For MHC-MG510AV/MG310AV 1 Press SURROUND to turn the surround mode on or off. For MHC-MG110 Press SURROUND MODE (or SURROUND on the remote) repeatedly to turn on the surround mode. 2 Press SURROUND...

Operating Instructions (primary manual)
Page 30
To sub woofer Connecting a DVD player (MHC-MG510AV/MG310AV only) To the front output To the center output of the DVD player of the DVD player To the rear output of the ... 5.1 channel surround sound if you connect a DVD player which does not have the 5.1 channel analog outputs. 30 Connecting a sub woofer speaker (MHC-MG310AV only) You can connect an optional sub woofer speaker. To listen to match the color of the connected DVD player, press 5.1CH/VIDEO (MD) (or 5.1CH on the remote) until...
To sub woofer Connecting a DVD player (MHC-MG510AV/MG310AV only) To the front output To the center output of the DVD player of the DVD player To the rear output of the ... 5.1 channel surround sound if you connect a DVD player which does not have the 5.1 channel analog outputs. 30 Connecting a sub woofer speaker (MHC-MG310AV only) You can connect an optional sub woofer speaker. To listen to match the color of the connected DVD player, press 5.1CH/VIDEO (MD) (or 5.1CH on the remote) until...

Operating Instructions (primary manual)
Page 32
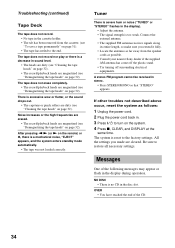
...tape longer than half a day. Inserting the vinyl portion of "Hooking up the system" on page 23. Troubleshooting If you have not turned on the system (See step 6 of the speaker cord will obstruct the speaker connections. • There is turned off. General The display starts flashing as soon... or VCR is very elastic. Precautions (continued) Before placing a cassette in the tape deck Take up any problem persist, consult your nearest Sony dealer. The clock setting/radio presetting/timer is canceled. • The power cord is disconnected or a power failure occurs longer than 90 minutes...
...tape longer than half a day. Inserting the vinyl portion of "Hooking up the system" on page 23. Troubleshooting If you have not turned on the system (See step 6 of the speaker cord will obstruct the speaker connections. • There is turned off. General The display starts flashing as soon... or VCR is very elastic. Precautions (continued) Before placing a cassette in the tape deck Take up any problem persist, consult your nearest Sony dealer. The clock setting/radio presetting/timer is canceled. • The power cord is disconnected or a power failure occurs longer than 90 minutes...
Operating Instructions (primary manual)
Page 33
...of a stable stand). • Try moving the speakers away from the center speaker (for MHC-MG110 or on the CD. The sound comes from the rear speakers (for MHC-MG510AV/MG310AV only). • The source being played back is no sound from the system, or placing them on page 28). Sound lacks...on the remote), switch the function to a track with the label side facing left and right volume. • Connect the speaker cords properly (see "Hooking up the optional A/V components" on separate stands. • When you press TIMER SELECT. • Set the timer correctly. • Set the ...
...of a stable stand). • Try moving the speakers away from the center speaker (for MHC-MG110 or on the CD. The sound comes from the rear speakers (for MHC-MG510AV/MG310AV only). • The source being played back is no sound from the system, or placing them on page 28). Sound lacks...on the remote), switch the function to a track with the label side facing left and right volume. • Connect the speaker cords properly (see "Hooking up the optional A/V components" on separate stands. • When you press TIMER SELECT. • Set the timer correctly. • Set the ...
Operating Instructions (primary manual)
Page 34
... are dirty (see "Cleaning the tape heads" on page 32). • The record/playback heads are magnetized (see "Demagnetizing the tape heads" on the system. 4 Press x, CLEAR, and DISPLAY at the same time. The tape does not record nor play or there is no CD in the disc slot. Tuner...Deck The tape does not record. • No tape in the cassette holder. • The tab has been removed from the speaker cords as possible. • Consult your nearest Sony dealer if the supplied AM antenna has come off the plastic stand. • Try turning off surrounding electrical equipments. If other ...
... are dirty (see "Cleaning the tape heads" on page 32). • The record/playback heads are magnetized (see "Demagnetizing the tape heads" on the system. 4 Press x, CLEAR, and DISPLAY at the same time. The tape does not record nor play or there is no CD in the disc slot. Tuner...Deck The tape does not record. • No tape in the cassette holder. • The tab has been removed from the speaker cords as possible. • Consult your nearest Sony dealer if the supplied AM antenna has come off the plastic stand. • Try turning off surrounding electrical equipments. If other ...
Operating Instructions (primary manual)
Page 35
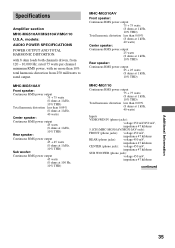
...% THD) Total harmonic distortion less than 0.09% (8 ohms at 1 kHz, 40 watts) Center speaker: Continuous RMS power output 25 watts (8 ohms at 1 kHz, 10% THD) Rear speaker: Continuous RMS power output 25 + 25 watts (8 ohms at 1 kHz, 10% THD) MHC-MG110 Continuous RMS power output 75 + 75 watts (8 ohms at 1 kHz, 10% THD) Total...
...% THD) Total harmonic distortion less than 0.09% (8 ohms at 1 kHz, 40 watts) Center speaker: Continuous RMS power output 25 watts (8 ohms at 1 kHz, 10% THD) Rear speaker: Continuous RMS power output 25 + 25 watts (8 ohms at 1 kHz, 10% THD) MHC-MG110 Continuous RMS power output 75 + 75 watts (8 ohms at 1 kHz, 10% THD) Total...
Operating Instructions (primary manual)
Page 36
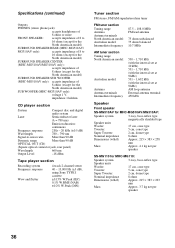
... connector jack, rear panel) Wavelength 660 nm Output Level -18 dBm Tape player section Recording system Frequency response Wow and flutter 4-track 2-channel stereo 40 - 13,000 Hz (±3 dB), using Sony TYPE I cassette ±0.15% W.Peak (IEC) 0.1% W.RMS (NAB) ±0.2% W....2 cm, dome type Nominal impedance Dimensions (w/h/d) 8 ohms Approx. 215 × 383 × 258 mm Mass Approx. 4.1 kg net per speaker SS-MG110 for MHC-MG110: Speaker system Speaker units 3-way, bass-reflex type Woofer: 17 cm, cone type Tweeter: Super Tweeter: 5 cm, cone type 2 cm, dome type Nominal ...
... connector jack, rear panel) Wavelength 660 nm Output Level -18 dBm Tape player section Recording system Frequency response Wow and flutter 4-track 2-channel stereo 40 - 13,000 Hz (±3 dB), using Sony TYPE I cassette ±0.15% W.Peak (IEC) 0.1% W.RMS (NAB) ±0.2% W....2 cm, dome type Nominal impedance Dimensions (w/h/d) 8 ohms Approx. 215 × 383 × 258 mm Mass Approx. 4.1 kg net per speaker SS-MG110 for MHC-MG110: Speaker system Speaker units 3-way, bass-reflex type Woofer: 17 cm, cone type Tweeter: Super Tweeter: 5 cm, cone type 2 cm, dome type Nominal ...
Operating Instructions (primary manual)
Page 37
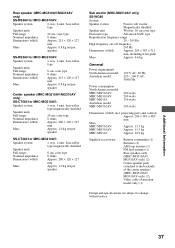
... 215 × 120 × 127 mm Mass Approx. 0.8 kg net per speaker Center speaker (MHC-MG510AV/MG310AV only) SS-CT560 for MHC-MG510AV: Speaker system 1-way, 1-unit, bass-reflex Speaker units type magnetically shielded Full-range: 10 cm, cone type Nominal impedance Dimensions ...MHC-MG510AV: Approx. 11.5 kg MHC-MG310AV: Approx. 11.3 kg MHC-MG110: Approx. 10.9 kg Supplied accessories: Remote commander (1) Batteries (2) AM loop antenna (1) FM lead antenna (1) Rear speaker cords (MHC-MG510AV/ MG310AV only) (2) Center speaker pads (attached to the backside of the center speaker) (MHC...
... 215 × 120 × 127 mm Mass Approx. 0.8 kg net per speaker Center speaker (MHC-MG510AV/MG310AV only) SS-CT560 for MHC-MG510AV: Speaker system 1-way, 1-unit, bass-reflex Speaker units type magnetically shielded Full-range: 10 cm, cone type Nominal impedance Dimensions ...MHC-MG510AV: Approx. 11.5 kg MHC-MG310AV: Approx. 11.3 kg MHC-MG110: Approx. 10.9 kg Supplied accessories: Remote commander (1) Batteries (2) AM loop antenna (1) FM lead antenna (1) Rear speaker cords (MHC-MG510AV/ MG310AV only) (2) Center speaker pads (attached to the backside of the center speaker) (MHC...


