MHCGX9900 Instructions (main component system)
Page 5
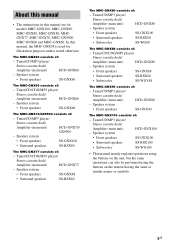
...) HCD-GNX88 - Speaker system • Front speakers SS-GNX90 The MHC-GNX100 consists of : - Tuner/CD/MP3 player/ Stereo cassette deck/ Amplifier (main unit) HCD-GNX100 - About this manual • The instructions in this manual, the MHC-GNX88 is used for models MHC-GNX100, MHC-GNX90, MHC-GNX88, MHC-GNX80, MHCGNX77, MHC-GNX70, MHC-GX9900, MHC-GNX66 and MHC-GNX60. Tuner/CD...
...) HCD-GNX88 - Speaker system • Front speakers SS-GNX90 The MHC-GNX100 consists of : - Tuner/CD/MP3 player/ Stereo cassette deck/ Amplifier (main unit) HCD-GNX100 - About this manual • The instructions in this manual, the MHC-GNX88 is used for models MHC-GNX100, MHC-GNX90, MHC-GNX88, MHC-GNX80, MHCGNX77, MHC-GNX70, MHC-GX9900, MHC-GNX66 and MHC-GNX60. Tuner/CD...
MHCGX9900 Instructions (main component system)
Page 11
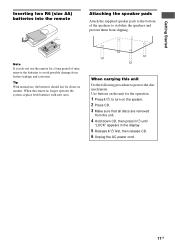
...this unit Do the following procedure to stabilize the speakers and prevent them from slipping. When the remote no longer operates the system, replace both batteries with new ones. Tip With normal use the remote for about six months. Note If you do not use , the batteries should last for a...the disc mechanism. Getting Started Inserting two R6 (size AA) batteries into the remote e E E e Attaching the speaker pads Attach the supplied speaker pads to the bottom of time, remove the batteries to turn on the system. 2 Press CD. 3 Make sure that all discs are removed from battery leakage...
...this unit Do the following procedure to stabilize the speakers and prevent them from slipping. When the remote no longer operates the system, replace both batteries with new ones. Tip With normal use the remote for about six months. Note If you do not use , the batteries should last for a...the disc mechanism. Getting Started Inserting two R6 (size AA) batteries into the remote e E E e Attaching the speaker pads Attach the supplied speaker pads to the bottom of time, remove the batteries to turn on the system. 2 Press CD. 3 Make sure that all discs are removed from battery leakage...

MHCGX9900 Instructions (main component system)
Page 13
or >+ repeatedly to set the minute. 6 Press ENTER. flashes in the display. 3 Press -. or >+ repeatedly to turn on the system. 2 Press CLOCK/TIMER SET. Then, the hour indication flashes in the display. 2 Press -. "SET" appears in Power Saving Mode (page 36). 13GB Notes • The ... flashes in the display. The clock starts functioning. The minute indication flashes in the display. 5 Press -. Getting Started Setting the clock Use buttons on the remote for the operation. 1 Press ?/1 to select "CLOCK SET?", then press ENTER.
or >+ repeatedly to set the minute. 6 Press ENTER. flashes in the display. 3 Press -. or >+ repeatedly to turn on the system. 2 Press CLOCK/TIMER SET. Then, the hour indication flashes in the display. 2 Press -. "SET" appears in Power Saving Mode (page 36). 13GB Notes • The ... flashes in the display. The clock starts functioning. The minute indication flashes in the display. 5 Press -. Getting Started Setting the clock Use buttons on the remote for the operation. 1 Press ?/1 to select "CLOCK SET?", then press ENTER.

MHCGX9900 Instructions (main component system)
Page 15
...DISCS SHUF (Shuffle Play) 1DISC SHUF (Shuffle Play) ALBM SHUF (Shuffle Play) PROGRAM (Program Play) To play mode. Playback When playing a CDG (MHC-GNX88/GNX77/ GNX66 only) Disc tray number Track number Elapsed playing time Disc playing Disc presence indicator indicator 1 Press CD. 2 When playback is stopped,... press PLAY MODE on the disc you want lights up in random order. The tracks on the remote repeatedly until the indication of the play mode. For discs other than discs with MP3 audio tracks, "ALBM" play mode performs the same operation...
...DISCS SHUF (Shuffle Play) 1DISC SHUF (Shuffle Play) ALBM SHUF (Shuffle Play) PROGRAM (Program Play) To play mode. Playback When playing a CDG (MHC-GNX88/GNX77/ GNX66 only) Disc tray number Track number Elapsed playing time Disc playing Disc presence indicator indicator 1 Press CD. 2 When playback is stopped,... press PLAY MODE on the disc you want lights up in random order. The tracks on the remote repeatedly until the indication of the play mode. For discs other than discs with MP3 audio tracks, "ALBM" play mode performs the same operation...
MHCGX9900 Instructions (main component system)
Page 16
...remote repeatedly). Switch to a track other than MP3 audio tracks, the system cannot recognize the track properly and will generate a random noise which could damage your speaker. • This system can be recognize by this system is buttons or EX-CHANGE/DISC stopped SKIP (or DISC SKIP on the MP3 audio tracks. 2) (MHC... from "TUNER" function, you may require a longer time to select "CD". • (MHC-GNX88/GNX77/GNX66 only) When you press CD while the system is turned off, the system turns on automatically and "CD" is selected as cannot play back MP3 audio tracks in complex ...
...remote repeatedly). Switch to a track other than MP3 audio tracks, the system cannot recognize the track properly and will generate a random noise which could damage your speaker. • This system can be recognize by this system is buttons or EX-CHANGE/DISC stopped SKIP (or DISC SKIP on the MP3 audio tracks. 2) (MHC... from "TUNER" function, you may require a longer time to select "CD". • (MHC-GNX88/GNX77/GNX66 only) When you press CD while the system is turned off, the system turns on automatically and "CD" is selected as cannot play back MP3 audio tracks in complex ...
MHCGX9900 Instructions (main component system)
Page 17
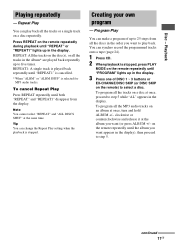
...until "REPEAT" or "REPEAT1" lights up in the display. clockwise or counterclockwise and release it at the same time. continued 17GB Press REPEAT on the remote repeatedly until "PROGRAM" lights up to step 5 while "AL" appears in the order you want (or press ALBUM +/- Program Play You can synchro... a tape (page 24). 1 Press CD. 2 When playback is stopped, press PLAY MODE on the remote repeatedly until the album you want to play back all the tracks or a single track on the remote) to step 5. REPEAT: All the tracks on the disc(s), or all the discs in the display. ...
...until "REPEAT" or "REPEAT1" lights up in the display. clockwise or counterclockwise and release it at the same time. continued 17GB Press REPEAT on the remote repeatedly until "PROGRAM" lights up to step 5 while "AL" appears in the order you want (or press ALBUM +/- Program Play You can synchro... a tape (page 24). 1 Press CD. 2 When playback is stopped, press PLAY MODE on the remote repeatedly until the album you want to play back all the tracks or a single track on the remote) to step 5. REPEAT: All the tracks on the disc(s), or all the discs in the display. ...
MHCGX9900 Instructions (main component system)
Page 18
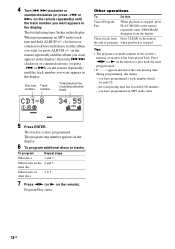
... until the track number you want appears in the display), then turn and hold ALBUM +/- or >+ on the remote). you want appears in the system's memory even after it at the album you have programmed a track number which exceeds 20. - 4 Turn . > clockwise or counterclockwise (or press... a track from the display. To program Repeat steps Other discs 3 and 5 Other tracks on the 4 and 5 same disc Other tracks on the remote repeatedly until the track number you want (or press ALBUM +/- Tips • The program you have programmed an MP3 audio track. 5 Press ENTER. you...
... until the track number you want appears in the display), then turn and hold ALBUM +/- or >+ on the remote). you want appears in the system's memory even after it at the album you have programmed a track number which exceeds 20. - 4 Turn . > clockwise or counterclockwise (or press... a track from the display. To program Repeat steps Other discs 3 and 5 Other tracks on the 4 and 5 same disc Other tracks on the remote repeatedly until the track number you want (or press ALBUM +/- Tips • The program you have programmed an MP3 audio track. 5 Press ENTER. you...
MHCGX9900 Instructions (main component system)
Page 19
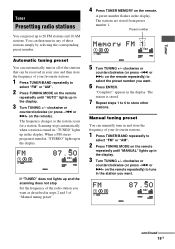
... MODE on the remote repeatedly until "MANUAL" lights up in the display. 3 Turn TUNING +/- Manual tuning preset You can manually tune in and store the frequency of your favourite stations. 1 Press TUNER/BAND repeatedly to select the preset number you want as the system scans for a ... ENTER. "Complete!" The station is tuned in, "STEREO" lights up to store other stations. clockwise or counterclockwise (or press -. or >+ on the remote). Preset number 5 Turn TUNING +/- Tuner Tuner Presetting radio stations You can preset up in steps 2 and 3 of "Manual tuning preset". 4 Press TUNER...
... MODE on the remote repeatedly until "MANUAL" lights up in the display. 3 Turn TUNING +/- Manual tuning preset You can manually tune in and store the frequency of your favourite stations. 1 Press TUNER/BAND repeatedly to select the preset number you want as the system scans for a ... ENTER. "Complete!" The station is tuned in, "STEREO" lights up to store other stations. clockwise or counterclockwise (or press -. or >+ on the remote). Preset number 5 Turn TUNING +/- Tuner Tuner Presetting radio stations You can preset up in steps 2 and 3 of "Manual tuning preset". 4 Press TUNER...
MHCGX9900 Instructions (main component system)
Page 20
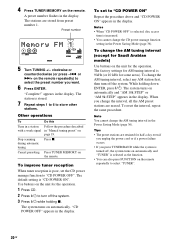
... ON" Repeat the procedure above and "CD POWER ON" appears in the Power Saving Mode (page 36). or >+ on the remote. appears in the display. The system turns on automatically and "AM 10k STEP" or "AM 9k STEP" appears in the display. To change the interval, all the...some areas). To set the CD power manage function to store other stations. Tips • The preset stations are stored from preset number 1. The system turns on automatically. Stop scanning during automatic tuning Press x. The default setting is 9 kHz (or 10 kHz for the operation. While holding x....
... ON" Repeat the procedure above and "CD POWER ON" appears in the Power Saving Mode (page 36). or >+ on the remote. appears in the display. The system turns on automatically and "AM 10k STEP" or "AM 9k STEP" appears in the display. To change the interval, all the...some areas). To set the CD power manage function to store other stations. Tips • The preset stations are stored from preset number 1. The system turns on automatically. Stop scanning during automatic tuning Press x. The default setting is 9 kHz (or 10 kHz for the operation. While holding x....
MHCGX9900 Instructions (main component system)
Page 21
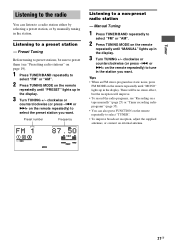
...see "Presetting radio stations" on page 19). 1 Press TUNER/BAND repeatedly to select "FM" or "AM". 2 Press TUNING MODE on the remote repeatedly until "MANUAL" lights up in the display. 3 Turn TUNING +/- clockwise or counterclockwise (or press -. Manual Tuning 1 Press TUNER/BAND ...repeatedly to select "FM" or "AM". 2 Press TUNING MODE on the remote repeatedly until "MONO" lights up in the station. Preset number Frequency Listening to a preset station - Preset Tuning Before tuning to preset stations,...
...see "Presetting radio stations" on page 19). 1 Press TUNER/BAND repeatedly to select "FM" or "AM". 2 Press TUNING MODE on the remote repeatedly until "MANUAL" lights up in the display. 3 Turn TUNING +/- clockwise or counterclockwise (or press -. Manual Tuning 1 Press TUNER/BAND ...repeatedly to select "FM" or "AM". 2 Press TUNING MODE on the remote repeatedly until "MONO" lights up in the station. Preset number Frequency Listening to a preset station - Preset Tuning Before tuning to preset stations,...

MHCGX9900 Instructions (main component system)
Page 22
... side) *3 You can use TYPE I (normal) tape. 1 Load a tape. 2 Press TAPE A/B (or TAPE on the remote) again to close the deck. Playback Loading a tape 1 Push b (Deck A) or B (Deck B) on the remote). Press nN (or N on the remote) repeatedly until "TAPE A" or "TAPE B" appears in the display. 3 Press DIRECTION repeatedly to select "g" to play...
... side) *3 You can use TYPE I (normal) tape. 1 Load a tape. 2 Press TAPE A/B (or TAPE on the remote) again to close the deck. Playback Loading a tape 1 Push b (Deck A) or B (Deck B) on the remote). Press nN (or N on the remote) repeatedly until "TAPE A" or "TAPE B" appears in the display. 3 Press DIRECTION repeatedly to select "g" to play...

MHCGX9900 Instructions (main component system)
Page 23
... "TAPE B". 23GB Push b (Deck A) or B (Deck B) when playback is no tape in the display. • If you press TAPE A/B (or TAPE on the remote) while the system is turned off, the system turns on automatically and "TAPE A" or "TAPE B" is selected as the function. • If you press nN (or N on the... remote) during "TAPE A" function and there is stopped. Note Do not push b (Deck A) or B (Deck B) while playing a tape, otherwise the tape could be damaged. ...
... "TAPE B". 23GB Push b (Deck A) or B (Deck B) when playback is no tape in the display. • If you press TAPE A/B (or TAPE on the remote) while the system is turned off, the system turns on automatically and "TAPE A" or "TAPE B" is selected as the function. • If you press nN (or N on the... remote) during "TAPE A" function and there is stopped. Note Do not push b (Deck A) or B (Deck B) while playing a tape, otherwise the tape could be damaged. ...
MHCGX9900 Instructions (main component system)
Page 24
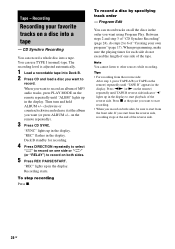
...other sources while recording. To stop recording Press x. If you start from the reverse side: After step 1, press TAPE A/B (or TAPE on the remote repeatedly). 3 Press CD SYNC. Tape - You can record a whole disc into a tape - Then turn and hold ALBUM +/- clockwise or counterclockwise ... side indicator "b" lights up in the display. Press x at the point you record on the remote repeatedly until "TAPE B" appears in the display. When you want using Program Play. on the remote) repeatedly until "ALBM" lights up in the display to 6 of the reverse side. Between steps...
...other sources while recording. To stop recording Press x. If you start from the reverse side: After step 1, press TAPE A/B (or TAPE on the remote repeatedly). 3 Press CD SYNC. Tape - You can record a whole disc into a tape - Then turn and hold ALBUM +/- clockwise or counterclockwise ... side indicator "b" lights up in the display. Press x at the point you record on the remote repeatedly until "TAPE B" appears in the display. When you want using Program Play. on the remote) repeatedly until "ALBM" lights up in the display to 6 of the reverse side. Between steps...
MHCGX9900 Instructions (main component system)
Page 25
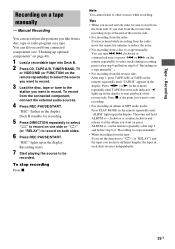
To record from connected components (see "Hooking up optional components" on page 40). 1 Load a recordable tape into Deck B. 2 Press CD, TAPE A/B, TUNER/BAND, TV or VIDEO/MD (or FUNCTION on the remote repeatedly until "ALBM" lights up in the display. Press x at the album you want (or press ALBUM ...an album of "Recording to a tape manually: You can record just the portions you record on a tape. You can also record from the connected component, connect the external audio sources. 4 Press REC PAUSE/START. Tips • When you like from a disc, tape or radio program on both...
To record from connected components (see "Hooking up optional components" on page 40). 1 Load a recordable tape into Deck B. 2 Press CD, TAPE A/B, TUNER/BAND, TV or VIDEO/MD (or FUNCTION on the remote repeatedly until "ALBM" lights up in the display. Press x at the album you want (or press ALBUM ...an album of "Recording to a tape manually: You can record just the portions you record on a tape. You can also record from the connected component, connect the external audio sources. 4 Press REC PAUSE/START. Tips • When you like from a disc, tape or radio program on both...

MHCGX9900 Instructions (main component system)
Page 26
... ON" is selected, "GROOVE" lights up in the display. 26GB Selecting the preset effect Turn OPERATION DIAL clockwise or counterclockwise (or press EQ on the remote repeatedly) to select the preset effect you press the button, the display changes cyclically as follows: GROOVE ON* t GROOVE OFF * The volume switches to power...
... ON" is selected, "GROOVE" lights up in the display. 26GB Selecting the preset effect Turn OPERATION DIAL clockwise or counterclockwise (or press EQ on the remote repeatedly) to select the preset effect you press the button, the display changes cyclically as follows: GROOVE ON* t GROOVE OFF * The volume switches to power...

MHCGX9900 Instructions (main component system)
Page 29
... Press SUBWOOFER ON/OFF on . 2 Turn SUBWOOFER LEVEL to low bass frequency sound. Tips • (MHC-GNX100 only) You can turn off the subwoofer Press SUBWOOFER ON/OFF on the remote), the volume for all speakers will be able to listen to adjust the level. The flashing effect is... repeatedly until the indicator lights up. To turn MASTER VOLUME (or press VOLUME +/- on the remote) to adjust the volume of the subwoofer to the front speakers. You will change. • (MHC-GNX100 only) When you select "SPEAKERS B", the subwoofer is turned off periodically. Hold down SOUND...
... Press SUBWOOFER ON/OFF on . 2 Turn SUBWOOFER LEVEL to low bass frequency sound. Tips • (MHC-GNX100 only) You can turn off the subwoofer Press SUBWOOFER ON/OFF on the remote), the volume for all speakers will be able to listen to adjust the level. The flashing effect is... repeatedly until the indicator lights up. To turn MASTER VOLUME (or press VOLUME +/- on the remote) to adjust the volume of the subwoofer to the front speakers. You will change. • (MHC-GNX100 only) When you select "SPEAKERS B", the subwoofer is turned off periodically. Hold down SOUND...
MHCGX9900 Instructions (main component system)
Page 33
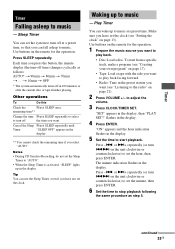
... music. The minute indication flashes in 100 minutes or after the current disc or tape finishes playing. Press -. t 10min t OFF * The system automatically turns off time) changes cyclically as step 5. Make sure you want to turn -off in the display. flashes in the display. ** ... the hour indication flashes in the display. or >+ repeatedly (or turn off at a preset time. or >+ repeatedly (or turn .> on the remote for the operation. Timer Timer Falling asleep to play back facing forward. • Radio: Tune in the display, then "PLAY SET?" Notes •...
... music. The minute indication flashes in 100 minutes or after the current disc or tape finishes playing. Press -. t 10min t OFF * The system automatically turns off time) changes cyclically as step 5. Make sure you want to turn -off in the display. flashes in the display. ** ... the hour indication flashes in the display. or >+ repeatedly (or turn off at a preset time. or >+ repeatedly (or turn .> on the remote for the operation. Timer Timer Falling asleep to play back facing forward. • Radio: Tune in the display, then "PLAY SET?" Notes •...
MHCGX9900 Instructions (main component system)
Page 35
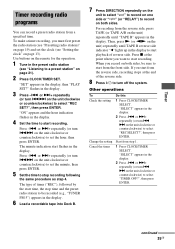
...) to a preset station" on one side or "j" (or "RELAY") to set the hour, then press ENTER. or >+ repeatedly (or turn off the system. Timer Timer recording radio programs You can record a preset radio station from step 1. 1 Press CLOCK/TIMER SELECT. Use buttons on the unit) repeatedly until "... 8 Press ?/1 to start from the front side. "ON" appears and the hour indication flashes in the display. Then, press N (or nN on the remote for the operation. 1 Tune in the preset radio station (see "Setting the clock" on the unit) repeatedly until TAPE B reverse side indicator "b" lights up...
...) to a preset station" on one side or "j" (or "RELAY") to set the hour, then press ENTER. or >+ repeatedly (or turn off the system. Timer Timer recording radio programs You can record a preset radio station from step 1. 1 Press CLOCK/TIMER SELECT. Use buttons on the unit) repeatedly until "... 8 Press ?/1 to start from the front side. "ON" appears and the hour indication flashes in the display. Then, press N (or nN on the remote for the operation. 1 Tune in the preset radio station (see "Setting the clock" on the unit) repeatedly until TAPE B reverse side indicator "b" lights up...
MHCGX9900 Instructions (main component system)
Page 38
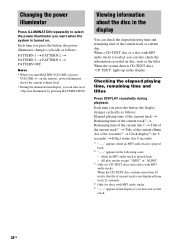
...time of the current track or current disc. Changing the power illuminator Press ILLUMINATION repeatedly to select the power illuminator you turn on the remote), power illuminator shows the current volume level. • During the demonstration display, you press the button, the display changes cyclically as ... time you press the button, the power illuminator changes cyclically as the titles. Viewing information about the disc in the display. When the system detects CD-TEXT discs, "CD TEXT" lights up in the display You can also check the information recorded on . while an MP3 audio...
...time of the current track or current disc. Changing the power illuminator Press ILLUMINATION repeatedly to select the power illuminator you turn on the remote), power illuminator shows the current volume level. • During the demonstration display, you press the button, the display changes cyclically as ... time you press the button, the power illuminator changes cyclically as the titles. Viewing information about the disc in the display. When the system detects CD-TEXT discs, "CD TEXT" lights up in the display You can also check the information recorded on . while an MP3 audio...
MHCGX9900 Instructions (main component system)
Page 41
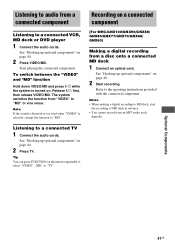
...a digital recording to select "VIDEO", "MD" or "TV". The system switches the function from an MP3 audio track digitally. See "Hooking up optional components" on page 40. 2 Press TV. Optional Components 41GB Listening to "MD" or vice versa. Refer to "MD". ...remote repeatedly to MD deck, start the recording of MD deck in advance. • You cannot record from "VIDEO" to a connected TV 1 Connect the audio cords. Listening to audio from a disc onto a connected MD deck 1 Connect an optical cord. See "Hooking up optional components" on a connected component (For MHC...
...a digital recording to select "VIDEO", "MD" or "TV". The system switches the function from an MP3 audio track digitally. See "Hooking up optional components" on page 40. 2 Press TV. Optional Components 41GB Listening to "MD" or vice versa. Refer to "MD". ...remote repeatedly to MD deck, start the recording of MD deck in advance. • You cannot record from "VIDEO" to a connected TV 1 Connect the audio cords. Listening to audio from a disc onto a connected MD deck 1 Connect an optical cord. See "Hooking up optional components" on a connected component (For MHC...


