MHCGX9900 Instructions (main component system)
Page 2
... protection against harmful interference in a particular installation. This symbol is provided to call CATV system installer's attention to Article 820-40 of the NEC that provides guidelines for energy efficiency....maintenance (servicing) instructions in particular, specifies that may cause harmful interference to operate this manual could void your authority to radio communications. To avoid electrical shock, do not open the... As an ENERGY STAR® partner, Sony Corporation has determined that any changes or modification not expressly approved in accordance with the limits...
... protection against harmful interference in a particular installation. This symbol is provided to call CATV system installer's attention to Article 820-40 of the NEC that provides guidelines for energy efficiency....maintenance (servicing) instructions in particular, specifies that may cause harmful interference to operate this manual could void your authority to radio communications. To avoid electrical shock, do not open the... As an ENERGY STAR® partner, Sony Corporation has determined that any changes or modification not expressly approved in accordance with the limits...
MHCGX9900 Instructions (main component system)
Page 3
... Playing a tape 22 Tape - Manual Recording Sound Adjustment Adjusting the sound 26 Selecting the preset effect 26 Adjusting the graphic equalizer or selecting the surround effect .......... 27 Selecting the MP3 Booster effect ......... 28 Selecting the sound system 28 (MHC-GNX88/GNX80/GNX77/ GNX70/GX9900 only) Using the subwoofer 29 (MHC-GNX100/GNX88/GNX80 only) Flashing...
... Playing a tape 22 Tape - Manual Recording Sound Adjustment Adjusting the sound 26 Selecting the preset effect 26 Adjusting the graphic equalizer or selecting the surround effect .......... 27 Selecting the MP3 Booster effect ......... 28 Selecting the sound system 28 (MHC-GNX88/GNX80/GNX77/ GNX70/GX9900 only) Using the subwoofer 29 (MHC-GNX100/GNX88/GNX80 only) Flashing...
MHCGX9900 Instructions (main component system)
Page 5
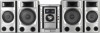
...; Surround speakers SS-RSX80 The MHC-GNX80 consists of : - About this manual • The instructions in this manual, the MHC-GNX88 is used for models MHC-GNX100, MHC-GNX90, MHC-GNX88, MHC-GNX80, MHCGNX77, MHC-GNX70, MHC-GX9900, MHC-GNX66 and MHC-GNX60. Speaker system • Front speakers SS-GNX90 The MHC-GNX100 consists of : - The MHC-GNX60 consists of : - Speaker system • Front speakers SS-GNX60...
...; Surround speakers SS-RSX80 The MHC-GNX80 consists of : - About this manual • The instructions in this manual, the MHC-GNX88 is used for models MHC-GNX100, MHC-GNX90, MHC-GNX88, MHC-GNX80, MHCGNX77, MHC-GNX70, MHC-GX9900, MHC-GNX66 and MHC-GNX60. Speaker system • Front speakers SS-GNX90 The MHC-GNX100 consists of : - The MHC-GNX60 consists of : - Speaker system • Front speakers SS-GNX60...
MHCGX9900 Instructions (main component system)
Page 19
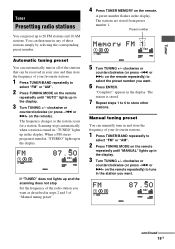
The frequency changes as described in steps 2 and 3 of "Manual tuning preset". 4 Press TUNER MEMORY on the remote repeatedly) to select the preset number you want as the system scans for a station. Preset number 5 Turn TUNING +/- "Complete!" continued 19GB You can preset up and ...display. 3 Turn TUNING +/- Scanning stops automatically when a station is tuned in. "TUNED" lights up in the display. 3 Turn TUNING +/- Manual tuning preset You can be received in your area and then store the frequency of your favourite stations. 1 Press TUNER/BAND repeatedly to select "...
The frequency changes as described in steps 2 and 3 of "Manual tuning preset". 4 Press TUNER MEMORY on the remote repeatedly) to select the preset number you want as the system scans for a station. Preset number 5 Turn TUNING +/- "Complete!" continued 19GB You can preset up and ...display. 3 Turn TUNING +/- Scanning stops automatically when a station is tuned in. "TUNED" lights up in the display. 3 Turn TUNING +/- Manual tuning preset You can be received in your area and then store the frequency of your favourite stations. 1 Press TUNER/BAND repeatedly to select "...
MHCGX9900 Instructions (main component system)
Page 20
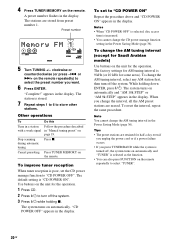
... ON". Cancel presetting Press TUNER MEMORY on page 19. Use buttons on automatically and "AM 10k STEP" or "AM 9k STEP" appears in "Manual tuning preset" on the remote. The factory settings for the operation. "Complete!" Stop scanning during automatic tuning Press x. To set the CD power ...time is poor, set to select "TUNER". 20GB To change the AM tuning interval, select any AM station first, then turn off the system. Note You cannot change the CD power manage function setting in the display. 4 Press TUNER MEMORY on automatically. The stations are retained for ...
... ON". Cancel presetting Press TUNER MEMORY on page 19. Use buttons on automatically and "AM 10k STEP" or "AM 9k STEP" appears in "Manual tuning preset" on the remote. The factory settings for the operation. "Complete!" Stop scanning during automatic tuning Press x. To set the CD power ...time is poor, set to select "TUNER". 20GB To change the AM tuning interval, select any AM station first, then turn off the system. Note You cannot change the CD power manage function setting in the display. 4 Press TUNER MEMORY on automatically. The stations are retained for ...
MHCGX9900 Instructions (main component system)
Page 21
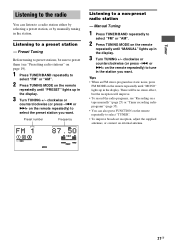
...see "Presetting radio stations" on page 19). 1 Press TUNER/BAND repeatedly to select "FM" or "AM". 2 Press TUNING MODE on a tape manually" (page 25) or "Timer recording radio programs" (page 35). • You can listen to a radio station either by selecting a preset station, or by... manually tuning in the display. 3 Turn TUNING +/- Manual Tuning 1 Press TUNER/BAND repeatedly to select "FM" or "AM". 2 Press TUNING MODE on the remote repeatedly) to preset them (...
...see "Presetting radio stations" on page 19). 1 Press TUNER/BAND repeatedly to select "FM" or "AM". 2 Press TUNING MODE on a tape manually" (page 25) or "Timer recording radio programs" (page 35). • You can listen to a radio station either by selecting a preset station, or by... manually tuning in the display. 3 Turn TUNING +/- Manual Tuning 1 Press TUNER/BAND repeatedly to select "FM" or "AM". 2 Press TUNING MODE on the remote repeatedly) to preset them (...
MHCGX9900 Instructions (main component system)
Page 25
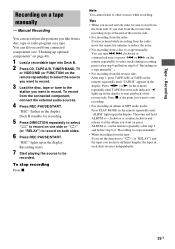
...on one side or "j" (or "RELAY") to start recording. • For recording an album of "Recording on a tape manually" ). • For recording from the connected component, connect the external audio sources. 4 Press REC PAUSE/START. "REC" lights up in the display. Note You cannot listen... x at the end of "Recording to "j" (or "RELAY") and the tapes you set the direction to a tape manually". • When recording from connected components (see "Hooking up optional components" on page 40). 1 Load a recordable tape into Deck B. 2 Press CD, TAPE A/B, TUNER/BAND, TV or ...
...on one side or "j" (or "RELAY") to start recording. • For recording an album of "Recording on a tape manually" ). • For recording from the connected component, connect the external audio sources. 4 Press REC PAUSE/START. "REC" lights up in the display. Note You cannot listen... x at the end of "Recording to "j" (or "RELAY") and the tapes you set the direction to a tape manually". • When recording from connected components (see "Hooking up optional components" on page 40). 1 Load a recordable tape into Deck B. 2 Press CD, TAPE A/B, TUNER/BAND, TV or ...
MHCGX9900 Instructions (main component system)
Page 30
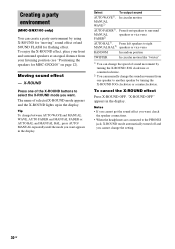
... one speaker to another speaker by using X-ROUND for "moving" sound effect or/and SOUND FLASH for MHC-GNX100" on page 12). Creating a party environment (MHC-GNX100 only) You can manually change the sound movement from your front and surround speakers at an equal distance from one of selected ...effect - To cancel the X-ROUND effect Press X-ROUND OFF. Tip To change between AUTO WAVE and MANUAL WAVE, AUTO FADER and MANUAL FADER or AUTO BAL and MANUAL BAL, press AUTO/ MANUAL repeatedly until the mode you want appears in the display. To enjoy the X-ROUND effect, place your ...
... one speaker to another speaker by using X-ROUND for "moving" sound effect or/and SOUND FLASH for MHC-GNX100" on page 12). Creating a party environment (MHC-GNX100 only) You can manually change the sound movement from your front and surround speakers at an equal distance from one of selected ...effect - To cancel the X-ROUND effect Press X-ROUND OFF. Tip To change between AUTO WAVE and MANUAL WAVE, AUTO FADER and MANUAL FADER or AUTO BAL and MANUAL BAL, press AUTO/ MANUAL repeatedly until the mode you want appears in the display. To enjoy the X-ROUND effect, place your ...

MHCGX9900 Instructions (main component system)
Page 32
...and adjust the microphone volume by selecting the "CD" function and not playing a disc. • When high level sound signals are input, the system automatically adjusts the recording level to prevent distortion of the microphone. • If you want to record your TV and select the video input. ...the recorded sound signal (Auto Level Control function). 32GB Adjust the microphone Turn ECHO LEVEL to "MIN". * MHC-GNX88/GNX77/GNX66 only. To record the sound, see "Recording on a tape manually" on your voice through the microphone only, you can sing along with any stereo CD or tape. You ...
...and adjust the microphone volume by selecting the "CD" function and not playing a disc. • When high level sound signals are input, the system automatically adjusts the recording level to prevent distortion of the microphone. • If you want to record your TV and select the video input. ...the recorded sound signal (Auto Level Control function). 32GB Adjust the microphone Turn ECHO LEVEL to "MIN". * MHC-GNX88/GNX77/GNX66 only. To record the sound, see "Recording on a tape manually" on your voice through the microphone only, you can sing along with any stereo CD or tape. You ...

