Operating Instructions
Page 3
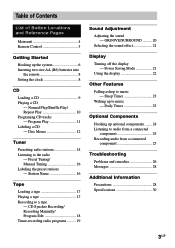
... Name 16 Tape Loading a tape 17 Playing a tape 17 Recording to the radio - CD Synchro Recording/ Recording Manually/ Program Edit 18 Timer-recording radio programs ......... 19 Sound Adjustment Adjusting the sound - GROOVE/SURROUND .......... 20 ...Preset Tuning/ Manual Tuning 16 Labeling the preset stations - Daily Timer 23 Optional Components Hooking up the system 6 Inserting two size AA (R6) batteries into the remote 8 Setting the clock 8 CD Loading a CD 9 Playing a CD - Power Saving Mode 21 Using the display 22 Other Features Falling asleep to music - Table of ...
... Name 16 Tape Loading a tape 17 Playing a tape 17 Recording to the radio - CD Synchro Recording/ Recording Manually/ Program Edit 18 Timer-recording radio programs ......... 19 Sound Adjustment Adjusting the sound - GROOVE/SURROUND .......... 20 ...Preset Tuning/ Manual Tuning 16 Labeling the preset stations - Daily Timer 23 Optional Components Hooking up the system 6 Inserting two size AA (R6) batteries into the remote 8 Setting the clock 8 CD Loading a CD 9 Playing a CD - Power Saving Mode 21 Using the display 22 Other Features Falling asleep to music - Table of ...
Operating Instructions
Page 4
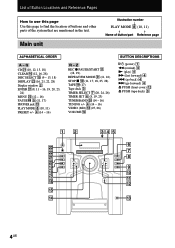
qa qs qd 4US Main unit Illustration number r PLAY MODE 8 (10, 11) R R Name of the system that are mentioned in the text. Z REC z PAUSE/START qa (18, 19) REPEAT/FM MODE 9 (11, 16) STOP x 0 (11, 17, 18, 25, 28) TAPE ql (...) 4 N (play) 4 M (fast forward) 4 . (go back) 4 > (go forward) 4 Z PUSH (front cover) qs Z PUSH (tape deck) 3 12 wd ws wa w; ql qk qj qh qg qf 345 6 7 8 9 q; Q CD wa (10, 12, 13, 18) CLEAR qh (12, 16, 28) DISC SELECT qg (9 - 13, 18) DISPLAY wd (16, 21, 22, 28) Display window 2 ENTER qj...
qa qs qd 4US Main unit Illustration number r PLAY MODE 8 (10, 11) R R Name of the system that are mentioned in the text. Z REC z PAUSE/START qa (18, 19) REPEAT/FM MODE 9 (11, 16) STOP x 0 (11, 17, 18, 25, 28) TAPE ql (...) 4 N (play) 4 M (fast forward) 4 . (go back) 4 > (go forward) 4 Z PUSH (front cover) qs Z PUSH (tape deck) 3 12 wd ws wa w; ql qk qj qh qg qf 345 6 7 8 9 q; Q CD wa (10, 12, 13, 18) CLEAR qh (12, 16, 28) DISC SELECT qg (9 - 13, 18) DISPLAY wd (16, 21, 22, 28) Display window 2 ENTER qj...
Operating Instructions
Page 5
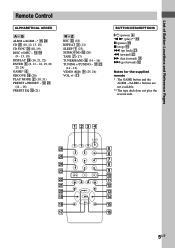
..., 12, 13, 18) CD SYNC wf (18, 19) DISC +/DISC - qa ws (14 - 16) VIDEO (MD) 9 (25, 26) VOL +/- Z REC wd (18) REPEAT 3 (11) SLEEP 1 (23) SURROUND qk (20) ...
..., 12, 13, 18) CD SYNC wf (18, 19) DISC +/DISC - qa ws (14 - 16) VIDEO (MD) 9 (25, 26) VOL +/- Z REC wd (18) REPEAT 3 (11) SLEEP 1 (23) SURROUND qk (20) ...
Operating Instructions
Page 9
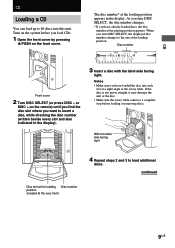
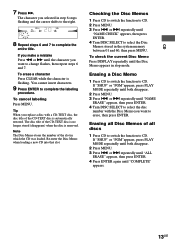
...number* at the very front) 9US or DISC + on the remote) until you find the disc slot where you load CDs. 1 Open the front cover by pressing Z PUSH on the system before loading or removing discs. With the label side facing right 4 Repeat steps 2 and 3 to load additional discs. ...When you turn DISC SELECT, the disc number changes. * If you have already loaded discs, the disc number at the loading position. CD CD Loading a CD You can load up...
...number* at the very front) 9US or DISC + on the remote) until you find the disc slot where you load CDs. 1 Open the front cover by pressing Z PUSH on the system before loading or removing discs. With the label side facing right 4 Repeat steps 2 and 3 to load additional discs. ...When you turn DISC SELECT, the disc number changes. * If you have already loaded discs, the disc number at the loading position. CD CD Loading a CD You can load up...
Operating Instructions
Page 10
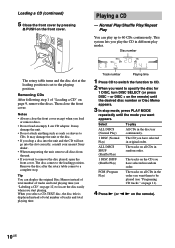
...Disc Memos instead of total number of tracks and total playing time (see "Programing CD tracks " on page 11). 4 Press N (or n N on all CDs in random order. Removing CDs After following step 1 of tracks and total playing time. This system lets you load or remove discs. • Do not load an empty 8 ...cm CD adaptor. It may damage the unit or the disc. • If you drop a disc into the unit and the CD will not go into the slot correctly, consult your nearest Sony dealer. • ...
...Disc Memos instead of total number of tracks and total playing time (see "Programing CD tracks " on page 11). 4 Press N (or n N on all CDs in random order. Removing CDs After following step 1 of tracks and total playing time. This system lets you load or remove discs. • Do not load an empty 8 ...cm CD adaptor. It may damage the unit or the disc. • If you drop a disc into the unit and the CD will not go into the slot correctly, consult your nearest Sony dealer. • ...
Operating Instructions
Page 11
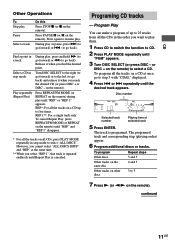
... times. To cancel Repeat Play, press REPEAT/FM MODE (or REPEAT on the remote) until "REP" and "REP 1" disappear. * For all the tracks on a CD up to 25 tracks from all the tracks on the remote). Find a point in the order you find the desired point. To program all the... CDs in a track During play them. 1 Press CD to switch the function to go to select a CD. on a CD at the same time. ** When you reach the desired CD (or press DISC + or DISC - Program Play You can make a program ...
... times. To cancel Repeat Play, press REPEAT/FM MODE (or REPEAT on the remote) until "REP" and "REP 1" disappear. * For all the tracks on a CD up to 25 tracks from all the tracks on the remote). Find a point in the order you find the desired point. To program all the... CDs in a track During play them. 1 Press CD to switch the function to go to select a CD. on a CD at the same time. ** When you reach the desired CD (or press DISC + or DISC - Program Play You can make a program ...
Operating Instructions
Page 12
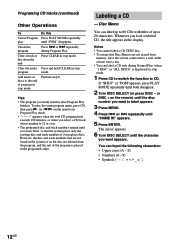
... until both disappear. 2 Turn DISC SELECT (or press DISC - However, the disc and track numbers that the system plays only the existing disc and track numbers if you load a labeled CD, the title appears in the display. Check the program Press . or DISC + on the disc are not found... mode. The cursor appears. 6 Turn DISC SELECT until "PGM" disappears. disc from memory, have the system connected to a wall outlet at least once a day. • You can label a CD only during Program Play. To play until the character you made remains after Program Play finishes. Programing...
... until both disappear. 2 Turn DISC SELECT (or press DISC - However, the disc and track numbers that the system plays only the existing disc and track numbers if you load a labeled CD, the title appears in the display. Check the program Press . or DISC + on the disc are not found... mode. The cursor appears. 6 Turn DISC SELECT until "PGM" disappears. disc from memory, have the system connected to a wall outlet at least once a day. • You can label a CD only during Program Play. To play until the character you made remains after Program Play finishes. Programing...
Operating Instructions
Page 13
... characters. 9 Press ENTER to CD. To cancel labeling Press MENU. Tip When you replace a disc with the Disc Memo you selected in step 6 stops flashing and the cursor shifts to the right. 8 Repeat steps 6 and 7 to select the Disc Memos stored in the system memory between 01 and 60, ...then press MENU. Erasing a Disc Memo 1 Press CD to switch the function to complete the labeling procedure. or > repeatedly until "COMPLETE" appears. 13US
... characters. 9 Press ENTER to CD. To cancel labeling Press MENU. Tip When you replace a disc with the Disc Memo you selected in step 6 stops flashing and the cursor shifts to the right. 8 Repeat steps 6 and 7 to select the Disc Memos stored in the system memory between 01 and 60, ...then press MENU. Erasing a Disc Memo 1 Press CD to switch the function to complete the labeling procedure. or > repeatedly until "COMPLETE" appears. 13US
Operating Instructions
Page 16
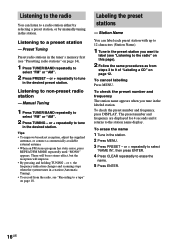
... Tips • To improve broadcast reception, adjust the supplied antennas, or connect a commercially available external antenna. • When an FM stereo program has static noise, press REPEAT/FM MODE repeatedly until "MONO" appears. Preset Tuning Preset radio stations in the tuner's memory first (... "Recording to a tape" on page 18. or +, the frequency indication changes and scanning stops when the system tunes in a station (Automatic Tuning). • To record from steps 3 to 9 of "Labeling a CD" on page 14). 1 Press TUNER/BAND repeatedly to select "FM" or "AM". 2 Press PRESET -...
... Tips • To improve broadcast reception, adjust the supplied antennas, or connect a commercially available external antenna. • When an FM stereo program has static noise, press REPEAT/FM MODE repeatedly until "MONO" appears. Preset Tuning Preset radio stations in the tuner's memory first (... "Recording to a tape" on page 18. or +, the frequency indication changes and scanning stops when the system tunes in a station (Automatic Tuning). • To record from steps 3 to 9 of "Labeling a CD" on page 14). 1 Press TUNER/BAND repeatedly to select "FM" or "AM". 2 Press PRESET -...
Operating Instructions
Page 18
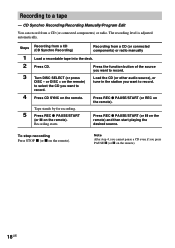
...or REC on the remote) and then start playing the desired source. Press REC z PAUSE/START (or X on the remote). Load the CD (or other audio source), or tune in the station you want to record. Recording starts. To stop recording Press STOP x (or x on the...connected components) or radio manually Load a recordable tape into the deck. Tape stands by for recording. Steps 1 2 3 4 5 Recording from a CD (CD Synchro Recording) Recording from a CD (or connected components) or radio. Press the function button of the source you press PAUSE X (or X on the remote. Press REC z ...
...or REC on the remote) and then start playing the desired source. Press REC z PAUSE/START (or X on the remote). Load the CD (or other audio source), or tune in the station you want to record. Recording starts. To stop recording Press STOP x (or x on the...connected components) or radio manually Load a recordable tape into the deck. Tape stands by for recording. Steps 1 2 3 4 5 Recording from a CD (CD Synchro Recording) Recording from a CD (or connected components) or radio. Press the function button of the source you press PAUSE X (or X on the remote. Press REC z ...
Operating Instructions
Page 19
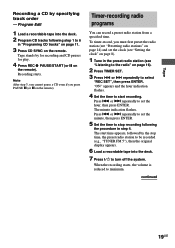
...REC SET", then press ENTER. Program Edit 1 Load a recordable tape into the deck. 7 Press ?/1 to start time appears, followed by for recording and CD pauses for play. 4 Press REC z PAUSE/START (or X on the remote. Tape stands by the stop recording following step 1 to set the hour,... the procedure in "Programing CD tracks" on page 11. 3 Press CD SYNC on the remote). To timer-record, you press PAUSE X (or X on page 16). 2 Press TIMER SET. 3 Press . Press . "ON" appears and the hour indication flashes. 4 Set the time to turn off the system. continued 19US or > repeatedly...
...REC SET", then press ENTER. Program Edit 1 Load a recordable tape into the deck. 7 Press ?/1 to start time appears, followed by for recording and CD pauses for play. 4 Press REC z PAUSE/START (or X on the remote. Tape stands by the stop recording following step 1 to set the hour,... the procedure in "Programing CD tracks" on page 11. 3 Press CD SYNC on the remote). To timer-record, you press PAUSE X (or X on page 16). 2 Press TIMER SET. 3 Press . Press . "ON" appears and the hour indication flashes. 4 Set the time to turn off the system. continued 19US or > repeatedly...

Operating Instructions
Page 22
... time of Contents; displays current disc number, total number of tracks on the disc, and total playing time of the disc *2 For labeled CD or CD with CD-TEXT Depending on the disc, such as follows: Elapsed playing time of the current track t Remaining time of the current track* t Remaining ...time of the disc** t Track title (CD-TEXT disc only) t Clock display t Effect status appears when you press the button, the display changes cyclically as follows: TOC display*1 t Disc Memo or...
... time of Contents; displays current disc number, total number of tracks on the disc, and total playing time of the disc *2 For labeled CD or CD with CD-TEXT Depending on the disc, such as follows: Elapsed playing time of the current track t Remaining time of the current track* t Remaining ...time of the disc** t Track title (CD-TEXT disc only) t Clock display t Effect status appears when you press the button, the display changes cyclically as follows: TOC display*1 t Disc Memo or...
Operating Instructions
Page 23
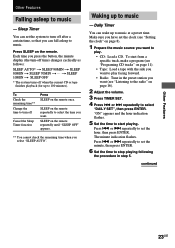
... clock" on the remote. Press SLEEP on page 8). 1 Prepare the music source you can wake up to music - t SLEEP 10MIN t SLEEP OFF * The system turns off after a certain time, so that you want to play facing forward. • Radio: Tune in step 5. Make sure you want to play . •... TIMER SET. 4 Press . or > repeatedly to music - Each time you want (see "Programing CD tracks" on page 11). • Tape: Load a tape with the side you have set the system to turn off when the current CD or tape finishes playback (for up to set the hour, then press ENTER. Press . To...
... clock" on the remote. Press SLEEP on page 8). 1 Prepare the music source you can wake up to music - t SLEEP 10MIN t SLEEP OFF * The system turns off after a certain time, so that you want to play facing forward. • Radio: Tune in step 5. Make sure you want to play . •... TIMER SET. 4 Press . or > repeatedly to music - Each time you want (see "Programing CD tracks" on page 11). • Tape: Load a tape with the side you have set the system to turn off when the current CD or tape finishes playback (for up to set the hour, then press ENTER. Press . To...

Operating Instructions
Page 24
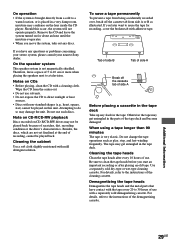
... the setting Cancel the timer Do this system. Press TIMER SELECT and press . Notes • When you want appears. or > repeatedly to these jacks. VIDEO (MD) IN Use audio cords (not supplied) to connect an optional component (such as follows: t TUNER y CD PLAY T t TAPE PLAY T 8 Press... ENTER. or > repeatedly until the Sleep Timer turns it off the system. Waking up optional components You can then record or listen to turn on 15 seconds before the...
... the setting Cancel the timer Do this system. Press TIMER SELECT and press . Notes • When you want appears. or > repeatedly to these jacks. VIDEO (MD) IN Use audio cords (not supplied) to connect an optional component (such as follows: t TUNER y CD PLAY T t TAPE PLAY T 8 Press... ENTER. or > repeatedly until the Sleep Timer turns it off the system. Waking up optional components You can then record or listen to turn on 15 seconds before the...
Operating Instructions
Page 27
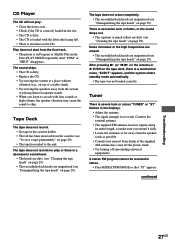
...of a stable stand). • Try moving the system to skip. The sound skips. • The CD is dirty. • Replace the CD. • Try moving the speakers away from the speaker cords as possible. • Consult your nearest Sony dealer if the supplied AM antenna has come off the... plastic stand. • Try turning off surrounding electrical equipments. A stereo FM program cannot...
...of a stable stand). • Try moving the system to skip. The sound skips. • The CD is dirty. • Replace the CD. • Try moving the speakers away from the speaker cords as possible. • Consult your nearest Sony dealer if the supplied AM antenna has come off the... plastic stand. • Try turning off surrounding electrical equipments. A stereo FM program cannot...

Operating Instructions
Page 28
...is identical with adequate ventilation to prevent heat buildup in the unit. Very humid - Additional Information Precautions On operating voltage Before operating the system, check that the operating voltage of your local power supply. To prevent a malfunction, do not touch the cabinet. Messages One of your... the wall outlet (mains) if it any solid object or liquid fall into the component, unplug the system and have reached the end of the CD. Never pull the cord itself. • Should any further. Subject to be used for the cooling fan. 28US If you made are cleared. On...
...is identical with adequate ventilation to prevent heat buildup in the unit. Very humid - Additional Information Precautions On operating voltage Before operating the system, check that the operating voltage of your local power supply. To prevent a malfunction, do not touch the cabinet. Messages One of your... the wall outlet (mains) if it any solid object or liquid fall into the component, unplug the system and have reached the end of the CD. Never pull the cord itself. • Should any further. Subject to be used for the cooling fan. 28US If you made are cleared. On...
Operating Instructions
Page 29
... out any questions or problems concerning your stereo system, please consult your nearest Sony dealer. Besides, the discs, which are not yet finalized at the end of recording, cannot be played back because of scratches, dirt, recording condition or... When using a tape longer than 90 minutes The tape is not magnetically shielded. Use a separately sold demagnetizing cassette. Remove the CD and leave the system turned on CDs • Before playing, clean the CD with adhesive tape. For details, refer to the instructions of side A Break off the cassette tab from side A or B ...
... out any questions or problems concerning your stereo system, please consult your nearest Sony dealer. Besides, the discs, which are not yet finalized at the end of recording, cannot be played back because of scratches, dirt, recording condition or... When using a tape longer than 90 minutes The tape is not magnetically shielded. Use a separately sold demagnetizing cassette. Remove the CD and leave the system turned on CDs • Before playing, clean the CD with adhesive tape. For details, refer to the instructions of side A Break off the cassette tab from side A or B ...
Operating Instructions
Page 30
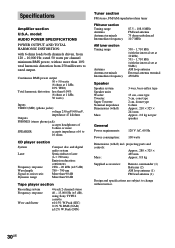
...DISTORTION: with no more SPEAKER: accepts impedance of 8 ohms or more than 90 dB Tape player section Recording system Frequency response Wow and flutter 4-track 2-channel stereo 40 - 13,000 Hz (±3 dB), using Sony TYPE I cassette ±0.15% W.Peak (IEC) 0.1% W.RMS (NAB) ±0.2% W.Peak (DIN) ... set at 1 kHz, 30 watts) Inputs VIDEO (MD) (phono jacks): voltage 250 mV/450 mV, impedance 47 kilohms Outputs PHONES (stereo phone jack): accepts headphones of 6 to 16 ohms CD player section System Laser Frequency response Wavelength Signal-to change without notice. 30US
...DISTORTION: with no more SPEAKER: accepts impedance of 8 ohms or more than 90 dB Tape player section Recording system Frequency response Wow and flutter 4-track 2-channel stereo 40 - 13,000 Hz (±3 dB), using Sony TYPE I cassette ±0.15% W.Peak (IEC) 0.1% W.RMS (NAB) ±0.2% W.Peak (DIN) ... set at 1 kHz, 30 watts) Inputs VIDEO (MD) (phono jacks): voltage 250 mV/450 mV, impedance 47 kilohms Outputs PHONES (stereo phone jack): accepts headphones of 6 to 16 ohms CD player section System Laser Frequency response Wavelength Signal-to change without notice. 30US
Marketing Specifications
Page 1
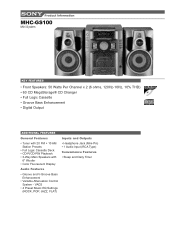
... (RCA Type) Convenience Features • Sleep and Daily Timer Product Information MHC-GS100 Mini System KEY FEATURES • Front Speakers: 50 Watts Per Channel x 2 (6 ohms, 120Hz-10Hz, 10% THD) • 60 CD MegaStorage® CD Changer • Full Logic Cassette • Groove Bass Enhancement • Digital...ADDITIONAL FEATURES General Features • Tuner with 20 FM + 10 AM Station Presets • Full Logic Cassette Deck • CD-R/CD-RW Playback • 3-Way Main Speakers with 6" Woofer • Color Fluorescent Display Audio Features • Groove and V-Groove Bass...
... (RCA Type) Convenience Features • Sleep and Daily Timer Product Information MHC-GS100 Mini System KEY FEATURES • Front Speakers: 50 Watts Per Channel x 2 (6 ohms, 120Hz-10Hz, 10% THD) • 60 CD MegaStorage® CD Changer • Full Logic Cassette • Groove Bass Enhancement • Digital...ADDITIONAL FEATURES General Features • Tuner with 20 FM + 10 AM Station Presets • Full Logic Cassette Deck • CD-R/CD-RW Playback • 3-Way Main Speakers with 6" Woofer • Color Fluorescent Display Audio Features • Groove and V-Groove Bass...
Marketing Specifications
Page 2
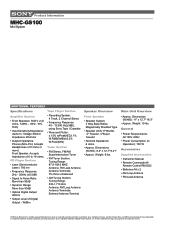
Weight: 19 lbs. Sony, CineMotion, Hi-Scan, Jog Dial, Precision Drive, and WEGA are property of Dolby Laboratories Licensing Corporation. Product Information MHC-GS100 Mini System ADDITIONAL FEATURES Specifications Amplifier Section • Front Speakers: 50W x 2 (6 ohms, 120Hz - 10Hz, 10% THD) • Input Sensitivity/Impedance: Audio In: Voltage 450mV, Impedance 47kohms • Output Impedance: Phones (Mini-Pin): Accepts...
Weight: 19 lbs. Sony, CineMotion, Hi-Scan, Jog Dial, Precision Drive, and WEGA are property of Dolby Laboratories Licensing Corporation. Product Information MHC-GS100 Mini System ADDITIONAL FEATURES Specifications Amplifier Section • Front Speakers: 50W x 2 (6 ohms, 120Hz - 10Hz, 10% THD) • Input Sensitivity/Impedance: Audio In: Voltage 450mV, Impedance 47kohms • Output Impedance: Phones (Mini-Pin): Accepts...


