
Operating Instructions
Page 4
... Connecting the Stereo 4 Inserting the Batteries 6 Setting the Clock 6 Chapter 2: the CD Player Playing CDs (normal play) 7 Playing Tracks in Random Order (shuffle play) 8 Playing Tracks in the Desired Order (program play) 9 Playing Tracks ...
... Connecting the Stereo 4 Inserting the Batteries 6 Setting the Clock 6 Chapter 2: the CD Player Playing CDs (normal play) 7 Playing Tracks in Random Order (shuffle play) 8 Playing Tracks in the Desired Order (program play) 9 Playing Tracks ...
Operating Instructions
Page 5
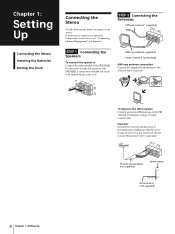
...; AM 75-ohm coaxial cable (not supplied) Screw clamp y Ground wire (not supplied) 4 Chapter 1: Setting Up If you want to connect any optional components to connect your stereo. Chapter 1: Setting Up Connecting the Stereo Inserting the Batteries Setting the Clock EN Connecting the Stereo Use the illustrations below to the stereo, see "Connecting Optional Equipment...
...; AM 75-ohm coaxial cable (not supplied) Screw clamp y Ground wire (not supplied) 4 Chapter 1: Setting Up If you want to connect any optional components to connect your stereo. Chapter 1: Setting Up Connecting the Stereo Inserting the Batteries Setting the Clock EN Connecting the Stereo Use the illustrations below to the stereo, see "Connecting Optional Equipment...
Operating Instructions
Page 7
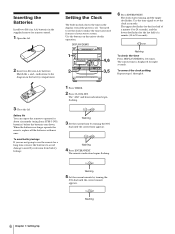
...operate for about six months (using Sony SUM-3 (NS) batteries) before the batteries run down. The upper dot flashes for the first half of a minute (0 to 29 seconds), and the lower dot flashes for the last half of your stereo system. To correct the clock setting Repeat steps 1 through 6. ] }}... EN ] 3 Close the lid. flashing 6 Chapter 1: Setting Up Inserting the Batteries Install two R6 (size AA) batteries in the display even if the...
...operate for about six months (using Sony SUM-3 (NS) batteries) before the batteries run down. The upper dot flashes for the first half of a minute (0 to 29 seconds), and the lower dot flashes for the last half of your stereo system. To correct the clock setting Repeat steps 1 through 6. ] }}... EN ] 3 Close the lid. flashing 6 Chapter 1: Setting Up Inserting the Batteries Install two R6 (size AA) batteries in the display even if the...
Operating Instructions
Page 23
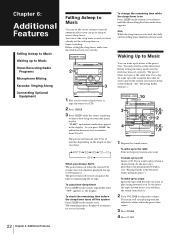
... 6: Additional Features Falling Asleep to Music Waking up to music at the same time every day. Before setting the sleep timer, make sure the clock has been set the timer once. POWERnON 2 3 To change the remaining time while the sleep timer is activated, the daily and recording timer functions do... CD or tape. Waking Up to Music You can go to sleep to music (sleep timer). Before setting the timer, made sure the clock has been set the stereo system to turn off the system Press SLEEP on the length of time indication appears. "SLEEP" and minutes indication appear in the Desired...
... 6: Additional Features Falling Asleep to Music Waking up to music at the same time every day. Before setting the sleep timer, make sure the clock has been set the timer once. POWERnON 2 3 To change the remaining time while the sleep timer is activated, the daily and recording timer functions do... CD or tape. Waking Up to Music You can go to sleep to music (sleep timer). Before setting the timer, made sure the clock has been set the stereo system to turn off the system Press SLEEP on the length of time indication appears. "SLEEP" and minutes indication appear in the Desired...
Operating Instructions
Page 24
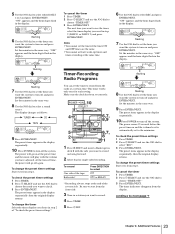
... ,10 tSELECT 4 6,7, 8,9 5 6,7, 2 8 1 1 Press § EJECT and insert a blank tape in deck B with the volume you desire in a station you want the system to turn -off the system. "ON" appears and the hour digits flash in the display. CLIP 12 345 678 63 125 250 500 1k 2k 4k 8k 16k... with the side you want to the minimum. 5 Use the JOG dial to next page EN 23 Chapter 6: Additional Features Make sure the clock has been set to check. 3 Press ENTER/NEXT. "OFF" appears and the hour digits flash in the same way. Timer-Recording Radio Programs You can...
... ,10 tSELECT 4 6,7, 8,9 5 6,7, 2 8 1 1 Press § EJECT and insert a blank tape in deck B with the volume you desire in a station you want the system to turn -off the system. "ON" appears and the hour digits flash in the display. CLIP 12 345 678 63 125 250 500 1k 2k 4k 8k 16k... with the side you want to the minimum. 5 Use the JOG dial to next page EN 23 Chapter 6: Additional Features Make sure the clock has been set to check. 3 Press ENTER/NEXT. "OFF" appears and the hour digits flash in the same way. Timer-Recording Radio Programs You can...
Operating Instructions
Page 29
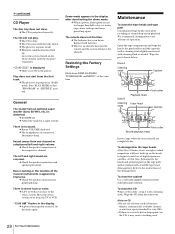
...the musical instruments is in the display after every 10 hours of operation. Set the clock again. Demo mode appears in program or shuffle mode. The batteries have built up . The CD is displayed. Leave the system turned on the heads to begin to 30 hours of use solvents such as... solution. There is no sound. The remote does not function. The CD is an obstacle between the remote and the system. EN General The sound from an optional super woofer (Sony SA-W10, etc.) is a scratch, dirt or fingerprints on the CD, it with cleaning fluid or alcohol. Maintenance ...
...the musical instruments is in the display after every 10 hours of operation. Set the clock again. Demo mode appears in program or shuffle mode. The batteries have built up . The CD is displayed. Leave the system turned on the heads to begin to 30 hours of use solvents such as... solution. There is no sound. The remote does not function. The CD is an obstacle between the remote and the system. EN General The sound from an optional super woofer (Sony SA-W10, etc.) is a scratch, dirt or fingerprints on the CD, it with cleaning fluid or alcohol. Maintenance ...
Operating Instructions
Page 31
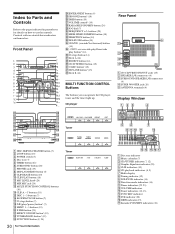
...) @º P FILE button (21) @¡ EFFECT ON/OFF button* (19) @™ TUNER/BAND button* (12) @£ FUNCTION button (8, 24) 30 For Your Information Timer TIMER CLOCK SET tSET tSELECT SLEEP Rear Panel 5 1 2 3 4 1 100 CD/VIDEO IN/OUT jacks (25) 2 SPEAKER L/R connectors (4) 3 SURROUND SPEAKER L/R connectors (4) 4 SUPER WOOFER jack (26) 5 ANTENNA terminals (4) Display Window...
...) @º P FILE button (21) @¡ EFFECT ON/OFF button* (19) @™ TUNER/BAND button* (12) @£ FUNCTION button (8, 24) 30 For Your Information Timer TIMER CLOCK SET tSET tSELECT SLEEP Rear Panel 5 1 2 3 4 1 100 CD/VIDEO IN/OUT jacks (25) 2 SPEAKER L/R connectors (4) 3 SURROUND SPEAKER L/R connectors (4) 4 SUPER WOOFER jack (26) 5 ANTENNA terminals (4) Display Window...
Operating Instructions
Page 32
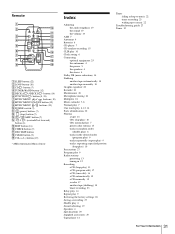
...Adjusting the audio emphasis 19 the sound 19 the volume 19 AMS 7 Antennas 4 Batteries 6 CD player 7 CD synchro recording 15 CLIP play 10 Clock setting 6 Connecting optional equipment 25 the antennnas 4 the power 5 the speakers 4 the stereo 4 Dolby NR (noise reduction) 14 Dubbing another tape ...automatically 15 a CD manually 15 a radio 17 another tape (dubbing) 18 timer recording 23 Relay play 14 Repeat play 9 Restoring the factory settings 28 Saving a recording 27 Shuffle play 8 Sound adjusting 19 Speakers 4 Specifications 29 Supplied accessories 29 Tape player 14 Timer falling asleep to music...
...Adjusting the audio emphasis 19 the sound 19 the volume 19 AMS 7 Antennas 4 Batteries 6 CD player 7 CD synchro recording 15 CLIP play 10 Clock setting 6 Connecting optional equipment 25 the antennnas 4 the power 5 the speakers 4 the stereo 4 Dolby NR (noise reduction) 14 Dubbing another tape ...automatically 15 a CD manually 15 a radio 17 another tape (dubbing) 18 timer recording 23 Relay play 14 Repeat play 9 Restoring the factory settings 28 Saving a recording 27 Shuffle play 8 Sound adjusting 19 Speakers 4 Specifications 29 Supplied accessories 29 Tape player 14 Timer falling asleep to music...


