

User Manual
Page 3
... a U.S. http://www.sony.net/ Precautions 5 Identifying parts and controls 6 Setup 9 Setup 1: Open the stand 9 Setup 2: Connect the cables 9 Setup 3: Connect the power cord 12 Setup 4: Replace the connector cover 12 Setup 5: Turn on the display and other equipment 12 Setup 6: Adjust the tilt 13 Setup 7: Insert batteries into the remote control 13 Watching the...
... a U.S. http://www.sony.net/ Precautions 5 Identifying parts and controls 6 Setup 9 Setup 1: Open the stand 9 Setup 2: Connect the cables 9 Setup 3: Connect the power cord 12 Setup 4: Replace the connector cover 12 Setup 5: Turn on the display and other equipment 12 Setup 6: Adjust the tilt 13 Setup 7: Insert batteries into the remote control 13 Watching the...

User Manual
Page 6
... the "Volume" adjustment bar to switch the "PIP" (Picture In Picture) setting. J (PinP) button (page 30) Press to control the volume. Disposal of video equipment are connected. For disposal or recycling information, please contact your local authorities or the Electronics Industries Alliance... (page 35) This sensor measures the brightness of the LCD display qs 6 43 6 7 8 9 0 qa qd A Remote control sensor This sensor receives a signal from the remote control. E Stereo speakers (page 34) These speakers output the audio signals as follows. For customers in two ways. As the button...
... the "Volume" adjustment bar to switch the "PIP" (Picture In Picture) setting. J (PinP) button (page 30) Press to control the volume. Disposal of video equipment are connected. For disposal or recycling information, please contact your local authorities or the Electronics Industries Alliance... (page 35) This sensor measures the brightness of the LCD display qs 6 43 6 7 8 9 0 qa qd A Remote control sensor This sensor receives a signal from the remote control. E Stereo speakers (page 34) These speakers output the audio signals as follows. For customers in two ways. As the button...

User Manual
Page 8
... button to activate the selected menu item and adjustments made using the 0-9 buttons. buttons (page 34) Press to select menu items and make adjustments. M VOL +/- Remote control 8 9 0 qa MUTING DISPLAY SLEEP 1 PC1 PC2 VIDEO1 VIDEO2 TV MENU OK 1 2 3 4 123 456 5 789 qs JUMP 0 ENT 6 VOL CH qd 7 DISPLAY A 1 (power) switch (page 12...
... button to activate the selected menu item and adjustments made using the 0-9 buttons. buttons (page 34) Press to select menu items and make adjustments. M VOL +/- Remote control 8 9 0 qa MUTING DISPLAY SLEEP 1 PC1 PC2 VIDEO1 VIDEO2 TV MENU OK 1 2 3 4 123 456 5 789 qs JUMP 0 ENT 6 VOL CH qd 7 DISPLAY A 1 (power) switch (page 12...

User Manual
Page 9
... cover. to the to connect a computer equipped with a DVI connector (digital RGB), follow the instructions below . Setup Before using your carton: • LCD display • Remote control • Size AAA batteries (2) • Power cord • HD15-HD15 video signal cable (analog RGB) • DVI-D video signal cable (digital RGB) • Audio cord...
... cover. to the to connect a computer equipped with a DVI connector (digital RGB), follow the instructions below . Setup Before using your carton: • LCD display • Remote control • Size AAA batteries (2) • Power cord • HD15-HD15 video signal cable (analog RGB) • DVI-D video signal cable (digital RGB) • Audio cord...

User Manual
Page 12
... connector cover onto the display until it happens, the input source that you can also select the inputs using the input select buttons on the remote control. • When you switch the input using the CH +/- button to "PIP On" using the PIP function, if you select the TV input, the number...
... connector cover onto the display until it happens, the input source that you can also select the inputs using the input select buttons on the remote control. • When you switch the input using the CH +/- button to "PIP On" using the PIP function, if you select the TV input, the number...

User Manual
Page 13
...about on-screen messages, see "Trouble symptoms and remedies" on the batteries to 60 Hz. No need to set to the diagram inside the remote control's battery compartment. US Notes • When adjusting the screen tilt, proceed slowly and carefully, being sure not to hit the display against ...: - The computer is automatically selected so that light is 1280 × 1024, the vertical frequency should be installed on -screen instructions. MFM-HT75W Horizontal frequency Vertical frequency Resolution Analog RGB 28-69 kHz 48-85 Hz 1280 × 768 or less Digital RGB 28-48 kHz 60...
...about on-screen messages, see "Trouble symptoms and remedies" on the batteries to 60 Hz. No need to set to the diagram inside the remote control's battery compartment. US Notes • When adjusting the screen tilt, proceed slowly and carefully, being sure not to hit the display against ...: - The computer is automatically selected so that light is 1280 × 1024, the vertical frequency should be installed on -screen instructions. MFM-HT75W Horizontal frequency Vertical frequency Resolution Analog RGB 28-69 kHz 48-85 Hz 1280 × 768 or less Digital RGB 28-48 kHz 60...

User Manual
Page 15
... the setting changes as follows. MFM-HT75W: Normal t Full t Wide Zoom t Zoom t Normal... Customizing Your Display Before making adjustments. Press the M/m buttons to select the item you want to turn them on page 32. x Using the Parental Control feature Select control options in the "Option" menu... Vision" in the "Parent" menu. MFM-HT95: Normal t Full t 16:9 t Normal... (page 22) Tip The and buttons are also available on the display. Switch the Picture Mode (page 35). Press the M/m buttons to "On." Button operations (remote control) Press MUTING DISPLAY JUMP SLEEP To Turn...
... the setting changes as follows. MFM-HT75W: Normal t Full t Wide Zoom t Zoom t Normal... Customizing Your Display Before making adjustments. Press the M/m buttons to select the item you want to turn them on page 32. x Using the Parental Control feature Select control options in the "Option" menu... Vision" in the "Parent" menu. MFM-HT95: Normal t Full t 16:9 t Normal... (page 22) Tip The and buttons are also available on the display. Switch the Picture Mode (page 35). Press the M/m buttons to "On." Button operations (remote control) Press MUTING DISPLAY JUMP SLEEP To Turn...

User Manual
Page 16
... main menu on the screen. Press the M/m buttons to the previous menu. Press the MENU button once to return to the default setting" on the remote control 1 Display the main menu. When you use the buttons on page 33. 16 x When you press the OK button, the setting is stored, then the...
... main menu on the screen. Press the M/m buttons to the previous menu. Press the MENU button once to return to the default setting" on the remote control 1 Display the main menu. When you use the buttons on page 33. 16 x When you press the OK button, the setting is stored, then the...

User Manual
Page 22
... can also switch the "Zoom" setting by pressing the remote control repeatedly. The "Zoom" menu appears on the screen. Tip You can enjoy stereo, bilingual, and monaural programs. 1 Press the MENU button. The "MTS" menu appears on the screen. MFM-HT75W Screen Zoom : Auto Adjust Phase : Pitch : H ...Center : V Center : : TV Normal Full Wide Zoom Zoom Select MFM-HT95 Screen Zoom : Auto Adjust Phase : Pitch : H Center : V Center : Set OK ...
... can also switch the "Zoom" setting by pressing the remote control repeatedly. The "Zoom" menu appears on the screen. Tip You can enjoy stereo, bilingual, and monaural programs. 1 Press the MENU button. The "MTS" menu appears on the screen. MFM-HT75W Screen Zoom : Auto Adjust Phase : Pitch : H ...Center : V Center : : TV Normal Full Wide Zoom Zoom Select MFM-HT95 Screen Zoom : Auto Adjust Phase : Pitch : H Center : V Center : Set OK ...

User Manual
Page 34
...is displayed on the screen. Technical Features Controlling the volume Using the display's speakers or headphones, you can control the volume by using the M/m buttons on the display when the main menu is connected to the display's audio input jacks. MFM-HT75W Power mode Power consumption 1 (power)...Digital input compliant, the display will automatically reduce power consumption as shown below. buttons on the remote control instead. • You cannot adjust the volume using the M/m buttons on the remote control. • When your display is in the standby mode or the Sleep timer is a ...
...is displayed on the screen. Technical Features Controlling the volume Using the display's speakers or headphones, you can control the volume by using the M/m buttons on the display when the main menu is connected to the display's audio input jacks. MFM-HT75W Power mode Power consumption 1 (power)...Digital input compliant, the display will automatically reduce power consumption as shown below. buttons on the remote control instead. • You cannot adjust the volume using the M/m buttons on the remote control. • When your display is in the standby mode or the Sleep timer is a ...
User Manual
Page 36
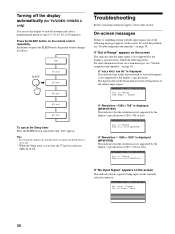
... the screen This indicates that the resolution is not supported by the display's specifications (1280 × 768 or less). Press the SLEEP button on the remote control repeatedly. To solve the problem, see "Trouble symptoms and remedies" on page 38. D : PC1 Ou t o f Ra n g e XXX . If...8226; If you press the SLEEP button, the period of the current input signal. XKHz / XXXHz If "Resolution i1280 × 768" is displayed (MFM-HT75W) This indicates that the input signal is being input via the currently selected connector. I NFORMA T I ON DV I - Turning off the display automatically...
... the screen This indicates that the resolution is not supported by the display's specifications (1280 × 768 or less). Press the SLEEP button on the remote control repeatedly. To solve the problem, see "Trouble symptoms and remedies" on page 38. D : PC1 Ou t o f Ra n g e XXX . If...8226; If you press the SLEEP button, the period of the current input signal. XKHz / XXXHz If "Resolution i1280 × 768" is displayed (MFM-HT75W) This indicates that the input signal is being input via the currently selected connector. I NFORMA T I ON DV I - Turning off the display automatically...

User Manual
Page 40
...power) switch on the menu screen, then enter the following information: • Model name: MFM-HT75W or MFM-HT95 • Serial number • Detailed description of the problem • Date of ...8226; Disconnect your computer and graphics board • Type of manufacture If any channels. Remote control does not operate. The master password clears your previous password and allows you intend to ...PC 2/TV/VIDEO 1/VIDEO 2) 40 Cannot receive any problem persists, call your authorized Sony dealer and give the following master password: 4357. Check these items • Make sure...
...power) switch on the menu screen, then enter the following information: • Model name: MFM-HT75W or MFM-HT95 • Serial number • Detailed description of the problem • Date of ...8226; Disconnect your computer and graphics board • Type of manufacture If any channels. Remote control does not operate. The master password clears your previous password and allows you intend to ...PC 2/TV/VIDEO 1/VIDEO 2) 40 Cannot receive any problem persists, call your authorized Sony dealer and give the following master password: 4357. Check these items • Make sure...

Brochure
Page 1
... Sony bridges the world of IT and TV technologies to see. Supports up to 1080i and 720p formats when connected to a high-definition video signal (displayed at your computer. HDTV-capable Enjoy HDTV content right at native 720P resolution via YPbPr or component). MFM-HT75W... Display Designed for computer, video and television Integrated NTSC TV tuner, HDTV connectivity and SRS WOW™ 3D Audio Technology for video and gaming. Remote Control Access features, channels, television and video source...
... Sony bridges the world of IT and TV technologies to see. Supports up to 1080i and 720p formats when connected to a high-definition video signal (displayed at your computer. HDTV-capable Enjoy HDTV content right at native 720P resolution via YPbPr or component). MFM-HT75W... Display Designed for computer, video and television Integrated NTSC TV tuner, HDTV connectivity and SRS WOW™ 3D Audio Technology for video and gaming. Remote Control Access features, channels, television and video source...

Brochure
Page 2
...Warranty Card Remote Windows® & Macintosh® Utility Files HD15 Cable DVI-D Cable 75 ohm Cable Audio Cable Batteries ©2004 Sony Electronics Inc. Windows XP®; Macintosh®; Sony, ErgoBright, ErgoStand and XBright are property of Sony. Windows Logo Compliance; MFM-HT75W Display Sony Electronics Inc... Management 68W Normal Operation (max), 1.2W Active Off (max), 1.2W Main Switch Off Limited Warranty 3 years (Parts, Labor, Backlight) On Screen Control Pwr, Menu, Cntr, Brt, Bklit, Pic Mode, Color Temp, Pitch, Phase, Zoom, Input, Vol, Chnl, PinP, SRS on/off, Bass...
...Warranty Card Remote Windows® & Macintosh® Utility Files HD15 Cable DVI-D Cable 75 ohm Cable Audio Cable Batteries ©2004 Sony Electronics Inc. Windows XP®; Macintosh®; Sony, ErgoBright, ErgoStand and XBright are property of Sony. Windows Logo Compliance; MFM-HT75W Display Sony Electronics Inc... Management 68W Normal Operation (max), 1.2W Active Off (max), 1.2W Main Switch Off Limited Warranty 3 years (Parts, Labor, Backlight) On Screen Control Pwr, Menu, Cntr, Brt, Bklit, Pic Mode, Color Temp, Pitch, Phase, Zoom, Input, Vol, Chnl, PinP, SRS on/off, Bass...


