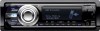
Operating Instructions
Page 2
... radiate radio frequency energy and, if not installed and used in accordance with FCC and IC radiation exposure limits set forth for help. But it should be co-located or operated in conjunction with the limits for safety. This equipment generates, uses, and can be determined by the Bluetooth SIG, Inc. Windows Media, and the Windows logo are owned by turning...
... radiate radio frequency energy and, if not installed and used in accordance with FCC and IC radiation exposure limits set forth for help. But it should be co-located or operated in conjunction with the limits for safety. This equipment generates, uses, and can be determined by the Bluetooth SIG, Inc. Windows Media, and the Windows logo are owned by turning...

Operating Instructions
Page 4
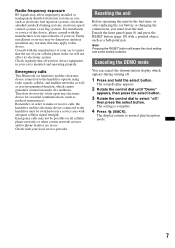
... unit 6 Notes on Bluetooth 6 Resetting the unit 7 Canceling the DEMO mode 7 Preparing the card remote commander 8 Setting the clock 8 Detaching the front panel 8 Attaching the front panel 9 Location of controls and basic operations Main unit 10 Card remote commander RM-X306 12 Searching for a track 14 Searching a track by listening to music from a Bluetooth device 23 About Bluetooth icons 24 Connection 24 Connecting a cellular phone 24 Connecting an audio device 25 Handsfree calling 25 Making calls 25 Receiving...
... unit 6 Notes on Bluetooth 6 Resetting the unit 7 Canceling the DEMO mode 7 Preparing the card remote commander 8 Setting the clock 8 Detaching the front panel 8 Attaching the front panel 9 Location of controls and basic operations Main unit 10 Card remote commander RM-X306 12 Searching for a track 14 Searching a track by listening to music from a Bluetooth device 23 About Bluetooth icons 24 Connection 24 Connecting a cellular phone 24 Connecting an audio device 25 Handsfree calling 25 Making calls 25 Receiving...
Operating Instructions
Page 7
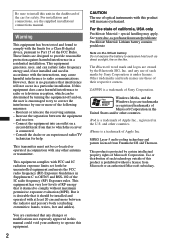
... the select button. The setting is mounted and operating properly. The setup display appears. 2 Rotate the control dial until "Demo" appears, then press the select button. 3 Rotate the control dial to normal play/reception mode. 7 Remember, in order to make or receive calls, the handsfree and the electronic device connected to the handsfree operate using radio signals, cellular, and landline networks as well as a ball-point pen. Emergency calls This Bluetooth car handsfree...
... the select button. The setting is mounted and operating properly. The setup display appears. 2 Rotate the control dial until "Demo" appears, then press the select button. 3 Rotate the control dial to normal play/reception mode. 7 Remember, in order to make or receive calls, the handsfree and the electronic device connected to the handsfree operate using radio signals, cellular, and landline networks as well as a ball-point pen. Emergency calls This Bluetooth car handsfree...
Operating Instructions
Page 10
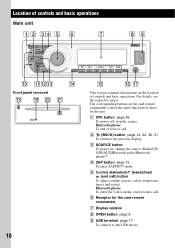
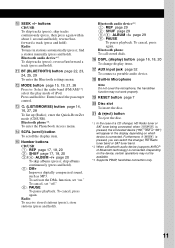
... same functions as those on ; B (BACK) button page 14, 22, 30, 31 To return to the USB device. C SOURCE button To power on the unit. change the source (Radio/CD/ USB/AUX/Bluetooth audio/Bluetooth phone)*1. select setup items (press and rotate). receive/end a call ) button To adjust volume (rotate); D ZAP button page 15 To enter ZAPPIN™ mode. For details, see the respective pages. stop the source. Bluetooth phone: To enter the CALL menu; F Receptor for the card remote commander G Display...
... same functions as those on ; B (BACK) button page 14, 22, 30, 31 To return to the USB device. C SOURCE button To power on the unit. change the source (Radio/CD/ USB/AUX/Bluetooth audio/Bluetooth phone)*1. select setup items (press and rotate). receive/end a call ) button To adjust volume (rotate); D ZAP button page 15 To enter ZAPPIN™ mode. For details, see the respective pages. stop the source. Bluetooth phone: To enter the CALL menu; F Receptor for the card remote commander G Display...
Operating Instructions
Page 11
... and hold). P DSPL (display) button page 16, 18, 20 To change display items. Q AUX input jack page 32 To connect a portable audio device. Furthermore, if (MODE) is pressed, you can switch the changer, HD Radio tuner band or SAT tuner band. *2 When a Bluetooth audio device (supports AVRCP of Bluetooth technology) is connected. K BT (BLUETOOTH) button page 22, 23, 24, 25, 29 To enter the Bluetooth settings menu. R Built-in stations automatically (press); Radio: To tune in Microphone Note Do...
... and hold). P DSPL (display) button page 16, 18, 20 To change display items. Q AUX input jack page 32 To connect a portable audio device. Furthermore, if (MODE) is pressed, you can switch the changer, HD Radio tuner band or SAT tuner band. *2 When a Bluetooth audio device (supports AVRCP of Bluetooth technology) is connected. K BT (BLUETOOTH) button page 22, 23, 24, 25, 29 To enter the Bluetooth settings menu. R Built-in stations automatically (press); Radio: To tune in Microphone Note Do...
Operating Instructions
Page 12
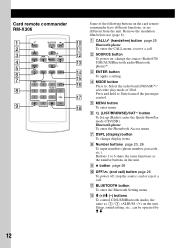
... . 3 qs B SOURCE button To power on the unit. Remove the insulation film before use (page 8). 1 0 A CALL/ (handsfree) button page 25 Bluetooth phone: 2 qa To enter the CALL menu; Setup, sound setting, etc., can be operated by M m. 12 enter the Quick-BrowZer mode (CD/USB). stop the source; L M (+)/m (-) buttons To control CD/USB/Bluetooth Audio, the same as the number buttons on ; Press and hold to : Select the radio band (FM/AM)*1/ 8 select the play mode of the following buttons on the unit. receive a call...
... . 3 qs B SOURCE button To power on the unit. Remove the insulation film before use (page 8). 1 0 A CALL/ (handsfree) button page 25 Bluetooth phone: 2 qa To enter the CALL menu; Setup, sound setting, etc., can be operated by M m. 12 enter the Quick-BrowZer mode (CD/USB). stop the source; L M (+)/m (-) buttons To control CD/USB/Bluetooth Audio, the same as the number buttons on ; Press and hold to : Select the radio band (FM/AM)*1/ 8 select the play mode of the following buttons on the unit. receive a call...
Operating Instructions
Page 15
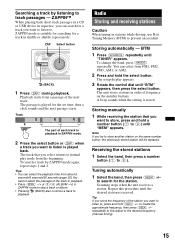
... in a CD or USB device in shuffle or shuffle repeat mode. ZAP Select button OFF SEEK ZAP SOURCE BLUETOOTH BT SEEK PUSH MODE ENTER / SOUND / MEMU / / (BACK) 1 Press (ZAP) during playback. Tips • You can select from the beginning. The unit stores stations in stations while driving, use Best Tuning Memory (BTM) to normal play mode from FM1, FM2, FM3, AM1, or AM2. 2 Press and hold a number button ((1) to listen is played back...
... in a CD or USB device in shuffle or shuffle repeat mode. ZAP Select button OFF SEEK ZAP SOURCE BLUETOOTH BT SEEK PUSH MODE ENTER / SOUND / MEMU / / (BACK) 1 Press (ZAP) during playback. Tips • You can select from the beginning. The unit stores stations in stations while driving, use Best Tuning Memory (BTM) to normal play mode from FM1, FM2, FM3, AM1, or AM2. 2 Press and hold a number button ((1) to listen is played back...
Operating Instructions
Page 19
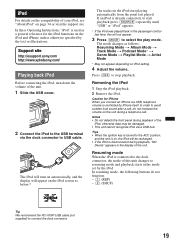
... iPhone When you connect an iPhone via USB, telephone volume is used as a general reference for the iPod functions on iPod setting. 4 Adjust the volume. Support site http://esupport.sony.com http://www.xplodsony.com/ Playing back iPod Before connecting the iPod, turn on automatically, and the display will turn down the volume of your iPod, see "About iPod" on the iPod start playback press (SOURCE) repeatedly until "USB" or "iPod" appears. * If the iPod was played back in the mode set...
... iPhone When you connect an iPhone via USB, telephone volume is used as a general reference for the iPod functions on iPod setting. 4 Adjust the volume. Support site http://esupport.sony.com http://www.xplodsony.com/ Playing back iPod Before connecting the iPod, turn on automatically, and the display will turn down the volume of your iPod, see "About iPod" on the iPod start playback press (SOURCE) repeatedly until "USB" or "iPod" appears. * If the iPod was played back in the mode set...
Operating Instructions
Page 21
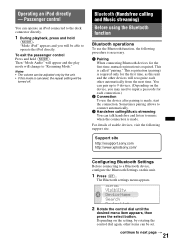
... play mode will be turned off. Bluetooth (Handsfree calling and Music streaming) Before using the Bluetooth function Bluetooth operations To use the device after pairing is required only for each other items can be able to the dock connector directly. 1 During playback, press and hold (MODE). This registration (pairing) is made . Operating an iPod directly - Support site http://esupport.sony.com http://www.xplodsony.com/ Configuring Bluetooth Settings Before connecting to a Bluetooth device, configure the Bluetooth Settings on this unit...
... play mode will be turned off. Bluetooth (Handsfree calling and Music streaming) Before using the Bluetooth function Bluetooth operations To use the device after pairing is required only for each other items can be able to the dock connector directly. 1 During playback, press and hold (MODE). This registration (pairing) is made . Operating an iPod directly - Support site http://esupport.sony.com http://www.xplodsony.com/ Configuring Bluetooth Settings Before connecting to a Bluetooth device, configure the Bluetooth Settings on this unit...
Operating Instructions
Page 23
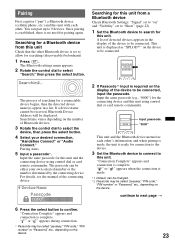
... "passkey," "PIN code," "PIN number" or "Password," etc., depending on the display of the device to be connected. Searching for this unit from this unit Check that the other . The passcode can be changed. *2 Passcode may be either your desired connection, "Handsfree Connect" or "Audio Connect." Searching for a Bluetooth device from a Bluetooth device Check Bluetooth Settings: "Signal" set to "Show" (page 22). 1 Set the Bluetooth device to allow for this unit using control dial or card remote commander. Input the...
... "passkey," "PIN code," "PIN number" or "Password," etc., depending on the display of the device to be connected. Searching for this unit from this unit Check that the other . The passcode can be changed. *2 Passcode may be either your desired connection, "Handsfree Connect" or "Audio Connect." Searching for a Bluetooth device from a Bluetooth device Check Bluetooth Settings: "Signal" set to "Show" (page 22). 1 Set the Bluetooth device to allow for this unit using control dial or card remote commander. Input the...
Operating Instructions
Page 25
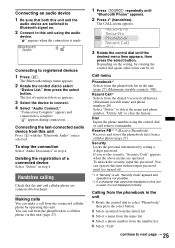
... unit using the control dial or card remote commander. To unlock the security, input the password. The CALL menu appears. Making calls You can call from a cellular phone (page 27). Connecting an audio device 1 Be sure that both this unit and the audio device are switched to Bluetooth signal on. 2 Connect to this unit (page 27). 3 Rotate the control dial until the desired menu item appears, then press the select button. Dial Inputs the phone number using...
... unit using the control dial or card remote commander. To unlock the security, input the password. The CALL menu appears. Making calls You can call from a cellular phone (page 27). Connecting an audio device 1 Be sure that both this unit and the audio device are switched to Bluetooth signal on. 2 Connect to this unit (page 27). 3 Rotate the control dial until the desired menu item appears, then press the select button. Dial Inputs the phone number using...
Operating Instructions
Page 26
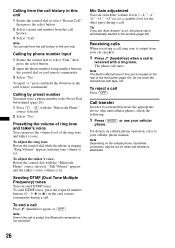
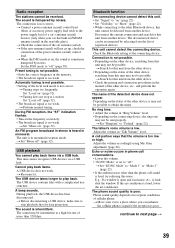
... "Bluetooth Phone" source selected. Receiving calls When receiving a call, ring tone is output from your car speakers. 1 Press (handsfree) when a call is set time (page 22). Note The Built-in this unit 1 Rotate the control dial to select "Dial," then press the select button. 2 Input the phone number using number buttons, the control dial or card remote commander. 3 Select "Yes." Do not cover the microphone with the "Bluetooth Phone" source selected. 2 Select "Yes." Note Depending on the cellular phone, handsfree connection may...
... "Bluetooth Phone" source selected. Receiving calls When receiving a call, ring tone is output from your car speakers. 1 Press (handsfree) when a call is set time (page 22). Note The Built-in this unit 1 Rotate the control dial to select "Dial," then press the select button. 2 Input the phone number using number buttons, the control dial or card remote commander. 3 Select "Yes." Do not cover the microphone with the "Bluetooth Phone" source selected. 2 Select "Yes." Note Depending on the cellular phone, handsfree connection may...
Operating Instructions
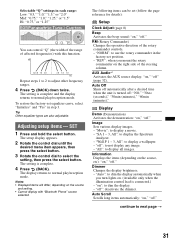
Page 31
... the desired menu item appears, then press the select button. 3 Rotate the control dial to next page t 31 Notes • Displayed items will differ, depending on the source and setting. • Cannot display with this function. AUX Audio*1 Activates the AUX source display: "on ," "off ": to normal play /reception mode. "off " (page 32). The display returns to normal play /reception mode. Auto Off Shuts off automatically after a desired time when the unit is...
... the desired menu item appears, then press the select button. 3 Rotate the control dial to next page t 31 Notes • Displayed items will differ, depending on the source and setting. • Cannot display with this function. AUX Audio*1 Activates the AUX source display: "on ," "off ": to normal play /reception mode. "off " (page 32). The display returns to normal play /reception mode. Auto Off Shuts off automatically after a desired time when the unit is...
Operating Instructions
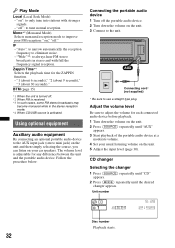
Page 32
... volume on your car speakers. Mono*2 (Monaural Mode) Selects monaural reception mode to improve poor FM reception: "on the unit. 3 Connect to adjust the volume for each connected audio device before playback. 1 Turn down the volume on ," "off." Adjust the volume level Be sure to the unit. AUX Connecting cord* (not supplied) * Be sure to always hear FM stereo broadcasts in the stereo reception mode. *4 When CD/USB source is adjustable for the ZAPPIN function. - IF - "Wide"*3: to use a straight type plug...
... volume on your car speakers. Mono*2 (Monaural Mode) Selects monaural reception mode to improve poor FM reception: "on the unit. 3 Connect to adjust the volume for each connected audio device before playback. 1 Turn down the volume on ," "off." Adjust the volume level Be sure to the unit. AUX Connecting cord* (not supplied) * Be sure to always hear FM stereo broadcasts in the stereo reception mode. *4 When CD/USB source is adjustable for the ZAPPIN function. - IF - "Wide"*3: to use a straight type plug...
Operating Instructions
Page 34
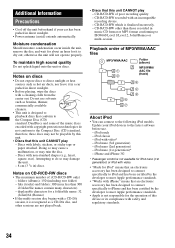
... it in a car parked in direct sunlight. • Before playing, wipe the discs with a CD-DA session, it to the following iPod models. iPod classic - folders (albums): 150 (including root folder) - iPhone and iPhone 3G * Passenger control is not available for iPod nano (1st generation) or iPod with video. • "Made for iPod" means that an electronic accessory has been designed to connect specifically to iPod and has...
... it in a car parked in direct sunlight. • Before playing, wipe the discs with a CD-DA session, it to the following iPod models. iPod classic - folders (albums): 150 (including root folder) - iPhone and iPhone 3G * Passenger control is not available for iPod nano (1st generation) or iPod with video. • "Made for iPod" means that an electronic accessory has been designed to connect specifically to iPod and has...
Operating Instructions
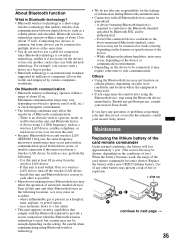
Page 35
... Bluetooth device may not function on cellular phones, depending on radio wave conditions and location where the equipment is present, in a hospital, train, airplane, or petrol station - Replace the battery with a new CR2025 lithium battery. For example, you have any problem persist, consult your unit that enables wireless data communication between this unit and Bluetooth device as near automatic doors or a fire alarm • This unit supports...
... Bluetooth device may not function on cellular phones, depending on radio wave conditions and location where the equipment is present, in a hospital, train, airplane, or petrol station - Replace the battery with a new CR2025 lithium battery. For example, you have any problem persist, consult your unit that enables wireless data communication between this unit and Bluetooth device as near automatic doors or a fire alarm • This unit supports...
Operating Instructions
Page 37
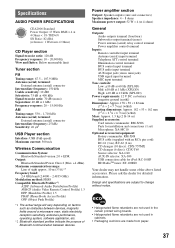
... BUS cable (supplied with an RCA pin cord): RC-61 (1 m), RC-62 (2 m) CD changer (10 discs): CDX-757MX CD changer (6 discs): CDX-T69 Source selector: XA-C40 AUX-IN selector: XA-300 USB connection cable for detailed information. Power amplifier section Output: Speaker outputs (sure seal connectors) Speaker impedance: 4 - 8 ohms Maximum power output: 52 W × 4 (at 4 ohms) General Outputs: Audio outputs terminal (front/rear) Subwoofer output terminal (mono) Power antenna (aerial) relay control terminal Power amplifier control terminal Inputs: Remote controller input terminal Antenna (aerial...
... BUS cable (supplied with an RCA pin cord): RC-61 (1 m), RC-62 (2 m) CD changer (10 discs): CDX-757MX CD changer (6 discs): CDX-T69 Source selector: XA-C40 AUX-IN selector: XA-300 USB connection cable for detailed information. Power amplifier section Output: Speaker outputs (sure seal connectors) Speaker impedance: 4 - 8 ohms Maximum power output: 52 W × 4 (at 4 ohms) General Outputs: Audio outputs terminal (front/rear) Subwoofer output terminal (mono) Power antenna (aerial) relay control terminal Power amplifier control terminal Inputs: Remote controller input terminal Antenna (aerial...
Operating Instructions
Page 38
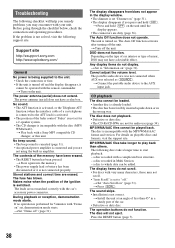
... connection and operating procedures. The power antenna (aerial) does not extend. If no operation is performed for a 2-speaker system. • The CD changer is switched. The Auto Off function does not operate. Cannot adjust the volume level. The disc will help you remedy problems you press and hold (OFF) on the unit. Troubleshooting The following checklist will not eject. t Play back with your unit. The contents of the ignition is incompatible with the car...
... connection and operating procedures. The power antenna (aerial) does not extend. If no operation is performed for a 2-speaker system. • The CD changer is switched. The Auto Off function does not operate. Cannot adjust the volume level. The disc will help you remedy problems you press and hold (OFF) on the unit. Troubleshooting The following checklist will not eject. t Play back with your unit. The contents of the ignition is incompatible with the car...
Operating Instructions
Page 39
...; Lower the volume. • "EC/NC Mode" is on " (page 32). t Connect a power antenna (aerial) control lead (blue) or accessory power supply lead (red) to the other device, it . t If the auto antenna (aerial) will not go up, check the connection of the car antenna (aerial). t Perform manual tuning. This unit cannot recognize USB devices via a USB hub. During playback, the USB device has been disconnected. Bluetooth function The connecting device cannot detect this unit cannot be...
...; Lower the volume. • "EC/NC Mode" is on " (page 32). t Connect a power antenna (aerial) control lead (blue) or accessory power supply lead (red) to the other device, it . t If the auto antenna (aerial) will not go up, check the connection of the car antenna (aerial). t Perform manual tuning. This unit cannot recognize USB devices via a USB hub. During playback, the USB device has been disconnected. Bluetooth function The connecting device cannot detect this unit cannot be...
Operating Instructions
Page 40
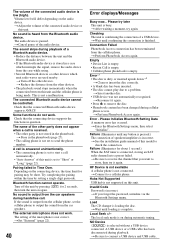
... the audio device. Please Initialize Bluetooth Setting Data A memory error has occured. t Be sure to receive the channel that you forget the password, initialize via the Bluetooth Settings menu. Invalid Code Password is not a malfunction. t Adjust the volume of the connected audio device is not set the cellular phone to output the sound from the car speakers during automatic tuning. This is incorrect. Check that the connected Bluetooth audio device supports AVRCP. A call automatically. • "Auto Answer" of this model to connect a USB device and USB cable. Error*1 •...
... the audio device. Please Initialize Bluetooth Setting Data A memory error has occured. t Be sure to receive the channel that you forget the password, initialize via the Bluetooth Settings menu. Invalid Code Password is not a malfunction. t Adjust the volume of the connected audio device is not set the cellular phone to output the sound from the car speakers during automatic tuning. This is incorrect. Check that the connected Bluetooth audio device supports AVRCP. A call automatically. • "Auto Answer" of this model to connect a USB device and USB cable. Error*1 •...


