
Operating Instructions
Page 4
... audio equipment 19 CD changer 19 Rotary commander RM-X4S 20 Additional Information Precautions 21 Notes on discs 21 Playback order of MP3/WMA files 21 About MP3 files 21 About WMA files 21 About Bluetooth function 22 Maintenance ...Bluetooth function 6 Resetting the unit 7 Canceling the DEMO mode 7 Preparing the card remote commander 8 Setting the clock 8 Detaching the front panel 8 Attaching the front panel 9 Location of all paired devices. . . . 17 4 EQ3 18 Adjusting setup items - BTM 13 Storing manually 13 Receiving the stored stations 13 Tuning automatically 13 CD...
... audio equipment 19 CD changer 19 Rotary commander RM-X4S 20 Additional Information Precautions 21 Notes on discs 21 Playback order of MP3/WMA files 21 About MP3 files 21 About WMA files 21 About Bluetooth function 22 Maintenance ...Bluetooth function 6 Resetting the unit 7 Canceling the DEMO mode 7 Preparing the card remote commander 8 Setting the clock 8 Detaching the front panel 8 Attaching the front panel 9 Location of all paired devices. . . . 17 4 EQ3 18 Adjusting setup items - BTM 13 Storing manually 13 Receiving the stored stations 13 Tuning automatically 13 CD...
Operating Instructions
Page 7
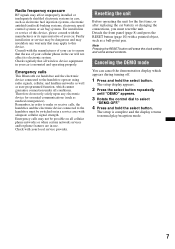
... to the handsfree must reset the unit. Remember, in order to make or receive calls, the handsfree and the electronic device connected to ensure that the use .... function, which appears during turning off. 1 Press and hold the select button. Emergency calls This Bluetooth car handsfree and the electronic device connected to this device, please consult with adequate cellular signal strength....the display returns to select "DEMO-OFF." 4 Press and hold the select button. Detach the front panel (page 8) and press the RESET button (page 10) with your cellular phone in the car will...
... to the handsfree must reset the unit. Remember, in order to make or receive calls, the handsfree and the electronic device connected to ensure that the use .... function, which appears during turning off. 1 Press and hold the select button. Emergency calls This Bluetooth car handsfree and the electronic device connected to this device, please consult with adequate cellular signal strength....the display returns to select "DEMO-OFF." 4 Press and hold the select button. Detach the front panel (page 8) and press the RESET button (page 10) with your cellular phone in the car will...
Operating Instructions
Page 8
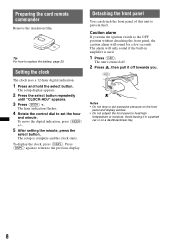
...The setup is turned off. 2 Press , then pull it in a parked car or on the front panel and display window. • Do not subject the front panel to the OFF position without detaching the front panel, the caution alarm will only sound if the built-in amplifier is used. 1 Press (OFF). The unit... select button. To display the clock, press (DSPL). Press (DSPL) again to return to set the hour and minute. Detaching the front panel You can detach the front panel of this unit to replace the battery, page 23. The alarm will sound for a few seconds. To move the digital indication, press (...
...The setup is turned off. 2 Press , then pull it in a parked car or on the front panel and display window. • Do not subject the front panel to the OFF position without detaching the front panel, the caution alarm will only sound if the built-in amplifier is used. 1 Press (OFF). The unit... select button. To display the clock, press (DSPL). Press (DSPL) again to return to set the hour and minute. Detaching the front panel You can detach the front panel of this unit to replace the battery, page 23. The alarm will sound for a few seconds. To move the digital indication, press (...

Operating Instructions
Page 9
A B Note Do not put anything on the inner surface of the unit, as illustrated, and push the left side into position until it clicks. Attaching the front panel Engage part A of the front panel with part B of the front panel. 9
A B Note Do not put anything on the inner surface of the unit, as illustrated, and push the left side into position until it clicks. Attaching the front panel Engage part A of the front panel with part B of the front panel. 9
Operating Instructions
Page 10
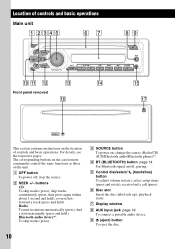
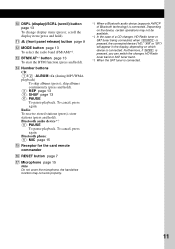
.../fastforward a track (press and hold ). F Disc slot Insert the disc (label side up), playback starts. qa qs qd qf Front panel removed qh qg qj RESET This section contains instructions on the unit. stop the source. Radio: To tune in stations automatically (press); C...button To power off , pairing. receive/end a call (press). skip tracks continuously (press, then press again within about 1 second and hold); G Display window H AUX input jack page 19 To connect a portable audio device. change the source (Radio/CD/ AUX/Bluetooth audio/Bluetooth phone)*2. select setup items (press ...
.../fastforward a track (press and hold ). F Disc slot Insert the disc (label side up), playback starts. qa qs qd qf Front panel removed qh qg qj RESET This section contains instructions on the unit. stop the source. Radio: To tune in stations automatically (press); C...button To power off , pairing. receive/end a call (press). skip tracks continuously (press, then press again within about 1 second and hold); G Display window H AUX input jack page 19 To connect a portable audio device. change the source (Radio/CD/ AUX/Bluetooth audio/Bluetooth phone)*2. select setup items (press ...
Operating Instructions
Page 11
.... K (front panel release) button page 8 L MODE button page 13 To select the radio band (FM/AM)*2. To cancel, press again. Radio: To receive stored stations (press); when (SOURCE) is connected. N Number buttons CD: (1)/(2): ALBUM -/+ (during MP3/WMA playback) To skip albums (press); Bluetooth phone: (5): MIC... or "SR") will appear in the display, depending on the device, certain operations may not work properly. *1 When a Bluetooth audio device (supports AVRCP of a CD changer, HD Radio tuner or SAT tuner being connected; scroll the display item (press and hold ). M BTM/CAT*3 button...
.... K (front panel release) button page 8 L MODE button page 13 To select the radio band (FM/AM)*2. To cancel, press again. Radio: To receive stored stations (press); when (SOURCE) is connected. N Number buttons CD: (1)/(2): ALBUM -/+ (during MP3/WMA playback) To skip albums (press); Bluetooth phone: (5): MIC... or "SR") will appear in the display, depending on the device, certain operations may not work properly. *1 When a Bluetooth audio device (supports AVRCP of a CD changer, HD Radio tuner or SAT tuner being connected; scroll the display item (press and hold ). M BTM/CAT*3 button...
Operating Instructions
Page 15
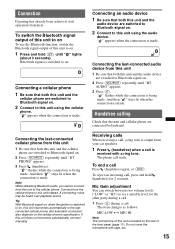
...connected cellular phone from this unit 1 Be sure that both this unit and the audio device are switched to the lastconnected cellular phone. Receiving calls When receiving a call . The phone call Press (handsfree) again, or (OFF). " " flashes while the connection is made . " "...connection is being made . To switch the Bluetooth signal output of this unit does not reconnect automatically, connect manually. Bluetooth signal is received with tape, etc. 15 If this unit to on To use the Bluetooth function, switch the Bluetooth signal output of the front panel (page 11).
...connected cellular phone from this unit 1 Be sure that both this unit and the audio device are switched to the lastconnected cellular phone. Receiving calls When receiving a call . The phone call Press (handsfree) again, or (OFF). " " flashes while the connection is made . " "...connection is being made . To switch the Bluetooth signal output of this unit does not reconnect automatically, connect manually. Bluetooth signal is received with tape, etc. 15 If this unit to on To use the Bluetooth function, switch the Bluetooth signal output of the front panel (page 11).

Operating Instructions
Page 23
...ignition before cleaning the connectors, and remove the key from the ignition switch. • Never touch the connectors directly with your nearest Sony dealer. If the fuse blows, check the power connection and replace the fuse. Otherwise, the connectors may be an internal malfunction. Fuse...blows again after replacement, there may be damaged. WARNING Battery may not function properly if the connectors between the unit and the front panel are not clean. Fuse (10 A) 23 Maintenance Replacing the lithium battery of the card remote commander Under normal conditions, the battery ...
...ignition before cleaning the connectors, and remove the key from the ignition switch. • Never touch the connectors directly with your nearest Sony dealer. If the fuse blows, check the power connection and replace the fuse. Otherwise, the connectors may be an internal malfunction. Fuse...blows again after replacement, there may be damaged. WARNING Battery may not function properly if the connectors between the unit and the front panel are not clean. Fuse (10 A) 23 Maintenance Replacing the lithium battery of the card remote commander Under normal conditions, the battery ...
Operating Instructions
Page 24
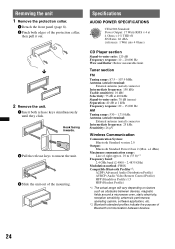
... pull it out. Removing the unit 1 Remove the protection collar. 1 Detach the front panel (page 8). 2 Pinch both release keys simultaneously until they click. Specifications AUDIO POWER SPECIFICATIONS ...< 1% THD+N SN Ratio: 82 dBA (reference: 1 Watt into 4 Ohms) CD Player section Signal-to-noise ratio: 120 dB Frequency response: 10 - 20,000...aerial) connector Intermediate frequency: 25 kHz Sensitivity: 26 µV Wireless Communication Communication System: Bluetooth Standard version 2.0 Output: Bluetooth Standard Power Class 2 (Max. +4 dBm) Maximum communication range: Line of sight approx....
... pull it out. Removing the unit 1 Remove the protection collar. 1 Detach the front panel (page 8). 2 Pinch both release keys simultaneously until they click. Specifications AUDIO POWER SPECIFICATIONS ...< 1% THD+N SN Ratio: 82 dBA (reference: 1 Watt into 4 Ohms) CD Player section Signal-to-noise ratio: 120 dB Frequency response: 10 - 20,000...aerial) connector Intermediate frequency: 25 kHz Sensitivity: 26 µV Wireless Communication Communication System: Bluetooth Standard version 2.0 Output: Bluetooth Standard Power Class 2 (Max. +4 dBm) Maximum communication range: Line of sight approx....


