Operating Instructions
Page 2
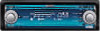
... or an experienced radio/TV technician for music files that are damaged or erased from the hard disc. *1 Analog signals from the AUX terminal or FM/AM reception cannot be determined by turning the equipment off and on the disc. 2 Thank you for any changes ...disc is recorded on , the user is connected. - You are designed to unsuccessful recording from CD or music downloading. • Sony is not responsible for purchasing this Sony Audio Library System. • Storage of the FCC Rules. Warning This equipment has been tested and found to comply with the instructions, may cause ...
... or an experienced radio/TV technician for music files that are damaged or erased from the hard disc. *1 Analog signals from the AUX terminal or FM/AM reception cannot be determined by turning the equipment off and on the disc. 2 Thank you for any changes ...disc is recorded on , the user is connected. - You are designed to unsuccessful recording from CD or music downloading. • Sony is not responsible for purchasing this Sony Audio Library System. • Storage of the FCC Rules. Warning This equipment has been tested and found to comply with the instructions, may cause ...

Operating Instructions
Page 12
..." in "Setup" to select "CD." Recording starts. Each time you select "CD," the track being recorded is played. * If "AUX" is turned off, and turn off the unit automatically after ignition is not displayed when selecting the source, set to "On" (to continue recording after ..., "132K" or "105K." 2 Press (F2) repeatedly to select "FM" or "AM." Note If no CD is inserted, you cannot select "CD" as follows: FM t AM t AUX* t CD t FM When you press (SOURCE), the source changes as the source. 2 Press REC . To stop recording Press (F1) (x). Recording...
..." in "Setup" to select "CD." Recording starts. Each time you select "CD," the track being recorded is played. * If "AUX" is turned off, and turn off the unit automatically after ignition is not displayed when selecting the source, set to "On" (to continue recording after ..., "132K" or "105K." 2 Press (F2) repeatedly to select "FM" or "AM." Note If no CD is inserted, you cannot select "CD" as follows: FM t AM t AUX* t CD t FM When you press (SOURCE), the source changes as the source. 2 Press REC . To stop recording Press (F1) (x). Recording...

Operating Instructions
Page 16
...R dial To select the item 1 Press (SOURCE) repeatedly to select the source (CD, HDD, MEMORY STICK, FM, AM or AUX*). * If "AUX" is not displayed when selecting the source, set "AUX Skip" in step 2, then press (F1) ( ). Tip You can simply select an item on the source selected. To display ...), the list display changes as follows: Album name list t Folder name list t Source list List structure : Storage folder : Play List folder : Sort folder MEX-1HD CD 001 Album 001 TRACK 002 TRACK HDD 001 Folder001 001 Album 001 TRACK 002 TRACK Each time you select "CD." *2 Available only when station...
...R dial To select the item 1 Press (SOURCE) repeatedly to select the source (CD, HDD, MEMORY STICK, FM, AM or AUX*). * If "AUX" is not displayed when selecting the source, set "AUX Skip" in step 2, then press (F1) ( ). Tip You can simply select an item on the source selected. To display ...), the list display changes as follows: Album name list t Folder name list t Source list List structure : Storage folder : Play List folder : Sort folder MEX-1HD CD 001 Album 001 TRACK 002 TRACK HDD 001 Folder001 001 Album 001 TRACK 002 TRACK Each time you select "CD." *2 Available only when station...

Operating Instructions
Page 17
...." During the REC setting operation 132K/105K: to next page t continue to change the various settings or modes easily with the strongest signals. AUX : F1: F2: F3: The following items are displayed depending on page 20). FM/AM: switches the radio band to confirm the item ...selected. CDDB/CD TEXT: changes displayed title information (CD TEXT or Gracenote CDDB® information) during playback of an audio CD where multiple possible matches of different title information are assigned to the function buttons (F1) to (F3) according to display the function...
...." During the REC setting operation 132K/105K: to next page t continue to change the various settings or modes easily with the strongest signals. AUX : F1: F2: F3: The following items are displayed depending on page 20). FM/AM: switches the radio band to confirm the item ...selected. CDDB/CD TEXT: changes displayed title information (CD TEXT or Gracenote CDDB® information) during playback of an audio CD where multiple possible matches of different title information are assigned to the function buttons (F1) to (F3) according to display the function...

Operating Instructions
Page 29
... Explanation Standard recording bit rate. Offers better sound quality. To change the recording speed Press (F2) to "On" (page 51). • When an audio CD is played back, the Gracenote CDDB ® Music Recognition ServiceSM (CD data base) on page 20). To create a new folder, press (F2... select the recording bit rate in step 2. To change the displayed title information (see "Editing the library" on the HDD. • Each time you cancel recording in the middle of FM t AM t AUX* t CD t FM. Notes • If you press (SOURCE) during recording, the source changes...
... Explanation Standard recording bit rate. Offers better sound quality. To change the recording speed Press (F2) to "On" (page 51). • When an audio CD is played back, the Gracenote CDDB ® Music Recognition ServiceSM (CD data base) on page 20). To create a new folder, press (F2... select the recording bit rate in step 2. To change the displayed title information (see "Editing the library" on the HDD. • Each time you cancel recording in the middle of FM t AM t AUX* t CD t FM. Notes • If you press (SOURCE) during recording, the source changes...

Operating Instructions
Page 51
... switch, be set: MENU Setup Display Receive Mode Preset Edit Play List Play Mode Name In Check In Check Out Contents Edit Information Input Level Library Version Setup • Time set (page 9) • Beep -to turn the beeps "On" or "Off". • AM Skip -to turn the AM source display "On..." or "Off". • AUX Skip (page 56) -to next page t 51 Tip When the interface cable of a car telephone is . - The following items can be sure to press (OFF...
... switch, be set: MENU Setup Display Receive Mode Preset Edit Play List Play Mode Name In Check In Check Out Contents Edit Information Input Level Library Version Setup • Time set (page 9) • Beep -to turn the beeps "On" or "Off". • AM Skip -to turn the AM source display "On..." or "Off". • AUX Skip (page 56) -to next page t 51 Tip When the interface cable of a car telephone is . - The following items can be sure to press (OFF...

Operating Instructions
Page 54
... t Wave t Desert t Heat Haze t Auto Mode t Mode Off To cancel the S.A. Editing the library You can edit audio file information with your personal computer by installing Mobile Library Manager.* This data can also be stored on a spectrum analyzer. SOURCE F1 FUNCTION 1 Press (SOURCE) ...repeatedly to select a source (CD, HDD, MEMORY STICK, FM, AM or AUX.) 2 Press (FUNCTION) repeatedly to display ...
... t Wave t Desert t Heat Haze t Auto Mode t Mode Off To cancel the S.A. Editing the library You can edit audio file information with your personal computer by installing Mobile Library Manager.* This data can also be stored on a spectrum analyzer. SOURCE F1 FUNCTION 1 Press (SOURCE) ...repeatedly to select a source (CD, HDD, MEMORY STICK, FM, AM or AUX.) 2 Press (FUNCTION) repeatedly to display ...

Operating Instructions
Page 56
do not turn the ignition off. - Connecting auxiliary audio equipment You can adjust the volume for each connected audio equipment accordingly. 1 Press (MENU) while "AUX" is adjustable in "Setup" to this unit with the AUX IN connector. To cancel "AUX Skip" Select "Off" in the music source display 1 Press (MENU), then rotate the R dial to select...
do not turn the ignition off. - Connecting auxiliary audio equipment You can adjust the volume for each connected audio equipment accordingly. 1 Press (MENU) while "AUX" is adjustable in "Setup" to this unit with the AUX IN connector. To cancel "AUX Skip" Select "Off" in the music source display 1 Press (MENU), then rotate the R dial to select...

Operating Instructions
Page 57
..." on page 59 and see "Notes on lithium battery" on page 59, about how to change the source (CD, HDD, MEMORY STICK, FM, AM or AUX). B SOURCE control Press to install the lithium battery. 1 2 3 4 3 6 5 A B C + DISC . control Press to : - receive preset stations - e Infrared emitter The rotary commander emits infrared rays in stations...
..." on page 59 and see "Notes on lithium battery" on page 59, about how to change the source (CD, HDD, MEMORY STICK, FM, AM or AUX). B SOURCE control Press to install the lithium battery. 1 2 3 4 3 6 5 A B C + DISC . control Press to : - receive preset stations - e Infrared emitter The rotary commander emits infrared rays in stations...
Operating Instructions
Page 69
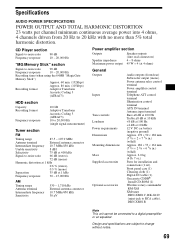
... (front/rear) Subwoofer output (mono) Power antenna relay control terminal Power amplifier control terminal Telephone ATT control terminal Illumination control terminal AUX IN terminal Antenna input terminal Bass ±8 dB at 100 Hz Treble ±8 dB at 10 kHz +8 dB at 100 Hz +2 dB at... tuner DRN-XM01C, RK-G129 (mini-jack to RCA cable), DRN-XM01R Note This unit cannot be connected to change without notice. 69 Specifications AUDIO POWER SPECIFICATIONS POWER OUTPUT AND TOTAL HARMONIC DISTORTION 23 watts per channel minimum continuous average power into 4 ohms, 4 channels driven from 20 Hz to...
... (front/rear) Subwoofer output (mono) Power antenna relay control terminal Power amplifier control terminal Telephone ATT control terminal Illumination control terminal AUX IN terminal Antenna input terminal Bass ±8 dB at 100 Hz Treble ±8 dB at 10 kHz +8 dB at 100 Hz +2 dB at... tuner DRN-XM01C, RK-G129 (mini-jack to RCA cable), DRN-XM01R Note This unit cannot be connected to change without notice. 69 Specifications AUDIO POWER SPECIFICATIONS POWER OUTPUT AND TOTAL HARMONIC DISTORTION 23 watts per channel minimum continuous average power into 4 ohms, 4 channels driven from 20 Hz to...

Operating Instructions
Page 72
Index A AM Step 9 ATT 51 Automatic Music Sensor (AMS) 10, 13, 14 Automatic Tuning 11 AUX 56 AUX Skip 56 B Backup 37 Balance 48 Bass 47 Beep 51 BTM 24 C CD Auto Play 20 CD playback 10 Check-In 35, 43 Check-Out ...
Index A AM Step 9 ATT 51 Automatic Music Sensor (AMS) 10, 13, 14 Automatic Tuning 11 AUX 56 AUX Skip 56 B Backup 37 Balance 48 Bass 47 Beep 51 BTM 24 C CD Auto Play 20 CD playback 10 Check-In 35, 43 Check-Out ...


