

Users Guide
Page 1
Model No. For installation and connections, see the supplied installation/connections manual. Refer to these numbers whenever you call upon your Sony dealer regarding this product. FM/AM MiniDisc Recorder FM/AM MiniDisc Recorder Operating Instructions US Mode d'emploi FR Manual de instrucciones ES MDX-C800REC Owner's Record The model and serial numbers are located on the bottom of the unit. MDX-C800REC Serial No. Record the serial number in the space provided below. MDX-C800REC © 2000 Sony Corporation
Model No. For installation and connections, see the supplied installation/connections manual. Refer to these numbers whenever you call upon your Sony dealer regarding this product. FM/AM MiniDisc Recorder FM/AM MiniDisc Recorder Operating Instructions US Mode d'emploi FR Manual de instrucciones ES MDX-C800REC Owner's Record The model and serial numbers are located on the bottom of the unit. MDX-C800REC Serial No. Record the serial number in the space provided below. MDX-C800REC © 2000 Sony Corporation
Users Guide
Page 2
... with a power antenna, it will increase eye hazard. This equipment generates, uses, and can radiate radio frequency energy and, if not installed and used in a residential installation. Consult the dealer or an experienced radio/ TV technician for purchasing the Sony MiniDisc Recorder. Thank you can connect MD changers, CD changers, MD players, or CD players. *2 A CD TEXT disc is equipped with the instructions, may...
... with a power antenna, it will increase eye hazard. This equipment generates, uses, and can radiate radio frequency energy and, if not installed and used in a residential installation. Consult the dealer or an experienced radio/ TV technician for purchasing the Sony MiniDisc Recorder. Thank you can connect MD changers, CD changers, MD players, or CD players. *2 A CD TEXT disc is equipped with the instructions, may...
Users Guide
Page 3
... go off, detecting a change in a very damp area, moisture may cause a malfunction. Turn the monitor off recording or REC Continue mode. Moisture condensation On a rainy day or in the car's electrical current. •When an optional TV/video unit is connected, the monitor stays on the lenses inside the unit, reduce the sound quality, or prevent sound reproduction altogether. Notes...
... go off, detecting a change in a very damp area, moisture may cause a malfunction. Turn the monitor off recording or REC Continue mode. Moisture condensation On a rainy day or in the car's electrical current. •When an optional TV/video unit is connected, the monitor stays on the lenses inside the unit, reduce the sound quality, or prevent sound reproduction altogether. Notes...

Users Guide
Page 5
... controls 6 Getting Started Resetting the unit 8 Detaching the front panel 8 Turning the unit on a disc 38 Watching the TV or video while listening to use the menu - Repeat Play 12 Playing tracks in a specific track order - Disc Memo 15 Locating a disc by name - List-up 17 * Functions available with optional CD/MD unit. Table of Contents Location of MDs 41 Specifications 43 Troubleshooting guide 44 5 Shuffle Play 13 Creating a program...
... controls 6 Getting Started Resetting the unit 8 Detaching the front panel 8 Turning the unit on a disc 38 Watching the TV or video while listening to use the menu - Repeat Play 12 Playing tracks in a specific track order - Disc Memo 15 Locating a disc by name - List-up 17 * Functions available with optional CD/MD unit. Table of Contents Location of MDs 41 Specifications 43 Troubleshooting guide 44 5 Shuffle Play 13 Creating a program...
Users Guide
Page 6
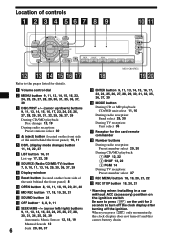
REC STOP button 18, 20, 21 * Warning when installing in a car without ACC (accessory) position on the ignition switch Be sure to press (OFF) on the front side of controls MENU D I SC + PR S T+ DSPL LIST SOURCE -SEEK/AMS SOUND PRST- ENTER MODE REP SHUF PGM 1 2 3 4 OPEN MD REC Xz REC STOP x REC MENU 5 6 MDX-C800REC Refer to turn off the ignition. When you press...
REC STOP button 18, 20, 21 * Warning when installing in a car without ACC (accessory) position on the ignition switch Be sure to press (OFF) on the front side of controls MENU D I SC + PR S T+ DSPL LIST SOURCE -SEEK/AMS SOUND PRST- ENTER MODE REP SHUF PGM 1 2 3 4 OPEN MD REC Xz REC STOP x REC MENU 5 6 MDX-C800REC Refer to turn off the ignition. When you press...

Users Guide
Page 8
... reset button will beep for the first time or B after replacing the car battery, you detach the panel while the unit is still turned on, the power will turn the ignition switch to direct sunlight or heat sources such as a ball- Getting Started Attaching the front panel Place the hole A in the front panel onto the spindle B on the unit as the station...
... reset button will beep for the first time or B after replacing the car battery, you detach the panel while the unit is still turned on, the power will turn the ignition switch to direct sunlight or heat sources such as a ball- Getting Started Attaching the front panel Place the hole A in the front panel onto the spindle B on the unit as the station...

Users Guide
Page 9
... flashes. 2 Press either side of (SEEK/AMS). (SEEK/AMS) (-): to select SOURCE leftwards (SEEK/AMS) (+): to select rightwards (DISC/PRST) (-): to normal play mode. 9 After the clock setting is completed, the display returns to select downwards Note In Menu mode the "v" in the left of the display indicates the selectable buttons of this unit is selecting functions/settings from a menu. The clock starts. Setting the clock The clock uses a 12-hour digital...
... flashes. 2 Press either side of (SEEK/AMS). (SEEK/AMS) (-): to select SOURCE leftwards (SEEK/AMS) (+): to select rightwards (DISC/PRST) (-): to normal play mode. 9 After the clock setting is completed, the display returns to select downwards Note In Menu mode the "v" in the left of the display indicates the selectable buttons of this unit is selecting functions/settings from a menu. The clock starts. Setting the clock The clock uses a 12-hour digital...

Users Guide
Page 10
...front panel. If an MD is always displayed (page 35). Note If you connect an optional CD unit with the CD TEXT function, the CD TEXT information will appear on the display window, then the playing time will appear on the display when you can also control external CD/MD units. Playing a disc Playing an ...to turn on the unit before you set to ON, the time is already inserted, press (SOURCE) repeatedly until "MD" appears to playing an MD with this unit) 1 Press (OPEN) and insert the MD. Notes • If your car has no ACC (accessory) position on the ignition switch, be displayed)....
...front panel. If an MD is always displayed (page 35). Note If you connect an optional CD unit with the CD TEXT function, the CD TEXT information will appear on the display window, then the playing time will appear on the display when you can also control external CD/MD units. Playing a disc Playing an ...to turn on the unit before you set to ON, the time is already inserted, press (SOURCE) repeatedly until "MD" appears to playing an MD with this unit) 1 Press (OPEN) and insert the MD. Notes • If your car has no ACC (accessory) position on the ignition switch, be displayed)....

Users Guide
Page 11
... turned off " in step 3. 11 After you select the desired item, the display will always take priority over , the track number indication returns to "1," and playback restarts from the beginning, after the disc name. (Only for CD TEXT discs with optional CD/MD unit) 1 Press (SOURCE) repeatedly to select "CD" or "MD." Notes • If you set the function...
... turned off " in step 3. 11 After you select the desired item, the display will always take priority over , the track number indication returns to "1," and playback restarts from the beginning, after the disc name. (Only for CD TEXT discs with optional CD/MD unit) 1 Press (SOURCE) repeatedly to select "CD" or "MD." Notes • If you set the function...

Users Guide
Page 17
... updates the TOC (Table of the unit. labeling an MD - You can record individual tracks/discs or programed tracks played on a connected CD/ MD unit onto the MD on the unit's display. the CD TEXT information: when you turn off the ignition or disconnect the power-...button, the display returns to record from that have been assigned custom names or for discs that point. 17 selecting Menu mode. * Unselectable only during recording • "Protected" appears when the tab for a CD or an MD using the card remote commander, press (LIST) to return to eject the MD before you play ...
... updates the TOC (Table of the unit. labeling an MD - You can record individual tracks/discs or programed tracks played on a connected CD/ MD unit onto the MD on the unit's display. the CD TEXT information: when you turn off the ignition or disconnect the power-...button, the display returns to record from that have been assigned custom names or for discs that point. 17 selecting Menu mode. * Unselectable only during recording • "Protected" appears when the tab for a CD or an MD using the card remote commander, press (LIST) to return to eject the MD before you play ...

Users Guide
Page 22
...-off recording or REC Continue mode. Example: Erasing track B. protection is connected, the monitor stays on editing • "Protected" appears if the tab for record- Erase function You can record the audio sound of a TV program or video in increments of the TOC information. • The (1) (REP), (2) (SHUF), and (DSPL) buttons do not work during edit mode. 5 Press (REC MENU) repeatedly until your car...
...-off recording or REC Continue mode. Example: Erasing track B. protection is connected, the monitor stays on editing • "Protected" appears if the tab for record- Erase function You can record the audio sound of a TV program or video in increments of the TOC information. • The (1) (REP), (2) (SHUF), and (DSPL) buttons do not work during edit mode. 5 Press (REC MENU) repeatedly until your car...
Users Guide
Page 29
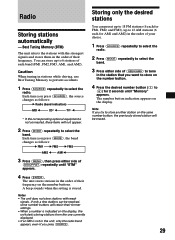
... frequency. A beep sounds when the setting is not connected, these items will retain their frequency on the same number button, the previously stored station will be received, some number buttons will not appear. 2 Press (MODE) repeatedly to select the radio. The number button indication appears on the number button. 4 Press the desired number button ((1) to 12 AM stations (6 each band (FM1, FM2, FM3, AM1, and AM2). Each time you press (SOURCE), the source changes...
... frequency. A beep sounds when the setting is not connected, these items will retain their frequency on the same number button, the previously stored station will be received, some number buttons will not appear. 2 Press (MODE) repeatedly to select the radio. The number button indication appears on the number button. 4 Press the desired number button ((1) to 12 AM stations (6 each band (FM1, FM2, FM3, AM1, and AM2). Each time you press (SOURCE), the source changes...

Users Guide
Page 30
... off " in stereo, manually switch to the "Wide" setting. 1 During radio reception, press (MENU), then press either side of (DISC/PRST) repeatedly until "IF Auto" appears. 2 Press the (+) side of (SEEK/AMS) to select "Local on" (Local Seek mode). To return to normal mode, select "Mono off " is received. Receiving the stored stations 1 Press (SOURCE) repeatedly to select the radio. 2 Press (MODE) repeatedly to select the band. 3 Press the number button ((1) to...
... off " in stereo, manually switch to the "Wide" setting. 1 During radio reception, press (MENU), then press either side of (DISC/PRST) repeatedly until "IF Auto" appears. 2 Press the (+) side of (SEEK/AMS) to select "Local on" (Local Seek mode). To return to normal mode, select "Mono off " is received. Receiving the stored stations 1 Press (SOURCE) repeatedly to select the radio. 2 Press (MODE) repeatedly to select the band. 3 Press the number button ((1) to...

Users Guide
Page 32
... station. Locating a station by the unit's button, the display returns to normal play mode. SOUND MODE DSPL DSPL MODE SOUND 32 Notes • When using the card remote commander, press (LIST) to return to the station currently tuned in flashes. 2 Press either side of the unit. When operating just by name - The name assigned to normal play mode after 5 seconds. • If you have a TV tuner connected, the list-up 1 During radio reception, press (LIST) momentarily. List...
... station. Locating a station by the unit's button, the display returns to normal play mode. SOUND MODE DSPL DSPL MODE SOUND 32 Notes • When using the card remote commander, press (LIST) to return to the station currently tuned in flashes. 2 Press either side of the unit. When operating just by name - The name assigned to normal play mode after 5 seconds. • If you have a TV tuner connected, the list-up 1 During radio reception, press (LIST) momentarily. List...
Users Guide
Page 34
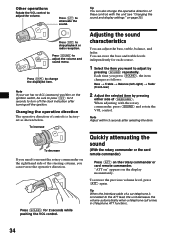
...) to adjust the volume and sound menu. "ATT on" appears on the rotary commander or card remote commander. When adjusting with the unit (see "Changing the sound and display settings" on the right hand side of the steering column, you press (SOUND), the item changes as shown below. To increase Adjusting the sound characteristics You can store the bass and treble levels independently for each source. 1 Select the item...
...) to adjust the volume and sound menu. "ATT on" appears on the rotary commander or card remote commander. When adjusting with the unit (see "Changing the sound and display settings" on the right hand side of the steering column, you press (SOUND), the item changes as shown below. To increase Adjusting the sound characteristics You can store the bass and treble levels independently for each source. 1 Select the item...

Users Guide
Page 35
... display returns to turn the lights on the right side of the equalizer display. •Dimmer - Note The displayed item will be set position. - Display •D.Info (Dual Information) - After the mode setting is playing on the display are not recognizable because of the display. - to normal play mode at low volumes. Select "rev" when you turn the beeps on ). •SA (Spectrum Analyser) - to change the brightness of the unit's installation...
... display returns to turn the lights on the right side of the equalizer display. •Dimmer - Note The displayed item will be set position. - Display •D.Info (Dual Information) - After the mode setting is playing on the display are not recognizable because of the display. - to normal play mode at low volumes. Select "rev" when you turn the beeps on ). •SA (Spectrum Analyser) - to change the brightness of the unit's installation...

Users Guide
Page 36
... be displayed. • If you press (+) side of a TV program or video. Each time you select the "SA 3" or "SA 4" setting, source indication will not be displayed. B TV1 B TV2 B AUX Watching a video 1 Press (SOURCE) repeatedly until "TV" or "AUX" appears. 2 Press (MODE) repeatedly to 5, or automatic display mode. Play the video. Selecting the spectrum analyzer The sound signal level is displayed. 36 Tip You can control an optional TV tuner and TV monitor with...
... be displayed. • If you press (+) side of a TV program or video. Each time you select the "SA 3" or "SA 4" setting, source indication will not be displayed. B TV1 B TV2 B AUX Watching a video 1 Press (SOURCE) repeatedly until "TV" or "AUX" appears. 2 Press (MODE) repeatedly to 5, or automatic display mode. Play the video. Selecting the spectrum analyzer The sound signal level is displayed. 36 Tip You can control an optional TV tuner and TV monitor with...

Users Guide
Page 43
... MHz/450 kHz 30 µV Power amplifier section Outputs Speaker outputs (sure seal connectors) Speaker impedance 4 - 8 Ω Maximum power output 45 W × 4 (at 4 Ω) General Outputs Inputs Tone controls Power requirements Dimensions Mounting dimensions Mass Supplied accessories Optional accessories Optional equipment Audio outputs Power antenna relay control lead Power amplifier control lead Telephone ATT control lead Digital input connector BUS audio input connector BUS control input connector Illumination control lead Bass ±9 dB at 100 Hz Treble ±9 dB at 10 kHz...
... MHz/450 kHz 30 µV Power amplifier section Outputs Speaker outputs (sure seal connectors) Speaker impedance 4 - 8 Ω Maximum power output 45 W × 4 (at 4 Ω) General Outputs Inputs Tone controls Power requirements Dimensions Mounting dimensions Mass Supplied accessories Optional accessories Optional equipment Audio outputs Power antenna relay control lead Power amplifier control lead Telephone ATT control lead Digital input connector BUS audio input connector BUS control input connector Illumination control lead Bass ±9 dB at 100 Hz Treble ±9 dB at 10 kHz...
Users Guide
Page 44
... the connection and operating procedures. Indications do not appear on the display. •The power cord or battery has been disconnected. •The reset button has been pressed. t Press (OFF) again for 2 seconds. See "Cleaning the connectors" (page 40) for a 2-speaker system. •Rotate the volume control dial clockwise to adjust the volume. •Be sure to the center position for...
... the connection and operating procedures. Indications do not appear on the display. •The power cord or battery has been disconnected. •The reset button has been pressed. t Press (OFF) again for 2 seconds. See "Cleaning the connectors" (page 40) for a 2-speaker system. •Rotate the volume control dial clockwise to adjust the volume. •Be sure to the center position for...
Users Guide
Page 46
... too weak. t Use manual tuning. t Set the IF mode to the power supply lead of a car's noises. Timer-off the ignition. Radio reception Problem Cause/Solution Preset tuning is not possible. •Store the correct frequency in monaural. reception. t Set to the monaural reception mode (page 30). The stations cannot be received. Interference occurs during FM The Wide mode is not possible. antenna booster. (Only...
... too weak. t Use manual tuning. t Set the IF mode to the power supply lead of a car's noises. Timer-off the ignition. Radio reception Problem Cause/Solution Preset tuning is not possible. •Store the correct frequency in monaural. reception. t Set to the monaural reception mode (page 30). The stations cannot be received. Interference occurs during FM The Wide mode is not possible. antenna booster. (Only...


