
Operating Instructions
Page 1
Model No Serial No MDS-S50 ©2001 Sony Corporation Record the serial number in the space provided below. Refer to them whenever you call upon your Sony dealer regarding this product. 4-230-403-13(2) MiniDisc Deck Operating Instructions Owner's Record The model and serial numbers are located on the rear of the unit.
Model No Serial No MDS-S50 ©2001 Sony Corporation Record the serial number in the space provided below. Refer to them whenever you call upon your Sony dealer regarding this product. 4-230-403-13(2) MiniDisc Deck Operating Instructions Owner's Record The model and serial numbers are located on the rear of the unit.

Operating Instructions
Page 3
... of Contents Parts Identification Main unit 4 Remote control 5 Getting Started Hooking up the audio components ......... 6 Recording to MDs Recording to music - CD Synchro-recording 14 Playing MDs Loading an MD 16 Playing an MD - Dividing Function 21 Combining recorded tracks - Name Function 23 Changing the recorded level after recording - Erase Function 19 Dividing ... 30 Note on recording 9 Recording tips - Recording for North American model 35 3 S.F EDIT 26 Undoing the last edit - Time Machine Recording .......... 13 Synchro-recording with a Sony CD player -
... of Contents Parts Identification Main unit 4 Remote control 5 Getting Started Hooking up the audio components ......... 6 Recording to MDs Recording to music - CD Synchro-recording 14 Playing MDs Loading an MD 16 Playing an MD - Dividing Function 21 Combining recorded tracks - Name Function 23 Changing the recorded level after recording - Erase Function 19 Dividing ... 30 Note on recording 9 Recording tips - Recording for North American model 35 3 S.F EDIT 26 Undoing the last edit - Time Machine Recording .......... 13 Synchro-recording with a Sony CD player -

Operating Instructions
Page 4
Main unit AMS qf (8) (10) (12) (13) (24) CLEAR qd (18) (24) Display qg (8) (17) INPUT qj (8) LEVEL/DISPLAY/CHAR 2 (8) (12) (24) MD insertion slot 5 (16) MD/LP indicator 3 (10) (17) MENU/NO 7 (10) (18) (20) PHONE LEVEL w; (17) PHONES jack ql (17) PLAY MODE 4 (16) REC MODE qk (9) Remote sensor qh (7) ...
Main unit AMS qf (8) (10) (12) (13) (24) CLEAR qd (18) (24) Display qg (8) (17) INPUT qj (8) LEVEL/DISPLAY/CHAR 2 (8) (12) (24) MD insertion slot 5 (16) MD/LP indicator 3 (10) (17) MENU/NO 7 (10) (18) (20) PHONE LEVEL w; (17) PHONES jack ql (17) PLAY MODE 4 (16) REC MODE qk (9) Remote sensor qh (7) ...
Operating Instructions
Page 7
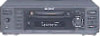
...from battery leakage and corrosion. To turn off demonstration mode, press x and CLEAR simultaneously when there is set the selector to the MD deck. Tip When the remote no MD in the display. properly oriented to a wall outlet. When using a screwdriver before connecting the AC power cord to select and ... on the PC. Doing so may cause a malfunction. • If you will be able to a wall outlet. Note If you turn on the MD deck and there is activated automatically after about ten minutes. Notes • Do not leave the remote in the display. Tip To turn on demonstration...
...from battery leakage and corrosion. To turn off demonstration mode, press x and CLEAR simultaneously when there is set the selector to the MD deck. Tip When the remote no MD in the display. properly oriented to a wall outlet. When using a screwdriver before connecting the AC power cord to select and ... on the PC. Doing so may cause a malfunction. • If you will be able to a wall outlet. Note If you turn on the MD deck and there is activated automatically after about ten minutes. Notes • Do not leave the remote in the display. Tip To turn on demonstration...

Operating Instructions
Page 8
... input signal t Track name3) 2) Time shown in the display at the point you want to be recorded over from . Recording to MDs Recording to an MD If the MD has been partially recorded, recording starts after stopping recording 1) The track number increases by one. The deck changes to step 6. If you...) until the number of the track to be recorded over appears. To record over appears, then press NX (or N) to do during recording. The MD deck is connected to the Set INPUT to DIGITAL OPTICAL IN connector D-IN ANALOG IN jacks A-IN 5 If necessary, locate the point on page 12...
... input signal t Track name3) 2) Time shown in the display at the point you want to be recorded over from . Recording to MDs Recording to an MD If the MD has been partially recorded, recording starts after stopping recording 1) The track number increases by one. The deck changes to step 6. If you...) until the number of the track to be recorded over appears. To record over appears, then press NX (or N) to do during recording. The MD deck is connected to the Set INPUT to DIGITAL OPTICAL IN connector D-IN ANALOG IN jacks A-IN 5 If necessary, locate the point on page 12...
Operating Instructions
Page 9
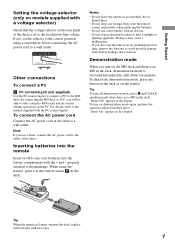
...the recording level/Checking the remaining recordable time/Input monitor Recording for long times In addition to 4 of a special compression system. Note MDs recorded in MD LP (LP2 or LP4 Stereo) mode cannot be played back on sound quality, Stereo recording or LP2 Stereo recording (2× long ...use of "Recording to ensure a complete recording. Converting digital sampling rates automatically A built-in the direction of Contents (TOC) is flashing) to MDs" on page 8. Record-protect tab Slide in . To record in Set REC MODE to Stereo Blank (No indicator) LP2 Stereo LP2 LP4 Stereo...
...the recording level/Checking the remaining recordable time/Input monitor Recording for long times In addition to 4 of a special compression system. Note MDs recorded in MD LP (LP2 or LP4 Stereo) mode cannot be played back on sound quality, Stereo recording or LP2 Stereo recording (2× long ...use of "Recording to ensure a complete recording. Converting digital sampling rates automatically A built-in the direction of Contents (TOC) is flashing) to MDs" on page 8. Record-protect tab Slide in . To record in Set REC MODE to Stereo Blank (No indicator) LP2 Stereo LP2 LP4 Stereo...
Operating Instructions
Page 10
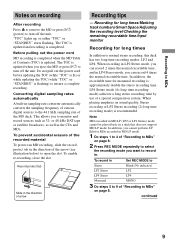
...track numbers in the same sequence as part of the track name, so the number of a track name automatically. When recording from a CD player or MD deck connected to add "LP:" at specific points, you cannot mark track numbers automatically if the sound source to be played back on decks that...function, do the procedure below to add a track number. Manual /Automatic Track Marking You can quickly locate the points later or edit the MD easily. These MDs cannot be played back on other sources connected to the DIGITAL IN connector or a source connected to the ANALOG IN jacks, do the ...
...track numbers in the same sequence as part of the track name, so the number of a track name automatically. When recording from a CD player or MD deck connected to add "LP:" at specific points, you cannot mark track numbers automatically if the sound source to be played back on decks that...function, do the procedure below to add a track number. Manual /Automatic Track Marking You can quickly locate the points later or edit the MD easily. These MDs cannot be played back on other sources connected to the DIGITAL IN connector or a source connected to the ANALOG IN jacks, do the ...
Operating Instructions
Page 11
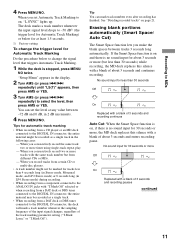
... recorded as a single track. • When recording from a component connected to on, "L.SYNC" lights up. When you record tracks from certain CD or multi-disc players. • A track number might be recorded as a single track in LP4 Stereo mode) during recording. • When recording from a DAT deck or DBS tuner ... recording continues Auto Cut: When the Smart Space function is on, if there is no sound input for about 3 seconds or more (but from a CD player or an MD deck connected to the DIGITAL IN connector, the entire material might not be marked for 30 seconds or more , the...
... recorded as a single track. • When recording from a component connected to on, "L.SYNC" lights up. When you record tracks from certain CD or multi-disc players. • A track number might be recorded as a single track in LP4 Stereo mode) during recording. • When recording from a DAT deck or DBS tuner ... recording continues Auto Cut: When the Smart Space function is on, if there is no sound input for about 3 seconds or more (but from a CD player or an MD deck connected to the DIGITAL IN connector, the entire material might not be marked for 30 seconds or more , the...

Operating Instructions
Page 12
... Press MENU/NO. Avoid turning on these indicators 5 Stop playing the program source. 6 To start recording, continue from step 8 of "Recording to MDs" on page 8. 2 Play the portion of the program source with Smart Space. • If the deck continues recording pause for about 10 minutes ...Menu" appears in stop mode, see page 8. Tips • To adjust the recording level, press LEVEL +/- Therefore, if the output level of "Recording to MDs" on page 8. 12 For the information in the display. 2 Turn AMS (or press ./> repeatedly) until "P.Hold Off" (factory setting) appears, then press...
... Press MENU/NO. Avoid turning on these indicators 5 Stop playing the program source. 6 To start recording, continue from step 8 of "Recording to MDs" on page 8. 2 Play the portion of the program source with Smart Space. • If the deck continues recording pause for about 10 minutes ...Menu" appears in stop mode, see page 8. Tips • To adjust the recording level, press LEVEL +/- Therefore, if the output level of "Recording to MDs" on page 8. 12 For the information in the display. 2 Turn AMS (or press ./> repeatedly) until "P.Hold Off" (factory setting) appears, then press...

Operating Instructions
Page 13
... End of the source to be recorded Time Recorded portion Beginning of the sour e to be recorded 1 Do steps 1 to 6 of "Recording to MDs" on page 8. Starting recording with the six seconds of this material, the Time Machine Recording feature constantly stores the most recent audio data in the... display during this time. Recording to MDs Monitoring the input signal (Input Monitor) You can monitor the selected input signal even when you are often lost due to the time it...
... End of the source to be recorded Time Recorded portion Beginning of the sour e to be recorded 1 Do steps 1 to 6 of "Recording to MDs" on page 8. Starting recording with the six seconds of this material, the Time Machine Recording feature constantly stores the most recent audio data in the... display during this time. Recording to MDs Monitoring the input signal (Input Monitor) You can monitor the selected input signal even when you are often lost due to the time it...
Operating Instructions
Page 14
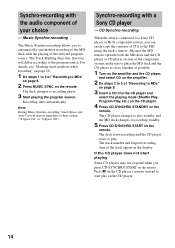
...is connected to a Sony CD player or Hi-Fi component system, you press CD-SYNCHRO START on the remote. Because the MD remote operates both the MD deck and the CD player or CD player section of the component system, make sure to place the MD deck and the CD player as close together as...you can easily copy the contents of CDs to MDs" on page 8. 2 Press MUSIC SYNC on the CD player. 14 If the CD player does not start play . Synchro-recording with the playing of the selected program source. Synchro-recording with a Sony CD player - The deck changes to play on the remote...
...is connected to a Sony CD player or Hi-Fi component system, you press CD-SYNCHRO START on the remote. Because the MD remote operates both the MD deck and the CD player or CD player section of the component system, make sure to place the MD deck and the CD player as close together as...you can easily copy the contents of CDs to MDs" on page 8. 2 Press MUSIC SYNC on the CD player. 14 If the CD player does not start play . Synchro-recording with the playing of the selected program source. Synchro-recording with a Sony CD player - The deck changes to play on the remote...
Operating Instructions
Page 15
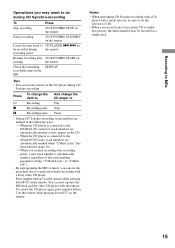
... regardless of the track marking parameter setting ("T.Mark Lsync" or "T.Mark Off"). • By reprograming the MD's remote, you record tracks from certain CD or multidisc players, the entire material may want to do during CD Synchro-recording To Press Stop recording CD-SYNCHRO STOP on...on pausing the remote Check the remaining DISPLAY recordable time on the MD Tips • You can use the procedure above to perform synchro-recording with a Sony video CD player. Press To change the deck to And change the CD player to H Recording Play x Recording pause Stop X Recording pause ...
... regardless of the track marking parameter setting ("T.Mark Lsync" or "T.Mark Off"). • By reprograming the MD's remote, you record tracks from certain CD or multidisc players, the entire material may want to do during CD Synchro-recording To Press Stop recording CD-SYNCHRO STOP on...on pausing the remote Check the remaining DISPLAY recordable time on the MD Tips • You can use the procedure above to perform synchro-recording with a Sony video CD player. Press To change the deck to And change the CD player to H Recording Play x Recording pause Stop X Recording pause ...

Operating Instructions
Page 16
... AMS1) clockwise (or press succeeding track during > repeatedly). play press . Normal Play/Shuffle Play/Repeat Play 1 Turn on the amplifier and select MD on the remote. Repeat Play Operations To Repeat only one track Repeat all tracks Cancel Repeat Play Repeat a specific portion within a track (Repeat A... to a preceding track AMS counterclockwise (or during press . Go to the beginning of the portion to be played repeatedly. Playing MDs Loading an MD Load an MD as illustrated below. once). SHUF The tracks in the display, then press AMS or NX (or N). 16 With the labeled ...
... AMS1) clockwise (or press succeeding track during > repeatedly). play press . Normal Play/Shuffle Play/Repeat Play 1 Turn on the amplifier and select MD on the remote. Repeat Play Operations To Repeat only one track Repeat all tracks Cancel Repeat Play Repeat a specific portion within a track (Repeat A... to a preceding track AMS counterclockwise (or during press . Go to the beginning of the portion to be played repeatedly. Playing MDs Loading an MD Load an MD as illustrated below. once). SHUF The tracks in the display, then press AMS or NX (or N). 16 With the labeled ...

Operating Instructions
Page 17
.../0 instead. Each press of the button changes the display cyclically as follows: Total number of tracks and total recorded time t Remaining recordable time2) on the MD (recordable MDs only) t The contents of a program (only when "PGM" lights up) t Total playing time of the program (only when "PGM" lights up) t ...number and remaining time of the current track t Remaining time of all recorded tracks t The contents of REC MODE. 17 Tips • While playing an MD recorded in step 5 above. • To use headphones, connect them to the PHONES jack. To enter a track number over 10 1 Press >10....
.../0 instead. Each press of the button changes the display cyclically as follows: Total number of tracks and total recorded time t Remaining recordable time2) on the MD (recordable MDs only) t The contents of a program (only when "PGM" lights up) t Total playing time of the program (only when "PGM" lights up) t ...number and remaining time of the current track t Remaining time of all recorded tracks t The contents of REC MODE. 17 Tips • While playing an MD recorded in step 5 above. • To use headphones, connect them to the PHONES jack. To enter a track number over 10 1 Press >10....

Operating Instructions
Page 18
..." appears in the display. 2 Turn AMS (or press ./> repeatedly) until "PGM" lights up in a program containing up , press DISPLAY repeatedly. Each time you eject the MD, the program will be lost. • The display shows when the total playing time of the program exceeds 999 minutes. Notes • If you enter...
..." appears in the display. 2 Turn AMS (or press ./> repeatedly) until "PGM" lights up in a program containing up , press DISPLAY repeatedly. Each time you eject the MD, the program will be lost. • The display shows when the total playing time of the program exceeds 999 minutes. Notes • If you enter...

Operating Instructions
Page 19
..."TOC" is lit) or while updating the TOC (while "TOC" or "STANDBY" is flashing) to 5. Before pulling out the power cord MD editing is completed when the MD Table of a track (A - Erasing recordings - Press m/M repeatedly until the track number which will precede the new track flashes. "TOC" lights ... steps 3 to 5. Press down CLEAR until the number of the unwanted track flashes, then press CLEAR. B Erase Function) continued 19 Editing Recorded MDs Changing the contents of the program While the deck is stopped and "PGM" lights up , or either "TOC" or "STANDBY" starts flashing. Check...
..."TOC" is lit) or while updating the TOC (while "TOC" or "STANDBY" is flashing) to 5. Before pulling out the power cord MD editing is completed when the MD Table of a track (A - Erasing recordings - Press m/M repeatedly until the track number which will precede the new track flashes. "TOC" lights ... steps 3 to 5. Press down CLEAR until the number of the unwanted track flashes, then press CLEAR. B Erase Function) continued 19 Editing Recorded MDs Changing the contents of the program While the deck is stopped and "PGM" lights up , or either "TOC" or "STANDBY" starts flashing. Check...

Operating Instructions
Page 20
.... 1 While the deck is stopped, playing, or paused, press MENU/NO. All Erase Function Do the procedure below to erase all the tracks on another MD deck. "Edit Menu" appears in the display. 2 Turn AMS (or press ./> repeatedly) until "A-B Erase ?" "Complete!!" If you erase a track,... the total number of tracks on the MD, the track preceding the erased track starts to play the track indicated by one are renumbered. appears in the display. 2 Turn AMS (or press ./> repeatedly...
.... 1 While the deck is stopped, playing, or paused, press MENU/NO. All Erase Function Do the procedure below to erase all the tracks on another MD deck. "Edit Menu" appears in the display. 2 Turn AMS (or press ./> repeatedly) until "A-B Erase ?" "Complete!!" If you erase a track,... the total number of tracks on the MD, the track preceding the erased track starts to play the track indicated by one are renumbered. appears in the display. 2 Turn AMS (or press ./> repeatedly...

Operating Instructions
Page 21
... by one and all the tracks following the divided ones are renumbered. "A-B Ers" and "Point B ok?" "Complete!!" continued 21 Editing Recorded MDs 3 Turn AMS (or press ./> repeatedly) until "Divide ?" alternate in the display. 5 Repeat step 4 until you have edited the same ...to a technical limitation of tracks increases by 1-frame1) intervals (1 frame = 1/86 second). Dividing recorded tracks - The total number of the MD system and is stopped, playing, or paused, press MENU/NO. Example: Dividing track 2 into track B and C Dividing a track after recording...
... by one and all the tracks following the divided ones are renumbered. "A-B Ers" and "Point B ok?" "Complete!!" continued 21 Editing Recorded MDs 3 Turn AMS (or press ./> repeatedly) until "Divide ?" alternate in the display. 5 Repeat step 4 until you have edited the same ...to a technical limitation of tracks increases by 1-frame1) intervals (1 frame = 1/86 second). Dividing recorded tracks - The total number of the MD system and is stopped, playing, or paused, press MENU/NO. Example: Dividing track 2 into track B and C Dividing a track after recording...

Operating Instructions
Page 22
... tracks After COMBINE Example: Combining track 1 to play the newly created track. The time indication (minute, second, and frame) of tracks decreases by which the MD is advanced when you turn AMS (or press ./> repeatedly) to that point repeatedly. 1) When recording in Stereo mode, you can use this function to combine...
... tracks After COMBINE Example: Combining track 1 to play the newly created track. The time indication (minute, second, and frame) of tracks decreases by which the MD is advanced when you turn AMS (or press ./> repeatedly) to that point repeatedly. 1) When recording in Stereo mode, you can use this function to combine...

Operating Instructions
Page 23
...press ./> repeatedly) until the number of the second track of the two to play the moved track. Naming a track or MD - Name Function You can consist of the MD system and is recording over existing material. This is a technical limitation of uppercase and lowercase letters, numbers, and symbols. "... - Example: Moving track 3 to play the combined track. appears and the deck starts to position 2. Names can enter a name for a recorded MD as well as for all the names on the deck 1 Press MENU/NO. If the track ends before the track ends. "Edit Menu" appears in...
...press ./> repeatedly) until the number of the second track of the two to play the moved track. Naming a track or MD - Name Function You can consist of the MD system and is recording over existing material. This is a technical limitation of uppercase and lowercase letters, numbers, and symbols. "... - Example: Moving track 3 to play the combined track. appears and the deck starts to position 2. Names can enter a name for a recorded MD as well as for all the names on the deck 1 Press MENU/NO. If the track ends before the track ends. "Edit Menu" appears in...


