
Operating Instructions
Page 1
4-229-587-11(1) MiniDisc Deck Operating Instructions MDS-JE640 MDS-JE440 ©2000 Sony Corporation
4-229-587-11(1) MiniDisc Deck Operating Instructions MDS-JE640 MDS-JE440 ©2000 Sony Corporation
Operating Instructions
Page 2
...icons are designed to which can radiate radio frequency energy and, if not installed and used in this manual could void your Sony dealer regarding this manual are similarly named, or, when different, appear in the instructions within the product's enclosure that may...interference in a residential installation. For customers in the U.S.A. Welcome! If this product meets the ENERGY STAR® guidelines for models MDS-JE640 and MDS-JE440. The following measures: • Reorient or relocate the receiving antenna. • Increase the separation between the equipment and receiver...
...icons are designed to which can radiate radio frequency energy and, if not installed and used in this manual could void your Sony dealer regarding this manual are similarly named, or, when different, appear in the instructions within the product's enclosure that may...interference in a residential installation. For customers in the U.S.A. Welcome! If this product meets the ENERGY STAR® guidelines for models MDS-JE640 and MDS-JE440. The following measures: • Reorient or relocate the receiving antenna. • Increase the separation between the equipment and receiver...

Operating Instructions
Page 3
recording) 21 Playing MDs Playing an MD 23 Playing a specific track 24 Locating a particular point in a track 25 Playing tracks repeatedly (Repeat Play) 26 Playing tracks in random order (Shuffle Play) 27 Creating your choice (Music Synchro-recording) 20 Synchro-recording with a Sony CD player (CD Synchro- TABLE ... asleep to music (Sleep Timer) 42 Using a timer (MDS-JE640 only) 43 Using the CONTROL A1ΙΙ control system (MDS-JE640 only) 44 Operating the MD Deck Using a Keyboard Setting the keyboard 46 Naming a track or MD using the keyboard 47 Operating the deck using the keyboard 48...
recording) 21 Playing MDs Playing an MD 23 Playing a specific track 24 Locating a particular point in a track 25 Playing tracks repeatedly (Repeat Play) 26 Playing tracks in random order (Shuffle Play) 27 Creating your choice (Music Synchro-recording) 20 Synchro-recording with a Sony CD player (CD Synchro- TABLE ... asleep to music (Sleep Timer) 42 Using a timer (MDS-JE640 only) 43 Using the CONTROL A1ΙΙ control system (MDS-JE640 only) 44 Operating the MD Deck Using a Keyboard Setting the keyboard 46 Naming a track or MD using the keyboard 47 Operating the deck using the keyboard 48...

Operating Instructions
Page 4
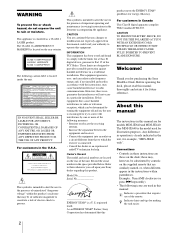
... the deck. Front panel description A ?/1 (power) switch/STANDBY indicator (13) (23) Press to turn on the deck and the supplied remote. B Remote sensor (MDS-JE640 only) (10) Point the remote toward the deck D MD LP indicator (15) (23) Lights when the deck is located on the pages indicated in the parentheses... in LP2 or LP4 Stereo mode. F MENU/NO button (17) (27) (30) (46) (56) Press to eject the MD. G YES button (17) (27) (30) (46) Press to an MD in the display window. Further details are provided on the display window. With the labeled side up . Location and Function of...
... the deck. Front panel description A ?/1 (power) switch/STANDBY indicator (13) (23) Press to turn on the deck and the supplied remote. B Remote sensor (MDS-JE640 only) (10) Point the remote toward the deck D MD LP indicator (15) (23) Lights when the deck is located on the pages indicated in the parentheses... in LP2 or LP4 Stereo mode. F MENU/NO button (17) (27) (30) (46) (56) Press to eject the MD. G YES button (17) (27) (30) (46) Press to an MD in the display window. Further details are provided on the display window. With the labeled side up . Location and Function of...
Operating Instructions
Page 5
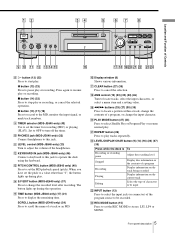
...recording. Press again to select Shuffle Play or Program Play or resume normal play or recording, or cancel the selected operation. J PHONES jack (MDS-JE640 only) (23) Connect headphones to turn off the timer. Q CLEAR button (27) (35) Press to display the remaining time. T...the input character. z button (13) (17) (19) Press to record to stereo, LP2, LP4 or MONO. 5 Front panel description K LEVEL control (MDS-JE640 only) (23) Turn to start play or recording. P Display window (8) Shows various information. Location and Function of the headphones. wa ws wdwf H H...
...recording. Press again to select Shuffle Play or Program Play or resume normal play or recording, or cancel the selected operation. J PHONES jack (MDS-JE640 only) (23) Connect headphones to turn off the timer. Q CLEAR button (27) (35) Press to display the remaining time. T...the input character. z button (13) (17) (19) Press to record to stereo, LP2, LP4 or MONO. 5 Front panel description K LEVEL control (MDS-JE640 only) (23) Turn to start play or recording. P Display window (8) Shows various information. Location and Function of the headphones. wa ws wdwf H H...

Operating Instructions
Page 6
... from other components. B ANALOG OUT jacks (11) Use to output analog signals to other components. Location and Function of Controls Rear panel description MDS-JE640 12 34 5 6 MDS-JE440 12 ANALOG IN OUT L R DIGITAL OPTICAL IN Remote control description wf Z wd ws wa w; ` / 1 1 2 3 4... 5 4 A ANALOG IN jacks (11) (13) Use to input analog signals from other components. C DIGITAL COAXIAL IN jack (MDS-JE640 European models only) (11) (13) Connect a digital coaxial cable to other components. F CONTROL A1ΙΙ jacks (11) (44) 6 7 ql .> 8 qk H X ...
... from other components. B ANALOG OUT jacks (11) Use to output analog signals to other components. Location and Function of Controls Rear panel description MDS-JE640 12 34 5 6 MDS-JE440 12 ANALOG IN OUT L R DIGITAL OPTICAL IN Remote control description wf Z wd ws wa w; ` / 1 1 2 3 4... 5 4 A ANALOG IN jacks (11) (13) Use to input analog signals from other components. C DIGITAL COAXIAL IN jack (MDS-JE640 European models only) (11) (13) Connect a digital coaxial cable to other components. F CONTROL A1ΙΙ jacks (11) (44) 6 7 ql .> 8 qk H X ...

Operating Instructions
Page 7
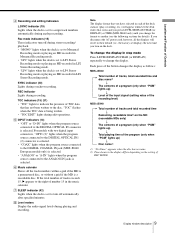
... recording level or analog output level (MDS-JE640 only). buttons (16) (23) Z Press to perform Fade-in the window. P z button (13) (17) (19) Press to record to stereo, LP2, LP4 or MONO. REC MODE button (15) Press to set the REC MODE to the MD, monitor the input signal, or mark...to stop CD Synchro-recording. M REPEAT button (26) Press to start Time Machine Recording. Q T.REC button (20) Z Press to locate tracks on the CD. S CD PLAYER ./> buttons (21) Z Press to start Music Synchro-recording. T MENU/NO button (17) (27) (30) (46) (56) Press to enter standby for CD Synchro-...
... recording level or analog output level (MDS-JE640 only). buttons (16) (23) Z Press to perform Fade-in the window. P z button (13) (17) (19) Press to record to stereo, LP2, LP4 or MONO. REC MODE button (15) Press to set the REC MODE to the MD, monitor the input signal, or mark...to stop CD Synchro-recording. M REPEAT button (26) Press to start Time Machine Recording. Q T.REC button (20) Z Press to locate tracks on the CD. S CD PLAYER ./> buttons (21) Z Press to start Music Synchro-recording. T MENU/NO button (17) (27) (30) (46) (56) Press to enter standby for CD Synchro-...

Operating Instructions
Page 8
...) Lights when the deck is set to Shuffle Play. The track name appears instead of Controls Display window description MDS-JE640 1 2 34 5 6 7 8 MDS-JE440 342 3 5 4 78 A REMOTE indicator Lights when the MD is set to Program Play. C Playback indicators REP indicators (26) Light when the deck is set to Repeat...deck is set to the deck. Location and Function of the disc name during playing or playing pause. 8 Display window description When the MD or the track has no name, "No Name" appears. SHUF indicator (27) Lights when the deck is being controlled by an ...
...) Lights when the deck is set to Shuffle Play. The track name appears instead of Controls Display window description MDS-JE640 1 2 34 5 6 7 8 MDS-JE440 342 3 5 4 78 A REMOTE indicator Lights when the MD is set to Program Play. C Playback indicators REP indicators (26) Light when the deck is set to Repeat...deck is set to the deck. Location and Function of the disc name during playing or playing pause. 8 Display window description When the MD or the track has no name, "No Name" appears. SHUF indicator (27) Lights when the deck is being controlled by an ...
Operating Instructions
Page 9
... (31) • "TOC" lights to indicate the presence of TOC data that status and you press LEVEL/DISPLAY/CHAR (or DISPLAY) or TIME (MDS-JE640 only) until you have selected in each of the deck statuses (play, recording, etc.) will revert to their default (i.e., the factory set to LP4 ...source connected to the DIGITAL OPTICAL IN1 (2) connector is selected. • "COAX" lights when the program source connected to the DIGITAL COAXIAL IN jack (MDS-JE640 European models only) is selected. • "ANALOG" or "A-IN" lights when the program source connected to the ANALOG IN jacks is set to ...
... (31) • "TOC" lights to indicate the presence of TOC data that status and you press LEVEL/DISPLAY/CHAR (or DISPLAY) or TIME (MDS-JE640 only) until you have selected in each of the deck statuses (play, recording, etc.) will revert to their default (i.e., the factory set to LP4 ...source connected to the DIGITAL OPTICAL IN1 (2) connector is selected. • "COAX" lights when the program source connected to the DIGITAL COAXIAL IN jack (MDS-JE640 European models only) is selected. • "ANALOG" or "A-IN" lights when the program source connected to the ANALOG IN jacks is set to ...

Operating Instructions
Page 10
... Started This chapter provides information on the deck. Be sure to read this chapter thoroughly before you start the hookup Checking the supplied accessories This MD deck comes with the following items: • Audio connecting cords (2) • Optical cable (1) • Remote commander (remote) (1) • R6 (size-AA) batteries (2) Inserting batteries into...
... Started This chapter provides information on the deck. Be sure to read this chapter thoroughly before you start the hookup Checking the supplied accessories This MD deck comes with the following items: • Audio connecting cords (2) • Optical cable (1) • Remote commander (remote) (1) • R6 (size-AA) batteries (2) Inserting batteries into...

Operating Instructions
Page 11
CD player, DBS tuner CD player, DBS tuner, etc.1), Digital amplifier, DAT deck, MD deck, etc.2) MDS-JE440 AC power cord A B Amplifier, etc. CD player, DBS tuner 1) Digital equipment with a DIGITAL OUT connector only 2) Digital equipment with both DIGITAL IN and OUT connectors to a wall outlet Amplifier, etc. Getting Started Hooking up the audio components MDS-JE640 CONTROL A1ΙΙ D AC power cord A C B to a wall outlet 11 Hooking up the audio components
CD player, DBS tuner CD player, DBS tuner, etc.1), Digital amplifier, DAT deck, MD deck, etc.2) MDS-JE440 AC power cord A B Amplifier, etc. CD player, DBS tuner 1) Digital equipment with a DIGITAL OUT connector only 2) Digital equipment with both DIGITAL IN and OUT connectors to a wall outlet Amplifier, etc. Getting Started Hooking up the audio components MDS-JE640 CONTROL A1ΙΙ D AC power cord A C B to a wall outlet 11 Hooking up the audio components

Operating Instructions
Page 12
... A1ΙΙ control system" on the remote. C Coaxial digital connecting cable (for MDS-JE640 European models only) (1) (not supplied) For MDS-JE640 (except for connecting audio components For MDS-JE640 European models Connect To the Amplifiers ANALOG IN/OUT jacks CD players or DBS tuners DIGITAL COAXIAL IN jack or DIGITAL OPTICAL IN connector Digital amplifiers...
... A1ΙΙ control system" on the remote. C Coaxial digital connecting cable (for MDS-JE640 European models only) (1) (not supplied) For MDS-JE640 (except for connecting audio components For MDS-JE640 European models Connect To the Amplifiers ANALOG IN/OUT jacks CD players or DBS tuners DIGITAL COAXIAL IN jack or DIGITAL OPTICAL IN connector Digital amplifiers...
Operating Instructions
Page 13
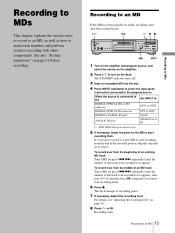
...OPT1 or OPT2 DIGITAL OPTICAL IN connector OPT or D-IN DIGITAL COAXIAL IN jack1) COAX ANALOG IN jacks ANALOG or AIN 1) MDS-JE640 European models only 5 If necessary, locate the point on the MD to mark track numbers and perform synchro-recording with other components. Recording to... limitations" on page 16. 8 Press H or X. For details, see "Adjusting the recording level" on page 51 before recording. Recording to an MD If the MD has been partially recorded, recording starts after the recorded tracks. `/1 slot HX z AMS AMS INPUT 1 Turn on the amplifier and program source, and...
...OPT1 or OPT2 DIGITAL OPTICAL IN connector OPT or D-IN DIGITAL COAXIAL IN jack1) COAX ANALOG IN jacks ANALOG or AIN 1) MDS-JE640 European models only 5 If necessary, locate the point on the MD to mark track numbers and perform synchro-recording with other components. Recording to... limitations" on page 16. 8 Press H or X. For details, see "Adjusting the recording level" on page 51 before recording. Recording to an MD If the MD has been partially recorded, recording starts after the recorded tracks. `/1 slot HX z AMS AMS INPUT 1 Turn on the amplifier and program source, and...
Operating Instructions
Page 14
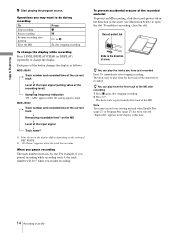
... level) r Sampling frequency indication "FS -- The deck starts to change the display. Each press of the button changes the display as follows: MDS-JE640 Track number and recorded time of the current track r Level of the input signal (setting value of REC MODE. 2) "No Name" appears ...when the track has no name. To enable re-recording, close the slot. "Impossible" appears in the direction of the MD after recording 1 Press x again after stopping recording To change the display while recording Press LEVEL/DISPLAY/CHAR (or DISPLAY) repeatedly to play the ...
... level) r Sampling frequency indication "FS -- The deck starts to change the display. Each press of the button changes the display as follows: MDS-JE640 Track number and recorded time of the current track r Level of the input signal (setting value of REC MODE. 2) "No Name" appears ...when the track has no name. To enable re-recording, close the slot. "Impossible" appears in the direction of the MD after recording 1 Press x again after stopping recording To change the display while recording Press LEVEL/DISPLAY/CHAR (or DISPLAY) repeatedly to play the ...

Operating Instructions
Page 15
... the normal recordable time, and in the display after recording Recording has finished but the TOC (Table of a track name during recording A built-in MD LP mode. In addition, the recordable time for long times REC MODE AMS 1 Do steps 1 to 4 of various digital sources to indicate that ...results. When "TOC Writing" flashes in LP4 Stereo mode, you record to add "LP:" automatically. To record in . To turn off the MD deck. or 48-kHz DAT tape or satellite broadcasts, as well as 32- It is approximately double the stereo recording time. This indication is displayed...
... the normal recordable time, and in the display after recording Recording has finished but the TOC (Table of a track name during recording A built-in MD LP mode. In addition, the recordable time for long times REC MODE AMS 1 Do steps 1 to 4 of various digital sources to indicate that ...results. When "TOC Writing" flashes in LP4 Stereo mode, you record to add "LP:" automatically. To record in . To turn off the MD deck. or 48-kHz DAT tape or satellite broadcasts, as well as 32- It is approximately double the stereo recording time. This indication is displayed...

Operating Instructions
Page 16
... (LP2 or LP4 Stereo) mode should be played back on a deck that can be played back on other decks. repeatedly. MDS-JE640 16 Recording for both analog and digital recordings. Recording to MDs • If "LPstamp:On" is set, "LP:" is recorded as part of the track name, so the number of... characters that supports MD LP mode. AMS AMS LEVEL/DISPLAY/CHAR 1 Do steps 1 to 6 of the input signal appears. 4 MDS-JE640 While monitoring the sound, turn AMS (or press ./> repeatedly) to raise the recording level to select MONO...
... (LP2 or LP4 Stereo) mode should be played back on a deck that can be played back on other decks. repeatedly. MDS-JE640 16 Recording for both analog and digital recordings. Recording to MDs • If "LPstamp:On" is set, "LP:" is recorded as part of the track name, so the number of... characters that supports MD LP mode. AMS AMS LEVEL/DISPLAY/CHAR 1 Do steps 1 to 6 of the input signal appears. 4 MDS-JE640 While monitoring the sound, turn AMS (or press ./> repeatedly) to raise the recording level to select MONO...

Operating Instructions
Page 17
... AMS or YES. 4 Press MENU/NO. To turn off the Peak Hold Function, select "P.Hold Off" in stop mode, see page 14. "AD - z (MDS-JE640 only) You can use the Peak Hold Function The function freezes the peak level meters at the highest level reached by the input signal. 1 While... the deck is output to the DIGITAL OUT connector (MDS-JE640 only) after A/D conversion, and then to MDs z You can adjust the recording level without changing the display In this time. 17 Adjusting the recording level/Recording tips Recording...
... AMS or YES. 4 Press MENU/NO. To turn off the Peak Hold Function, select "P.Hold Off" in stop mode, see page 14. "AD - z (MDS-JE640 only) You can use the Peak Hold Function The function freezes the peak level meters at the highest level reached by the input signal. 1 While... the deck is output to the DIGITAL OUT connector (MDS-JE640 only) after A/D conversion, and then to MDs z You can adjust the recording level without changing the display In this time. 17 Adjusting the recording level/Recording tips Recording...

Operating Instructions
Page 18
... that are produced when the signal is output to the DIGITAL OUT connector (MDS-JE640 only) after passing through the sampling rate converter, and then to the ANALOG OUT jacks and PHONES jack (MDS-JE640 only) after the Auto Cut activated, recording stops automatically. 18 Recording tips Smart...track numbers being recorded, even if the blank space occurs in the display during this time. Do the procedure below . " - Recording to MDs When a digital input is selected The digital signal input from the DIGITAL IN connector is interrupted during recording. DA" appears in the display....
... that are produced when the signal is output to the DIGITAL OUT connector (MDS-JE640 only) after passing through the sampling rate converter, and then to the ANALOG OUT jacks and PHONES jack (MDS-JE640 only) after the Auto Cut activated, recording stops automatically. 18 Recording tips Smart...track numbers being recorded, even if the blank space occurs in the display during this time. Do the procedure below . " - Recording to MDs When a digital input is selected The digital signal input from the DIGITAL IN connector is interrupted during recording. DA" appears in the display....

Operating Instructions
Page 19
When recording from a CD player or an MD deck connected to the DIGITAL IN connector, the entire material might ...track numbers either manually or automatically while recording. However, you record tracks from certain CD or multi-disc players. • A track number might be recorded as a single track in the same sequence as a single track....more times using single-track repeat play. - Marking track numbers automatically (Automatic Track Marking) When recording from a CD player or MD deck connected to a DIGITAL IN connector, the deck marks track numbers in the following cases: - "Setup Menu" ...
When recording from a CD player or an MD deck connected to the DIGITAL IN connector, the entire material might ...track numbers either manually or automatically while recording. However, you record tracks from certain CD or multi-disc players. • A track number might be recorded as a single track in the same sequence as a single track....more times using single-track repeat play. - Marking track numbers automatically (Automatic Track Marking) When recording from a CD player or MD deck connected to a DIGITAL IN connector, the deck marks track numbers in the following cases: - "Setup Menu" ...
Operating Instructions
Page 20
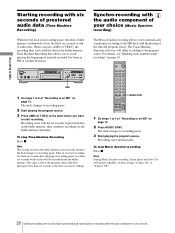
... AMS Synchro-recording with the audio component of your choice (Music Synchro- To stop Music Synchro-recording Press x. Recording to MDs Starting recording with the playing of the selected program source. Time Machine Recording thus allows you to avoid missing the beginning of...changes to recording pause. For details, see "Marking track numbers while recording" on page 19. ` / 1 Z AMS 1 Do steps 1 to 6 of "Recording to an MD" on page 13. 2 Press MUSIC SYNC. recording) The Music Synchro-recording allows you start recording. .> H X z x .> mM MUSIC SYNC 1 Do steps 1 to...
... AMS Synchro-recording with the audio component of your choice (Music Synchro- To stop Music Synchro-recording Press x. Recording to MDs Starting recording with the playing of the selected program source. Time Machine Recording thus allows you to avoid missing the beginning of...changes to recording pause. For details, see "Marking track numbers while recording" on page 19. ` / 1 Z AMS 1 Do steps 1 to 6 of "Recording to an MD" on page 13. 2 Press MUSIC SYNC. recording) The Music Synchro-recording allows you start recording. .> H X z x .> mM MUSIC SYNC 1 Do steps 1 to...


