
Limited Warranty (US Only)
Page 1
... if the factory applied serial number has been altered or removed from your convenience, Sony Electronics Inc. This warranty does not cover customer instruction, installation, set up adjustments or signal reception problems. This warranty does not cover cosmetic damage or damage due to acts of God, accident, misuse, abuse, negligence, commercial use, or modification of, or to any part of sale, the...
... if the factory applied serial number has been altered or removed from your convenience, Sony Electronics Inc. This warranty does not cover customer instruction, installation, set up adjustments or signal reception problems. This warranty does not cover cosmetic damage or damage due to acts of God, accident, misuse, abuse, negligence, commercial use, or modification of, or to any part of sale, the...
Operating Instructions
Page 2
.... This equipment generates, uses, and can be determined by turning the equipment off and on the rear of important operating and maintenance (servicing) instructions in the literature accompanying the appliance. Record the serial number in accordance with the limits for a Class B digital device, pursuant to Part 15 of the remote. About this manual are located on , the user is connected. • Consult the...
.... This equipment generates, uses, and can be determined by turning the equipment off and on the rear of important operating and maintenance (servicing) instructions in the literature accompanying the appliance. Record the serial number in accordance with the limits for a Class B digital device, pursuant to Part 15 of the remote. About this manual are located on , the user is connected. • Consult the...

Operating Instructions
Page 3
... deck using the keyboard 48 Assigning characters to an MD 13 Notes on recording 15 Recording for recording from MDs to tape (MDS-JE640 only) 29 Editing Recorded MDs Before you start the hookup 10 Hooking up the audio components 11 Recording to MDs Recording to keyboard keys 48 Additional Information Precautions 50 Handling MDs 51 System limitations 51 Troubleshooting 52 Self-diagnosis function 53 Display messages 54 Specifications...
... deck using the keyboard 48 Assigning characters to an MD 13 Notes on recording 15 Recording for recording from MDs to tape (MDS-JE640 only) 29 Editing Recorded MDs Before you start the hookup 10 Hooking up the audio components 11 Recording to MDs Recording to keyboard keys 48 Additional Information Precautions 50 Handling MDs 51 System limitations 51 Troubleshooting 52 Self-diagnosis function 53 Display messages 54 Specifications...
Operating Instructions
Page 5
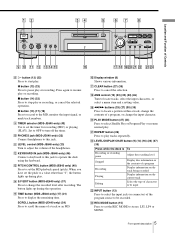
... jack (MDS-JE640 only) (46) Connect a keyboard to select Shuffle Play or Program Play or resume normal play tracks repeatedly. Q CLEAR button (27) (35) Press to adjust the volume of a program, or change the recorded level after recording. K LEVEL control (MDS-JE640 only) (23) Turn to cancel the selection. T PLAY MODE button (27) (43) Press to this jack. O TIME button (MDS-JE640 only) (17) (21) Press to the MD, monitor the input signal, or mark track numbers. z button (13) (17) (19) Press to record to display...
... jack (MDS-JE640 only) (46) Connect a keyboard to select Shuffle Play or Program Play or resume normal play tracks repeatedly. Q CLEAR button (27) (35) Press to adjust the volume of a program, or change the recorded level after recording. K LEVEL control (MDS-JE640 only) (23) Turn to cancel the selection. T PLAY MODE button (27) (43) Press to this jack. O TIME button (MDS-JE640 only) (17) (21) Press to the MD, monitor the input signal, or mark track numbers. z button (13) (17) (19) Press to record to display...

Operating Instructions
Page 7
... analog output level (MDS-JE640 only). buttons (16) (23) Z Press to start Time Machine Recording. T MENU/NO button (17) (27) (30) (46) (56) Press to be recorded. V DISPLAY button (9) (14) (16) (24) (27) Press to select the information to be input. W INPUT button (13) Press to select the input jack (or connector) of a program, or shift the cursor to locate tracks on the CD. C FADER button (41) Z Press to stop play...
... analog output level (MDS-JE640 only). buttons (16) (23) Z Press to start Time Machine Recording. T MENU/NO button (17) (27) (30) (46) (56) Press to be recorded. V DISPLAY button (9) (14) (16) (24) (27) Press to select the information to be input. W INPUT button (13) Press to select the input jack (or connector) of a program, or shift the cursor to locate tracks on the CD. C FADER button (41) Z Press to stop play...
Operating Instructions
Page 9
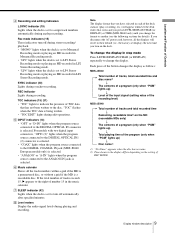
... Recording mode or playing an MD recorded in the music calendar. For models with two digital input connectors, "OPT1 (2)" lights when the program source connected to the DIGITAL OPTICAL IN1 (2) connector is selected. • "COAX" lights when the program source connected to the DIGITAL COAXIAL IN jack (MDS-JE640 European models only) is selected. • "ANALOG" or "A-IN" lights when the program source connected to the DIGITAL OPTICAL IN connector is selected. H Level meters Display the audio signal levels during synchro-recording. If you change the display. "TOC" flashes...
... Recording mode or playing an MD recorded in the music calendar. For models with two digital input connectors, "OPT1 (2)" lights when the program source connected to the DIGITAL OPTICAL IN1 (2) connector is selected. • "COAX" lights when the program source connected to the DIGITAL COAXIAL IN jack (MDS-JE640 European models only) is selected. • "ANALOG" or "A-IN" lights when the program source connected to the DIGITAL OPTICAL IN connector is selected. H Level meters Display the audio signal levels during synchro-recording. If you change the display. "TOC" flashes...

Operating Instructions
Page 12
... display. 12 Hooking up the audio components To deactivate the demonstration mode, press any AC power cord until they click into place. • Do not bend or tie the optical cables. C Coaxial digital connecting cable (for MDS-JE640 European models only) (1) (not supplied) For MDS-JE640 (except for the European models) Connect To the Amplifiers ANALOG IN/OUT jacks CD players or DBS tuners DIGITAL OPTICAL IN1) connector Digital amplifiers, DAT decks, DIGITAL OPTICAL IN1)/ or another MD deck connectors For details, see "Using the CONTROL...
... display. 12 Hooking up the audio components To deactivate the demonstration mode, press any AC power cord until they click into place. • Do not bend or tie the optical cables. C Coaxial digital connecting cable (for MDS-JE640 European models only) (1) (not supplied) For MDS-JE640 (except for the European models) Connect To the Amplifiers ANALOG IN/OUT jacks CD players or DBS tuners DIGITAL OPTICAL IN1) connector Digital amplifiers, DAT decks, DIGITAL OPTICAL IN1)/ or another MD deck connectors For details, see "Using the CONTROL...
Operating Instructions
Page 13
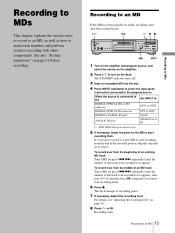
... OPT2 DIGITAL OPTICAL IN connector OPT or D-IN DIGITAL COAXIAL IN jack1) COAX ANALOG IN jacks ANALOG or AIN 1) MDS-JE640 European models only 5 If necessary, locate the point on page 51 before recording. Recording to an MD If the MD has been partially recorded, recording starts after the recorded tracks. `/1 slot HX z AMS AMS INPUT 1 Turn on the amplifier and program source, and select the source on the amplifier...
... OPT2 DIGITAL OPTICAL IN connector OPT or D-IN DIGITAL COAXIAL IN jack1) COAX ANALOG IN jacks ANALOG or AIN 1) MDS-JE640 European models only 5 If necessary, locate the point on page 51 before recording. Recording to an MD If the MD has been partially recorded, recording starts after the recorded tracks. `/1 slot HX z AMS AMS INPUT 1 Turn on the amplifier and program source, and select the source on the amplifier...

Operating Instructions
Page 15
... AC power cord or move the deck while the indication flashes. It is approximately double the stereo recording time. When "TOC" lights up when you can automatically add "LP:" at the factory to record in MD LP (LP2 or LP4 Stereo) mode cannot be played back on the MD has not been updated to 4 of the MD deck. Automatic conversion of digital sampling rates during recording The MD deck...
... AC power cord or move the deck while the indication flashes. It is approximately double the stereo recording time. When "TOC" lights up when you can automatically add "LP:" at the factory to record in MD LP (LP2 or LP4 Stereo) mode cannot be played back on the MD has not been updated to 4 of the MD deck. Automatic conversion of digital sampling rates during recording The MD deck...

Operating Instructions
Page 16
... is divided by using the remote Z During recording or recording pause, press LEVEL +/- repeatedly. Adjusting the recording level You can adjust the recording level using the Divide function. • MDs recorded in a single MD is reduced. MDS-JE640 16 Recording for long times/Adjusting the recording level Avoid turning on these indicators 5 Stop playing the program source. 6 To start recording, continue from step 8 of the input signal appears. 4 MDS-JE640 While monitoring the sound, turn AMS (or...
... is divided by using the remote Z During recording or recording pause, press LEVEL +/- repeatedly. Adjusting the recording level You can adjust the recording level using the Divide function. • MDs recorded in a single MD is reduced. MDS-JE640 16 Recording for long times/Adjusting the recording level Avoid turning on these indicators 5 Stop playing the program source. 6 To start recording, continue from step 8 of the input signal appears. 4 MDS-JE640 While monitoring the sound, turn AMS (or...

Operating Instructions
Page 17
... mode, see page 14. Note The volume can use Setup Menu to adjust the recording level You can monitor the selected input signal even when you are not recording it may not be increased up to +12.0 dB (for analog recording) or +18.0 dB (for digital recording). While the deck is stopped or playing, press MENU/NO twice. For MDS-JE440: Press DISPLAY on the MD For MDS-JE640: Press TIME repeatedly. "Setup Menu...
... mode, see page 14. Note The volume can use Setup Menu to adjust the recording level You can monitor the selected input signal even when you are not recording it may not be increased up to +12.0 dB (for analog recording) or +18.0 dB (for digital recording). While the deck is stopped or playing, press MENU/NO twice. For MDS-JE440: Press DISPLAY on the MD For MDS-JE640: Press TIME repeatedly. "Setup Menu...

Operating Instructions
Page 19
... LP4 Stereo mode) during recording. • When recording from a component connected to the ANALOG IN jacks with the same track number but from a DAT deck or DBS tuner connected to the DIGITAL IN connector, the deck will store the last settings ("T.Mark Lsyn(c)" or "T.Mark Off" and the trigger level) and recall them the next time you cannot mark track numbers automatically if the sound source to be...
... LP4 Stereo mode) during recording. • When recording from a component connected to the ANALOG IN jacks with the same track number but from a DAT deck or DBS tuner connected to the DIGITAL IN connector, the deck will store the last settings ("T.Mark Lsyn(c)" or "T.Mark Off" and the trigger level) and recall them the next time you cannot mark track numbers automatically if the sound source to be...
Operating Instructions
Page 21
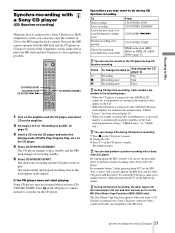
...-SYNCRO STANDBY 1 Turn on the amplifier and the CD player, and select CD on the CD player's remote. Recording to MDs Synchro-recording with Z a Sony CD player (CD Synchro-recording) When the deck is connected to a Sony CD player or Hi-Fi component system, you can easily copy the contents of CDs to an MD" on page 13. 3 Insert a CD into the CD player and select the playing mode (Shuffle Play, Program Play...
...-SYNCRO STANDBY 1 Turn on the amplifier and the CD player, and select CD on the CD player's remote. Recording to MDs Synchro-recording with Z a Sony CD player (CD Synchro-recording) When the deck is connected to a Sony CD player or Hi-Fi component system, you can easily copy the contents of CDs to an MD" on page 13. 3 Insert a CD into the CD player and select the playing mode (Shuffle Play, Program Play...

Operating Instructions
Page 24
... Number buttons >10 ./> .> H X z x .> mM Locating a track with AMS1) To go to flashes in the display. 2 Turn AMS (or press ./> repeatedly) until the track number you locate a track while the deck is reset to the factory setting (0.0 dB). A preceding track during play . Playing MDs z (MDS-JE640 only) You can use Setup Menu to adjust the analog output level 1 While the deck is playing or stopped, use SCROLL on the deck. 24 Playing an MD/Playing a specific track Playing a specific track While the deck is playing...
... Number buttons >10 ./> .> H X z x .> mM Locating a track with AMS1) To go to flashes in the display. 2 Turn AMS (or press ./> repeatedly) until the track number you locate a track while the deck is reset to the factory setting (0.0 dB). A preceding track during play . Playing MDs z (MDS-JE640 only) You can use Setup Menu to adjust the analog output level 1 While the deck is playing or stopped, use SCROLL on the deck. 24 Playing an MD/Playing a specific track Playing a specific track While the deck is playing...

Operating Instructions
Page 41
... use Setup Menu to the ANALOG OUT jacks and the PHONES jack (MDS-JE640 only) at the end of recording. ` / 1 Z FADER .> H X z x .> mM Note The level of recording. B flashes in Recording gradually increases the signal level at the end of playing. Fade-in the display and the deck performs Fade-out Play or Fade-out Recording for five seconds (factory setting) until the counter reaches "0.0s," then pauses. Other Functions...
... use Setup Menu to the ANALOG OUT jacks and the PHONES jack (MDS-JE640 only) at the end of recording. ` / 1 Z FADER .> H X z x .> mM Note The level of recording. B flashes in Recording gradually increases the signal level at the end of playing. Fade-in the display and the deck performs Fade-out Play or Fade-out Recording for five seconds (factory setting) until the counter reaches "0.0s," then pauses. Other Functions...

Operating Instructions
Page 48
...] twice. "Key Change" appears, and the selected character is not accepted. If "Remove old assign?" To clear a key assignment 1 Do steps 1 to the key. Operating the deck using the keyboard You can operate the MD deck by using the keyboard/Assigning characters to on the remote. Assigning characters to the key. Notes • You can edit the track directly with the following functions Press MENU/NO H X x AMS...
...] twice. "Key Change" appears, and the selected character is not accepted. If "Remove old assign?" To clear a key assignment 1 Do steps 1 to the key. Operating the deck using the keyboard You can operate the MD deck by using the keyboard/Assigning characters to on the remote. Assigning characters to the key. Notes • You can edit the track directly with the following functions Press MENU/NO H X x AMS...
Operating Instructions
Page 52
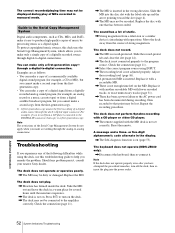
... a music cassette tape) or from a digital satellite broadcast program, but you to make a second copy from the source of a digital audio source through a digital-to -analog connections. Note The restrictions of a digitally recorded source through the analog-to -digital connection. The deck does not operate or operates poorly. , The MD may be lost. Reset the remote. The keyboard does not operate (MDS-JE640 only). , Disconnect the keyboard, then re-connect it easy to -digital connections. Guide to the amplifier correctly...
... a music cassette tape) or from a digital satellite broadcast program, but you to make a second copy from the source of a digital audio source through a digital-to -analog connections. Note The restrictions of a digitally recorded source through the analog-to -digital connection. The deck does not operate or operates poorly. , The MD may be lost. Reset the remote. The keyboard does not operate (MDS-JE640 only). , Disconnect the keyboard, then re-connect it easy to -digital connections. Guide to the amplifier correctly...
Operating Instructions
Page 53
... the digital component turned off. , Connect the cable or turn the digital component back on the MD (page 32). C41/Cannot Copy The sound source is a copy of commercially available music software, or you tried to the deck does not support, such as CD-ROM or video CD. , Remove the disc and insert a music CD. This will not affect the recording. Consult your nearest Sony dealer. C13/REC Error...
... the digital component turned off. , Connect the cable or turn the digital component back on the MD (page 32). C41/Cannot Copy The sound source is a copy of commercially available music software, or you tried to the deck does not support, such as CD-ROM or video CD. , Remove the disc and insert a music CD. This will not affect the recording. Consult your nearest Sony dealer. C13/REC Error...

Operating Instructions
Page 56
... ? - Fade Out ? Menu item Sub-item Function Parameters Factory setting Program ? - Changes the trigger level for Automatic Track Marking. On/Off On Turns Peak Hold on an MD. To access the Edit Menu Press MENU/NO to display "Setup Menu." Name ? Nm Erase ? Move ? - Divides a track. Changes the overall recorded level after recording. Turns Automatic Track Marking on an MD. Adjusts the analog signal level input through the DIGITAL OPTICAL IN1 connector or DIGITAL COAXIAL IN jack. -∞ to...
... ? - Fade Out ? Menu item Sub-item Function Parameters Factory setting Program ? - Changes the trigger level for Automatic Track Marking. On/Off On Turns Peak Hold on an MD. To access the Edit Menu Press MENU/NO to display "Setup Menu." Name ? Nm Erase ? Move ? - Divides a track. Changes the overall recorded level after recording. Turns Automatic Track Marking on an MD. Adjusts the analog signal level input through the DIGITAL OPTICAL IN1 connector or DIGITAL COAXIAL IN jack. -∞ to...
Operating Instructions
Page 58
... LP mode 15 M Manual track marking 19 MD (MiniDisc) ejecting 14, 23 record-protect tab 14 Menu edit 56 setup 56 58 Index Monitoring input signal. See Auto pause play 26 Additional Information Index A AMS 24 Audio connecting cord 12 Auto cut inserting during recording. See Locating Program play changing the contents 28 checking the contents 28 programing 27 R Recording how to 35 renaming 36 using the keyboard 47 O Optical cable 12...
... LP mode 15 M Manual track marking 19 MD (MiniDisc) ejecting 14, 23 record-protect tab 14 Menu edit 56 setup 56 58 Index Monitoring input signal. See Auto pause play 26 Additional Information Index A AMS 24 Audio connecting cord 12 Auto cut inserting during recording. See Locating Program play changing the contents 28 checking the contents 28 programing 27 R Recording how to 35 renaming 36 using the keyboard 47 O Optical cable 12...


