
Limited Warranty (US Only)
Page 1
... Stereo/Hifi Components/Tape Decks ® CD Players/Mini Disc Players/Audio Systems Hifi Audio LIMITED WARRANTY Sony Electronics Inc. ("Sony") warrants this Product is determined to be presented to obtain warranty service. After the warranty period, you must pay for product information or operation, call : 1-800-488-SONY (7669) Printed in material or workmanship as fuses or batteries). This warranty does not cover customer instruction, installation, set up adjustments or signal reception problems...
... Stereo/Hifi Components/Tape Decks ® CD Players/Mini Disc Players/Audio Systems Hifi Audio LIMITED WARRANTY Sony Electronics Inc. ("Sony") warrants this Product is determined to be presented to obtain warranty service. After the warranty period, you must pay for product information or operation, call : 1-800-488-SONY (7669) Printed in material or workmanship as fuses or batteries). This warranty does not cover customer instruction, installation, set up adjustments or signal reception problems...
Operating Instructions
Page 9
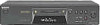
... AC power cord to the local power line voltage. Other connections To connect a CONTROL A1ΙΙ compatible component (MDSJE770 only) D Monaural (2P) mini-plug cables (2) (not supplied) For details, see "Using the CONTROL A1ΙΙ control system (MDS-JE770 only)" on the rear panel of IN1 and IN2 connectors. continued 9 If not, set to a wall outlet. C Coaxial digital connecting cable (for all other models) (only one supplied) • When connecting an optical cable...
... AC power cord to the local power line voltage. Other connections To connect a CONTROL A1ΙΙ compatible component (MDSJE770 only) D Monaural (2P) mini-plug cables (2) (not supplied) For details, see "Using the CONTROL A1ΙΙ control system (MDS-JE770 only)" on the rear panel of IN1 and IN2 connectors. continued 9 If not, set to a wall outlet. C Coaxial digital connecting cable (for all other models) (only one supplied) • When connecting an optical cable...

Operating Instructions
Page 10
... on the remote. "Demo Off" appears in the display. Notes • Do not leave the remote in the deck, demonstration mode is no longer operates the deck, replace both batteries with the PC connecting kit. Hooking up the audio component (continued)s To connect a PC E PC connecting kit (not supplied) Use the PC connecting kit to connect a PC to a wall outlet. Tip You can connect a PC to direct sunlight or lighting apparatus...
... on the remote. "Demo Off" appears in the display. Notes • Do not leave the remote in the deck, demonstration mode is no longer operates the deck, replace both batteries with the PC connecting kit. Hooking up the audio component (continued)s To connect a PC E PC connecting kit (not supplied) Use the PC connecting kit to connect a PC to a wall outlet. Tip You can connect a PC to direct sunlight or lighting apparatus...

Operating Instructions
Page 11
... amplifier and program source, and select the source on the deck. MDS-JE470 Track number and recorded time of the current track t Remaining recordable time4) on the MD t Level of the input signal t Track name5) 4) Time shown in the display differs depending on page 16. 7 Press H or X. Operations you may want to recording pause. 6 If necessary, adjust the recording level. kHz" appears while the analog signal is connected to the Set INPUT to change the display...
... amplifier and program source, and select the source on the deck. MDS-JE470 Track number and recorded time of the current track t Remaining recordable time4) on the MD t Level of the input signal t Track name5) 4) Time shown in the display differs depending on page 16. 7 Press H or X. Operations you may want to recording pause. 6 If necessary, adjust the recording level. kHz" appears while the analog signal is connected to the Set INPUT to change the display...
Operating Instructions
Page 14
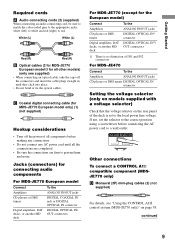
... "Setup?" Recording for long times This deck has two long time recording modes: LP2 and LP4 (MDLP recording). When placing emphasis on sound quality, Stereo recording or LP2 Stereo recording (2× long time recording mode) is stopped, playing, or paused, press MENU/NO. 2 Turn AMS (or press ./> repeatedly) until "LPstamp On" (factory setting) appears, then press AMS or YES. 4 Turn AMS (or press ./> repeatedly) to select "LPstamp...
... "Setup?" Recording for long times This deck has two long time recording modes: LP2 and LP4 (MDLP recording). When placing emphasis on sound quality, Stereo recording or LP2 Stereo recording (2× long time recording mode) is stopped, playing, or paused, press MENU/NO. 2 Turn AMS (or press ./> repeatedly) until "LPstamp On" (factory setting) appears, then press AMS or YES. 4 Turn AMS (or press ./> repeatedly) to select "LPstamp...
Operating Instructions
Page 15
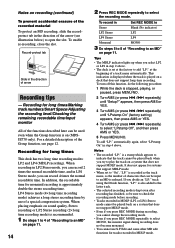
... MD deck connected to select the level, then press AMS or YES. To Select Turn on , "L.SYNC" lights up. The deck marks a track number whenever the input signal level drops to -50 dB1) (the trigger level for Automatic Track Marking) or below to on Automatic Track Marking T.Mark LSyn(c) (factory setting) Turn off Automatic Track Marking T.Mark Off 5 Press MENU/NO. When you cannot mark track numbers automatically if the sound source...
... MD deck connected to select the level, then press AMS or YES. To Select Turn on , "L.SYNC" lights up. The deck marks a track number whenever the input signal level drops to -50 dB1) (the trigger level for Automatic Track Marking) or below to on Automatic Track Marking T.Mark LSyn(c) (factory setting) Turn off Automatic Track Marking T.Mark Off 5 Press MENU/NO. When you cannot mark track numbers automatically if the sound source...

Operating Instructions
Page 16
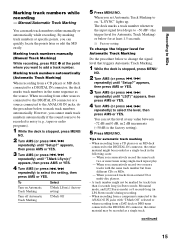
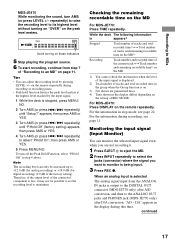
... No sound input for 30 seconds or more Off On Replaced with a blank of 3 seconds and recording pauses 1 While the deck is on Smart Space S.Space On (factory and Auto Cut setting) Turn off in tandem with the strongest output. 3 Press LEVEL/DISPLAY/CHAR (or DISPLAY) repeatedly until the level of about 3 seconds and continues recording. Avoid turning on page 27. Adjusting the recording level You...
... No sound input for 30 seconds or more Off On Replaced with a blank of 3 seconds and recording pauses 1 While the deck is on Smart Space S.Space On (factory and Auto Cut setting) Turn off in tandem with the strongest output. 3 Press LEVEL/DISPLAY/CHAR (or DISPLAY) repeatedly until the level of about 3 seconds and continues recording. Avoid turning on page 27. Adjusting the recording level You...
Operating Instructions
Page 17
... premasterd discs. 4) Time shown in the display differs depending on the MD 1) You cannot check the information when the level of the input signal is displayed. 2) Total number of REC MODE. Avoid turning on these indicators 5 Stop playing the program source. 6 To start recording, continue from the ANALOG IN jacks is output to the DIGITAL OUT connector (MDS-JE770 only) after D/A conversion. Note The recording level can monitor the selected input signal even when...
... premasterd discs. 4) Time shown in the display differs depending on the MD 1) You cannot check the information when the level of the input signal is displayed. 2) Total number of REC MODE. Avoid turning on these indicators 5 Stop playing the program source. 6 To start recording, continue from the ANALOG IN jacks is output to the DIGITAL OUT connector (MDS-JE770 only) after D/A conversion. Note The recording level can monitor the selected input signal even when...
Operating Instructions
Page 18
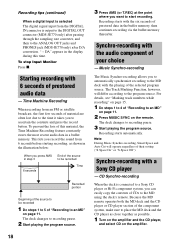
... the display during this time. Music Synchro-recording The Music Synchro-recording allows you to automatically synchronize recording to the MD deck with the audio component of your choice - Recording tips (continued) When a digital input is selected The digital signal input from the DIGITAL IN connector is connected to a Sony CD player or Hi-Fi component system, you can easily copy the contents of CDs to the MD using the deck's remote. Synchro...
... the display during this time. Music Synchro-recording The Music Synchro-recording allows you to automatically synchronize recording to the MD deck with the audio component of your choice - Recording tips (continued) When a digital input is selected The digital signal input from the DIGITAL IN connector is connected to a Sony CD player or Hi-Fi component system, you can easily copy the contents of CDs to the MD using the deck's remote. Synchro...

Operating Instructions
Page 20
... pointing toward the deck Playing an MD - Go to be played repeatedly. during play Press x. Playing MDs Loading an MD Load an MD as illustrated below. Resume play after stopping play . 6 Adjust the volume on the amplifier. 2 Press ?/1 to a Turn AMS counterclockwise (or preceding track press . Find a point in the display, then press AMS or H. Select To play Blank (no PLAY The MD in the original order MODE indication) SHUF The...
... pointing toward the deck Playing an MD - Go to be played repeatedly. during play Press x. Playing MDs Loading an MD Load an MD as illustrated below. Resume play after stopping play . 6 Adjust the volume on the amplifier. 2 Press ?/1 to a Turn AMS counterclockwise (or preceding track press . Find a point in the display, then press AMS or H. Select To play Blank (no PLAY The MD in the original order MODE indication) SHUF The...

Operating Instructions
Page 21
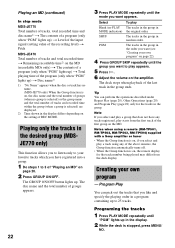
... monitoring the sound. 3) When you select a track recorded in LP2 or LP4 Stereo mode. • To use Setup Menu to the PHONES jack and the ANALOG OUT jacks (MDSJE770 only). 1 While the deck is recorded), press SCROLL on an MD recorded with 50 tracks, press >10, then 3 and 10/0. • To select track number 30 on the remote. Playing a track by observing the time indication. "-" equal to the number of digits...
... monitoring the sound. 3) When you select a track recorded in LP2 or LP4 Stereo mode. • To use Setup Menu to the PHONES jack and the ANALOG OUT jacks (MDSJE770 only). 1 While the deck is recorded), press SCROLL on an MD recorded with 50 tracks, press >10, then 3 and 10/0. • To select track number 30 on the remote. Playing a track by observing the time indication. "-" equal to the number of digits...
Operating Instructions
Page 22
... is selected) are displayed. 2) Time shown in the order you want to play starts from the deck display. Programing the tracks 1 Press PLAY MODE repeatedly until "PGM" lights up . Notes when using any tracks registered, play appears. 5 Press H. 6 Adjust the volume on the amplifier. Creating your own program" on page 22). 4 Press GROUP SKIP repeatedly until the mode you have any of the above remotes, the Group function automatically turns...
... is selected) are displayed. 2) Time shown in the order you want to play starts from the deck display. Programing the tracks 1 Press PLAY MODE repeatedly until "PGM" lights up . Notes when using any tracks registered, play appears. 5 Press H. 6 Adjust the volume on the amplifier. Creating your own program" on page 22). 4 Press GROUP SKIP repeatedly until the mode you have any of the above remotes, the Group function automatically turns...

Operating Instructions
Page 36
... display and the deck performs Fade-in Play or Fade-in Recording for Fade-out Recording), press FADER on Sleep Timer Sleep On1) Turn off Sleep Timer Sleep Off (factory setting) 1) For MDS-JE470, the deck turns off automatically after 60 minutes. Note The level of the signal output from the DIGITAL OUT connector does not change the duration of recording. To Select Turn on the remote. Press MENU...
... display and the deck performs Fade-in Play or Fade-in Recording for Fade-out Recording), press FADER on Sleep Timer Sleep On1) Turn off Sleep Timer Sleep Off (factory setting) 1) For MDS-JE470, the deck turns off automatically after 60 minutes. Note The level of the signal output from the DIGITAL OUT connector does not change the duration of recording. To Select Turn on the remote. Press MENU...
Operating Instructions
Page 44
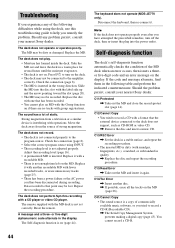
... them in the wrong direction. C41/Cannot Copy • The sound source is inserted. The deck does not play an MD with operations. Check the connection (page 8). • The MD is interfering with the Group function on the MD (page 26). The deck does not record. • The deck is not adjusted properly. Check the connection (page 8). • Select the correct program source using the deck, use this troubleshooting guide to record a CD...
... them in the wrong direction. C41/Cannot Copy • The sound source is inserted. The deck does not play an MD with operations. Check the connection (page 8). • The MD is interfering with the Group function on the MD (page 26). The deck does not record. • The deck is not adjusted properly. Check the connection (page 8). • Select the correct program source using the deck, use this troubleshooting guide to record a CD...
Operating Instructions
Page 45
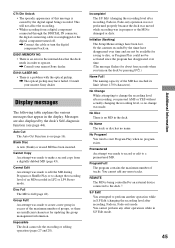
... (flashing) The Setup Menu settings have disappeared over time. (The message flashes for updating the group management information. No Disc There is a problem with the optical pickup. , The optical pickup may have failed. You attempted to change was in progress or the MD is on . Display messages The following table explains the various messages that the deck needs in order to operate. , Consult your nearest Sony dealer. Disc...
... (flashing) The Setup Menu settings have disappeared over time. (The message flashes for updating the group management information. No Disc There is a problem with the optical pickup. , The optical pickup may have failed. You attempted to change was in progress or the MD is on . Display messages The following table explains the various messages that the deck needs in order to operate. , Consult your nearest Sony dealer. Disc...
Service Manual
Page 2
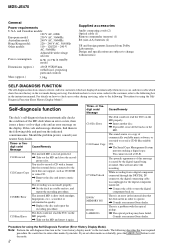
.... protect slot. There is an error in the internal data that the external device connected to the following describes the least required procedure. Three- projecting parts and controls Mass (approx.) 3.0 kg Supplied accessories Audio connecting cords (2) Optical cable (1) Remote commander (remote) (1) R6 (size-AA) batteries (2) US and foreign patents licensed from a digital component connected through the DIGITAL IN connector, the digital connecting cable was not made properly. , Set the deck in standby mode...
.... protect slot. There is an error in the internal data that the external device connected to the following describes the least required procedure. Three- projecting parts and controls Mass (approx.) 3.0 kg Supplied accessories Audio connecting cords (2) Optical cable (1) Remote commander (remote) (1) R6 (size-AA) batteries (2) US and foreign patents licensed from a digital component connected through the DIGITAL IN connector, the digital connecting cable was not made properly. , Set the deck in standby mode...
Service Manual
Page 4
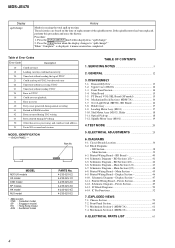
... 1. Press the lAMSL knob when displayed as "spdl change ?" Press the YES button when the display changes to "spdl change " 2. MODEL IDENTIFICATION - Front Panel Section 14 3-4. TEST MODE 20 5. ELECTRICAL ADJUSTMENTS 25 6. DIAGRAMS 6-1. BD Section (2/2 42 6-6. IC Block Diagrams 50 6-14. EXPLODED VIEWS 7-1. ELECTRICAL PARTS LIST 63 4 Table of Error Codes Error Code Description 10 Could not load 12 Loading switches combined incorrectly 20 Timed out without reading UTOC 24...
... 1. Press the lAMSL knob when displayed as "spdl change ?" Press the YES button when the display changes to "spdl change " 2. MODEL IDENTIFICATION - Front Panel Section 14 3-4. TEST MODE 20 5. ELECTRICAL ADJUSTMENTS 25 6. DIAGRAMS 6-1. BD Section (2/2 42 6-6. IC Block Diagrams 50 6-14. EXPLODED VIEWS 7-1. ELECTRICAL PARTS LIST 63 4 Table of Error Codes Error Code Description 10 Could not load 12 Loading switches combined incorrectly 20 Timed out without reading UTOC 24...
Service Manual
Page 28
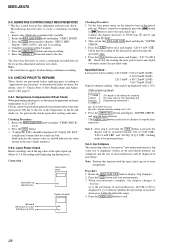
..., the display changes to Parts Replacement and Adjustments" (See page 9). 5-6-1. USING THE CONTINUOUSLY RECORDED DISC * This disc is displayed, it cannot be set properly, press the m button or M button to move the optical pick-up . (When it means that the results are bad. (@@ indicates the current value set at shipment) written in the nonvolatile memory are performed before replacing parts according to "approximate specifications" to be displayed. So...
..., the display changes to Parts Replacement and Adjustments" (See page 9). 5-6-1. USING THE CONTINUOUSLY RECORDED DISC * This disc is displayed, it cannot be set properly, press the m button or M button to move the optical pick-up . (When it means that the results are bad. (@@ indicates the current value set at shipment) written in the nonvolatile memory are performed before replacing parts according to "approximate specifications" to be displayed. So...
Service Manual
Page 52
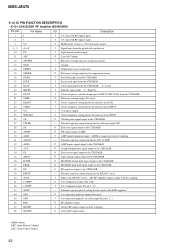
... connection pin for the sled error signal LPF 28 SE O Sled error signal output to the CXD2662R 29 ADFM O FM signal output of BPF22, BPF3T, EQ from the optical pick-up detector 10 PD I Light amount monitor input 11 APC O Laser APC output 12 APCREF I Center frequency setting pin for the internal circuit BPF22 26 TE O Tracking error signal output to F I Signal input from the CXD2662R 21 VREF O Reference voltage output (Not used...
... connection pin for the sled error signal LPF 28 SE O Sled error signal output to the CXD2662R 29 ADFM O FM signal output of BPF22, BPF3T, EQ from the optical pick-up detector 10 PD I Light amount monitor input 11 APC O Laser APC output 12 APCREF I Center frequency setting pin for the internal circuit BPF22 26 TE O Tracking error signal output to F I Signal input from the CXD2662R 21 VREF O Reference voltage output (Not used...

Service Manual
Page 53
... 24 XBCKI I Serial data clock input 25 ADDT I Data input from the system control 16 OSCI I System clock input (512Fs=22.5792 MHz) 17 OSCO O System clock output (512Fs=22.5792 MHz) (Not used) 18 XTSL I System clock frequency setting "L": 45.1584 MHz, "H": 22.5792 MHz (Fixed at "H") 19 DIN0 I Digital audio input (Optical input) 20 DIN1 I Digital audio input (Optical input) (Not used) 21 DOUT O Digital audio output (Optical output) (Not used ) 30 DVDD I /O 53...
... 24 XBCKI I Serial data clock input 25 ADDT I Data input from the system control 16 OSCI I System clock input (512Fs=22.5792 MHz) 17 OSCO O System clock output (512Fs=22.5792 MHz) (Not used) 18 XTSL I System clock frequency setting "L": 45.1584 MHz, "H": 22.5792 MHz (Fixed at "H") 19 DIN0 I Digital audio input (Optical input) 20 DIN1 I Digital audio input (Optical input) (Not used) 21 DOUT O Digital audio output (Optical output) (Not used ) 30 DVDD I /O 53...


