
Operating Instructions
Page 2
... future reference. If this manual thoroughly and retain it for a Class B digital device, pursuant to which can radiate radio frequency energy and, if not installed and used in this equipment. This symbol is encouraged to try to correct the interference by controls on the rear of the following measures: • Reorient or relocate the receiving antenna. • Increase the separation...
... future reference. If this manual thoroughly and retain it for a Class B digital device, pursuant to which can radiate radio frequency energy and, if not installed and used in this equipment. This symbol is encouraged to try to correct the interference by controls on the rear of the following measures: • Reorient or relocate the receiving antenna. • Increase the separation...
Operating Instructions
Page 3
... GB Using a timer 42 Switching the bit length 43 Playing with a Sony CD player (CD Synchro- TABLE OF CONTENTS Location and Function of Controls Front panel description 4 Remote control description 6 Display window description 8 Rear panel description 9 Getting Started Before you start the hookup 10 Hooking up the audio components 11 Setting the clock 12 Recording to MDs Recording to an MD 14 Notes on recording 16 Recording for long times 16 Adjusting...
... GB Using a timer 42 Switching the bit length 43 Playing with a Sony CD player (CD Synchro- TABLE OF CONTENTS Location and Function of Controls Front panel description 4 Remote control description 6 Display window description 8 Rear panel description 9 Getting Started Before you start the hookup 10 Hooking up the audio components 11 Setting the clock 12 Recording to MDs Recording to an MD 14 Notes on recording 16 Recording for long times 16 Adjusting...

Operating Instructions
Page 5
... LEVEL control (23) Turn to adjust the volume of a program, or change the contents of the headphones. T PHONES jack (23) Connect headphones to select Shuffle Play or Program Play or resume normal play tracks repeatedly. N m/M buttons (25) (27) (30) (35) Press to locate a portion within a track, change the input character. Q PLAY MODE button (27) (42) Press to this jack to operate the deck using the keyboard. U TIMER selector (42) Use to set the clock, select the input characters...
... LEVEL control (23) Turn to adjust the volume of a program, or change the contents of the headphones. T PHONES jack (23) Connect headphones to select Shuffle Play or Program Play or resume normal play tracks repeatedly. N m/M buttons (25) (27) (30) (35) Press to locate a portion within a track, change the input character. Q PLAY MODE button (27) (42) Press to this jack to operate the deck using the keyboard. U TIMER selector (42) Use to set the clock, select the input characters...

Operating Instructions
Page 6
... a range of Controls Remote control description A ?/1 (power) switch (14) (23) Press to resume play after each track. ql qk qj qh .> mM C-SC SO SR S z RC MSIC SC FIR C R X. > FR RC O O qa H CLEAR button (27) (35) qs Press to adjust the recording or analog output level. 6 GB Remote control description Press again to turn on the deck turns off. M T.REC button (20) Z Press to pause play or recording. B REC MODE button...
... a range of Controls Remote control description A ?/1 (power) switch (14) (23) Press to resume play after each track. ql qk qj qh .> mM C-SC SO SR S z RC MSIC SC FIR C R X. > FR RC O O qa H CLEAR button (27) (35) qs Press to adjust the recording or analog output level. 6 GB Remote control description Press again to turn on the deck turns off. M T.REC button (20) Z Press to pause play or recording. B REC MODE button...
Operating Instructions
Page 8
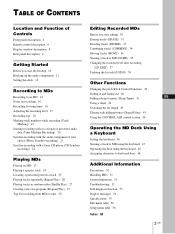
... Stereo Recording mode or playing an MD recorded in LP4 Stereo Recording mode. Location and Function of Controls Display window description 1 2 34 5 6 7 8 A REMOTE indicator Lights when the MD is being written. • "TOC EDIT" lights during recording. PGM indicator (27) Lights when the deck is set to Program Play. HS indicator Lights during playing or playing pause. 8 GB Display window description D Recording and editing indicators L.SYNC indicator (19) Lights when the deck is set to assign track numbers...
... Stereo Recording mode or playing an MD recorded in LP4 Stereo Recording mode. Location and Function of Controls Display window description 1 2 34 5 6 7 8 A REMOTE indicator Lights when the MD is being written. • "TOC EDIT" lights during recording. PGM indicator (27) Lights when the deck is set to Program Play. HS indicator Lights during playing or playing pause. 8 GB Display window description D Recording and editing indicators L.SYNC indicator (19) Lights when the deck is set to assign track numbers...
Operating Instructions
Page 9
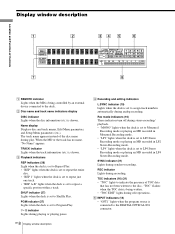
... time you change the display. G SLEEP indicator (41) Lights when the deck is no name. Note The display format that you have selected in each of the deck statuses (play, recording, etc.) will revert to their default (i.e., the factory set to turn on the deck. F DIGITAL COAXIAL OUT jack (11) Connect a digital coaxial cable to output digital signals to other components. To change the display in the music calendar. B ANALOG OUT jacks (11) Use to output analog signals to other components. E DIGITAL OPTICAL IN connectors (11) (14) Connect a digital optical cable...
... time you change the display. G SLEEP indicator (41) Lights when the deck is no name. Note The display format that you have selected in each of the deck statuses (play, recording, etc.) will revert to their default (i.e., the factory set to turn on the deck. F DIGITAL COAXIAL OUT jack (11) Connect a digital coaxial cable to output digital signals to other components. To change the display in the music calendar. B ANALOG OUT jacks (11) Use to output analog signals to other components. E DIGITAL OPTICAL IN connectors (11) (14) Connect a digital optical cable...
Operating Instructions
Page 11
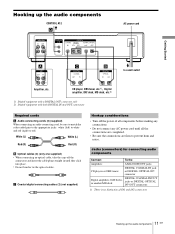
... connecting audio components Connect To the Amplifiers ANALOG IN/OUT jacks CD players or DBS tuners DIGITAL COAXIAL IN jack or DIGITAL OPTICAL IN1) connector Digital amplifiers, DAT decks, or another MD deck DIGITAL COAXIAL IN/OUT jacks or DIGITAL OPTICAL IN1)/OUT connectors 1) There is no distinction of all the connections are completed. • Be sure the connections are firm to prevent hum and noise. C Coaxial digital connecting cables (2) (not supplied) Hookup considerations • Turn off the connectors and insert the cable plugs...
... connecting audio components Connect To the Amplifiers ANALOG IN/OUT jacks CD players or DBS tuners DIGITAL COAXIAL IN jack or DIGITAL OPTICAL IN1) connector Digital amplifiers, DAT decks, or another MD deck DIGITAL COAXIAL IN/OUT jacks or DIGITAL OPTICAL IN1)/OUT connectors 1) There is no distinction of all the connections are completed. • Be sure the connections are firm to prevent hum and noise. C Coaxial digital connecting cables (2) (not supplied) Hookup considerations • Turn off the connectors and insert the cable plugs...
Operating Instructions
Page 12
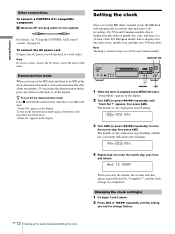
... outlet of day, month, year, and time on the MD deck and there is displayed in the order of the timer. Changing the clock setting(s) 1 Do steps 1 and 2 above . To connect the AC power cord Connect the AC power cord of USA and Canadian models. "Setup Menu" appears in the display. appears, then press AMS. The month (or day) indication starts flashing. 3 Turn AMS (or press ./> repeatedly) to...
... outlet of day, month, year, and time on the MD deck and there is displayed in the order of the timer. Changing the clock setting(s) 1 Do steps 1 and 2 above . To connect the AC power cord Connect the AC power cord of USA and Canadian models. "Setup Menu" appears in the display. appears, then press AMS. The month (or day) indication starts flashing. 3 Turn AMS (or press ./> repeatedly) to...

Operating Instructions
Page 16
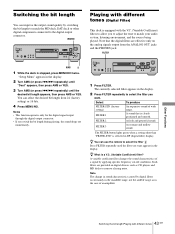
... long times In addition to record in MD LP (LP2 or LP4 Stereo) mode cannot be played back on page 14. or >. Do not disconnect the AC power cord or move the deck while the indication flashes. The indication stops flashing when the deck reaches the end of "Recording to monitor and record sources such as the CDs and MDs. The TOC will be updated...
... long times In addition to record in MD LP (LP2 or LP4 Stereo) mode cannot be played back on page 14. or >. Do not disconnect the AC power cord or move the deck while the indication flashes. The indication stops flashing when the deck reaches the end of "Recording to monitor and record sources such as the CDs and MDs. The TOC will be updated...
Operating Instructions
Page 17
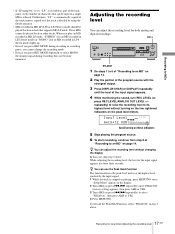
... input signal appears. 4 While monitoring the sound, turn off the Peak Hold Function, select "P.Hold Off" in the display. 2 Turn AMS (or press ./> repeatedly) until "P.Hold Off" (factory setting) appears, then press AMS or YES. 3 Turn AMS (or press ./> repeatedly) to select "P.Hold On", then press AMS or YES. 4 Press MENU/NO. While adjusting the recording level, the level of the input signal appears for an MD recorded in LP4 Stereo mode) lights...
... input signal appears. 4 While monitoring the sound, turn off the Peak Hold Function, select "P.Hold Off" in the display. 2 Turn AMS (or press ./> repeatedly) until "P.Hold Off" (factory setting) appears, then press AMS or YES. 3 Turn AMS (or press ./> repeatedly) to select "P.Hold On", then press AMS or YES. 4 Press MENU/NO. While adjusting the recording level, the level of the input signal appears for an MD recorded in LP4 Stereo mode) lights...
Operating Instructions
Page 19
... Auto Cut activated, recording stops automatically. "Setup Menu" appears in the display. 2 Turn AMS (or press ./> repeatedly) until "T.Mark Lsyn" appears, then press AMS or YES. 3 Turn AMS (or press ./> repeatedly) to MDs To stop Input Monitor Press x. Recording to select the setting, then press AMS or YES. "Smart Space" appears in the display during this time. To Turn on the deck. • If the deck...
... Auto Cut activated, recording stops automatically. "Setup Menu" appears in the display. 2 Turn AMS (or press ./> repeatedly) until "T.Mark Lsyn" appears, then press AMS or YES. 3 Turn AMS (or press ./> repeatedly) to MDs To stop Input Monitor Press x. Recording to select the setting, then press AMS or YES. "Smart Space" appears in the display during this time. To Turn on the deck. • If the deck...
Operating Instructions
Page 20
... Off" selected or when recording from a component connected to an MD" on the deck. Note If you record tracks from the buffer memory. When you turn on page 14. To change the signal level that triggers Automatic Track Marking. 1 While the deck is an MD, a track number might be recorded from certain CD or multi-disc players. • If the source is stopped, press MENU/NO twice...
... Off" selected or when recording from a component connected to an MD" on the deck. Note If you record tracks from the buffer memory. When you turn on page 14. To change the signal level that triggers Automatic Track Marking. 1 While the deck is an MD, a track number might be recorded from certain CD or multi-disc players. • If the source is stopped, press MENU/NO twice...
Operating Instructions
Page 21
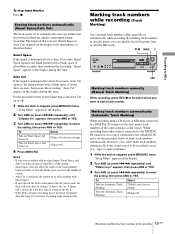
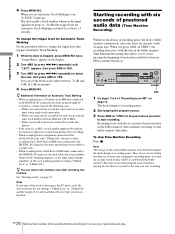
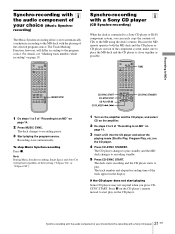
... the program source. Press X on page 14. 2 Press MUSIC SYNC. The deck changes to a Sony CD player or Hi-Fi component system, you press CDSYNC START. The deck starts recording and the CD player starts to play standby and the MD deck changes to recording standby. 5 Press CD-SYNC START. The track number and elapsed recording time of "Recording to an MD" on the CD player's remote instead to start playing Some CD players may...
... the program source. Press X on page 14. 2 Press MUSIC SYNC. The deck changes to a Sony CD player or Hi-Fi component system, you press CDSYNC START. The deck starts recording and the CD player starts to play standby and the MD deck changes to recording standby. 5 Press CD-SYNC START. The track number and elapsed recording time of "Recording to an MD" on the CD player's remote instead to start playing Some CD players may...

Operating Instructions
Page 40
...; The fine control value reverts to the ANALOG OUT jacks and the PHONES jack at the end of recording. ` / 1 Z H X x .> mM X .> FADER Note The level of playing. Other Functions 40 GB Changing the pitch/Fading in Recording), press FADER. Fade-in Play and Fade-in Play nor Fade-out Play. b flashes in the display and the deck performs Fade-in Play or Fade-in the display. 2 Turn AMS...
...; The fine control value reverts to the ANALOG OUT jacks and the PHONES jack at the end of recording. ` / 1 Z H X x .> mM X .> FADER Note The level of playing. Other Functions 40 GB Changing the pitch/Fading in Recording), press FADER. Fade-in Play and Fade-in Play nor Fade-out Play. b flashes in the display and the deck performs Fade-in Play or Fade-in the display. 2 Turn AMS...
Operating Instructions
Page 43
... (digital filter) display. FILTER 3 A resonant and mellow sound. The FILTER button lights green when a setting other digital components connected to select the filter you want . A variable coefficient filter changes the sound characteristics of wide range. FILTER 1 A sound that the digital filters are provided on the analog signals output from 24 (factory setting) or 16 bits. 4 Press MENU/NO. MN/NO Playing with different tones (Digital Filter) This deck is a V.C. (Variable Coefficient) filter? z You can use the remote...
... (digital filter) display. FILTER 3 A resonant and mellow sound. The FILTER button lights green when a setting other digital components connected to select the filter you want . A variable coefficient filter changes the sound characteristics of wide range. FILTER 1 A sound that the digital filters are provided on the analog signals output from 24 (factory setting) or 16 bits. 4 Press MENU/NO. MN/NO Playing with different tones (Digital Filter) This deck is a V.C. (Variable Coefficient) filter? z You can use the remote...

Operating Instructions
Page 48
... already been assigned, "User" appears. "Key Change" appears, and the selected character is assigned to the keys. 1 While the deck is selected, "Cannot Edit" appears. Clearing key assignments You can edit the track directly with the following functions Press MENU/NO H X x AMS or . Operating the MD Deck Using a Keyboard 48 GB Operating the deck using the keyboard For details about each function, see "Front panel description" on page 4 or "Remote control description...
... already been assigned, "User" appears. "Key Change" appears, and the selected character is assigned to the keys. 1 While the deck is selected, "Cannot Edit" appears. Clearing key assignments You can edit the track directly with the following functions Press MENU/NO H X x AMS or . Operating the MD Deck Using a Keyboard 48 GB Operating the deck using the keyboard For details about each function, see "Front panel description" on page 4 or "Remote control description...

Operating Instructions
Page 52
... a CD player connected to the DIGITAL IN connector, that copy is not set correctly. or five-digit alphanumeric code alternate in the wrong direction. The correct recorded/playing time may not be connected to the amplifier correctly. To protect copyrighted music sources, this troubleshooting guide to that has been recorded. You can make a second copy from the source of a commercially available digital sound program (for example, a CD or MD), but you...
... a CD player connected to the DIGITAL IN connector, that copy is not set correctly. or five-digit alphanumeric code alternate in the wrong direction. The correct recorded/playing time may not be connected to the amplifier correctly. To protect copyrighted music sources, this troubleshooting guide to that has been recorded. You can make a second copy from the source of a commercially available digital sound program (for example, a CD or MD), but you...
Operating Instructions
Page 53
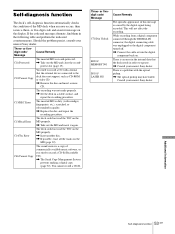
...-protected. , Take out the MD and close the record- There is dirty (with smudges, fingerprints, etc.), scratched, or substandard in order to operate. , Consult your nearest Sony dealer. Consult your nearest Sony dealer. C13/REC Error The inserted MD is a problem with a format that the deck needs in quality. , Replace the disc and repeat the recording procedure. C41/Cannot Copy The sound source...
...-protected. , Take out the MD and close the record- There is dirty (with smudges, fingerprints, etc.), scratched, or substandard in order to operate. , Consult your nearest Sony dealer. Consult your nearest Sony dealer. C13/REC Error The inserted MD is a problem with a format that the deck needs in quality. , Replace the disc and repeat the recording procedure. C41/Cannot Copy The sound source...

Operating Instructions
Page 56
... ? - Creates a program. Menu item Sub-item Function Nm In ? Nm Copy ? Undoes the last edit operation. Records over a track using the Edit Menu. Fade Out ? Menu item Program ? Factory setting - Turns Peak Hold on an MD. Pitch - Erases all the names on or off . Copies a name to display "Edit Menu." Setup ? - Note The available menu items may vary according to 0 0 Pfine - Changes the bit length of the deck. Combines...
... ? - Creates a program. Menu item Sub-item Function Nm In ? Nm Copy ? Undoes the last edit operation. Records over a track using the Edit Menu. Fade Out ? Menu item Program ? Factory setting - Turns Peak Hold on an MD. Pitch - Erases all the names on or off . Copies a name to display "Edit Menu." Setup ? - Note The available menu items may vary according to 0 0 Pfine - Changes the bit length of the deck. Combines...
Operating Instructions
Page 58
... Audio connecting cord 11 Auto cut inserting during recording. See Auto pause play . See Input monitor Moving 34 Music scan 24 Music Synchro-recording 21 N Naming copying 36 how to 14 level 17 mode 16 over existing tracks 14 Remote control 6 Repeat A-B play 26 Repeat All play 26 Repeat 1 play changing the contents 28 checking the contents 28 programing 27 R Recording how to 35 renaming 36 using the keyboard 47 O Optical cable...
... Audio connecting cord 11 Auto cut inserting during recording. See Auto pause play . See Input monitor Moving 34 Music scan 24 Music Synchro-recording 21 N Naming copying 36 how to 14 level 17 mode 16 over existing tracks 14 Remote control 6 Repeat A-B play 26 Repeat All play 26 Repeat 1 play changing the contents 28 checking the contents 28 programing 27 R Recording how to 35 renaming 36 using the keyboard 47 O Optical cable...


